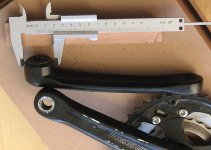
left side freewheel crank

happybrahma

10 µW
Joined
Oct 29, 2014
Messages
6
Ok, I'll admit my application is not an e-bike. I'm trying to figure out how to freewheel a child stoker on a tandem. This seems to be the best forum I've found for discussing freewheel cranks.

Also, this is for a child stoker (third crank). Trying to freewheel the real stoker on a left side sync, right rear drive tandem is a harder/different problem. The bikemotive left/right freewheel crank looks like it would solve the real stoker problem. If fact, I think that design would allow both the captain and stoker to freewheel independently. Basically, the motor is replaced with the captain. Unfortunately, that design seems to require a very custom bottom bracket, so I won't be attempting to make one of those!

The child stoker It is a simple left side single chainring that needs to be able to spin forward free when not pedaling. This would be a simple left side freewheel crank. As far as I can tell, no such product exits.

So, I'm considering how to make one. I've not used any of these parts before. If I've got this completely botched, please help me out.

1. Get a regular right threaded freewheel crankarm.
2. Get a flange freewheel intended for use as regular right front freewheel.
3. Install the freewheel backwards so that the removal slots are against the crank arm. AFAICT, this will result in the correct freewheeling direction.
4. Use a pedal repair reamer/tap and heliocoil to convert the right side pedal thread to left side pedal thread.
5. Use a strong adhesive to permanently thread the freewheel onto the crank. This is to avoid left side pedaling unscrewing the freewheel from the crank.
6. Get a spider so I can mount my chainring on the freewheel flange.

I'm not sure if I understand all the thread and freewheel directions of these parts directly. I'm also not sure of the best way to bond the freewheel to the crank. I suppose I could disassemble the freewheel, and braze the shell into the crank arm if the metals are similar. I've never seen or taken apart one of these freewheels, so I'm not sure if it would be possible to re-assemble the freewheel with the shell stuck in the crank.

Do I have any of this correct?

Also, I'd rather not use this topic discuss the pros/cons of stoker freewheeling in general, which would be the typical result of posting such a topic on a tandem centric forum :)

-Steve
 
happybrahma said:
As far as I can tell, no such product exits.
So, I'm considering how to make one.

Right attitude.
In your situation I'd considered one more - perhaps possible - solution:

First - find a MTB crankset (usually beefier) or just left crank with suitable size and shape of the proximal part - like the Suntour cheapie pictured.
crankset1.jpg
Then turn down this part to 35mm (if you are lucky and find a machinist who can cut 1.375" x 24 tpi LH thread) or to 30mm for M30x1 LH thread (more realistic).
In first case you could use Staton-Ink flanged LH freewheel, but I don't no if anyone makes similar thing for smaller thread.
So in this case you should find a suitable regular LH freewheel - ACS Southpaw for example comes in both versions - 16T in 1.375" x 24 tpi and 14T in M30x1.
Then make chainring adapter plate with 7 or 8 boltholes around centre hole - as close to centre as possible - and perhaps another plate for opposite side too - with smaller OD and threaded boltholes.
Clamp the freewheel teeth between them and... in case anything doesn't work - blame me :)
 
happybrahma said:
Do I have any of this correct?
I think that's all correct. You can use one of the anaerobic engineering adhesives to bond the freewheel to the crankarm.

One other possibility is to use the splined freewheel and crank system that has recently surfaced..... This is naturally ambidextrous :)

I don't know if you saw this thread? It was my attempts to solve the same problem as the Bike Motive system.
 
Right attitude.
In your situation I'd considered one more - perhaps possible - solution:

First - find a MTB crankset (usually beefier) or just left crank with suitable size and shape of the proximal part - like the Suntour cheapie pictured.

Then turn down this part to 35mm (if you are lucky and find a machinist who can cut 1.375" x 24 tpi LH thread) or to 30mm for M30x1 LH thread (more realistic).
In first case you could use Staton-Ink flanged LH freewheel, but I don't no if anyone makes similar thing for smaller thread.

Is there an advantage of using the station link freewheel? Is this one set up as a front freewheel, so that there is no need to put it on backwards? Or are you just suggesting this one because it is a 5 hole flange?

So in this case you should find a suitable regular LH freewheel - ACS Southpaw for example comes in both versions - 16T in 1.375" x 24 tpi and 14T in M30x1.

I'm pretty sure either of these will need to be installed backwards, hiding the removal slots. Do I understand this correctly?

Then make chainring adapter plate with 7 or 8 boltholes around centre hole - as close to centre as possible - and perhaps another plate for opposite side too - with smaller OD and threaded boltholes.
Clamp the freewheel teeth between them and... in case anything doesn't work - blame me :)
[/quote]

Just drill out the chainring on the freewheel to make mounting holes for the plate, and then mount my chainring on the plate as well. Use a second plate for added security (sandwich). Am I following your suggestion correctly?
 
I think that's all correct. You can use one of the anaerobic engineering adhesives to bond the freewheel to the crankarm.

Loctite red or similar knock off? The docs on loctite red claim that it is not for threads over 1 inch, and for this, they recommend locktite 2047, which appears to be very expensive.

Perhaps this? Looks cheap in small quantities:

http://www.amazon.com/Vibra-TITE-Permanent-Diameter-Anaerobic-Threadlocker/dp/B008D6F4GI

I know nothing about these adhesives. I wonder why locktite red claims to be no good for large diameter fasteners. My guess is that it might lock up before you can get the thing threaded all the way? I really have no idea, and am just guessing.

Sounds like once I figure out which adhesive to use, I'm all set. Thanks!

One other possibility is to use the splined freewheel and crank system that has recently surfaced..... This is naturally ambidextrous :)

I've found a few pictures of those, but nowhere to actually buy one. Even the photos I've found do not show a flanged one to allow for choice of chainring.
Too bad. Looks like a spline would work well, and I could get it apart if needed.

I don't know if you saw this thread? It was my attempts to solve the same problem as the Bike Motive system.

I did not find that. I just read it. looks over my head. :) The whole double shaft bottom bracket (one inside the other) is way above my pay grade :) Da-vinci tandems, who make the only independent freewheeling tandem I know of, use a double left freewheel to power a right side drive, and both captain and stoker have simple left chainwheels. This is a very simple solution, but iit requires a frame with three bottom brackets. The bikemotive-type solution only requires two bottom brackets, so it could be retrofitted into pretty much any tandem. If I only had machinist skills to build one :)

The other generic tandem freewheeling option would be to convert to right side sync, and make both the captain and stoker a simple right side freewheel crank. This gets a bit tricky, as the stoker typically has a triple crank, and you would need a fourth chainwheel for the stoker synch chain. That, or just sacrifice a chainring for the sync chain, and get by with a double drive crank. Either way, this requires two right freewheel cranks, with the stoker being three or four chainrings. Kinda sounds like a lot, but in reality, this is probably really the simplest way to retrofit a tandem to freewheel independently. Maybe before I get around to trying this, another option will come along. My biggest fear on this is really just ordering all the parts and finding out that it does not work because of something that I failed to realize in advance. That would be a bummer.

-Steve
 
happybrahma said:
Is there an advantage of using the station link freewheel? Is this one set up as a front freewheel, so that there is no need to put it on backwards? Or are you just suggesting this one because it is a 5 hole flange?
I'm pretty sure either of these will need to be installed backwards, hiding the removal slots. Do I understand this correctly?

All LH freewheels are actually the same thing - they are mirrored images of all RH freewheels.
So - when they are mounted to the left side of rear hub, their removal slots are exposed - facing to the left dropout.
When mounted to the left crank, their removal slots should be exposed too - facing to the BB shell.

Freewheels are side-specific, not front/rear specific.
There's no such thing as setting up the freewheel for front or rear use.
Mounted on hub - they are driven. Mounted on crank - they drive.
They don't hide their removal slots in correctly designed setups.

edit:

happybrahma said:
Just drill out the chainring on the freewheel to make mounting holes for the plate, and then mount my chainring on the plate as well. Use a second plate for added security (sandwich). Am I following your suggestion correctly?

I meant something like this - 1,2 (without the central part containing the bearing) on the other side of freewheel teeth - looks and probably works better than just some nuts. Pictures from GNG thread.
 
happybrahma said:
I've found a few pictures of those, but nowhere to actually buy one. Even the photos I've found do not show a flanged one to allow for choice of chainring.
This was the one I remembered: http://www.trialinside.com/waw-presente-la-manivelle-as30/?lang=en I'd forgotten that it was for PF30 BB, though.... CrewKerz list the 15t freewheel, only, on their site: http://www.crewkerzstore.com/categorie-transmission-crewkerz.htm So, that's probably a dead end....

If you can find someone to LH thread a LH crank, the solution that silence proposed would be preferable, for sure. Best to use an ISIS set, which will be easier to back mount on a lathe.
 
All LH freewheels are actually the same thing - they are mirrored images of all RH freewheels.
So - when they are mounted to the left side of rear hub, their removal slots are exposed - facing to the left dropout.
When mounted to the left crank, their removal slots should be exposed too - facing to the BB shell.

Freewheels are side-specific, not front/rear specific.
There's no such thing as setting up the freewheel for front or rear use.
Mounted on hub - they are driven. Mounted on crank - they drive.
They don't hide their removal slots in correctly designed setups.

Thanks for this explanation.. My mental image was wrong for the way the freewheel mounts on a crank. This simplifies my life. Any freewheel will work as long as I match the thread (LH/RH, ISO/METRIC).

I'm going to see if I can find someone that can turn a crank down and thread it to match a LH freewheel, hopefully ISO. I agree this would be ideal.

Thanks!
 
One other possible option I considered at one time for CrazyBike2, when it used a left side chaindrive from a powerchair motor, and I wanted freewheeling cranks. Mine was for a rightside pedal chain, but you could flip this for a leftside:
http://electricle.blogspot.com/2009/08/pedal-freewheel.html


Take a steel BB cup from the proper side of an old bike to thread a regular rigthside singlespeed freewheel. Or use the threaded end of a steel hub from an old bike's rear wheel.

pedal+freewheel+idea+%281%29.jpg


Take a steel leftside crank, and machine down (file, lathe, grind, whatever you have tools for) to the inner diameter of the BB cup, so the BB cup fits down onto the inner side of the crank in a way that both allows the freewheel to mount to it without rubbing the crank or bike frame, and also lets the crank fully mount to the BB shaft.

Find a chainring of the right number of teeth for your speed application, that will also either mount to the freewheel directly, or make a ring (possibly out of another chainring) to connect the freewheel's teeth to the inner BCD points of the chainring you want to use.

Weld the BB cup to the crank.

Install the chainring to the freewheel.

Install the freewheel onto the BB cup.
pedal+freewheel+idea+%283%29.jpg


pedal+freewheel+idea+%285%29.jpg


pedal+freewheel+idea+%282%29.jpg


Install the assembly onto the bike.


Add chain(s), ride.

:)
 
amberwolf said:
Take a steel leftside crank, and machine down (file, lathe, grind, whatever you have tools for) to the inner diameter of the BB cup, so the BB cup fits down onto the inner side of the crank in a way that both allows the freewheel to mount to it without rubbing the crank or bike frame, and also lets the crank fully mount to the BB shaft.

Huh. Basically, find something with the correct male threads, grid away to get it to fit in a way that everything works,, and weld it to the crank. I'd braze since that's what I know. I could probably do this myself. Thanks for the idea!

-Steve
 
The hardest part (that I coudln't really do at the time) was to center my "machining" of the crank itself so that everything else ends up centered with little or no runout....if you don't do this you end up with what could be a lot of wobble on the chainrings, and worse, chain-tension changes.
 
Well, I chickened out and just went with two right side freewheel cranks for the captain and stoker. Had to covert the tandem to right side sync/timing chain. The child stoker crank is in sync with the real stoker crank using left side fixed chainrings (no freewheel), but since the real stoker right chainrings freewheel, the child stoker piggybacks on that freewheel and is therefore independent of the captain, just as the real stoker is.

The bad news is I lost my triple chainring, which can be brought back if I drill some 74bcd holes in the spider/freewheel flange and tap to m8x0.75. The good news is now I have more than just a freewheeling child stoker. I have a complete independent pedaling tandem. I used the standard freewheels, cranks, and 110bcd spiders from sickbikeparts.com. Seems to work well, and I'm using all my existing chainrings.

Fortunately, there is enough clearance between the front/rear cranks so that pedals/riders shoes don't collide. I forgot to check this before ordering the parts. Lucked out on that one!

-Steve
 
Back
Top