lostrack
100 W
Yo!
First build. Am trying to build something really fun to ride...
After deciding non hub is for me (weight distribution, smaller controller, lower (safer) voltage & I actually like the sound they make) I got in touch with Matt Shumaker and ordered some kit.
Spec:
Thanks to: Matt Shumaker, Steve Labib, bobC, Matt Idontwanttopedal and EVERYONE who has helped with suggestions and support on this build.
View attachment 11
Naked bike.
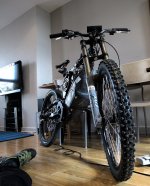
The bike today


My friend building the battery box mould out of mdf veneer offcuts. He actually used walnut veneer...!

It's so much easier with great kit and a very skilled cabinet maker (http://www.mosfurniture.co.uk
Priorities for this build -
Strong, good looking, tarmac shredding acceleration, great brakes, range of around 15 miles without trying to economise, room to expand. Burnouts a plus!
NEW PICS


View attachment 6
Video rendering just now...check after the break. THIS IS SO MUCH FUN (when it's working!!)


 Business End
 250 amps. This happened when trying NOT to fall off the back (Brakes VS Motor)
There are a few cables/bits of tape still around, but I am so sick of building - I just want to get out and ride now. It's been almost 5 months of evenings and weekends, time for some reward")
cheers
Tom
First build. Am trying to build something really fun to ride...
After deciding non hub is for me (weight distribution, smaller controller, lower (safer) voltage & I actually like the sound they make) I got in touch with Matt Shumaker and ordered some kit.
Spec:
Giant DH Comp with Fox 40s and Hayes 8" strokers and Magura Gustav M rear. 8" travel front and back. New 450lb Spring.
12S3P Turnigy Lipo (courtesy of Jozztek) @ 50.4V
Shumaker DaVinci / Astro 3220 motor (courtesy of Matt Shumaker)
Castle Creations HV160 (rev 2)
Custom carbon fibre enclosure (courtesy of MOS furniture)
Hyperion 1420i, 1KW Variable Voltage / Amperage PSU
Cycle Analyst, Magura throttle, temperature gauges etc.
Custom built drivetrain using BMX freewheels, Surly tensioners, custom springs, frame mounts...etc.
Custom designed laser cut chainring with keeper plates (thanks BobC)
Thanks to: Matt Shumaker, Steve Labib, bobC, Matt Idontwanttopedal and EVERYONE who has helped with suggestions and support on this build.
View attachment 11
Naked bike.
The bike today
My friend building the battery box mould out of mdf veneer offcuts. He actually used walnut veneer...!
It's so much easier with great kit and a very skilled cabinet maker (http://www.mosfurniture.co.uk
Priorities for this build -
Strong, good looking, tarmac shredding acceleration, great brakes, range of around 15 miles without trying to economise, room to expand. Burnouts a plus!
NEW PICS
View attachment 6
Video rendering just now...check after the break. THIS IS SO MUCH FUN (when it's working!!)
Business End 250 amps. This happened when trying NOT to fall off the back (Brakes VS Motor)There are a few cables/bits of tape still around, but I am so sick of building - I just want to get out and ride now. It's been almost 5 months of evenings and weekends, time for some reward
cheers
Tom