Giant Glory '09 (83mm BB) + GNG Mid Drive build

Meister

1 mW
Joined
Dec 29, 2013
Messages
18
Location
Zagreb, Croatia
My first post here on ES, so hello everyone :D

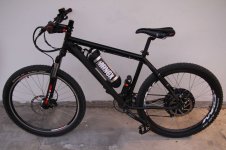
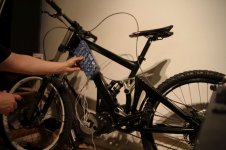
Been e-biker for a year, this is my primary ride:

http://endless-sphere.com/forums/download/file.php?mode=view&id=126783

Based upon MXUS 36V500W hub motor, Marin frame and Marzocchi fork.
Max speed 40-45km/h with some pedaling.

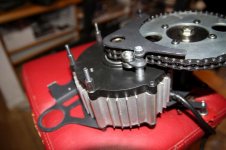
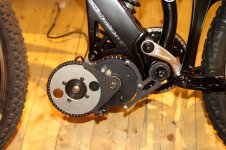
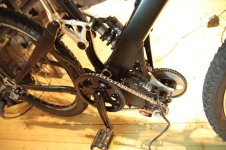
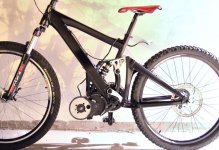
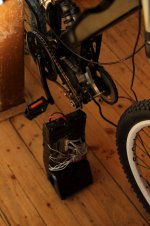
Wanted to build something faster, with usable gears and full suspension, so I ordered GNG 48V450W Mid Drive kit.
It arrived within 8 days; Jon at GNG is a great guy!
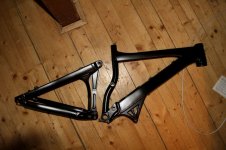
At the same time, spotted Giant Glory '09 frame at local used bike market, and had a feeling that those components might mate perfectly with some mods.
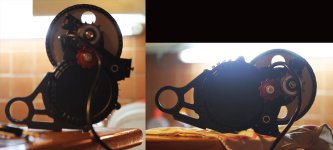
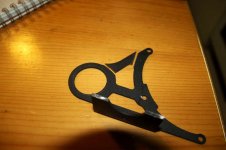
So, I repositioned the GNG mounting bracket by 60°, by simply moving it one mounting hole backwards.
Whole thing got linear, stretched look.
http://endless-sphere.com/forums/download/file.php?mode=view&id=126785

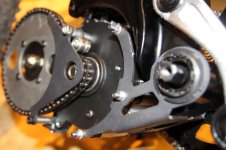
Primary reduction isn't affected, secondary will need longer chain

A quick scaled mockup in PS shows that things may fit well:
http://endless-sphere.com/forums/download/file.php?mode=view&id=126784

So I contacted the guy, tried everything in place and bought the frame.
Oh, the joy!


Everything is properly aligned and has proper clearance.
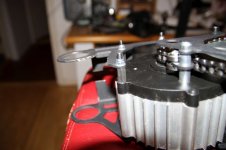
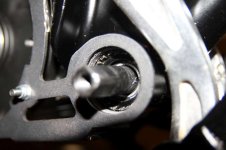
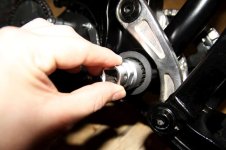
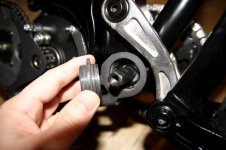
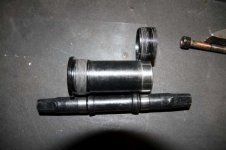
Mounting bracket had to be cut in half and had 15mm spacers inserted on the left side of the motor.
Also, I found a neat solution how to implement standard GNG BB 68mm axle into a 83mm downhill bike frame.

Gotta sort the pictures - more details in a next post :)
 

Attachments

  • IMG_2833-3000.jpg
    IMG_2833-3000.jpg
    255.3 KB · Views: 6,025
  • MockUp.jpg
    MockUp.jpg
    120.4 KB · Views: 6,025
  • Motor-Rotate.jpg
    Motor-Rotate.jpg
    76.7 KB · Views: 6,025
Fabricated a longer bracket hex bolts:

file.php


New bolts and 15mm spacers in place.
You can notice halved bracket:

file.php


Nuts tightened

file.php


New bracket width is 83mm, compatible with downhill bike BB

file.php
 

Attachments

  • Bolts.jpg
    Bolts.jpg
    91.7 KB · Views: 6,007
  • IMG_7767-1000.jpg
    IMG_7767-1000.jpg
    52.9 KB · Views: 2,360
  • IMG_7772-1000.jpg
    IMG_7772-1000.jpg
    44.9 KB · Views: 2,360
Fresh from the local paint shop

file.php


Had to cut left side of bracket because it interferred with bike frame

file.php


Resulting fit is SICK

file.php


file.php
 

Attachments

  • IMG_7765-1000.jpg
    IMG_7765-1000.jpg
    46.2 KB · Views: 2,359
  • IMG_7839-1000.jpg
    IMG_7839-1000.jpg
    53.6 KB · Views: 2,359
  • IMG_7840-1000.jpg
    IMG_7840-1000.jpg
    69.3 KB · Views: 2,359
  • IMG_7798-1000.jpg
    IMG_7798-1000.jpg
    65 KB · Views: 2,359
Removed original GNG upper clamp post and fabricated nice shiny brackety thingy

file.php


It connects lower shock pivot and two points on motor assembly

file.php


Upgraded secondary transmission to half link BMX chain.
Also, moved the tensioner arm one bolt ahead from original position

file.php
 

Attachments

  • IMG_7754-1000.jpg
    IMG_7754-1000.jpg
    49.8 KB · Views: 2,359
  • IMG_7826-1000.jpg
    IMG_7826-1000.jpg
    77 KB · Views: 2,359
  • IMG_7827-1000.jpg
    IMG_7827-1000.jpg
    68.2 KB · Views: 2,359
GNG bottom bracket axle is 150mm long and designed for 67mm frame.
Disassembled for measuring.
Bearing dimensions are 16mm inner, 31mm outer diameter, and 10mm width.

file.php


When installed in 83mm frame, chainwheel ( right) side is properly aligned, but left sided BB cup is too short.

Elegant solution to this problem: screw the original bearing cup all the way in and tighten, so the axle bearing is secured in place.
DH bikes usually have plenty of threading in bottom bracket tube

file.php

file.php


Then take another BB cup and tighten it over the first (internally installed) one

file.php


This additional cup will hold GNG bracket in place

file.php


Pedals now have slight 10mm offset to the right side, but I can live with that.
 

Attachments

  • IMG_7847-1000.jpg
    IMG_7847-1000.jpg
    47.5 KB · Views: 2,359
  • IMG_7844-1000.jpg
    IMG_7844-1000.jpg
    48.1 KB · Views: 2,359
  • IMG_7845-1000.jpg
    IMG_7845-1000.jpg
    53.6 KB · Views: 2,359
  • IMG_7846-1000.jpg
    IMG_7846-1000.jpg
    47.5 KB · Views: 2,359
  • IMG_7738-1000.jpg
    IMG_7738-1000.jpg
    59.3 KB · Views: 2,359
Very nice! What city/country are you in?

If you use the stock GNG pulley (which is machined into the motor shaft so it can be as small as possible), that pulley is known to have sharp edges. Carefully sand off the sharp edges as soon as possible.
 
spinningmagnets said:
Very nice! What city/country are you in?

If you use the stock GNG pulley (which is machined into the motor shaft so it can be as small as possible), that pulley is known to have sharp edges. Carefully sand off the sharp edges as soon as possible.

Greetings from Zagreb, capitol of Croatia :D

Sharp edges on stock pulley?
This is a problem on belt drive version, right?
Endless sphere forum was resourceful in my initial research, so I opted for Gen2 with primary chain transmission.
But thank you for shared knowledge!

litespeed said:
Excellent build.

Tom

Thank you! :D
 
Snapped two pics while waiting for other parts to arrive :)
Front fork will be 200mm RockShox Boxxer - currently on my other e-bike

file.php


file.php
 

Attachments

  • IMG_7865-left-1000.jpg
    IMG_7865-left-1000.jpg
    87.3 KB · Views: 2,355
any updates? how is this going? what are you doing for a battery setup. what kind of speeds are you getting?
 
Do you have any ground clearance issues ? the GNG is very long and the angle it points down is very low , i could see you hitting some objects with the motor that low on big drops.

You may have been better suited to the more compact cyclone style builds on that bike frame like this one:

http://endless-sphere.com/forums/viewtopic.php?f=28&t=55066

they take up a lot less room under the frame
 
No ground clearance issues at all :)
This 120mm fork was installed just for testing.
Front end is now upgraded to 200mm Boxxer RC, whole bike jumped up by 50mm :)

Will post some pics soon!
 
VERY good work here! Your documentation of the work is very good and concise as well. I'm sure this will help someone in their personal quest for a badass ride. :D

Bookmarked!
 
cal3thousand said:
VERY good work here! Your documentation of the work is very good and concise as well. I'm sure this will help someone in their personal quest for a badass ride. :D

Bookmarked!

Well, it is definitely an inspiration for me. I'm thinking about starting my own Glory-GNG project.
Meister, you da man.
 
Thank you, guys! :-D

Just a quick update; after a 2 months wait, battery finally arrived from China!
Woohoo!
Gotta provide invoices to custom office and wait for a few more days, but further action is coming SOON :-D
 
My V-Power battery has finally arrived from China!
It's a hefty 6kg brick, measuring 195 x 150 x 125 mm
It has external BMS in separate plastic housing.
( Pictured Watt-meter isn't part of this package )
I know there's a lot of better solutions, but for $260 this is a big bang for a buck.
Also, I live in Croatia - you have to include extra 30% VAT on every USA price
Will do the trick for now, at least in this initial bike building and testing phase :)

file.php


My plan was to disassemble it and rearrange whole battery pack into something more useful regarding placement and overall bike design.
So, I removed aprox. 10 layers of duct-tape

file.php


And voila:
file.php


Battery pack consist from 16 series of 4 parallel elements.
Unlabelled cells, eh :)

file.php


Rearranged the cells by cutting and re-soldering the tabs

file.php


More pics follows!
 

Attachments

  • IMG_8287-1000.jpg
    IMG_8287-1000.jpg
    62.1 KB · Views: 2,345
  • IMG_8291-1000.jpg
    IMG_8291-1000.jpg
    58.2 KB · Views: 2,345
  • IMG_8294-1000.jpg
    IMG_8294-1000.jpg
    71 KB · Views: 2,345
  • IMG_8297-1000.jpg
    IMG_8297-1000.jpg
    76 KB · Views: 4,928
  • IMG_8298-1000.jpg
    IMG_8298-1000.jpg
    70.3 KB · Views: 2,345
After testing of various battery placements, I realized that split design is a way to go.
So I split the battery in two halves.
Initial plan was to mount battery on front frame downtube, just over the motor assembly - but it's a tad too bulky to fit without cutting all the cells and rearranging them in impossible and impractical ways.
Also, I consider the Stealth bike battery mounting, but this will make a whole frame a bit non-ergonomic.

So, I ended with two solutions.
First:
file.php

file.php


Second version:
file.php

file.php


First one has good flow and blends nicely with bike's lines, but second has better fork and pedals clearance.

Now I have to fabricate battery tray.
Epoxy resin time, yay! :-D
 

Attachments

  • IMG_8321-2000.jpg
    IMG_8321-2000.jpg
    129.7 KB · Views: 2,106
  • IMG_8323-2000.jpg
    IMG_8323-2000.jpg
    126.7 KB · Views: 2,106
  • IMG_8327-2000.jpg
    IMG_8327-2000.jpg
    126.9 KB · Views: 2,106
  • IMG_8329-2000.jpg
    IMG_8329-2000.jpg
    139.3 KB · Views: 2,106
Go with the second and get them as close to the headset as possible without interfering with your steering. I have a similar setup...I actually did the exact same thing with a Vpower pack and stripped it down to two parts on either side of the frame. You'll want the peddle and knee clearance.
How big is that battery? 48v 10ah?
 
sBfxCpF.jpg

I have a 15ah and kept my batteries rectangular (in hindsight, I would have done a rhombus like yours)
Also note that I don't have a double crown fork - in which case it would interfere with steering.
You might also want to open up that BMS and make sure the board is secured well (mine was floating around in the plastic case and I had to secure it)
 
This is one sick looking machine! :-D

Yes, mine BMS was also a floating one :-/
I will fit it in between battery halves, there will be plenty of space left.

I've found neat battery position and I'm making mold for encasing.

Your battery is secured solely by adhesive tape, or this is only external protection?
 
gorilla tape is holding everything together right now. Since November, no problems all winter.
I don't want to put too much effort into battery box right now...I want a FS frame first. This one's killing my back.
 
Last week I assembled the whole battery pack in Ver2 split design, positioned everything and started making brackets... and then my OCD kicked in.

So, I mangled everything to pieces and constructed a battery pack which fits under the front downtube:

file.php


file.php


file.php


BMS is integrated into housing, everything secured by silicone glue and insulated using thin plastic sheets and rubber cushioning.
Wrapped in duct tabe at the moment, I will make hard shell casing with mounts.

Tested, everything is smooth :)

Next, I will cut all the cables ( motor and throttle ) to neat lenghts and remove unused connectors from controller.

Quick question; is it safe to use 5V voltage supply from controller ( throttle cable ) to run 10W CREE headlight?
 

Attachments

  • IMG_8348-2000.jpg
    IMG_8348-2000.jpg
    148.2 KB · Views: 2,102
I've removed PAS sensor and brake switch wires from breakout cable bundle.
Installed miniature key lock switch directly on controller chassis - connected as power On/Off switch
The key can be removed in both positions.

file.php


Next, removed plastic Hall sensors connector and installed more rugged multipin connector.

file.php


Have anybody tried 3-pin XLR audio connector on phase wires?
Will it hold 15-20A?
 

Attachments

  • IMG_8354-2000.jpg
    IMG_8354-2000.jpg
    161.6 KB · Views: 4,719
  • IMG_8357-2000.jpg
    IMG_8357-2000.jpg
    137.6 KB · Views: 2,100
Back
Top