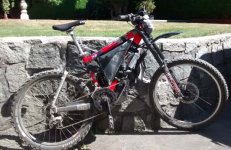
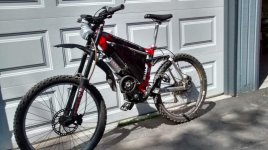
LightningRods mid drive, givitago's build

givitago

1 W
Joined
Jun 20, 2012
Messages
57
Location
North Vancouver, BC
I thought I'd finally do a build thread. I was planning on doing one several years ago when I initially put a 10T Mac with a 9 Fet controller on my 2001 Kona Stab. But in the end, I never did - I thought it was pretty cool, but it was a little bit too run of the mill to hold much interest for others. That cannot be said for the LR kit! All I can say is that it was like Christmas when it finally arrived a week ago after nine months of waiting :D. The build quality appears excellent and you can see all the attention to detail and effort Mike has obviously put in. Little things like plates for his adjustment screws to push against, flush mount screws, those carriage bolts and the list goes on.

Anyway, the kit came well packed via USPS/Canada post. No issues:
View attachment 3

I received the full 219 kit with chain breaker. I did elect for a 75T 219 sprocket as I was worried about clearance with the swingarm.
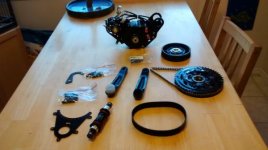
UnpackedKit.jpg

I got two chainrings, a 48 & 34T. I was expecting a 44T bike chainring because I had read one of Skyungjae's posts about clearance issues but the 48T actually turned out to be a good thing as it ended up fitting after dealing with some spacing issues and I like the idea of a little more top end as I have a low gear to drop into if I want more torque. The 48T is pretty much exactly the same size as the bash guard for the 75T.

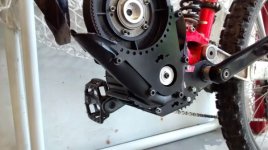
I spent Canada Day installing the kit. The plates fit my 68 mm bottom bracket perfectly. I needed to grind a bit off one side because the Stab/Stinky frame as very little clearance on one side. I also found some minor issues with the spacing of the bottom bracket - it was a little tight on the chain side so I needed to space it over by 10 mm with a couple of spacers from old ISIS BBs bracket I had laying around. That pushed the whole assembly out such that I have a millimeter or two clearance between the large chainring and the swingarm and also the bolts on the kit. I also had to remove a washer on one motor bolt because the chain touched when chainging gears.
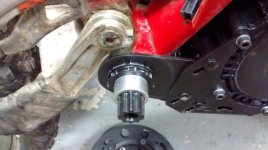
Spacers.jpg

I spent a bit of time figuring out how to get the belt tightened properly. It is a good idea to make sure the adjuster bolts are nicely tightened before you put the pulley on. I ended up using feeler gauges wedged between the nut and the sheets to hold the bolt in place when tightening the nuts as there is no room for a wrench. This technique worked to tighten the locknuts too.

I found it a but tricky at first to square the jackshaft when tightening the belt and ended up with a situation where the belt wanted to walk off the pulley. I ended up putting a strap around the 219 driver and using a screwdriver to lever the assembly back towards the motor and then snugged the plate bolts. But I'm sure that this kit makes it a breeze compared to what it must be like with the GNG kit. Not really sure how much tension to put on the belt.

I did a bench test of the motor with my EM3Ev controller. I used Lyen's website as a reference to get the colors to match as he listed Mac and GNG setups.

If anyone else is interested, these are the color matches for both the halls and phases:

EDIT: THIS DRIVES THE MOTOR IN REVERSE! See a corrected combo in later post:


EM3EV Controller GNG Motor
Green Yellow
Yellow Blue
Blue Green

The motor worked fine. It drew 85 Watts with no belt on at 45V on my CA V3. After putting the belt on, it was about 115. It is slightly noisier than the Mac, but definitely not loud. I have yet to determine how noisy it will be with chains because I have yet to install the chain. Mike ordered a bunch of 34 inch chains but for some reason, I guess he received a 30 incher in the mix and that is what I got. Not quite long enough. Mike was fantastic to deal with even though he seemed a bit disappointed that it wasn't perfect. I haven't got to try it yet, but it seems pretty close to perfect to me - especially compared to my otherwise ghetto build. Anyway, he sent out some extra links same day so hopefully I'll get them sometime this week.

I had this weekend to play around a bit so I added a mudguard for the belt. Mikes safety brackets make adding such a thing a snap. Basically just cut up an old plastic downtube fender and used a paper hole punch to allow the screws to hold it in place. If Mike makes a mudguard, I'll probably order one, but in the meantime this should do the trick. Also threw on a new headset and ordered some Shimano SLX brakes. The old Hayes HFX 9s are a little long in the tooth and I have replaced pretty much everything else on the bike.
MudGuard.jpg


Hope to be up and riding very soon. I ordered a GPS analogger from Ebikes.ca so I can upload trip data to Justin's cool new trip website. At some point I'll get a temp sensor in there to add that into the stats. There are some fantastic mountain trails around here so I should be able to put the kit through its paces!
 
Wonderful! I'll add this link to the build index.

I really like the front cover that you fabbed from a fender, awesome idea! I think there will be some great options in the near future from the factory (*wink). The stock metal covers over the left-side belts and the right side chain provide many places for a DIY'r to fab and attach your own solutions for mud-guards...
 
Great news givitago! Great to see the thread started here and your details of putting it all together. What is planned for the battery pack? Are you going pack back style?

I am especially interested in how your controller will work with the new LR kit as I also have a controller that is currently running with a Mac. I hope to use this same EB3 controller along with my Version 3 CA to run with the LR kit.

As I am just a ferry ride away from North Vancouver I hope to pay you a visit soon to hear and see the bike in action. I would like to bring my bike along and we maybe we can do a nice climb up Mount Seymour or something......subscribed!

Wayne
 
waynebergman said:
What is planned for the battery pack? Are you going pack back style?

The battery is going to stay the same for now. 12S "20" Amp Hours of 20c Turnigy Lipo. Actually, the pack is going on two years now and is more like 16 Ahs now. I'm going to have to order some more when the get in stock again.

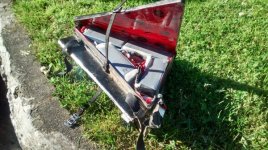
I put the battery in the triangle in an aluminum box. I think this is one of the cooler bits of the bike. I wish I could take credit for it but my father in law built it for me when visiting from Germany a few years back. He is a much better craftsman than I. Anyhow, I did contribute a sketchup template that didn't take into account the bend radius in in aluminum :?. What I like about it is that it drops in easily and is anchored with a couple of nylon straps. Comes out easily to be balanced charged in my chimney with a cell pro 8 at 40 amps (paralleled). Makes for a half hour charge before I'm out the door.

BatteryBox.jpg

waynebergman said:
maybe we can do a nice climb up Mount Seymour or something

Definitely

Thanks for the kind comments guys!
 
I just couldn't wait any longer for the extra links to arrive in the mail. So I found a local kart dealer and picked up a 110 link D.I.D. #219 chain. Took out 2 links (probably should have taken out 3) and installed it on the kit and hit the throttle. I discovered that I had the motor wired so it spun backwards for the kit and all that happened was that it drove the freewheels. So I started playing around with hall/phase combinations and found a combination that reveresed it.

For anywone who is interested
[pre]Phases:
EM3Ev Controller -> LR Motor
Y - G
B - B
G - Y

Halls:
EM3Ev Controller -> LR Motor
B - G
G - B
Y - Y[/pre]


Hurray, it moves the wheel! So I ground down my battery box to fit over the kit and took 'er for a spin around the block. I was in the smaller chainring and it just crawls with that gearing. Nice to have should the battery die, but with power, probalby not going to see much use. I found out within a block that you best have the front derailleur stops adjusted properly. If the two chains touch, they have a tendancy to suck the bike chain in between the two sprockets. Not terribly easy to get out again. Hopefully a bit of adjustment will cure that issue.

With a 44v (pretty dead) battery, hit about 42km in top gear. Accelleration seemed a bit more sluggish than my old Mac and for some reason, it didn't seem to pull as many watts. Not sure if I understand this. But it seems too have oodles of torque which will really make a difference on the trails. Bike is like a tractor and handles so much better without the weight in the wheel. The suspension feels like suspension again.

Anyway, I didn't get too much of a chance to try it out as the 219 chain started skipping. The seemed to have loosened so I returned home to tighten it up gain. That's where things went down hill. I guess I was a little overzealous in my tightening of the carriage bolts and ended up snapping two of them :cry: I didn't think I put very much torque on them but they are quite thin and obviously it was too much. So instead of out riding tomorrow, I will be trying to find something to replace them with.
 
Sounds like a lot problems trying to get it to fit hope all the LR installs aren't like that- Bottom bracket needing packing out, grinding needed around the BB, Problems evenly tensioning the belt and then a snapped bolt to top it off sounds like a nightmare installation.

And finally when it worked it seemed sluggish, Are your phase wires setup correct ? guess that's one problem when the controller doesn't come pre-wired as a pair to the motor by the same supplier.

it could also be the gearing has too much reduction so yes it has a lot of torque but since it doesn't load the motor much on the flat you get no power out of it, The Standard GNG kit is probably better in this regard as it has less reduction so you will put more load on motor and hence get more power out of it.
 
you seems to forget that mid drive kits are almost ALWAYS some work to install and adjust just because bb. chains, pedals, frame all look a bit different from bike to bike. i don't see how you could make that any easier?
sluggish motor response has nothing to do with the kit itself. middrives tend to react a bit sluggish just because of how they work. you got a lot of reduction, chains, belts and freewheels that all have a little play and need to engage. and of course you have to setup the controller correctly. i set mine to a gear friendly phase amps setting. now it's nice to drive but no monster. crank up phase amps from 70 to 120 and it pull wheelies all the time.
 
I think most of the challenges go with the territory like izeman says. The belt issue becomes pretty much a non issue once you have a chain to be able to sqeeze. The grinding issue was minor and likely not needed on other frame designs. I don't think you can blame the kit for a mechanically challenged installer snapping bolts. I'll get there eventually. It's a hobby and part of the fun is the journey - athough I love the riding bit too :)

One thing I was thinking about on that issue is that the slipping might have had something to do with the fact that I should have taken another link out of the chain and had 107 links. The bolts are all the way back in their slots and perhaps would bite better if they were tensioned farther away from the BB. They seem to have a fair bit of stretch in them so I was never really getting a sensation that they were tight. On the two broken bolts, I plan on shortening them and trying separate bolts on each side. A bit more of a fiddle, but then stretch shouldn't be a factor.

Anyway, yes, I'm pretty sure the phase combination is correct as the motor is running smoothly. The controller is 30 amps and tuned for a Mac. Perhaps there are ways to tune it for this lower pole count motor?? Given all the reduction, I'm not surprised it accelerates more slowly and I don't think the accelleration is unreasonably slow. Perhaps I was testing it in too low a gear. It also may be the CA need tweaking. Its almost like it is somehow ramping much more slowly even though I've got it set to very quick ramping. Once I get it working again, I'll try it in passthrough mode.

I definitely see what izeman means about all the play in each one of the drivetrain components. There is a bit of a sensation of elasticity in the whole thing - the motor starts, the chains tension and freewheels engage, the belt stretches a tiny bit, the suspension compresses and you are off! Quite different from a hub motor for sure. When just pedalling, the double engagement of both freewheels is a new sensation too.

Hopefully I'll get it fixed soon and will be able to test on the trails where hopefully it will really shine.
 
On the gng I've grown accustomed to stomping on the peddle to tighten the chain line and start rolling (about a foot) before throttling. Not using a CA yet,but zombiess throttle tamer has provided me with a super smooth takeoff and ramp up.
Sometimes still a bit jerky still with the dead zone play on my crap throttle, but way nicer on the whole drive system
 
Good to know that particular bolt can't take extra hard tightening. I recall LR had a hard time finding that bolt, and I am sure he will now uprate the grade of bolt he sources. The nuts are nylocks, so they have a plastic o-ring built into them that when it is first tightened on, it makes the bolt very secure against vibration causing a loosening over time. Multiple removals and re-assembly of a nylock reduces it's holding ability.

If I am uncertain about the ability of a nut to be tightened without breaking (for the first 12 kits that are now out there), Then I include a split-lock washer. I tighten until the lockwasher is flat, and that usually provides a very secure hold. The split lockwasher should be in-between the nut and a flat washer.

Common steel split lockwashers can vary between a very springy steel and a slightly softer steel, I use stainless steel because the quality and level of springiness is more consistent:

splitlockwasher114.jpg
 
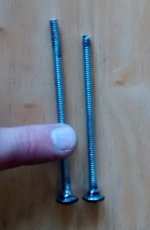
Took the bolts off and noticed that they are bent, both at the cap side and mostly where they snapped at the nut side. I guess when you tension the chain, there is a tendency for the inner plate to twist as there is tension on the chain side but none on the other side. Next time I will try to use my strap and lever again to even this out before tightening the bolts. I'm going to need some thin washers as well as there is a gap between the tensioning plate and the sheets which will be an issue if using two small bolts instead of one long one. Some SS lockwashers too. Thanks SM.

bolts.jpg
 
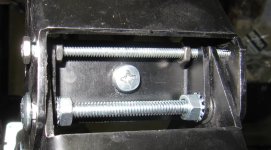
So I fixed the broken bolts and I am pleased with the results. I replaced the middle bolt with a 1/4" carriage bolt. #10 or 3/16" bolts at 3.5" long don't seem to be readily available and I prefer the heavier duty bolt here anyway. A bit of drilling and filing of the sheets and a bit of of filing around the square part of the carriage bolt is all that it took and there is plenty of metal in that spot to drill. I didn't chance it on the other bolt because the BB plate has very little extra metal around the bolt hole and I figured it was unnecessary anyway if I could get better bite on the plates with the big bolt. I found some 3/16" rod so I made a bolt out of it by cutting it to length, threading on a nut with loctite and hammering the end threads so the nut cannot come out. I re-used the remaining #10 carriage bolt. I used some extra nuts on the inside of the sheets so I can lock the chain side first and give it lots of torque without any bolt stretch. I did the same on the belt side but used some washers to fill in the gap between the adjustment plate and the BB plate.

plateMods.jpg
 
Hi,

Nice job! Good kit choice!

Pictures of the bike with the battery box?!
 
Is yours the standard bottom brackets or the long ones?
I've got pretty much the same bike, but ordered the longer brackets... So waiting on those but if it doesn't need them might ask Mike to change it.
I also ordered with the 44 thinking the 48 wouldn't fit so if you can elaborate on how you got that to fit that'd be helpful too :)

Love your battery box. Reckon I'll be doing something like that when my current battery dies on me. Much narrower solution than mine is. I did get everything in the triangle but I've got 5ah less than yours.
 
t0me said:
Is yours the standard bottom brackets or the long ones?
I ordered the standard 68mm brackets. They fit perfectly.

t0me said:
if you can elaborate on how you got that to fit
When you buy a 68MM bottom bracket, they usually come with a 5mm spacer so that they also work with a 73mm BB. I threaded two of these on the chain side of the BB before installing it in the BB shell. This moves the whole assembly to the left by 1cm and was required to make the innermost chainring not rub the kit and also allowed the 48mm chainring to clear the suspension by the thinnest of margins. There is still enough room on the other side to clear the pulley protector but not by much. I could have got away with one spacer for the small chainring to kit bolt clearance issue, no spacer if I had a single chainring and a 44 tooth chainring. From my brief ride, its pretty likely the smallest chainring will not be used unless the battery is dead.

I noticed that this thread is getting links as negative references to Mike's kit. That is definitely not my intention and these teething issues are to be expected in a brand new product and one that really is still under development. Additionally, some of these issues (such as my controller issues, particular frame designs) are out of Mike's control. I'm also just contrasting some of the differences between a hub and a mid-drive which is really interesting and I though others might like to know about when making their design decisions. Both have their pluses and minuses. The important thing is that Mike is doing a bang up job of supporting his product and is trying his best to develop his product in a very public way. This is pretty cool not just from the e-bike perspective but also to get a perspective on the challenges involved in starting a business venture. I'd like to see us supporting him instead of bashing his efforts.
 
You're do a terrific job of adapting the kit to your bike. I like your carriage bolt upgrade. I'll take a serious look at implementing that upgrade immediately.

It's going to take some miles on the roads and trails to shake the bugs out and make everything work as we want. I'll keep listening to what you guys want on your bike and making the improvements.
 
So life has finally given me a chance to play again after spending the last little while digging, replacing a broken waterline and plugged drains around the house.

Anyway, I have been able to give the new kit a good trial and I the kit definitely lives up to the high expectations I had of it. It is awesome to have a suspension that works properly again! Jumps no longer are accompanied by a big bang when the rear tire hits the dirt. Riding along rock armoured or root covered trails is so much smoother. Also the torque is fantastic. Starting off on a really steep hill is now possible and climing is limitted to having enough traction and my ability to stay on top of the bike. I added a thermistor and found the motor stayed nice and cool, never really exceeding 60 degrees C. Of course, I'm only throwing 1.5kW at it. Averaged 20 W/km on the 22km ride I did today (10ah or so). Top speed is about 42 km/h .

I bought an analogger GPS unit and had hoped to use it, but I either bumped switch or never turned it on, so no luck there. I wanted to try out ebike.ca's new ride traking app! Maybe next time I'll get the go-pro and that going.

Ground clearance is decent and I only caught the kit a couple of times, but it just bumps off like the chainring bash guard does (maybe it was the bash guard).

Only downer was some bitchy lady yelling at me to get off my bike when I was 100ft away from her and her horse when I was moving walking speed on a hydro right of way. She claims her horse is skittish, but it seemed she was the excitable one.

Got lots of smiles and fingers pointing at the bike on my ride up Mt Fromme - a very popular biking spot around here. I don't quite sneak up on people quite as easily with this kit due to the whine of the motor which maybe is a good thing as it allows me to pass when people know I'm there. Actually some people in a group didn't notice so perhaps it isn't too loud.

You definitely have to get the derallieurs setup correctly. On a test ride with the front deraillieur out of adjustment, I ended up having to push the bike home as the chain can get very stuck on either side if it falls off. One drawback of a mid-drive I guess - no redundant systems.

I figured out the acceleration issue too - the very low ramp rate on my current based throttle mode of the cycle analyst worked well for the Mac, but makes this motor very sluggish. Changing the setting back to the default 200 fixed that issue. Throttle was quite predictable and easy to handle, especially if I switch the 3 speed switch to the middle setting for really technical stuff.

I bought new set of Shimano SLX brakes, but only installed the front one. That is going to change soon as my old Hayes 9 brakes are not even close to the stopping power of the Shimanos My right forearm was very tired at the end of a run, but my left didn't feel anything.

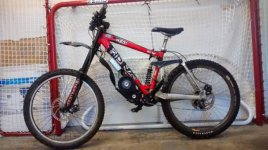
bike2.jpg

bike3.jpg
 
:D Awesome! I'm thrilled to see the first customers getting their bikes out on the roads and trails!

Your previous "sluggish response" comment didn't make sense to me at the time. I'm glad that you found the cause of it. The fact that you are using the middle power setting on the 3 way switch suggests that's it's responsive now.

The front chainrings may need some adjustment in terms of the spacing between the 44 or 48 tooth large chainwheel and the small 32 tooth. I install them with 4 washer spacers between them. If you have a more cogs on the rear cassette you may need to remove a washer spacer to bring the chainwheels closer together. If your shifter overshoots the outside chainwheel and derails you need more separation. If your shifter stuffs the chain between the chainwheels you probably need less separation between the chainwheels.
 
Back
Top