
You are using an out of date browser. It may not display this or other websites correctly.
You should upgrade or use an alternative browser.
You should upgrade or use an alternative browser.
1,000lb "Elec-tow’d” Electric Tow’d Dune Buggy Build Thread
- Thread starter oatnet
- Start date
oatnet
1 MW
Thanks hillzofvalp! Glad you can experience this build vicariously, guess that is the good side to my overposting, vs putting so many pictures on one page that it can take a while to load.
Thanks Tommy L!
Thanks Bronz!
I have not gotten much done (for reasons I will explain) but here is what is new:


Then I put on the new paper gasket...
.


Here The transmission is "resting" on the solid mounts, with the motor lined up behind it.
No matter how much I want to work on a project, I find it hard to do anything until I have all of the parts in hand. Probably the result of decades of projects that had to be re-worked when a part was not as expected, or I hadn't fully considered how it would impact the installation.
I have been waiting for the solid rear tranny mount for a month and a half. I ordered it from the same place I got the solid front mount from, Topline Auto parts, but it turned out to be a new item they hadn't released yet. Each week I check in with the owner, and get a response that it will be "soon" or "a few days" or that their lasercutter is "having problem with the bends?"
I wanted to use the Topline mount because it is supposed weigh only 1.6lbs, 3.0lbs less than the solid mount I already have - a pretty easy way to save a good chunk of weight. I want to progress this project again so I don't know that I can wait any longer - I need the mount to install the transmission, so I can install the half shafts, so I can install the motor, so I can mount the controller on top, so I can start re-installing the body and get this thing GOING.
I am going to have to use the heavier solid mount shown in the picture, and saw a few chunks off it to clear the tubes to accept the rear bumper, oh well.
Another note - the tranny tilts farther forward than I expected. I wonder if the steep angle made it easier for oil to leak out the weephole in front, and THAT was the source of the leak. That would suck, because unless the new paper gasket solves the problem, I am going to have more oil mess issues.
.
Please ignore these duplicate pictures:
Thanks Tommy L!
Thanks Bronz!
I have not gotten much done (for reasons I will explain) but here is what is new:
Then I put on the new paper gasket...
.
Here The transmission is "resting" on the solid mounts, with the motor lined up behind it.
No matter how much I want to work on a project, I find it hard to do anything until I have all of the parts in hand. Probably the result of decades of projects that had to be re-worked when a part was not as expected, or I hadn't fully considered how it would impact the installation.
I have been waiting for the solid rear tranny mount for a month and a half. I ordered it from the same place I got the solid front mount from, Topline Auto parts, but it turned out to be a new item they hadn't released yet. Each week I check in with the owner, and get a response that it will be "soon" or "a few days" or that their lasercutter is "having problem with the bends?"
I wanted to use the Topline mount because it is supposed weigh only 1.6lbs, 3.0lbs less than the solid mount I already have - a pretty easy way to save a good chunk of weight. I want to progress this project again so I don't know that I can wait any longer - I need the mount to install the transmission, so I can install the half shafts, so I can install the motor, so I can mount the controller on top, so I can start re-installing the body and get this thing GOING.
I am going to have to use the heavier solid mount shown in the picture, and saw a few chunks off it to clear the tubes to accept the rear bumper, oh well.
Another note - the tranny tilts farther forward than I expected. I wonder if the steep angle made it easier for oil to leak out the weephole in front, and THAT was the source of the leak. That would suck, because unless the new paper gasket solves the problem, I am going to have more oil mess issues.
.
Please ignore these duplicate pictures:
Attachments


The fingers
10 TW
That is awesome, the motor looks like a giant M80. 8)
Praying for your toe, one of mine got ran over a few years ago. Just turned black a couple of weeks later and stayed that way for a year, but never lost the nail.
Now I also wear safety toe shoes most of the time. :wink:
Praying for your toe, one of mine got ran over a few years ago. Just turned black a couple of weeks later and stayed that way for a year, but never lost the nail.
Now I also wear safety toe shoes most of the time. :wink:
oatnet
1 MW
It may look like a giant M80, but let's hope the motor does not explode like one  .
.
As mentioned in my last post, I called Topline and told them I couldn't wait any longer, so they started processing a refund for me. The next day, they called back and told me that the first prototype was finished, and I could have that. It was bare metal (I had ordered it with silver powder coat) but I agreed, and they had it in my hands the next day.


View attachment 22


View attachment 19


View attachment 15


View attachment 7
View attachment 6
View attachment 5
View attachment 4


. As mentioned in my last post, I called Topline and told them I couldn't wait any longer, so they started processing a refund for me. The next day, they called back and told me that the first prototype was finished, and I could have that. It was bare metal (I had ordered it with silver powder coat) but I agreed, and they had it in my hands the next day.
View attachment 22
View attachment 19
View attachment 15
View attachment 7
View attachment 6
View attachment 5
View attachment 4
oatnet
1 MW
Whups, ran into the 30-pic limit , here are the last 2.
View attachment 1
Most project hours go by with little visible progress, so it is nice to have a session like this, when the whole drivetrain bolts together in an afternoon. 8) Although I'll have to take the fenders/rollbar/nose off to continue work, it is nice to see it looking like a car again, instead of a pile of tools, parts, rags, and boxes.
-JD
Doctorbass
100 GW
Hey that is becoming really nice !! 8)
i'll be continuing following your thread for long! :wink:
Keep the good work!
Doc
i'll be continuing following your thread for long! :wink:
Keep the good work!
Doc
Tommy L
100 kW
Hi Oatnet!
How did you make your decision on motor selection?
Tommy L sends.....
How did you make your decision on motor selection?
Tommy L sends.....
oatnet
1 MW
Thanks Scott! feel free to post pictures here, I'd love to see it. Yep, I will be selling the original tow'd gas tank and 1600 motor after the conversion is successful. .
Thanks Doc, much appreciated!
Thanks Tommy, that motor/controller was in my VW bus conversion, so I had it sitting around. It's been a while, not sure why I chose DC over AC originally, although I remember it was significantly cheaper than AC at that time. If I had to purchase one today, I'd probably get an HPEVS AC-50, or their AC-35 x 2 (dual motor) - which could be my upgrade path if I find the chassis can make use of more power.
I've been putting in a lot of hours on the Tow'd, but it has all been design so there wasn't much visible to post about until now, when the design is finished.

**********************************************************************************************************
The picture above is hard to read, so here is a PDF printout for more detailed reference:
View attachment wiring9.pdf
**********************************************************************************************************
.
View attachment 10
View attachment 9

View attachment 7


View attachment 4
View attachment 3


So, a little more pondering the design, then off to BigBlueSaw!
-JD
feel free to post pictures here, I'd love to see it. Yep, I will be selling the original tow'd gas tank and 1600 motor after the conversion is successful. .Thanks Doc, much appreciated!
Thanks Tommy, that motor/controller was in my VW bus conversion, so I had it sitting around. It's been a while, not sure why I chose DC over AC originally, although I remember it was significantly cheaper than AC at that time. If I had to purchase one today, I'd probably get an HPEVS AC-50, or their AC-35 x 2 (dual motor) - which could be my upgrade path if I find the chassis can make use of more power.
I've been putting in a lot of hours on the Tow'd, but it has all been design so there wasn't much visible to post about until now, when the design is finished.
**********************************************************************************************************
The picture above is hard to read, so here is a PDF printout for more detailed reference:
View attachment wiring9.pdf
**********************************************************************************************************
.
View attachment 10
View attachment 9
View attachment 7
View attachment 4
View attachment 3
So, a little more pondering the design, then off to BigBlueSaw!
-JD
oatnet
1 MW
More progress on the Tow'd, got the controller plate which enables all the work I have left. I also got a bunch done on the rewiring, but it will make more sense if I cover that later when it is finished, lots of other fun stuff in the meantime, like the brake reservoir:
.
.


View attachment 18


View attachment 9


View attachment 5
View attachment 4


.
.
.
.
.
Please ignore this duplicate photo:
.
.
View attachment 18
View attachment 9
View attachment 5
View attachment 4
.
.
.
.
.
Please ignore this duplicate photo:
Attachments

Nice tread!
Thinking you could save some weight by replacing many of the big steel washers at the battery case with distances cut from alu tubing. Double nuts with nyloc and locktite seams overkill? Potential to save more weight
Secure that lumber that holds up the body before you get hurt. What it looks like in the pics anyway.
You should put a propeller at the rear end of that motor
oatnet
1 MW


The fingers
10 TW
Looks like you'll be posting drive videos up soon. 8) Have you checked out any Manx owners groups? Yours might be the only electric one. Actually I chanced to see a tow'd for sale up close while walking Oliver the other day. No price on the sign, just phone number. It was in very good condition, probably wanted mucho $$$$$$$$'s. One of my mechanics knows of a few of them, he has a VW-powered sand rail and regularly goes out to Glamis.
oatnet
1 MW
The fingers said:Looks like you'll be posting drive videos up soon. 8) Have you checked out any Manx owners groups? Yours might be the only electric one.
I look forward to it, but don't want to post it in any Manx groups until it is actually running under electric power
It won't be finished at that point - I have so many potential "enhancement" projects planned, it won't be finished until I lose interest in the car overall. I found a few electric dune buggies when planning the project, but all were lead-acid and heavy with 6" motors. I don't know that any of them were actual Manx though, so maybe I will be the first.
-JD
Laserman
100 W
Love your build ! You have some mad skills there. Don't say you do not as you have done some wild work, one thing you could do for fun is move your license plate holder higher then make a small cage around your end shaft and mount a small prop there either a marine or air prop and when people ask about it you say it's what makes you go faster by moving the air 
Jim
Jim
oatnet
1 MW
Thanks for the kind words Jim!
While I have pictured a propellor back there and others have mentioned it, I never thought of trying to hype it like it was an airboat - that is HI-Larious. :lol:
Anyhow, an update of the activity over the past few weeks:


The green arrow points to the same cable, now finished and installed. A layer of black heatshrink seals the cable from lug-to-lug, and holds the dart in the conduit closed so the cable is completely over-protected. I left these clamps in place overnight and the cable/conduit now keeps that "L" shape. This run completes the negative-side power path.
.
View attachment 14
View attachment 13


View attachment 8


View attachment 3

View attachment 1
.
.
.
Now I need to do the final re-assembly of the controller plate, run the wiring harness conduit through it, and install it through the towd. Then I route and terminate the wires in the back, then do the same on the front after deciphering/reinterpreting the existing wire mess, and I can put the body back on and give this EV a test. A lotta work still, but I have cleared a lot of hurdles and hopefully the end is in sight.
-JD
.
.
.
.
.
.
.
Please ignore this duplicate picture:
While I have pictured a propellor back there and others have mentioned it, I never thought of trying to hype it like it was an airboat - that is HI-Larious. :lol:
Anyhow, an update of the activity over the past few weeks:
The green arrow points to the same cable, now finished and installed. A layer of black heatshrink seals the cable from lug-to-lug, and holds the dart in the conduit closed so the cable is completely over-protected. I left these clamps in place overnight and the cable/conduit now keeps that "L" shape. This run completes the negative-side power path.
.
View attachment 14
View attachment 13
View attachment 8
View attachment 3
View attachment 1
.
.
.
Now I need to do the final re-assembly of the controller plate, run the wiring harness conduit through it, and install it through the towd. Then I route and terminate the wires in the back, then do the same on the front after deciphering/reinterpreting the existing wire mess, and I can put the body back on and give this EV a test. A lotta work still, but I have cleared a lot of hurdles and hopefully the end is in sight.
-JD
.
.
.
.
.
.
.
Please ignore this duplicate picture:
Attachments
etard
100 kW
You could write a book by the end of this build! This is looking great man, keep it up.
oatnet
1 MW
etard said:You could write a book by the end of this build! This is looking great man, keep it up.
Thanks Etard! WIth so many pictures, I think this thread is almost as long as a book already :lol:


View attachment 12


View attachment 8

View attachment 6


View attachment 1
This completes the Controller assembly phase. With the driveline complete, I can move onto the control wiring. I'll start by soldering up all the connections in the back, and then move onto the connections in front.
I ordered an encoder for the tailshaft to drive the existing ICE tachometer; tachs depend on pulses, 2 pulse for a 4 cylinder like this VW, 3 pulse for 6 cylinder, 4 pulse for (8) cylinder. The FB1-4001a has a 7/8" tailshaft. I longed for a tachometer in the VW bus conversion, so I look forward to having this data available.
I also ordered a new fusebox to clean up the wiring mess, and an LED blinker, and a cheepo AC inverter to power the fan. The biggest news is a "Spare" part I bought at a stunning discount, but I'll post about that one when it arrives and I figure out if it is bang or bust.
-JD
oatnet
1 MW
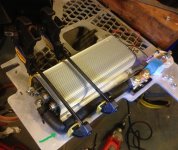
The "spare part" I mentioned in my last post arrived. This is a watercooled Zilla 2K-LV DC controller, rated for 2,000 amps at 150+v. That is 300kw, 402hp, and an obscene amount of torque. Full power would twist the towd's frame into pretzel, although I could run lower amps. I had planned on upgrading the tow'd to an HPEVS AC35x2 or AC51 for more power, but maybe I'll just upgrade the controller instead. Or, maybe it would be better suited for the project I have been planning as my next adventure.
I've always wanted to try a Zilla, but the this model costs $4,000 new and I would rather put that cash to an HPEVS system. However, it came at a price point that made it worthwhile. Besides, it occurred to me that I haven't tested the controller since it was installed in the Bus - I really should have a spare on hand. Of course, the Kelly weighs 5lbs, and this monster weighs 30lbs before adding water cooling...
-JD
Bluefang
10 kW
Awesome build Oatnet 
With both your build and lukes recent acquisition I am really tempted to go out and get a road legal Kit car or dune buggy and really put some power into it Looks like it will be a lot safer for me then a stupidly high powered motorbikes I keep wanting to build
With both your build and lukes recent acquisition I am really tempted to go out and get a road legal Kit car or dune buggy and really put some power into it
Looks like it will be a lot safer for me then a stupidly high powered motorbikes I keep wanting to build oatnet
1 MW


View attachment 20


The first 3 switches have been wired for the "on" side, and are being test fit.
.


View attachment 9


View attachment 1

please ignore this duplicate picture:
Attachments

oatnet
1 MW


I don't have pictures handy, but I also ran a wiring harness to the front for lights/horn/brake relay. It took a few tries before I got it the way I wanted it, but the final solution is really elegant.
That my friends, sums a weeks worth of work; I took last week off to finish the towd, but this is as far as I got. tomorrow 6/5/14 is the 1-year anniversary I wanted to have the car finished for, but that is not going to happen. OTOH, the conversion parts are pretty complete right now, and I am just hung up on reconditioning the car itself. If I connected the 150v battery and a 12v power source, I could turn on the controller and contactors and make the car move - but I am saving the maiden voyage for when it is complete.
The major projects are dwindling... Wire headlights/taillights/signals/horn (adding parking and hazard lights!), build/connect the throttle (I have a great idea for this), hook up the AC inverter and fans, 12v testing, hook up the battery and do 150v testing, then bolt the body/rollbar and hook up the parking brake/stickshift, and it will be a runner...
Also, thanks for the kind words Bluefang, I hope you build one!
-JD
oatnet
1 MW
.
For a few years I have been following the build thread by a teenage boy doing a ground-up restoration on a '72 bug. He has done an incredible job, and the finished build is well documented with tons of pictures, details, and explanations. At that age, i couldn't follow through on a project that would take a week, let alone years, so his vision and work ethic are impressive too. It occurred to me that folks who can tolerate the abundance of pictures and minutia on my thread, might enjoy his thread (even though it is about an ICE) so I decided to post a link. Enjoy!
-JD
CLICK HERE to see Noah's 1972 VW bug restoration.
.
.
The fingers
10 TW
I spent 2 years on my '56 in the early 80's, never close to the job this kid's doing. Kudos to the kid! 8)
oatnet
1 MW
in the same vein as Noah, I think this blog starts from the bottom.
Click Here to read the story of Ellie the '64..
.
.
Click Here to read the story of Ellie the '64..
.
.
Similar threads
- Replies
- 5
- Views
- 421
- Replies
- 32
- Views
- 3,814
- Replies
- 19
- Views
- 1,182
- Replies
- 9
- Views
- 772
- Replies
- 0
- Views
- 626