Phoenix Rising: P1

Kingfish

100 MW
Joined
Feb 3, 2010
Messages
4,064
Location
Redmond, WA-USA, Earth, Sol, Orion–Cygnus Arm, Mil
Sired from the ashes of a faithful machine, my next ebike takes flight.
Part 1

Back-story:
In September of 1991 I moved to Austin Texas and quickly discovered that mountain bikes were the choice way of getting around. I bought a Specialized Rockhopper with (what I believe was) the first generation Rock Shox RS-1. Last year, 13 months ago I converted this bike over to electric using the Nine Continent 2806 FH motor purchased as part of a kit that included a 25A 6FET controller from ebikes.ca.

Reference Prototype Permutations: P0 Evolved

Spec.Rockhopper1991.WinterYJFaring2.jpg

EOY 2010 - Last good build of P0; except for the gimpy shock – this was my best ebike configuration.

Slowly over the course of summer the front shock began to leak fluid on the right side, and the shock as a whole finally failed completely after a week of hellish storm activity mid-December. I purchased what I thought was a reasonable replacement shock for the 1-inch steerer however that assembly didn’t survive the trip home from the bike shop, a result that left me with now two broken shocks on New Year’s Eve and no way to get to work the following week. :cry:

2009FeltCompulsion1-Frame.png

P1 started out as a humble bare frame.

Fortunately I had been working away quite diligently early last spring on a 2WD replacement ebike – trying to get it ready for my summer road trip. Somewhere along the way I became a little bit frustrated with the 9C motors by the lack of support for disk brake and idled further construction in lieu of new motor development, a project that is taking longer than expected.

With one broken bike, another stalled bike, and a free weekend I made the prudent decision to retire original ebike and part it.
<Queue theme to Six Million Dollar Man: “We can rebuild; we can make it better…”>

P0-neckkid&broke-2.jpg

Like a horse with a broken leg, P0 was put down. :cry:

OldSig-2010-12.png

My old sig… :cry:

Into the Fire:
Starting at about 6:30 PM New Year’s Eve, I rolled up my sleeves, put on some good old rock music from the 60s and 70s when they made music worth listening to, with a pile of Cliff Bars & coffee, and just went for it!

The original idea was to assemble a rear-wheel drive but then I recalled all the issues that started it all with the ill-fitting rear 9C hub, and that thought was given way to creating a FWD nearly identical to the old bike. The first task then was to transfer over the front wheel. Although I had several new hubs available it was decided to keep the tried & true wheel and run with it, saving time from not having to goof around with swapping tires.

P1-Rising0.jpg

P1 (The Phoenix) is like a foal trying to get on its’ feet...

Most of the rest of the components were already loaded on the frame; pretty much starting with a good base of top-of-the-line Shimano, SRAM, Avid, and Tru-Vativ parts to pick and choose from. Intially this was going to be a 7-speed for the 9C hub, but then I got to thinking about making a FWD with a freehub in the rear as an 8-Speed, then a 9-speed, and they led to a well-stocked parts bin (and I’m still sorting this out). The bike as imaged below has the rear wheel from P0 mounted with an original 7-speed freewheel, and a new 7-speed Shimano chain. The rear tire doesn’t have a disk brake, and the new frame doesn’t support rim brakes so this would be a work item on Sunday Jan. 2nd when the stores open.

P1-Rising1.jpg

P1 with electrics in place sans batteries

Also migrated over where all the electrical features of P0, such as the CA, throttle, 3-Way current switch & Cruise Control, HP-LED lights, Modified 6FET controller, DC-DC converter, and Blinkies. New for this ebike was the mounting of the controller; I fussed about with this until I conjured up an idea of straddling the controller directly in front of the handlebars. This effectively removes all the nastly web of cabling out from the triangle except for power and rear lights: Simple.

Another change was how the front wheel was mounted. I didn’t have the Lawyer’s Lips (I have no idea why since I have just about every other little ebike doodad on the planet), and therefore had to figure out a way to make the quick-release fork work with the motor. I resolved to use heavy-gauge solid copper wire which would deform and fill the void; I just have to be attentive and tighten the nuts periodically the first week. Two torque arms were used; the clunky steel on the wire-side and the fancy adjustable stainless on the bolted side. Two would have to be enough. Since the clunky metal side pointed down I was puzzled on how best to secure it; this was resolved by scavenging an old pedal for metal which is clearly displayed in the photo above… See it? A pedal cut in half… Yes, yes, cheap thrills here in the hovel of Kingfish.

P1-Rising2.jpg

Close-up of the controller integration from the front; functional though not pretty.

P1-Rising3.jpg

Close-up of the controller integration from the back side; an inglorious rat’s nest.

P1-Rising4.jpg

Clean triangle area awaiting a battery pack.

More in a moment...
~KF
EDIT: Added reference to P0 evo
 
Part 2

Out of the Barn:
Mounting the saddlebag batteries was a bit of a chore mainly because the top-tube has a more severe rake to it and the bag had a tendency to slide towards the rear. Beneath the down tube is a free cable heading towards a derailleur; this I covered with ½ inch poly-tubing borrowed (albeit sacrificially) from my brewing equipment. The tubing was split lengthwise and placed over the top of the cable creating a makeshift protective tunnel, and then was covered over with black duct tape. The bag could then be laced in place. Afterwards the free-spin test was given and the electronics tested; everything passed without a hitch. One small note: I did not transfer the eBrake; the magnetic reed switch is problematic and for the birds. I am instead opting to give a mechanical leaf-switch a try.

P1-Rising5.jpg

The Saddlebag mounted.

It was now Sunday and I wanted to make the ebike a bit more presentable on its’ maiden voyage to REI. Since the frame is a metallic sky blue, I thought that the Canary Yellow faring would appear to garish. Therefore I decided to revert back to the White and Black theme which was already partly constructed. The forward faring almost became all-white, a wild hair developed and I settled in on a black stealthy faring with a white rally stripe as being more fetching. In addition, I added an internal deflector that provided the faring with shape as well as reducing the front tire spray. The fenders on this beast are nearly shite and wobbly; something else to fix or replace.

P1-Rising6.jpg

Side View

P1-Rising7.jpg

Rear-Quarter

P1-Rising8.jpg

Front-Quarter

P1-Rising9.jpg

Front-Quarter View dim light visibility test (meaning my flash didn't go off)

P1-RisingA.jpg

Front View in dim light (durn pesky flash...)

And that’s the way I drove it over to REI to get a new wheel made: Rear wheel is crafted from a double-walled 26-inch DA16 Alex Rim, using DT Swiss Competition Spokes connecting to an older Shimano Deore XT Freehub (about two generations old). The Freehub is 9-Speed 11-34T late model Shimano from 2009. The disk rotor is an Avid 203mm. I also purchased a Shimano 9-Speed chain; surprisingly one of the few items I didn’t have in my inventory. The studded tire was transferred over to the new wheel.

After the installation I rode the bike home in 20*F weather with tires gripping quite well. The final details included moving the Wellgo BMX pedals over (I don’t want to deal with clip-ins during the winter), adjusting the disk brake, and fine-tuning the pressures in the two shocks. It’s not finished by any means; I still have to fabricate a rain-proof faring specific to this frame, and I have a 7-speed shifter than needs to be swapped out for a 9-speed. Details details details…

But enough already; it'll do to get to work and beyond. There will be more improvements on this frame and bike as time marches on.

Cheers to my Phoenix, P1 by another name. :wink:
~KF
 
Nice full suspension frame. What kind front fender are you using it and I need get one for my new ebike building.
 
Fenders, both F&R are X-Blade, purchased from REI. I saw an interesting set over at another bike shop, might have been the Specialized dealer (yeah, it was ‘cos I had to fetch the Specialized Rim Tape) – they were made by Topeak.

The part that I don’t like about mine is that they are not straight and true: There is a noticeable twist from front to rear – like they didn’t make the mold properly and when the plastic was released it still had pliability to it and cooled with a contorted twist. If you’re mudding it won’t matter.

I would see if you could get one mounted before you buy it to see how it looks if looks bother you (like they do me) :roll: :)

Cheers, KF
 
KF,

You pulled out a great weekend save. Going from a breakdown and no working ebike, to a significant upgrade is quick work. I can't put my finger on exactly what it is, but I really like that new frame. It seems longer and lower than others, and I really prefer longer and lower for ebikes. Are those 24" wheels in your pics that are fooling my eyes?

John
 
Kingfish said:
I thought that the Canary Yellow faring would appear to garish.
Oh mannn, put on a happy face!!! :lol:

"P1 started out as a humble bare frame."

Did you find a deal on this somewhere? Does the pedaling force seem to transmit well with the long rear travel? What do you think it might be like with the motor in the rear pushing on that rear sus/travel?

Thanks! :mrgreen:
 
Thank you John for the kind comments. And you have sharp eyes too! :wink:

From tip-to-toe the P1 frame is longer: Little did I know at the time of purchase but the Felt Compulsion 1 frame is like the largest “medium” frame on the planet – meaning that their “small” frame is more like a typical full-suspension medium, and their “medium” is more like a large. It would be a perfect match if I was 5’9” - but I am a little guy apparently of Pictish or Elfin heredity no doubt (I would have made a fine race jockey I just know it)! :roll:

As such, the P1 frame is both long and tall; a full 6 inches longer from axle to axle and 3 inches taller from crankarm to top tube. The height surprised me but I bought the frame off of eBay and there was no going back. In anticipation, I originally bought Mavic EX 729 for 26” with matching Hookworms, however a 26” Hookworm is also larger than a typical 26” tyre when inflated to operating pressure – being closer to 27.5” in diameter. A wee midgey Kingfish would likely look out of place on such a large beastie. Instead, the plan is that after the thaw, come spring I shall mount the 24” Kris Holm Mountain Unicycle rim with matching 24” Hookworms front and back. Only then I can put away the step stool and ladder. Thankfully the bike sags one full inch when I sit on it, least I get a nosebleed. <nods>

From the rear, it astounds me how narrow is the bike. Part of that is because I have cut the carbon fiber handlebars down to a size between typical road bike and mountain bike, for it has always bothered me how wide the MtB handlebars are. Why should it be a tight squeeze to get past cars on the road when sneaking through next to the curb, or attempting to pass people on the bridge? The narrow tires deceptively contribute to that slender perception as well.

The reality is that now after being loaded down with batteries and gear, it is very easy to drive and maneuver – at least at slow speed which is all that I dare go until I am more confident in my ridership on these icy streets. :)

Reaching up to ring the bell <~oofta!> KF
<ding ding>
 
deVries said:
Kingfish said:
I thought that the Canary Yellow faring would appear to garish.
Oh mannn, put on a happy face!!! :lol:

"P1 started out as a humble bare frame."

Did you find a deal on this somewhere? Does the pedaling force seem to transmit well with the long rear travel? What do you think it might be like with the motor in the rear pushing on that rear sus/travel?

Thanks! :mrgreen:

dV, da happy face was for da yellow bike! Dis bike is gonna git mustang racing stripes! YAAAAA! :twisted: I already boughts a padded handlebar wrap that says “Hot Wheels!” - you know, like the little Matchbox-cars logo :twisted: 8)

Frame: That came off of eBay in November 2009 methinks with the idea of building a 2WD for winter. I also bought two hubs, F&R from ebikes.ca – but as a lark I decided to use P0 as the test bed victim instead of messing up a perfectly good new frame. The MSRP on the Felt Compulsion 1 frame at the time was about $1500 or $1600 dollars. The eBay price was much less; when received the frame looked as though it was previously assembled – like someone parted out a floorshow model. Beyond that there were no obvious signs of use. I thought it was a heck of a deal!
The key factor in my search was the open triangle, and the Felt design opens that right up as much as one could hope in a quality FS bike. The only thing I don’t like about the frame is the color; in 2010 they switched to white. But this is a tiny issue – even though it prevents me from using Canary Yellow, causing frightening levels of insomnia finding a proper matching color of HDPE, and, and… <yawn>

Here’s the link to the technical details about the frame.

Pedaling: It feels like a boat front and back. However this is because I have little experience with this bike, and have yet to properly dial in the front Marzocchi Shock and the Fox rear shock both in terms of pressure and rebound. I plan to carry the pump with me for the next few days though. :wink: As far as downward force goes – the bike already has a dampening mass called a battery pack weighing in at 23 pounds. I haven’t really got on it yet, pumping hard like an ox climbing a hill because the streets are wicked icy and frankly I am very glad to have studded tires so that I go straight and forward instead of flipped-over and run-over by crazy people. :shock: But let me get back to you on that when it warms up and thaws this week (fingers-crossed). :D

Rear-motor pushing: I couldn’t say because I didn’t feel comfortable mounting the 9C RH – it was too wide for the frame and scratching it in a nasty sort of manner. This is why I am seriously considering designing my own motors, and if I am going to go that far into the mechanics of the design I might as well fix a few other goofy oddities as well – aside from making it more efficient… but I digress. I suspect that the motor will shove the frame up and that I shall have to reduce the sensitivity somewhat to avoid pogo. The good news is that I can always swap out the shock for a more modern version with remote adjustments should it come to that.

Happy to be happy. Are you happy?
Most definitely happy, KF
 
Very happy. ;)
Kingfish smiley bike2.jpg


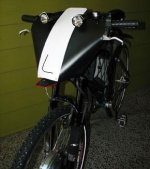
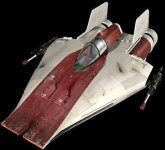
Of course, what it *really* reminds me of is this:
rs2_AWING_1.jpg
You could be the first person to go for the ebike version of Obi-Shawn's H-Wing:
http://www.roadsquadron.com/Cars/Hwing/
View attachment 1
(EDIT: I totally forgot about his bicycles and stuff he'd already done this to:
http://www.shawnandcolleen.com/shawn/Pages/transport.html )
:oops:

With the big round wheel in front it also reminds me of this:
Amber_II_(Attacked_on_patrol).JPG

(sorry for the very OT intrusion; couldn't really help myself :lol: )
 
I thought KF was shooting for a steel steed, not a space ship, and pulled it off pretty darn well, and that's before considering materials and time use. Striping was what was missing from the yellow version.

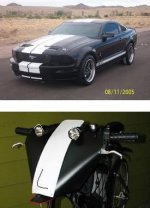
For a bike look how on target it is:
mustang bike.JPG
 
Ja! A black pin-stripe down the middle would do it; have to hit an auto parts store today, wipe it down with alcohol, and plaster it on. I’ll have to take the “2694” number back off ;)

For the sides, I was thinking a solution similar the yellow-jacket; a black wrap with white HDPE sewn in, followed with a black stripe down the middle like the mustang photie. Probably won’t get to that until the weekend... I think that white does nearly as good a job as a reflective band. 8)

Also – I need to put a grill and duct-work right about in the center of the front faring:
The controller is directly behind the center portion; it’s fine right now in the dead of winter, but come summer it will roast. I am thinking some reflective aluminum tape on the inside surface of the faring, a horizontal U-shaped notch about center, maybe 1 x 4, construct an ABS channel (or use any numerous pre-existing Home Despot moldings), and place it so it directs the airflow directly upon the controller’s FETs (which on my unit are pointed upward). This will create a laminar flow of cool air pulled in by low pressure opposite of the faring, likely in a dual vortex pattern, and cascading over the Heatsink. Eliminates both drag and heating issues. The front of the grill would need to be inventive: Chrome anyone? Or blackout webbing? 8)

BTW – I mounted a SPST Submini Lever Switch in place of the Magnetic Reed Switch for the eBrake and gave it a spin: Works like a champ!

The 3-Way Current-control and Cruise-Control unit may give way to Directional switching: L/R/Horn. I never really did use the 3-Way, and the Cruise was only useful for cross-country. I definitely want a horn for cars. :twisted:

<sigh> Toys for boyz…
<Diabolical snicker> KF
 
Yeah, some pinstripes will be a nice touch. If I can just figure out how to swap some of my great pumpkin genes for some of those elf genes you have, it sure would make chasing performance much easier. I can only imagine what my bikes would be like with half my weight aboard. Ebiking definitely pays huge dividends to those who are jockey size individuals, far more than in horse racing.
 
John in CR said:
I thought KF was shooting for a steel steed, not a space ship, and pulled it off pretty darn well, and that's before considering materials and time use.
Yes, he did, and I apologize for having a bit of fun at his expense. :(
 
AW, no harm done friend; I gots a tale to tell so pull up a stool and pour yerself a pint on me… :wink:

Ah lads, today was the first day on the road commuting, and yam here to tell you with the temps rising to a balmy 37° it was a right bloody mess with all the snow and ice melting into various states of slush, gunk, grim, and who knows what else was in the mix. I discovered a new “feature” about these studded tires: They do an excellent job of catching the crud and hanging on to it as the wheel spins around till just when it hits the optimum angular velocity at 180° releasing straight into the wind and flipping so it heads back at eye level… all the way up to my destination for a meeting with the Boss & Team. The spray pattern upon my fantastically lemon-neon jacket was absolutely perfect for blending in with the gutter; I couldn’t have done a better job if I was trying. And at 33 mph the distribution pattern definitely increases in width and breadth, although at a wimpy 18 mph it’s just a tiny squirter and not worth the bother. No, go for it with gusto to get that grimy smile and make points with the Team! Yeah… 8)
<face shield down>

Speaking of smile, after I got back home – it was dark and all, I was about to pull the bike into the secret hidden urban bat cave when I spotted this sly grin:

P1-HappyFace!.jpg


Would you look at that! I done think P1 had a better time today than I, and that’s pretty dang happy if you ask me! :D

dV, I can now quantitatively express how the ride went today most completely. At slow speed the ride is a little bit soft; possibly could use another 10 psi in the rear shock just to keep it from bottoming out. However at WOT this bike is an absolute dream and it really levels out – sort of like how a boat comes out of the water and planes nice and level at higher speed. It is nimble, responding to the slightest notion with ease and comfort. I was so distracted by how smooth it was that I actually enjoyed the cushy ride and before I knew it there I was 11 miles later at my destination.

The road rumble and studded tire razzle melt away and are hardly noticeable, whereas divots and pebbles are still felt, but then greater drops and larger bumps are smoothed out – which leaves me to believe that the pebble-size is a hole in the attenuation spectrum; I’d wager a gravel road would not be so cushy. Beyond that, the ride exceeded my expectations ~ but then I went into this with an open mind and frankly didn’t know what to expect.

Other observations:
  • I did not experience pogo or up/down dampening issues; there is however a slight side-to-side wobble from pumping hard and shifting weight at high speed/WOT – but it is a minor thing and not a bother.
  • The bike feels light; it strongly feels like the front end is going to come up, like there isn’t enough weight forward, like a gazelle trying to leap out of the reigns. I found myself struggling to put it in horse terms: If P0 were like a Quarter horse – strong, versatile, agile, durable – then P1 is like a stallion, it wants to race and be driven hard, yet it is responsive and gentle; truly as John put it earlier - a complete step-up. I no longer doubt the utility of the bike; it will make an excellent platform for the AF tests.
  • There are some issues to work out – other than the mud-slinging wheels. The X-Blade fenders are a pain in the rump and not worth putting up; I am well motivated to take the fenders off P0 and make them work on the new frame.
  • The gearing is too slow and low: P0 was using a ratio of 13:54 ≈ 1:4.154, whereas presently P1 is 11:44 = ¼ and wearing me out. I have a 48T chain ring but the derailleur is too short; work item.
  • There are no mirrors; the handlebar-end-mounting won’t work because the carbon-fiber type handlebars evidently get progressively narrower on the inside. A typical motorcycle mirror uses a 10mm screw whereas scooter mirrors are 8 mm. Not sure where I can put these though. My first though was to screw them straight into the Shimano Shifters; they have a 5mm screw that holds the assembly together right in the center, and that would make for optimum placement. Possibly work-item: 5mm Male to 8mm Female adapter.
  • I’m in the process of replacing the hacky ½-pedal torque arm with a modified heavy-gauge 5x5 angle bracket I snagged at Home Despot tonight. Actually I bought two; one for each side. There is security in having solid torque arms, don’t you think? :)

That’s me; done. Ready for dinner & a movie.
<Mmmm…> KF
 
Kingfish said:
AW, no harm done friend; I gots a tale to tell so pull up a stool and pour yerself a pint on me… :wink:
What, you didn't get wet enough on the ride? :p

[*]There are no mirrors; the handlebar-end-mounting won’t work because the carbon-fiber type handlebars evidently get progressively narrower on the inside. A typical motorcycle mirror uses a 10mm screw whereas scooter mirrors are 8 mm. Not sure where I can put these though. My first though was to screw them straight into the Shimano Shifters; they have a 5mm screw that holds the assembly together right in the center, and that would make for optimum placement. Possibly work-item: 5mm Male to 8mm Female adapter.
Depending on the space available, you might look at how I mounted the MC mirror on DGA, using part of an old seatpost clamp:
http://www.endless-sphere.com/forums/viewtopic.php?p=268272#p268272
http://www.endless-sphere.com/forums/download/file.php?id=38962
http://www.endless-sphere.com/forums/download/file.php?id=38963
http://www.endless-sphere.com/forums/download/file.php?id=38964
It has been problem-free since installation, except for being a bit in the way as I haven't gotten round to making the padded 1/2 grip on the bars that would keep the edge of my hand off of it. Without bar-ends on there it would be completely out of the way no matter what.

Oh, and here's what it looks like when painted to match the rest of DGA:
http://www.endless-sphere.com/forums/download/file.php?id=46136
http://www.endless-sphere.com/forums/download/file.php?id=46138
 
AW, those lights look way cool! 8)

Been a short while since I last posted an update so here it goes…
The Blacksmith’s hammer & anvil have not been silent, no. Like a Damascus Sword, the ideas have folded over and over again to forge a better beast from raw material and off-the-shelf product. In the past month there have been four prominent changes:

The faring is the one topic not yet covered and has been the last modification applied. The image below is how the battery bag & bike previously appeared.

P1-Rising6.jpg


Black & White Faring
This new frame has a slightly different triangle shape with wider tube members, especially the top tube which has a taper that is widest at the front and narrowing as it heads aft towards the seat post. Technically the distance between the steerer tube and seat post is farther away to accommodate the rear shock. Where P0 had an exposed cable running across the top tube, P1 has the opposite condition running along the bottom of the down tube. The problems with the battery bag were pretty much the same as with P0 before adding the faring:

  • It was wide enough to cause chafing of my winter trousers
  • The batteries were getting wet (although for a time during the sub-freezing weather this was less of an issue)
  • Excessive road splatter created a cleaning nightmare.
I knew it was unfinished; something had to be done, and I waited until an opportune weekend to do it. After stripping off the plastic bits and rope, the (formerly) top flap of each camelback bag was cut off, essentially slimming down the profile by nearly a ¼ inch per side. Next I added protective tubing to the bottom cable in precisely the same manner as with P0 using old Homebrewer’s spare tubing and Black Duct Tape. I also took the opportunity to restring the battery bag forward about 1.5 inches so that I could access the front shock air attachment for future adjustments. The image below displays this part of the story as completed and before the application of new faring materials.

P1-2011Jan0.jpg

Stripped, clean as a whistle...

I detest water spraying up onto my batteries. Borrowing material left over from the Epic Battery Bag Story, I took a large shingle of black 42 oz. Vinyl-coated Polyester and cut out matching Left & Right pieces that would cover the exterior, like flexible water-proof armor. Each side was uniquely fitted to completely cover the exposed front, bottom and sides, requiring minimalist sewing to create the conformity with three modest seams. Extra material was provided at the top where the halves met so that the two pieces could be sewn together. The remaining edges were punched and secured with grommets. Sturdy shock line was used to fasten it into place. Except for the bottom where fastened, the bags should now be well-protected from water. This heavy vinyl covering looks in the pictures as if having a diamond-plate pattern; that is in part deception upon the manufacturer for the reinforcing weave is heavy though the pattern is faux. It is tough stuff to punch through and does not easily rip or tear!

The next part of the armoring is the HDPE. The Black Vinyl does a great job at protection but I needed some bright color for better visibility. Yellow doesn’t look right on this bike, though White does. The covering is slightly smaller than what was used on P0, mainly due to geometry and best fit. Once trimmed up, it too was punched and secured with nylon line.

The last bit of HDPE took the most time. I used Black to create a better-fitting forward cowl and was able to keep it in one piece along the entire length of the bottom. The top of the cowling wraps over the top tube and is modestly secured with zippies whereas the the bottom uses Velcro. Funny stuff Velco; the forward section where it meets with the White plastic is stitched in place whereas the rear section is super-glued. I think if I had to do this again I’d forgo both methods and use Urethane instead. Regardless – there have not been any issues to report; the faring assembly fits flush and is quite aerodynamic: it feels like I’ve picked up another mph in the slipstream as wind rolls right over it.

The final addition to the faring is the 1-inch wide Reflective Striping. For some reason I only had a yard of this stuff so I put one along the trailing edge of the White faring to visually mask the overlay, and the remainder went on the front faring. It’s very reflective in all lighting conditions. The sticky-back is likewise very grippy even on Polyethylene.

Catwalk Gallery: Take a bow. Apologies for the filth – it is winter and I do ride the bike nearly every day.

P1-2011Jan1.jpg


P1-2011Jan2.jpg


P1-2011Jan3.jpg


Stop back soon: More mods are in the queue. :wink:
WOT, KF
 
Oh time to update this project! The last picture posted was the FWD version that was used during the Winter and Spring of 2011. In May, I began the redesign and construction of a Push me–Pull you FWD eBike and pusher Trailer in preparation for my next road trip to California. Below are pictures of that assembly prior to launch.

P1-Mods.2011.2.jpg

FWD eBike with two controllers to support the pusher-trailer when attached. This version is technically labeled P3 because I have completely rewired the whole bike from end-to-end with new handlebar controls, new motors, new 12-FET controllers, indicator signal lights, active taillight, integrated eBrake & Stop light, two CAs, and trailer cabling interface. All battery-operated components run from one battery, and use the DC-DC converter to power the auxiliaries. I also employed a key-lock switch to completely disconnect the electrical power. In addition, I replaced the Meanwell S/SP units for bulk-charging with the faster HRP-600 Series which required zero-modification. New hardware included disc brakes, custom torque arms, and a new Brooke’s saddle.

Later I swapped out the chainrings, crank, and bottom bracket for a Campagnolo 53-39-30 Road Racing chainring & crank, a Phil Wood BB, and a Campagnolo Braze-on Derailleur. In order to mount the derailleur I designed a custom MtB Braze-on adapter. This provided an available gear ratio as high as 53-11. The views below include this modification and are taken just before my first (false) start on my journey to California.

P1&P2-1.jpg

Top View: Note that the right pannier is not mounted (cos I have the camera out).

P1&P2-0.jpg

Rear ¾ view. In 2011 I changed out my Ortlieb panniers from yellow to black to match the B&W theme.

Alas – there were problems with the pusher-trailer, namely the framework twisted axially and created an extremely unpleasant situation above 5 mph. This configuration was therefore abandoned. However – I was able to keep the pulse alive on the road trip by removing the hub motor from the trailer and mounted it instead onto the eBike, creating a 2WD in the process. The trailer frame was stiffened by injecting foam into the tubing (this is all covered in the trailer thread). After a couple of weeks or reintegration and bug-solving the assembly was ready again and I launched a successful road trip to California and back as a 2WD eBike pulling a traditional trailer covering 2500 miles over 28 days. This eBike configuration I label as P4 because I had to make and hardware wiring changes that were unique and specific to the activity. The design continued to evolve On the Road as I resolved persistent nagging issues one-by-one. Below are pictures of this assembly from the road. Each motor has 2 hp programmed into the associated controller.

P1&P2.Spanaway.jpg

July 26th, 2011 - Spanaway, WA: First day on the road to California. Look how spiffy it was! Difficult to believe I am hauling 100 lbs. of LiPo.

Changes include the addition of fenders front and rear, rear torque arms, rear freehub was replaced with a hub motor with an 8-speed freewheel. The front wheel is 26 inches using the Mavic EX 729 Disc rim, the rear and trailer wheels are 24 inches using the Kris Holm Unicycle rims. All tires are 2.5 inch wide Hookworms. The Harley-Davidson tool bag is mounted over the rear tire, although I moved it over the saddlebags a couple of days later to reduce the handling problems and wobble: The rear suspension can’t take a lot of weight mounted above the axles.

PacificPride-Longview1.jpg

This is picture of the assembly just before I crossed the Columbia back into Washington after 27 days On the Road. The rear fender was a pesky biotch the whole way cos the bike frame was not designed to support fenders. The modification I created split the fender into two parts: Rear over the tire, and a short front splash-guard which protected the linkage and front derailleur. When the suspension would pivot in the extreme, the rear tire would crash into it and make a horrible grating sound; most annoying. Eventually I had to remove the front section and that eliminated 80% of THAT problem, although there were many other issues with the rear suspension et al. Though essentially useless, the aerobars made the bike look even more badass and were a convenient place to hang my helmet :lol:

BremertonFerry3.jpg

August 22nd, 2011 - Bremerton-Seattle Ferry crossing over the Puget Sound. Regardless of the pesky issues, this design worked very well. Although I had one flat tire, there were no show-stopping failures; lots of mods – yes, lots of tinkering – sure, just no failures. :wink:

At present I have the trailer disconnected and the Ebike is used for commuting. It will do 42 mph on a flat, although I prefer to ride at 32 mph.

Cheers, KF
 
*edited* Nevermind, I found your information in other thread. I am going ask my girlfriend do the custom sewing 2 of the backpack together as saddle bag.

:D
 
COOL! Do you have any pics of the trip? What kind of power consumption were you seeing? 100# of LiPo?! How many AH total was that and what kind of range did you get? Sounds like a fun ride! Wish I could take a month long vacation and not loose my job! LOL!
 
Kingfish said:
Fenders, both F&R are X-Blade, purchased from REI. I saw an interesting set over at another bike shop, might have been the Specialized dealer (yeah, it was cos I had to fetch the Specialized Rim Tape) they were made by Topeak.

The part that I don't like about mine is that they are not straight and true: There is a noticeable twist from front to rear like they didn't make the mold properly and when the plastic was released it still had pliability to it and cooled with a contorted twist. If you're mudding it won't matter.

I would see if you could get one mounted before you buy it to see how it looks if looks bother you (like they do me) :roll: :)

Cheers, KF

I have the same front fender on my bike and it is also twisted somewhat. I wanted to relay that I once left my bike sitting out in the sun all day long. When I got to the bike, the X-Blade fender was completely warped and distorted and looked more like roadkill. I took it off the bike and thought it was destined for the recycling bin. However, after a few hours in the shade, it returned back to it's original shape! Leave it out in the sun for a while and see if it will "undistort!" :shock:

Ambrose
 
Last time, When KF visited in San Francisco, I was surprised KF mentioned, and He carried 130Ah total of the LiPo on his touring ebike! Here the picture in other thread about his longest trip (Washington state to California then return Washington state. viewtopic.php?f=1&t=28573

Whiplash said:
COOL! Do you have any pics of the trip? What kind of power consumption were you seeing? 100# of LiPo?! How many AH total was that and what kind of range did you get? Sounds like a fun ride! Wish I could take a month long vacation and not loose my job! LOL!
 
ambroseliao said:
Kingfish said:
Fenders, both F&R are X-Blade, purchased from REI. I saw an interesting set over at another bike shop, might have been the Specialized dealer (yeah, it was cos I had to fetch the Specialized Rim Tape) they were made by Topeak.

The part that I don't like about mine is that they are not straight and true: There is a noticeable twist from front to rear like they didn't make the mold properly and when the plastic was released it still had pliability to it and cooled with a contorted twist. If you're mudding it won't matter.

I would see if you could get one mounted before you buy it to see how it looks if looks bother you (like they do me) :roll: :)

Cheers, KF

I have the same front fender on my bike and it is also twisted somewhat. I wanted to relay that I once left my bike sitting out in the sun all day long. When I got to the bike, the X-Blade fender was completely warped and distorted and looked more like roadkill. I took it off the bike and thought it was destined for the recycling bin. However, after a few hours in the shade, it returned back to it's original shape! Leave it out in the sun for a while and see if it will "undistort!" :shock:

Ambrose
All plastic fenders have a slight bothersome twist to them. The Aluminum plated with CF have the least twist. For my most recent build, I was quite happy with the Electra Alloy Balloon Townie Fender Set; the Front was mounted on the front of the eBike and the Rear on the trailer; the Rear was too wide though for the rear of the eBike frame.

choot said:
Last time, When KF visited in San Francisco, I was surprised KF mentioned, and He carried 130Ah total of the LiPo on his touring ebike! Here the picture in other thread about his longest trip (Washington state to California then return Washington state. viewtopic.php?f=1&t=28573
Link is Correct; also in my sig :)

Best, KF
 
Upgrades between November 2011 and September 2012

Greetings –

I haven’t posted on this thread in some time, and yet what I have done to this ebike in the past few months is shy of a complete new build, and it's tempting to call it P1-Mark II or something of that sort. Anyways, it’s the night before I finish the assembly and put the fairings back on, so I thought I’d spend a little time and talk about what’s new under the covers – which pictures and stories. Briefly, I have listed the items that I have modified, reworked, repaired, upgraded, investigated, or otherwise reviewed below. The most significant changes are in larger text.

  • Hub motors:
    • RUST R&R, varnished, vented, new seals and bearings. Done.
    • RH Phase Wire through Axle upgraded to 12-AWG, and replaced damaged HE sensors. Done.
    • Correct Controller/Phase/Halls wiring for 2WD:
      With typical Infineon-based/clone Controller = A-B-C,
      Using 9C 28XX Series F & R Hub Motors having Left (RH) & Right (FH) exits,
      And corresponding Hall Effect Sensors,
      The best performing relationships are (color agnostic):
      • FH: C->M, A-A B-B C-C & C->H, A-B B-C C-A
      • RH: C->M, A-A B-C C-B & C->H, A-A B-C C-B
      • The relationships can be swapped for C & H, so long as the pattern is preserved.
  • Battery Harness completely reengineered: The primary goals were achieved for the Commuter pack although some details remain for the secondary packs.
  • Controller Signal Harness redesigned. Initially this was to resolve missing regen on the RH:
    • -EBS apparently only goes to GND on one controller. One idea was to explore putting a diode in-line, and a plan was made to do just that – however upon inspection of the PCB, a diode is already in place. The next probable cause was poor GND quality. Thus the rework attempts to move GND dependencies from the Controllers and instead use direct GND from the battery pack; reduce the length of wire and upgrade wire gauge.
    • This rework also includes the incorporation of the PCI Express 8-Pin Extension Cable; a more robust connector interface between shared functionality and the Dashboard. In this concept, there is no Master-Slave; both controllers are essentially identical with exception to Power: FH is de-rated by 20% to prevent spinout at the starting line.
    • The entire dashboard wiring & Black Box has been simplified.
    • +5V is now shared for Throttle; there is a diode in-line on the PCB, and we do not foresee a problem with two sharing the miniscule load created by the Throttle.
    • Except Throttle, all connectors have been replaced/upgraded with more robust quality.
    • All signal wires are now minimum 18-AWG.
    • All harnesses are now sheathed in Nylon-Braid Expando Cable Sleeves for protection, natural lubricity in a dynamic environment, and for consistent appearance.
    • The L/R Signal & Headlamp Dashboard Control also has a horn button; however the wires were overtly unattached to the connector. We anticipate the employment of a small light horn in the future; therefore the dashboard control is now wired to support the accessory when it is acquired.
  • FH Controller Current Mod (was Master) Evidently I missed upgrading the traces, so these were beefed with 10-AWG twisted wire.
  • HE Throttle was replaced following the accidental short of the RH Controller during testing; more below. Added two plug types to accept both EBikes.ca and Lyen/Molex type connections.
  • RH Controller Replaced (was Slave) and upgraded to match FH Controller. Lyen calls this a Version 2 (MII) controller. There were slight changes noticed. I took the opportunity to match both controllers with identical Capacitor upgrades, trace-beefing, and wiring. RH does not have the R12 mod because of the impending Prototype project described below.
  • Move RH controller to Left/Port, and reverse for FH. The Phase wiring may need to be shortened. This change eliminates all wiring passing through the fulcrum of the rear suspension.
  • R12 Progressive Brake & Regen Mod investigated. Parts were ordered/received for the first prototype board. Construction is in progress. The new Controller Signal Harness has a new pigtail incorporated to facilitate attachment of the prototype directly behind the fairing for easy access, measurements, and adjustments.
  • High-Powered LED Headlights Upgrade - Bust:
    • The idea was to swap out the 5-way flashlight for Single-Mode due to flakey circuitry: Hit a bump and the lights would change mode.
    • Problems with supplier and replacement product: DinoDirect took approximately 33 days to ship product. When the units arrived, they were much smaller than anticipated, and unfortunately cannot be parted out; they are 100% incompatible with original lights.
    • However, it was also determined that the flakey nature of the lights could be from the poor quality of the power connection. The automobile-style bullet connectors were replaced with recycled APP connectors. Given the low current and high stability of the fairing – we think the problem – at least with connection quality has been resolved.
  • Bar-End Handlebar extensions (replaces Aerobars). Reoriented LED headlights to allow for closer spacing. This arraignment conflicts with the two CAs; see below.
  • Unified CAs. Removed mounting hardware from RH CA and glued the top frame surface to the bottom frame surface of the FH CA. The two units now tilt/toggle together, and are more closely organized for better viewing. The new alignment better affects placement of the LED Headlights, and provides more room for the Handlebar extensions.
  • Handlebar Hardware, Controls, & Instruments: Because the previous-style Aerobars were removed, there is room to reorient the LED Headlights: The mounting hardware was reversed and trimmed to extend the lights more forward on the handlebar, thus freeing up space directly behind them which in turn allows the newly unified CAs to angle for better viewing. Without this hardware mod, the CAs couldn’t have been joined. Mild trims were made to the Front Fairing to accommodate new instrument positions with the fit more snugly improved.
Present Status:
  • The electricals are finished: New Battery Harness, Controller instrumentations, and DOT Indicators and subsystems are mounted and tied down.
  • The motors have been mounted and tested. The disc rotors have been trued up and brakes adjusted. Tires are pressurized for touring. Both shocks are topped off.
  • The Commuter Pack has been laid upon the bike and charge topped off, but is not yet tied down.
  • The front and side fairings will be added next. By the time I got to mounting the batteries is was already close to 5 PM and I know it would be dark before the task could be completed, so we shall finish this last bit of construction in the AM and perform some test rides before moving on to the Prototype Brake/Regen project.

Links and briefs and pics to related stories will be listed shortly. :)

More in a bit, KF
 
Continuing...

This ebike went down for the count in November of 2011 when the RWD stopped working, and followed about two weeks later by the FWD. Second to that, I somehow managed to injure myself sitting cross-legged on the sofa playing a marathon round of XBox: Quadriceps Tendonitis was what the Doc said. I couldn’t stand to put any pressure on my knee, so working on the bike was out of the question for several weeks until things calmed down. Finally about mid-winter I was able to attack the hub problem.

Highlights of activity below.

RUST: DIY Hub Motor Repair & Restoration
Short story: Rust was removed, hub covers vented to eliminate pressure differentials that introduced moisture. The mods now allows for any moisture to weep out, and in combination with new varnish coat over the stators the chance for future rust is greatly reduced. Hub wires were upgraded on the RH to match the FH; both now 12-AWG:

  • From the 2011 Road Trip, the rear phase wires became hot and partly melted through the plastic sheath covering the individual wires, though not quite through the wire insulation. Still, there was some unforeseen wear and shorting that contributed to several pesky drive problems with the slaved Rear Controller & Hub. This was a must-fix.
These repairs took time, and seemed the correct action to take, however – either the rust or the repair process appears to have reduced the efficiency of the motors and they no longer perform at rated power (I need to test this to be sure but the freewheel test suggests so). The RH incurred phase wire damage from testing, and is in risk of failure; for now we are keeping an eye on the problem while we sort out a good fix… something like an armored elbow – like a two-piece cable gland (but they don’t make those).

Battery Harness:
The next big mod to the bike factored in my continued frustration with Anderson Power Poles, and I decided to replace the entire lot with regards to power distribution. The APPs are acceptable for the Phase connections; with contacts removed from the plastic case, they are the only connectors I know that can slither out from the nut, washer, and hub cover. All APPs between the Batteries and the physical controllers were replaced using EC5, HXT 4mm and XTS150 6mm Barrel Connectors. Previously the Main Harness was a kludge of 10- and 8AWG. No more: The Main Harness, the Utility Harness, and Trailer Harness are now all multi-strand Marine-Grade 6-AWG. All connections to batteries are via 8-AWG links, using EC5 connections. The Harnesses themselves are interconnected using the XTS150 6mm connections, and there is one HTX 4mm connector that uses 10-AWG wire to mate with the DC-DC Converter which supplies 60W of 12V & 3.3V power to the bike accessories and lighting. The 8-AWG links are mechanically swaged onto the 6-AWG harness using a Hydraulic Crimp Tool. The swages are actually 0.03 thick wall copper tubing; it’s stronger, faster to assemble, and more conductive than the tedious solder methods I have previously employed. The weight of the harness is about 3X of the original, and yet, I am certain that the resistance of the new harness is likely 10X less. My hope is that this will end the voltage sag issues that I’ve been experiencing when On The Road.

P1-NewBatteryHarness.jpg

On the Left, the old nasty kludge of 10- and 8-AWG. On the Right, the rebuilt robust & streamlined Battery Bus.

There’s a second part to this mod in that each battery unit consists of a small assembly of three 5S batteries connected in series to make 15S. These “units” are then connected in parallel as assembled packs, and they connect to the Harness via the newly minted 8-AWG wires. The wires that connect the units together I call “collectors” for lack of a better term. The wire gauge from the batteries has been 12-AWG, although somewhere in the last year or two of production Zippy FlightMax changed to 10-AWG. For whatever reason, all my collector wires are 12-AWG and they are unified into a 10-AWG wire which connects to the harness. All of these collector-unions are this way; the physical union is wire-wrapped together and soldered, then covered with heatshrink in an incredibly long and tedious and laborious process. I need to change these all out to have the maximum benefit of the new harness as: 10-AWG silicone wire collectors into swaged 8-AWG unions: Altogether a work item of 28 collectors and 8 unions. Doesn’t need to happen right now, but certainly could be a rainy day project.

The Battery Harness is part of a larger system for the entire ebike and designed to serve me for cross-country. Below is the master EBike & Trailer Wiring Diagram for Main Power. (Apologies for the large picture.) I like drawing up my ideas and refer to them frequently during construction.

TrailerWiringDiagram.png

It can be viewed separately here...

Front Controller Current Mod:
For some reason I had not completed this mod before heading out last summer. The FWD never had issues; it was the Rear that would drop out during the most extreme loading. Very odd. Anyways, this mod was completed using 10-AWG stranded copper wire on the power and phase traces. The battery wires were upgraded to the same 10-AWG, although the phase wires remained 12-AWG: The FH is down-rated slightly from the RH by about 20% to prevent the front wheel from spinning during inclement weather.

P1-FH-12FETController.jpg

Shiny Happy PCB

More in a bit, KF
 
Back
Top