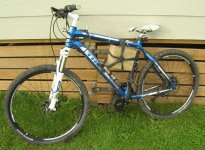
Trek 4300 Disk BBS01 build

BeaNZ

100 µW
Joined
Apr 29, 2014
Messages
7
Location
New Zealand, Wairarapa
Hi Everyone,
First build
I found ES a couple of months ago (which has helped me a lot) and finally found time to sign up. Here we go.

Before:
Treek-4300.jpg

(Picture off the internet)

After:
4300 After 1.JPG
file.php

I need to add some more links to the chain to accommodate the new sprocket

Spending:
-bike second hand (hardly used) for $500NZD
-Bafang BBS01 250W motor about $440USD off Aliexpress.com
-Battery pack samsung ICR18650-26F 2600mAh 10S7P 18.2Ah @ 36V (haven't tested yet) $250USD of batteries
So less than $1500NZD ($1280USD) :D

This will be my commute to school and work (12km) from now on. Old Road bike is made redundant. Woohoo :mrgreen:

Bike weighs 22kg now.
Battery pack: 4kg
Motor: 4-5kg
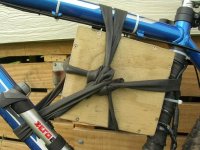
Inner tube battery pack.JPG
Using old inner tubes is just a mock up at this stage. It works pretty well as long as it's not too bumpy. Notice the ripped tube in the bottom right on the seat post tube (from bouncing around in the paddock). :wink:
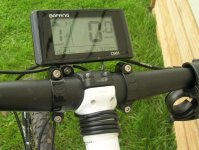
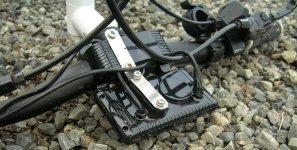
Display Top.JPGDisplay Bottom.JPG
The display stuck up too much when I put my bike upside down. It's a lot nicer now. (about 15mm ground clearance now)

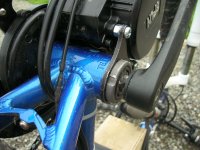
file.php

DSCN7270.JPG
Unfortunately my bb was 73mm rather than 68mm so I added spacers, but there is another nut that goes on the end which doesn't fit now, so it becomes a bit loose every so often :(. Anyone got any bright ideas? It also doesn't quite fit snug up to the bar because it's a fatter bar.
I had to add 150mm of wire to the speed sensor to make it fit.
When I am in the lowest gear and I spin the rear wheel backwards (making the pedals turn backwards) it derails the front sprocket. A bit annoying but it only happens in first gear. Not very obtrusive. It may go away once I've added some more links into the chain.

Altogether I'm quite impressed with the BBS01. I've been learning to wheely 8) (On 250W I know).
I'll post some more pics & info on the battery pack once I've charged the camera (if only everything ran on 18650s :roll: )
 
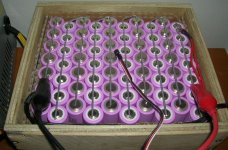
Ok, for the batteries. I was inspired by Snath's no solder/weld 18650 build so I decided I'd try magnets :idea: . here's how it looks:

Bottom
View attachment 2

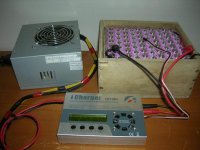
Top (charging)
Batteries top magnet charging.JPG

I bought the neodymium magnets off fasttech.com. At first I was going to use sheet steel but it was too rigid and there would be a couple of batteries not making contact. so I used wire. It is not perfect but it's more flexible than sheet steel. I just use cardboard to pack it in which works alright. I had to add in a couple more slices as it compacted. The wooden box is just a quick mock up and not intended to be permanent. The magnets hold their position well on the road but for anything off-road or bumpy they tend to shift slightly. I haven't got balance leads in yet either. Nor have I got a BMS...
:!: This is only a temporary battery pack. I'm no going to use this long term :!:
I recommend this only for prototyping.

Specs:
10S7P
18.2Ah@36V
700Wh...ish
Samsung 2600mAh 18650cells

Charging.JPG
I'm using the iCharger 1010B+ and I love it. I converted an old 450W ATX PSU which has worked a charm.

Eventually I want to have the charger and PSU all incorporated onto the bike. Maybe with an ITX PSU or similar. With a decent BMS probably...

Tell me what you think, I'm keen for some constructive criticism :wink:
 
Hi Cabledawg,

I had to buy another connector for my battery pack and solder that on to the motor end as well because I was making my own, I'm not sure if they are a standard connector as I don't have a lipo to plug in and try. I used a T-connector variety because that is what the local store had.

You'll need to remove the whole BB (Bottom Bracket) crank assembly. It should come out pretty easily as one unit. Though you'll need a crank puller tool and a spindle wrench or similar to get that out. Your local bike store will have them, If you're not intending to do any more BB removals/replacements then you should probably borrow them. They are quite specialized tools so you'll probably never use them for anything else, and they're not cheap either :roll: There's plenty of info on this online.

The kit doesn't come with instructions but is pretty straight-forward. You can hardly go wrong :wink:
There's always this youtube video if you get stuck.

Other than that I didn't really need anything else... Some wire to lengthen the speedo sensor may be needed. I was pretty impressed by how straight forward this all was. I think for my next build I'll experiment a bit more. Oh yeah you may want to add a few more links to your chain because of the enlarged front sprocket so you'll need a chain break tool and spare chain for that, otherwise ask the people at the bike shop really nicely. :D

I can't find it now, but there are a couple of pdf files with general info in them from the manufacturer. I'll post them when I find them.

That's all for now.

P.S are the images in the first 2 posts displaying properly, They aren't at my friend's house but are here :?

EDIT: Here are the manuals for the display and the motor itself:
https://onedrive.live.com/?cid=9208...!5064&ithint=folder,&authkey=!ANVVfvQeIRwB9Lo
 
Ok I think I fixed the images. Shame there's no way to display larger images the same as smaller ones. but I just use tags then attachment tags after...
 
BeaNZ said:
Oh yeah you may want to add a few more links to your chain because of the enlarged front sprocket so you'll need a chain break tool and spare chain for that, otherwise ask the people at the bike shop really nicely. :D
Yeah I noticed the large crank sprocket in the after upgrade picture. Is it a 48t? Did you include that in your total costs or did you pull it off an old bike? What one did you use?

I love your magnets battery build concept! Jeez talk about thinking outside the box. If you are getting your ideas from some weird piece of robot junk found in a warehouse giving you new ideas and direction, things you never ordinarily would of thought of then we might have to kill you, you know... to save the world. :|
 
The sprocket I am pretty sure is 48T (I haven't got my bike with me at the moment). It comes with the kit. I haven't extended the chain yet, I'll post a picture when I can of the dérailleur stretched out fully in the lowest gear. I was quite fortunate with this bike to have quite a good range of sprockets on the rear (I have yet to count them :| , and the pre-conversion front sprockets). My dad's got a chain break tool, so it won't really cost me anything to do. I might zip down to the bike store and ask them if they have some spare chain I could have. :D

I have to say the magnets are no good for going over jumps and such. but I've been using them for a week or so now on the road, with potholes and such and it's just fine for those. They haven't shifted when I opened the pack up again. I don't want to keep it like this though, because I know some cells are taking less load than others (needs more compression, lots more compression, or more flexible wires). The problem is that the wire is quite rigid and the magnets stick stronger to the wire without the wire bending to the cells :( . I need to find out how to make/who has a tab spot welder.

TheBeastie said:
we might have to kill you, you know... to save the world.
My plans to dominate the battery industry can never be thwarted in peaceful New Zealand. :twisted: Even though there isn't really a battery industry in New Zealand. :|
 
Back
Top