Looking good in chrome

Modbikemax

1 kW
Joined
Jul 15, 2014
Messages
453
Location
Perth Western Australia
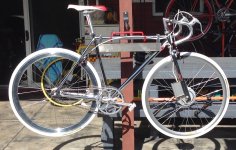
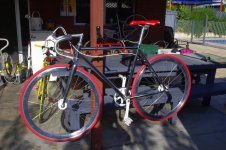
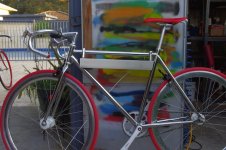
I've always wanted a chrome bike, how about a chrome ebike?
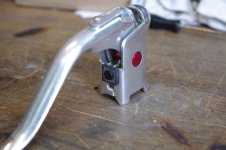
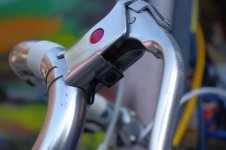
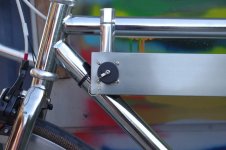
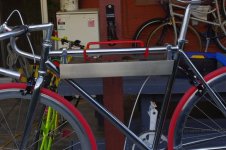
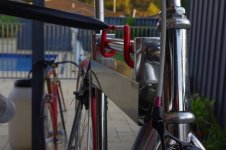
I found some motorcycle riser clamps which are the same diameter as the top tube on my chrome frame bike.
Ah ha the ideal way to mount a battery box.
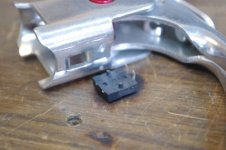
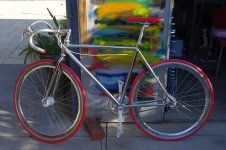
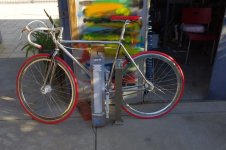
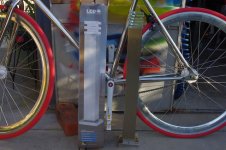
The next problem is the battery box itself. It has to look good so no plastic boxes would do.
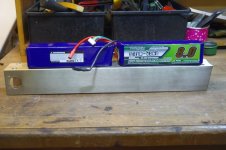
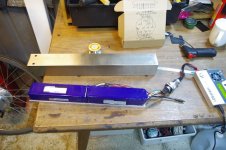
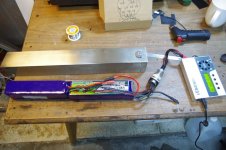
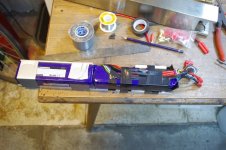
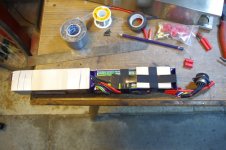
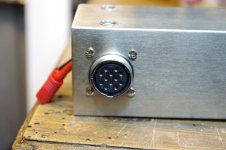
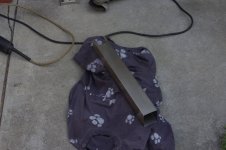
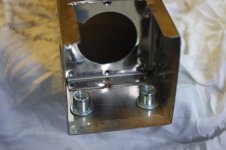
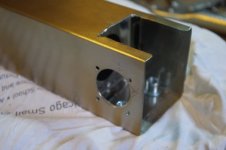
Ali tube in 50x50mm is too small for most lipo batteries with enough capacity. I found the perfect thing at the local hardware, a bollard garden light with a 60x60mm stainless tube base.
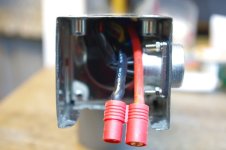
Perfect for the 2x Turnigy 5s 8AH packs.
So the build begins:
 

Attachments

  • silver 1.jpg
    silver 1.jpg
    70.2 KB · Views: 1,887
  • silver 2.jpg
    silver 2.jpg
    61.1 KB · Views: 1,887
  • silver 3.jpg
    silver 3.jpg
    54.9 KB · Views: 1,887
  • silver 4.jpg
    silver 4.jpg
    62.1 KB · Views: 1,887
  • silver 6.jpg
    silver 6.jpg
    42.9 KB · Views: 1,887
  • silver 7.jpg
    silver 7.jpg
    61.5 KB · Views: 1,887
  • silver 8.jpg
    silver 8.jpg
    46.7 KB · Views: 1,887
  • silver 9.jpg
    silver 9.jpg
    65.4 KB · Views: 1,887
  • silver 11.jpg
    silver 11.jpg
    60.2 KB · Views: 1,887
Raining day today so did a bit more.
Added a balance charge port and some riv nuts.
 

Attachments

  • silver 12.jpg
    silver 12.jpg
    35.7 KB · Views: 1,837
  • silver 13.jpg
    silver 13.jpg
    31.6 KB · Views: 1,837
  • silver 14.jpg
    silver 14.jpg
    29.8 KB · Views: 1,837
I am blinded, that is sirious bike pornography :) Thumbs up for riv nuts, got me self the tool just a few days ago. It is a beautiful, beautiful bike and the color frame match is very sexy. Just keep going same direction
 
This is a nice example of a clean minimalist build. Subscribed!
 
I'm also impressed by the look you've achieved so far, and looking forward to the finished project! Where did you get the two billet aluminum tube clamps?

edit: to cal3thousand in the post below: Thanks!...$15? Daaaaamn...

file.php
 
Oz ebay
http://www.ebay.com.au/itm/271580898300?ssPageName=STRK:MEWNX:IT&_trksid=p3984.m1439.l2649

It was a bit of luck the top tube is 1 1/8 inch, none of my other bikes have the same top tube.
If you search ebay there are a range of clamps for mirrors, motorised bike engine clamps, pipe clamps, water bottle clamps etc.
Sometimes a project starts with something as simple as a clamp and grows from there. I spied the LED light bollard a few months ago after building my last bike so I filed that away for future reference. When I found the clamps it came together.
More evolution than design. :wink:
 
Batteries arrived this week. Mounted on an ali base and balance plug fitted.
 

Attachments

  • silver battery 1a.jpg
    silver battery 1a.jpg
    51.1 KB · Views: 1,565
  • silver battery 1.jpg
    silver battery 1.jpg
    62.2 KB · Views: 1,565
  • silver battery 2.jpg
    silver battery 2.jpg
    60.7 KB · Views: 1,565
  • silver battery 3.jpg
    silver battery 3.jpg
    35.5 KB · Views: 1,565
More work on the battery tonight.
I used that blue heat shrink typically used on battery packs for the first time. Its amazing stuff. not like regular heat shrink at all.
Shrinks with minimal heat and fast. Just have to watch you dont over do it or it rips.
 

Attachments

  • silver battery 1 a.jpg
    silver battery 1 a.jpg
    60.3 KB · Views: 1,508
  • silver battery 2 a.jpg
    silver battery 2 a.jpg
    56.5 KB · Views: 1,508
  • silver battery 5 a.jpg
    silver battery 5 a.jpg
    35.7 KB · Views: 1,508
  • silver battery 6 a.jpg
    silver battery 6 a.jpg
    32.1 KB · Views: 1,508
  • silver battery 8 a.jpg
    silver battery 8 a.jpg
    43.6 KB · Views: 1,508
Have got it running but not finished. I will spend more time on detail and the controller will be much smaller and discrete. Cabling is temporary to test out the throttle.
I fitted a tactile push button switch for the throttle, on off, to the underside of the brake lever so I can easily reach it fro top or bottom.
I want to make it invisible so the cable will be routed through the bars when testing is complete.
So far it works quite well.
 

Attachments

  • silver brake 1.jpg
    silver brake 1.jpg
    41 KB · Views: 1,439
  • silver brake 2.jpg
    silver brake 2.jpg
    41 KB · Views: 1,439
  • silver brake 5.jpg
    silver brake 5.jpg
    37.8 KB · Views: 1,439
  • silver brake 7.jpg
    silver brake 7.jpg
    47.7 KB · Views: 1,439
  • silver 600 crank.jpg
    silver 600 crank.jpg
    56.3 KB · Views: 1,439
I ditched the rubbish kenda tyres and got some new maxis. They didn't have red so i settled on some white ones.

I also re did the bracket for the controller, it is a stainless steel kitchen draw handle from the local hardware.
I think it looks a bit chunky but my daughter, the arty one, said it looked ok.
I tried to tidy up the wiring as much as possible and went for a Hobby king socket on top of the controller.
I'm not sure I like it but it will do for now.
It all looks simple but there are hours of messing around to get it to this stage.
 

Attachments

  • image.jpg
    image.jpg
    190.1 KB · Views: 1,272
  • image.jpg
    image.jpg
    148.4 KB · Views: 1,272
Back
Top