Miles' 90mm inrunner build thread

madin88 said:
very nice motor!

what about a venting system with air intake on one side blowing through the stator / windings and outtake the hot air on the other side?
I think this would enhance the cooling performance..
Thanks madin.

I thought that cooling the endturns of the windings would probably be more effective than trying to force a flow through the air-gap. I'll probably pot the windings inside the core, for maximum conduction. The idea is to have one core design which can be used with a sealed case or with a vented case and fans.

If I wanted to vent axially through the motor, I think I would add an external fan unit onto the case. This would increase the overall length, of course, which I didn't want to do with this version.

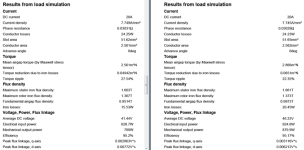
Hopefully, I'll only need to dissipate about 50 Watts to meet the Motor Challenge... :)
 
Miles said:
Ventilation system added.

One fan at each end.


that design was "community made" , in Guzzi they found out this thermal issue during the fist tests , and since the chief designer was taliking about it in the "new motor building" thread I suggested the improvement and later they invited me in the factory to see it made because it solved the problem well.


BTW if you want to save even more space you can use conical head screw to hold the cover to the body , I think you can gain one extra mm or even more on motor diameter by collapsing the screw head inside
VITE_TESTA_SVASA_4d641e104b744.jpg
 
What an interesting experience!

The screws don't protrude beyond the case diameter on a plane tangent to the case at the mid point between them. Aligning the cases correctly avoids any conflicts. Case wall is only 2mm, so probably a bit thin for countersunk M4.
 
Is design intent to use a flat ribbon winding? I love your cooling fans, if you used a flat ribbon and spaced the end-turn gaps to have say 0.5mm gaps between each overlaying point you could lower the Rth between the windings and the air rushing by them.

Those fans look extremely potent IMHO. You may find your no-load increases substantially driving them, but at least if anything is gonna raise no-load, you would want it to be cooling. :)
 
Hi Luke,

No, I don't think it would be practical to use flat strip with this design. I'll make sure to spread the wires out a bit, though...

If the fans are too effective, I can always drill a few holes in the blades :)
 
I've also been working on a 24t 20p version. It's meant a change to "bread loaf" pairs, rather than rectangular magnets, because of the increased pole width. My magnet retention system precludes circumferential magnet segmentation. I'll use axial segmentation to reduce magnet losses.

Anyway, 500Hz is a bit more reasonable :)
 
Better by the day, Miles! Congrats!

3D printing the fans?

Why not angled or curve blades?

Some suggestions:
Vent-section.png
Better "cooling" flow, sorry...
 
Thanks Hotrod!
h0tr0d said:
Why not angled or curve blades?
Because the motor has to work in both directions :wink:

Sure, I can drill more holes in the case, if necessary. The ones on the edge have the least effect on case rigidity, though.

I don't think that holes through the fan base, into the centre of the rotor, will do very much.

Yes, the fan is an ideal candidate for 3D printing and a good excuse for me to try it out :D
 
Miles said:
Sure, I can drill more holes in the case, if necessary. The ones on the edge have the least effect on case rigidity, though.

Not more holes, just move them. The place you've put them is the best possible for air flow, my suggestion is better for cooling because it force the air around the end coils and also helps to cool the iron a bit. Small improvement yes, but we can afford it, still on the design stage and same final cost.
For torsion I don't much difference in rigidity but if you've done the sims, I rest my case.

I don't think that holes through the fan base, into the centre of the rotor, will do very much.

Well, inrunners tend to heat the magnets quite nicely, one reason Astro uses samarium cobalt magnets... Also thinking of hub motors with drilled covers, but no blades (no centrifugal forces), the result in cooling is very significant . In this case, if you have the opportunity, take it and put the holes in the fan. :wink:

Miles said:
Yes, the fan is an ideal candidate for 3D printing and a good excuse for me to try it out :D
Send me fan part ou post it (Solidworks, right?) let me help. I've learned much from you, time to give back a bit. :D
 
h0tr0d said:
Not more holes, just move them. The place you've put them is the best possible for air flow, my suggestion is better for cooling because it force the air around the end coils and also helps to cool the iron a bit. Small improvement yes, but we can afford it, still on the design stage and same final cost.
Sorry, I misread your comment :oops:

That's possible. In practice, I think that almost the whole of that area will be filled with copper, one way or the other. I haven't modeled all the links between the phase groups, for a start.... Anyway, I'll think about that. Thanks.
 
h0tr0d said:
Send me fan part ou post it (Solidworks, right?) let me help. I've learned much from you, time to give back a bit. :D
Thanks for the offer! No, I use Alibre (or Geomagic Design, as it's now called). I can export as a STEP file? Or, convert directly to STL.
 
[pre]. 24t 28p 24t 20p 24t 20p
Mean airgap torque 3.563Nm 3.452Nm 3.438Nm
Torque ripple 2.275% 4.037% 1.8%
Max. flux density 2.054T 2.034T 1.751T
Airgap flux density 1.206T 1.211T 0.9514T
Iron losses 21.16W 18.49W 14.66W
Efficiency 95.91% 95.79% 95.22%[/pre]


As the 24t 28p is likely to have greater magnet losses, I'd call that even........
 
Interesting. So you made a two versions of the 24t 20p, one of them with a lower air gap flux?
What's the difference between them?
 
bearing said:
Interesting. So you made a two versions of the 24t 20p, one of them with a lower air gap flux?
What's the difference between them?

The reason for that is:
When I increased the flux density of the 24t 20p design beyond a certain point, I started to get 3rd harmonic content. It didn't seem to matter if I increased magnet strength, reduced airgap width or narrowed the width of the teeth. I'm not sure why this is.

Anyway, the third column is the B-EMF optimised version and the second column is for a version which was configured to give exactly the same stator flux density as the 24t 28p design. You can see the difference in the torque ripple....

Both 24t 20p versions have identical stators, the difference is in the magnet strength and airgap width [N45; 0.6mm versus N35; 1mm]. The only difference between the 24t 28p stator and the 24t 20p stator is that the yoke on the 20p one is 0.2mm deeper.
 
The "lower flux" version of the 24t 20p gives quite a useful band of output power:
88% Eta for 100 Watts, 95% for 1000 Watts.
Peak Eta is 95.9% at 750 Watts output.
All at 3000 rpm.
 
Miles said:
h0tr0d said:
Send me fan part ou post it (Solidworks, right?) let me help. I've learned much from you, time to give back a bit. :D
Thanks for the offer! No, I use Alibre (or Geomagic Design, as it's now called). I can export as a STEP file? Or, convert directly to STL.
Please send both STL and STEP, can't remember which one is better for SW...
 
Just did a series of simulations varying the airgap diameter. Current was adjusted to give the same power output (1kW).

Stator OD is 88mm

[pre]Airgap dia. Eta Wt. of active mat.

47mm 93.40% 1107g
49mm 93.91%
51mm 94.33%
53mm 94.57%
55mm 94.83%
57mm 95.04%
59mm 95.12%
61mm 95.16%
63mm 95.15% 917g
65mm 95.04%
67mm 94.91%
69mm 94.63%
71mm 94.15%
73mm 93.25% 735g
75mm 91.39%[/pre]
 
Looks like my intuition was right. The airgap dia. in my design is 63mm :) Obviously, there's no point in reducing this as Eta falls and active weight increases. There might be a case for increasing the airgap diameter but this was too crude a test to use as a basis for that. Anyway a factor of around 0.7 seems to be the sweet spot.
 
Another experiment with pole count...

This time I kept the current as a constant for simulation of the same stator design with pole counts of 20 and 28. The magnet strength was increased for the 28 pole version to load the magnetic circuit by the same amount. Max. flux density in the core was 2T for each case.

[pre]20p 43.45V 2.7Nm
28p 51.41V 3.2Nm[/pre]
 
Miles said:
Another experiment with pole count...

This time I kept the current as a constant for simulation of the same stator design with pole counts of 20 and 28. The magnet strength was increased for the 28 pole version to load the magnetic circuit by the same amount. Max. flux density in the core was 2T for each case.

[pre]20p 43.45V 2.7Nm
28p 51.41V 3.2Nm[/pre]

In this case, it looks like the difference is the square root of the pole count ratio.

3,2 Nm = sqrt(28p/20p) * 2,7 Nm

Miles said:
Repeated this as a non-linear simulation, to check:

Thank you.

The differences in torque are smaller with non-linear materials. If the flux density was to be normalized, I guess it would be an even smaller difference.
 
bearing said:
The differences in torque are smaller with non-linear materials. If the flux density was to be normalized, I guess it would be an even smaller difference.
Yes.

It took me 3 credits to get it that close :)

Anyway, it looks to be in the region of 10% advantage, at most, in this case. Certainly not directly proportional.....

Do you think this is a fair comparison?
 
I think that peak flux density of the iron is probably not the best way to normalize with, because it probably changes if the mesh changes (which it probably does when you change tooth count), even if the average tooth density is the same. If you could get the average (or RMS) of the tooth, or air gap, flux density, those could be better values to compare with, if you are looking for a fair comparison. But I like the way you are thinking, that the flux density should be the same, when you compare different pole counts.
 
Back
Top