I bet that will make a huge difference. Tighten up that old machine a bit!
You are using an out of date browser. It may not display this or other websites correctly.
You should upgrade or use an alternative browser.
You should upgrade or use an alternative browser.
QULBIX DIY Frame Q140MD
- Thread starter Andje
- Start date
Andje
10 kW
- Joined
- Aug 25, 2010
- Messages
- 779
Indeed. Its working much better now.I bet that will make a huge difference. Tighten up that old machine a bit!
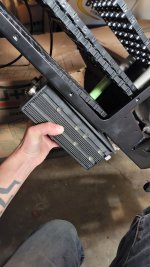
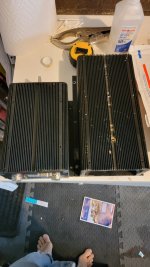
Got the new controller in today and i wasnt aware how much smaller it is. 200 peak 100 continuous vs 300 peak 150 continuous.
The smaller it gets the better clearance i have for the front wheel when the shock compresses. This is an interesting development. My BMS only does 200 anyway, so maybe ill aim to.use the smaller controller. Saves weight too.
I could always set it up so that the big one can be attached if i wanted to do a straight line speed run, but i also want to get some output numbers from the bms before i assume theres anything more for it to give. Much more likely i get less then 200 out of it, but we shall see.
The copper bus bar is supposed to be in today or tmrw at the metal shop, then i can make some battery progress.
Attachments
Andje
10 kW
- Joined
- Aug 25, 2010
- Messages
- 779
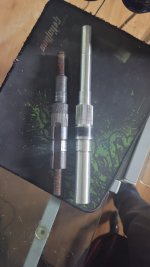
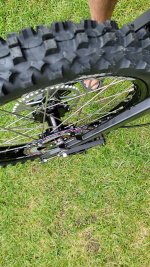
Had a go at one of the axles today. Lathe worked well, needed to do very shallow cuts on this 303 stainless, but we got there in the end.
Basic dimensions and bearing races and knurling is done. I need to flatten the end to fit the dropout style brackets and add the channel for the wiring. Thay will also be done on the lathe using the milling attachment to hold the work and an endmil in a collet in the lathe. Im not sure yet how to center the flats on the axle, ill have to research that part.
Basic dimensions and bearing races and knurling is done. I need to flatten the end to fit the dropout style brackets and add the channel for the wiring. Thay will also be done on the lathe using the milling attachment to hold the work and an endmil in a collet in the lathe. Im not sure yet how to center the flats on the axle, ill have to research that part.
Attachments
Andje
10 kW
- Joined
- Aug 25, 2010
- Messages
- 779
Ok, after some thought, the plan is to take down both ends to the just under 16mm mm they need to be for the rear swingarm bearings, then use a er-32 collet and collet block to mount the axle directly in the milling attachment. That way I can ensure that the flats are parallel and centered by simply flipping the block.
Andje
10 kW
- Joined
- Aug 25, 2010
- Messages
- 779
You are getting close. What are your plans for the battery?
I just discovered that the new stealth bomber is now pushing $9k USD Though they are a really good bike
Sometimes DIY can pay off bigtime.
I just discovered that the new stealth bomber is now pushing $9k USD
Though they are a really good bikeSometimes DIY can pay off bigtime.
Andje
10 kW
- Joined
- Aug 25, 2010
- Messages
- 779
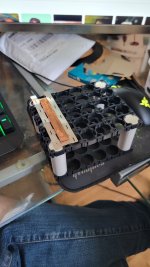
I have a good battery spot welder, and .2mm nickel strip, and then I also have a bunch of 3.5 inch long 1/8 of an inch copper bar that I will solder to the nickel strip first, then spot weld the nickel to the cells.

I ordered some copper/nickel solder paste, and I'm hoping to clean the strips well then place small balls of the solder on the nickel strip then weigh down that on a silicon mat and oven heat the whole thing to the flash temp of the solder.

The cells are;
Ive got the cell holders, fish paper, and heatshrink. I'll be splitting the battery int he center to load it into the bike, then hard attaching it with either a welder quick disconnect or more copper strip bent and bolted to some sort of busbar attachment.
BMS is a DALY 200 amp 40s, so it will be protected and balanced and also monitorable via bluetooth.
One thing i need to finalise is the way it will anchor in the bike. Maybe straps, maybe solid mounting point in the fiberglass isolator board, maybe wedged with solidcore foam?
I want to be able to jump/lay down this thing so it cant be loose in there. Most companies would latch a hardcase somehow.
I ordered some copper/nickel solder paste, and I'm hoping to clean the strips well then place small balls of the solder on the nickel strip then weigh down that on a silicon mat and oven heat the whole thing to the flash temp of the solder.
The cells are;
Molicel P45B 21700 4500mAh 45A Battery
40s5p... 168 volt 22.5ah.Ive got the cell holders, fish paper, and heatshrink. I'll be splitting the battery int he center to load it into the bike, then hard attaching it with either a welder quick disconnect or more copper strip bent and bolted to some sort of busbar attachment.
BMS is a DALY 200 amp 40s, so it will be protected and balanced and also monitorable via bluetooth.
One thing i need to finalise is the way it will anchor in the bike. Maybe straps, maybe solid mounting point in the fiberglass isolator board, maybe wedged with solidcore foam?
I want to be able to jump/lay down this thing so it cant be loose in there. Most companies would latch a hardcase somehow.
Attachments
Last edited:
I must say this 5 times a day; BMSs are fine, just so you don't depend on them for safe charging.
Andje
10 kW
- Joined
- Aug 25, 2010
- Messages
- 779
The outer diameter of the swingarm bearings is 1 3/8". The inner diameter varies depending on your motor axle width. I did get some with my frame, but I ended up ordering the ones below because I custom made my motor axle.
Rear shock always requires spacers to center them properly. You could use something as low tech as washers. In my case I will be making spacers on my lathe. Or you could use something like this;
Rear shock always requires spacers to center them properly. You could use something as low tech as washers. In my case I will be making spacers on my lathe. Or you could use something like this;
Ah ok, I contacted qulbix about the missing bearings but they are on vacation  I also had some other things missing from my order so I'll guess I have to wait a couple of weeks until I can finish my build.. so close though.
I could not find any premade shock hardware that suited the dimension of the qulbix frame, so I think I'll make my own aswell, or see if qulbix can supply them.
I also had some other things missing from my order so I'll guess I have to wait a couple of weeks until I can finish my build.. so close though.I could not find any premade shock hardware that suited the dimension of the qulbix frame, so I think I'll make my own aswell, or see if qulbix can supply them.

Andje
10 kW
- Joined
- Aug 25, 2010
- Messages
- 779
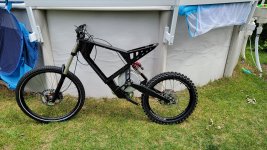
You have beaten me to the punch. I got to the point of rolling chassis last year, and then summer got here and the family took priority.
But I'm making progress now! I've been working for the last couple weeks.
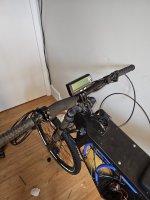
All the controls are mounted, I now have a J1772 port for charging, the battery is half assembled and I'm waiting on more nickel strip on monday to finalize that. Once the battery is finalized i can finish the control wiring once I know where the connector block will fit.
Let's just say that the number of cells im trying to fit makes everything... tight...
But I'm making progress now! I've been working for the last couple weeks.
All the controls are mounted, I now have a J1772 port for charging, the battery is half assembled and I'm waiting on more nickel strip on monday to finalize that. Once the battery is finalized i can finish the control wiring once I know where the connector block will fit.
Let's just say that the number of cells im trying to fit makes everything... tight...