baisikol
100 µW
This is a unstructured review of a tsdz2b motor I used to convert a gravel bike into an ebike.
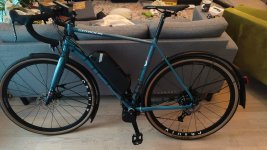
The base bike is an aluminium 1x12 gravel bike with through axles and 68mm bottom bracket.
The conversion kit was purchased from pswpower who ships from inside EU. Actual purchase portal is on aliexpress and there are few customization choices.
Engine I selected is 48v/500W, display is 850c and battery of 17.5aH (HL-plus). The cost of the kit was 570€ shipped.
The kit arrived in a bit over week, few days longer than shipping promise was. Everything one could assume is included, is.
The motor, rpm-sensor for rear wheel, y-split to the rear fork to attach lights, battery holder, battery, 2A charger, various fixing screws, cranks, pedals, throttle, display, tool to tighten bottom bracket.
I did not plan to have the throttle attached so I am not interested in brake sensors nor gear-shift sensors.
The installation manual is rather short, but it actually is pretty much as simple as that. I did watch the manufacturer installation video on youtube which was helpful.
What you extra I needed: various length zip ties, 5mm and 8mm hex socket tools, torque wrench, front and rear lights, xt60 connectors to replace the bullet connectors, soldering iron, a broken fatbike inner tube, original bottom bracket removal tool
To start, I cut the bullet connectors from the battery holder and the motor off and soldered xt60 connectors in.
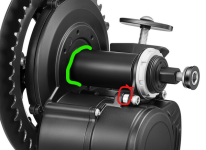
Installation begins with removal of old bottom bracket. After that is done, the fitting of the engine can begin. With the bike I had, this was very simple, I could just push the brake/shifter cables aside, push the engine in and place the cables in appropriate places where they're not in the way and can still work. Fixing the motor in place is done using a tightening plate in the rear fork and this was a tight spot but eventually it worked out just fine.
Battery holder comes next. Since the bottleholder screws are so close to each other, I drilled space to the top of the holder to allow a thick ziptie to fasten the top part to the frame. Thus, the holder is held in place by 2 bottleholder screws and a ziptie.
Lastly it's the fun part, which is cable management. A lot of zipties and happythoughts later, it will not look like a bike from a factory but hopefully something you won't feel ashamed riding on.
The installation took a day for me with long pauses between. This was the first ebike I've built with a little experience in electrics and bikes.
So far I've ridden about 100km with it. The first ride was 2x27km at max assist level on a -4C weather with variable road-profile and a mass of around 100kg on the bike (+10kg bike, +10kg motor/battery). The battery was almost empty after the ride. Second rides were 1x27 with battery at around 49v at the end.
The assist feel very much the same as it does on my factory built fatbike with a M400 bafang motor. It does have a sharp kick-in/out, and riding at the threshhold (the maximum speed I've set it to assist at) can feel bouncy. I knew before I bought the kit that the 42T chainring will not work and it doesn't, I only use the 5 lowest cogs on the cassette and they'll likely wear out very quickly. A 52T chainring is a must for this bike.
The tool for tightening the engine (the included BB tool) is bad, you're supposed to tighten the BB to 40Nm but the tool cannot be attached to a wrench. I've already once had to undo the pedal to tighten the BB and it's loose again.
The base bike is an aluminium 1x12 gravel bike with through axles and 68mm bottom bracket.
The conversion kit was purchased from pswpower who ships from inside EU. Actual purchase portal is on aliexpress and there are few customization choices.
Engine I selected is 48v/500W, display is 850c and battery of 17.5aH (HL-plus). The cost of the kit was 570€ shipped.
The kit arrived in a bit over week, few days longer than shipping promise was. Everything one could assume is included, is.
The motor, rpm-sensor for rear wheel, y-split to the rear fork to attach lights, battery holder, battery, 2A charger, various fixing screws, cranks, pedals, throttle, display, tool to tighten bottom bracket.
I did not plan to have the throttle attached so I am not interested in brake sensors nor gear-shift sensors.
The installation manual is rather short, but it actually is pretty much as simple as that. I did watch the manufacturer installation video on youtube which was helpful.
What you extra I needed: various length zip ties, 5mm and 8mm hex socket tools, torque wrench, front and rear lights, xt60 connectors to replace the bullet connectors, soldering iron, a broken fatbike inner tube, original bottom bracket removal tool
To start, I cut the bullet connectors from the battery holder and the motor off and soldered xt60 connectors in.
Installation begins with removal of old bottom bracket. After that is done, the fitting of the engine can begin. With the bike I had, this was very simple, I could just push the brake/shifter cables aside, push the engine in and place the cables in appropriate places where they're not in the way and can still work. Fixing the motor in place is done using a tightening plate in the rear fork and this was a tight spot but eventually it worked out just fine.
Battery holder comes next. Since the bottleholder screws are so close to each other, I drilled space to the top of the holder to allow a thick ziptie to fasten the top part to the frame. Thus, the holder is held in place by 2 bottleholder screws and a ziptie.
Lastly it's the fun part, which is cable management. A lot of zipties and happythoughts later, it will not look like a bike from a factory but hopefully something you won't feel ashamed riding on.
The installation took a day for me with long pauses between. This was the first ebike I've built with a little experience in electrics and bikes.
So far I've ridden about 100km with it. The first ride was 2x27km at max assist level on a -4C weather with variable road-profile and a mass of around 100kg on the bike (+10kg bike, +10kg motor/battery). The battery was almost empty after the ride. Second rides were 1x27 with battery at around 49v at the end.
The assist feel very much the same as it does on my factory built fatbike with a M400 bafang motor. It does have a sharp kick-in/out, and riding at the threshhold (the maximum speed I've set it to assist at) can feel bouncy. I knew before I bought the kit that the 42T chainring will not work and it doesn't, I only use the 5 lowest cogs on the cassette and they'll likely wear out very quickly. A 52T chainring is a must for this bike.
The tool for tightening the engine (the included BB tool) is bad, you're supposed to tighten the BB to 40Nm but the tool cannot be attached to a wrench. I've already once had to undo the pedal to tighten the BB and it's loose again.