Charging issue on Ultra Motor A2B Metro

adh247

10 mW
Joined
Jan 8, 2020
Messages
26
Bought a used A2B Metro but the charger just flashes red and green regardless of it being plugged in or not. Anyone have any idea why? This is my first e-bike so I'm kinda new to this but so have electronic know how. I'm just not sure where to start. It also does not show any lights by the throttle. Any help would be hugely appreciated!

Here's a GIF of what it doing:]https://i.imgur.com/fyNSVJ0.gifv

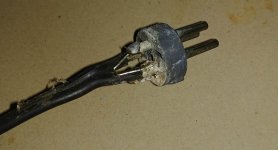
I just noticed the tip of the XLR charger plug was missing a screw so I took the other one out to see if any wires were loose and was met with this:
https://i.imgur.com/sURsk7M.jpg

But I have since cleaned it.
https://i.imgur.com/v8wJPwr.jpg

Also, When I tested the output of the charger via the XLR plug, I get this as the voltage reading, but i dont know if its supposed to do that or not. https://media.giphy.com/media/eNYmf4NLP2a8oiwWUb/giphy.gif

Any ideas or suggestions? I'm really new at ebikes, so i'll take all the help i can get.

I'm basically trying to determine whats bad, the charger or the bike,
 
i can' t see your pics, but generally when a battery won't charge and a biek wont run, the battery has cells dropped below the minimum lvc of the bms so it has disabled both input and output to prevent a potential fire.

that will usually show a wierd low voltage, even sometimes a changing voltage, on the input and output of the bms due to leakage current in the bms fets on those ports.

you'd have to open the battery to verify voltages on cell groups. if any are below around 2.8-3.0v, tha'ts probabl whats wrong. if theyre right at that 2.8v it might be ok to manually recharge them just a litle bit at a low current, one cell group at a time, until the bms allows charge.

but if they're below that, especially if they're really low or really dead, then they're not safe to recharge and you'd probaly need to replace the cells wiht new ones. if you do this ou might as well replace them all rather than just the low ones.


if the cells all show tehy're ok, and the voltage on the charging and discharging ports show tehy're still off, the bms may be damaged. in that case other than diagnosing the specific problem and rpeairing it, i don't know if you can even find a replacment for it.


the charger may not output a voltage until it's connected to a working battery, so if you don't read a voltage on it that's not unusual. or you might read a changing one becuase it's turning on just a moment to start battery charge, and if it detects no battery it turns off again, and cycles until it detects a battery. not all chargers do taht bu some do.


there are several a2b threads for different versions that have good info on fixing stuff here on es, so i also recommend you go thru those for helpful info.
https://endless-sphere.com/forums/search.php?keywords=a2b&terms=all&author=&sc=1&sf=titleonly&sr=topics&sk=t&sd=d&st=0&ch=300&t=0&submit=Search
 
I agree most likely the battery was left discharged for too long and the BMS can no longer turn on to allow charge. I assume nothing happens when you turn the key on.

While it may be possible to "revive" the battery by bypassing the BMS, the batteries may be permanently damaged and be somewhat unsafe to use. Removing the battery and replacing the cells is a very challenging task and a new battery is pretty much unavailable.

The easiest thing to do is remove the frame battery (even that is not so easy) to save weight and install a generic battery on the rear rack connected to the B battery connector. If you cut off the B battery connector and strip the jacket, you will find two heavy wires and several small ones. You can ignore the small ones and attach any battery to the two heavy ones. I did this on mine and used a 52v battery instead of 36v. If you get a 36v battery you can still use the stock charger.
 
Just possible that this place could still help you out in someway, if that is the route you choose to follow:

https://ebikemarketplace.com/products/a2b-li-ion-electric-bike-batteries

Personally, I chose to 'can' all the original A2B Metro cell packs/BMS/Charger and replace with modern 6/7S Lipo packs (both in-frame & rear pack) @ around 45-55v + smart-charger, similar to these:

https://hobbyking.com/en_us/turnigy-high-capacity-10000mah-6s-12c-multi-rotor-lipo-pack-w-xt90.html?___store=en_us

https://www.skyrc.com/Charger/D400_Charger

Not the mega cheapest solution, but so far absolutely no problems.. and a few years use still in-store, hopefully! ;)

Wishing you luck.. they are a unique, comfortable but heavy bike to ride. :))
 
adh247 said:
Bought a used A2B Metro but the charger just flashes red and green regardless of it being plugged in or not. Anyone have any idea why? This is my first e-bike so I'm kinda new to this but so have electronic know how. I'm just not sure where to start. It also does not show any lights by the throttle. Any help would be hugely appreciated!

Here's a GIF of what it doing:]https://i.imgur.com/fyNSVJ0.gifv

I just noticed the tip of the XLR charger plug was missing a screw so I took the other one out to see if any wires were loose and was met with this:
https://i.imgur.com/sURsk7M.jpg

But I have since cleaned it.
https://i.imgur.com/v8wJPwr.jpg

Also, When I tested the output of the charger via the XLR plug, I get this as the voltage reading, but i dont know if its supposed to do that or not. https://media.giphy.com/media/eNYmf4NLP2a8oiwWUb/giphy.gif

Any ideas or suggestions? I'm really new at ebikes, so i'll take all the help i can get.

I'm basically trying to determine whats bad, the charger or the bike,
Looks to me like the charger is not working properly. Repair or replace the charger.
 
The charger needs to "see" battery voltage to enable output. Some kind of safety feature and prevents sparking.
 
fechter said:
The charger needs to "see" battery voltage to enable output. Some kind of safety feature and prevents sparking.
adh247 said:
-charger just flashes red and green regardless of it being plugged in or not.-
See video of red and green alternating flashing.
https://i.imgur.com/fyNSVJ0.gifv
If I am remembering correctly? My A2B Metro charger never flashes like that.
Look at this picture. Looks like the charger might have spent some time on the bottom of a lake?
sURsk7M_crop_800w.jpg
My guess is that the charger is broke.
 
I have taken your advice about getting a new battery. I was able to determine that not only was my charger broken, but my battery was no longer charging due to the BMS. I bought a new charger, and found out that the reason the battery had a low voltage was due to it sitting for about 4 months before i got it, and was working fine before sitting. I read online a trick to test the bike to see if the battery was bad was to disconnect the battery, and connect the charger directly in place to somewhat simulate a working battery. That method actually worked and I was able to have the bike power on and was able to simulate usage, which helped me correctly assume the battery was bad.

I went ahead and ordered a new battery, however, I ordered one that will be able to fit into the frame the way the old "A" battery did. My own concern/questions I have now is what is the easiest way to connect the new battery to the bike? It has a BMS already built in, and comes with a new charger, however I would like to figure out how to just connect the battery back up and utilize the factory XLR Connector/Charger. The specs are the same as the old original battery.

Also, I do have a couple 18650 chargers. Is there a way I can go about attempting to test the original batteries without disconnecting it all from the rails? It would be great if i could possibly try to bring a little bit of life back into that thing, and see if i can get it to start charging again. I understand safety and overcharging being an issue, but would like to at least give it a shot.

Thanks again! I appreciate the help

https://ibb.co/J3rddJ8
https://ibb.co/PCFKw5n
 
~~~

Glad to hear that you successfully found replacement Battery & Charger! :)

Do you mean that you would like to test/restore life to the original (A) 'Battery' - or instead to the individual 'cells' of that battery?
- It would likely only take one or two apparently 'dead' cells cause the BMS & Charger to refuse to charge the battery.

One 'trick', mentioned elsewhere here, to bring your battery back up to a voltage where at least the BMS & the charger are again 'talking' successfully to each other, might be to try applying some trickle-charge/voltage to the existing/fitted battery, but instead via it's output (+ & -) leads to the motor, as this in effect then bypasses the 'constraints' of the BMS board?

- This could take several/many hours to achieve.. and for obvious safety reasons, only carried out whilst you are there to monitor proceedings. ;)

Hope this helps a bit anyway.

;)
 
Yes thanks, I was looking to try to trickle charge them. I've got some time on my hands so im going to try to see what i can get done. We shall see how it goes!
 
Just thought I would update you on the charging issue. You guys were indeed right on the money. Now as far as what happen, The old charger was broken, so i ordered a new one (hoping it would end the problem) but it wouldn't charge so i went ahead and pulled the frame battery out, and just like you guys said i had a group of 4 cells that were real low, so what i did was buy an 18650 charger and opened it up so that i could then solder a new cable with magnetic leads on the end of it (+/-) that way i could easily test, and charge the batteries individually without having to take the battery apart.
(https://imgur.com/BdclJhV) (https://i.imgur.com/nX3a76V.jpg)

Once i did confirm that I had 4 dead batteries, I went and ordered a new 36v battery that i could fit back into the frame.

In the meantime i decided to try to revive the group of 4 batteries that were dead, and i'll be damned if it didn't allow The charger to start working properly and start charging the battery all the way back up. I know this is not a long term fix, but having it set up so that on a rare occasion that my A battery goes dead, I can always switch it over to B.

As far as fixing the A battery, how do i go about doing so? i don't have a tack-welder, so i'm not sure how to replace them. Of course the dead cells just so happen to be in the middle of the battery. :oops:

I do have one more question, do I have to cut off the end of the B battery connector in order to access the 2 wires, or is there an alternate place to find them.

I have also added pics that show how i am charging the cells separately with the magnetic leads,

I also wanted to thank you guys for helping me out so much! I appreciate it.


Here is the imgur link with a bunch of pics https://imgur.com/a/1hYJH00


E-Glider said:
~~~

Glad to hear that you successfully found replacement Battery & Charger! :)

Do you mean that you would like to test/restore life to the original (A) 'Battery' - or instead to the individual 'cells' of that battery?
- It would likely only take one or two apparently 'dead' cells cause the BMS & Charger to refuse to charge the battery.

One 'trick', mentioned elsewhere here, to bring your battery back up to a voltage where at least the BMS & the charger are again 'talking' successfully to each other, might be to try applying some trickle-charge/voltage to the existing/fitted battery, but instead via it's output (+ & -) leads to the motor, as this in effect then bypasses the 'constraints' of the BMS board?

- This could take several/many hours to achieve.. and for obvious safety reasons, only carried out whilst you are there to monitor proceedings. ;)

Hope this helps a bit anyway.

;)
 
I think the only way to repair the original battery is to use a spot welder. There are several DIY versions around that aren't too expensive.

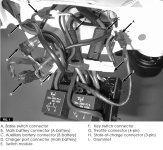
You can access the B battery wires in the "rats nest" under the bottom bracket if you don't want to cut off the original connector. There is a "trailer hitch" connector that comes from the B battery cable.

Module Wiring.JPG
 
fechter said:
I think the only way to repair the original battery is to use a spot welder. There are several DIY versions around that aren't too expensive.

You can access the B battery wires in the "rats nest" under the bottom bracket if you don't want to cut off the original connector. There is a "trailer hitch" connector that comes from the B battery cable.

Module Wiring.JPG

Thanks! You're a life saver. I have the manual associated with the pic and saw this too but i wasn't 100% sure if those were indeed the correct wires.

I'm gonna have to figure out what to do as far as replacing the 4 dead cells as I am on a budget. Ive seen videos on how to make a DYI welder thats capable of doing it, but i was hoping there was an alternative.

Also, something i didn't think of is how do you go about removing the cells from the spot its been welded to? I have also seen a couple youtube videos that say you can use a soldering iron, but it seems that it doesn't have as secure of a hold. Has anyone ever tried this?

Thanks again for the help
 
Soldering directly to the cells is not recommended (but I have seen many people do it with apparently good results) The danger of soldering is you can damage the internal structure of the cell which may cause failure over time.

If your "bad" cells never got below about 2v, then they might work OK after being recharged. You might try that first.

If you are going to replace bad cells, you should just do the entire pack with new cells.

There are several spot welder kits around. I'm using a JP spot welder, but I don't think those are available anymore. The K-weld is nice but more expensive. There are a few others out there.
Here is another one: https://endless-sphere.com/forums/viewtopic.php?f=14&t=89076
 
That little Korean spot welder is super cute! But I have also soldered these batteries with no apparent ill-effect.

I think the (obvious) trick is to allow only a minimum amount of heat to conduct into the cell, in order to prevent/minimise any damage etc.
Thus (contact) 'time' is of the essence here. ;)

So, although it may sound counter-intuitive, I surmise that the use of a very hot and fairly large iron gets the job done quickly & efficiently - as opposed to a lower heat iron with a small head, which may actually take a lot longer to get your components up to heat.. and thus also transfer even more heat into the cells during/in the process etc?

You can also grab a damp rag and wrap the cell if possible, as this would really help conduct excess any heat away from it immediately.

'Tinning' your components with solder first also really facilitates the job.

I guess it's a matter of $ savings etc too, but if you do have to replace just a few cells - as opposed to the entire pack, I would always try for the former-by-soldering first!

Removing the old cells mid-pack could involve some considerable micro-surgery with mini-pliers etc.. a bit like opening a sardine can! It also depends upon the quality of the original build & material thickness etc, but even if you 'tear' a connecting strip entirely in the process, you can usually & effectively 'band aid' over it OK, using your solder - and a patch of connecting strip too if necessary.

And take care not to short out any cells/tabs with your metal tools too! ;)

Good luck & hope this helps a bit.

;)
 
I seem to be having an issue now. Whenever i try to turn the throttle up all the way, the bike powers off. I can turn the key off and on, and then i can i ride it still, but i always have to baby the throttle, If i try to just go quick, I get a power down. Any ideas as to what is causing this? Ive pulled everything out, check connections, and put it back in. Still does it.
 
You should check the balance of the battery cells. One or more groups is likely sagging in voltage so much under load that it causes the BMS to shut off to protect the cells from damage.

If you find some are lower than others (all should be the same voltage), you can try leaving the battery on the charger whenever the bike is not in use so that it will keep the cells closer to balanced. Over time it will improve at least some.

However, once a balance problem starts, it usually means some of the cells are no longer able to support the load, and have higher internal resistance and lower capacity. Other cells that appear ok may have also aged enough to have issues soon enough after this, but sometimes they last a lot longer than the first ones to fail (especially if the cells were not well-matched before pack assembly).

Sometimes the problem is cell interconnects, where the cells may not all be well-connected to the rest of the parallle groups, but it's much more common for cells to simply begin failing from age or overload or heat.
 
Thanks so much for the response, I'm going to go take the battery out and test them all. I'm so glad you mentioned this because it reinforced what I thought it could be. (I tend to doubt myself when it comes to problems with it)

One thing that bothers me is that this is a new battery thats about 2 months old, so why would it go out already? The problem is getting worse and worse by the way, I can barely even apply throttle to it now and it's basically pointless to try to use.

Also, I've been making sure it's charged well (I have a multimeter connected while charging, and have tried keeping it plugged in, but no difference. The charger is just a cheap one that I bought as the bike didn't come with one, it basically doesn't seem to do anything once the battery is charged. Orange when charging, green when done.

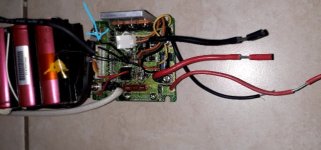
OK so now that i have finished up working on my internal battery, and now have all 60 batteries (18650s) fixed up and in great working order, I have no decided i want to change the BMS that is now connected to it, with a different BMS. I have seen some on ebay that say the can handle the battery (36v/42v.

So i was wondering if anyone has any suggestions for what BMS i should go for, while also one that isnt going to be painful pricewise.
there any BMS out there that would work great on ny old but refurbished battery?

PLEASE FEEL FREE TO GET INTO TOUCH WITH ME IF YOU HAPPEN TO FIND A GOOD DEAL FOR A 10S6P BATTERY
 

Attachments

  • 20200703_015704.jpg
    20200703_015704.jpg
    34.3 KB · Views: 1,008
Hey Amberwolf, you nailed it! I took apart the new battery and went over it with a fine tooth comb and what I found actually astonished me! The ground cable that is soldered onto the bms was barely even hanging on! As if someone did a poor solder job to begin with! So basically I went In and yested all the batteries and charging them one by one and resoldered them. It works perfect now! I can't thank you and everyone else enough for the advice!

I'm still in need of that upper and lower the sooner if anyone has one laying around! Thanks again guys!

amberwolf said:
You should check the balance of the battery cells. One or more groups is likely sagging in voltage so much under load that it causes the BMS to shut off to protect the cells from damage.

If you find some are lower than others (all should be the same voltage), you can try leaving the battery on the charger whenever the bike is not in use so that it will keep the cells closer to balanced. Over time it will improve at least some.

However, once a balance problem starts, it usually means some of the cells are no longer able to support the load, and have higher internal resistance and lower capacity. Other cells that appear ok may have also aged enough to have issues soon enough after this, but sometimes they last a lot longer than the first ones to fail (especially if the cells were not well-matched before pack assembly).

Sometimes the problem is cell interconnects, where the cells may not all be well-connected to the rest of the parallle groups, but it's much more common for cells to simply begin failing from age or overload or heat.
 
Back
Top