torque arm picture thread

auraslip

10 MW
Joined
Mar 5, 2010
Messages
3,535
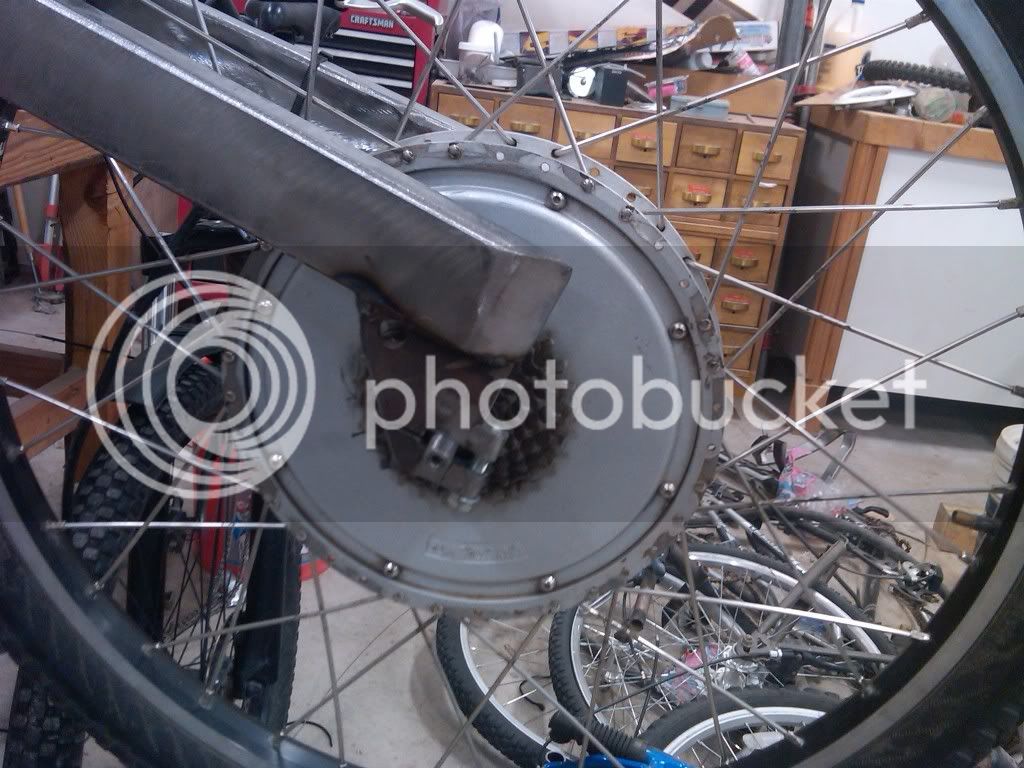
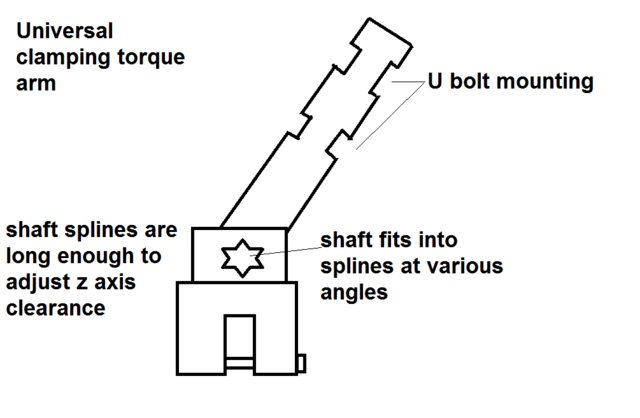
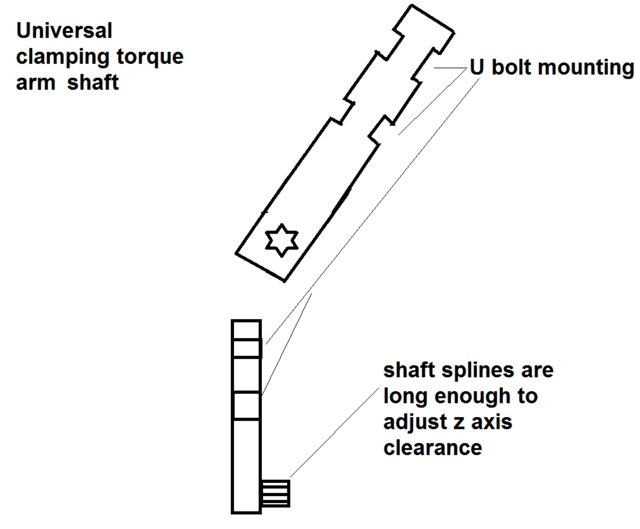
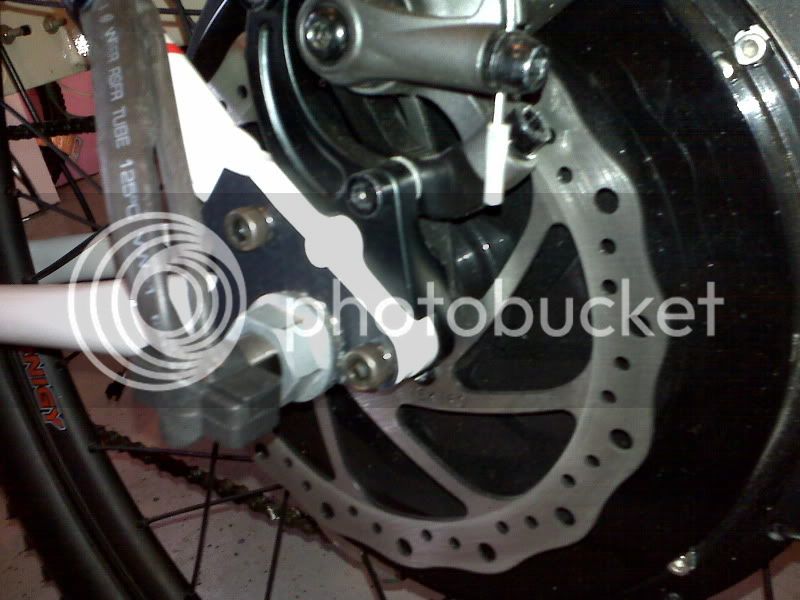
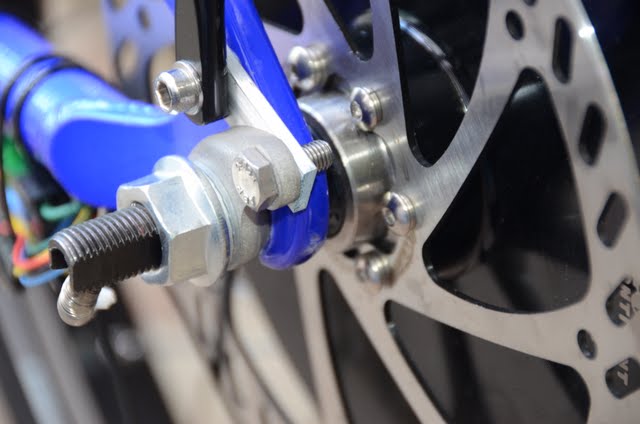
Cross-posting these two threads so a search will turn up both:

"Found an awesome torque arm" (3 pages)
https://endless-sphere.com/forums/viewtopic.php?f=1&t=11570

xxxxxxxxxxxxxxxxxxxx

Original thread died. Figured I'd help out and repost what I saved.


sFuHil.jpg


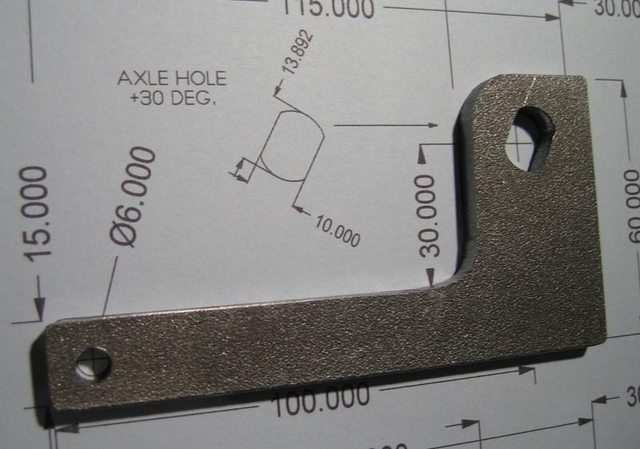
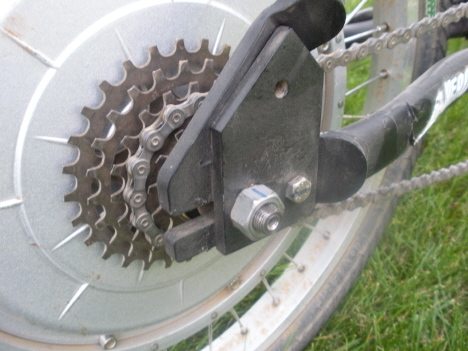
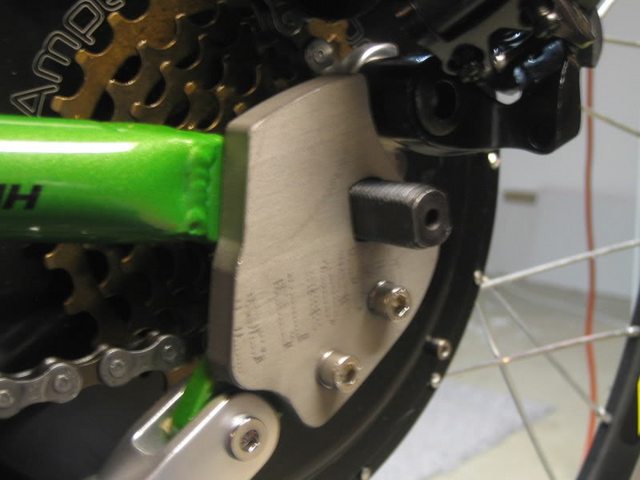
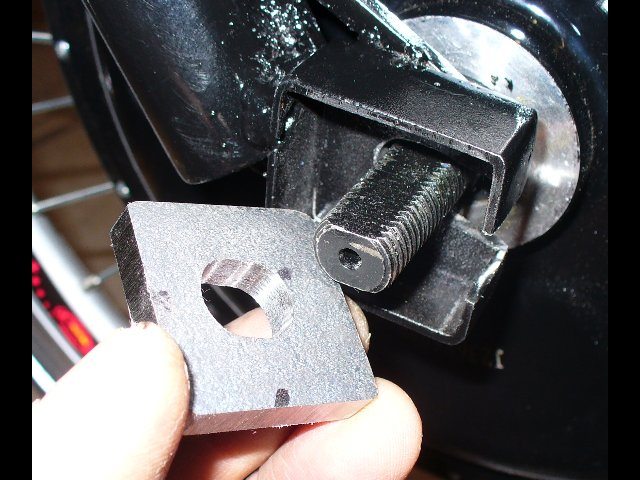
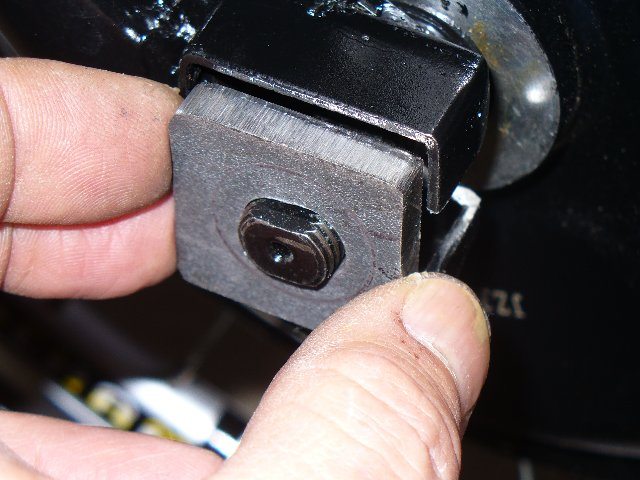
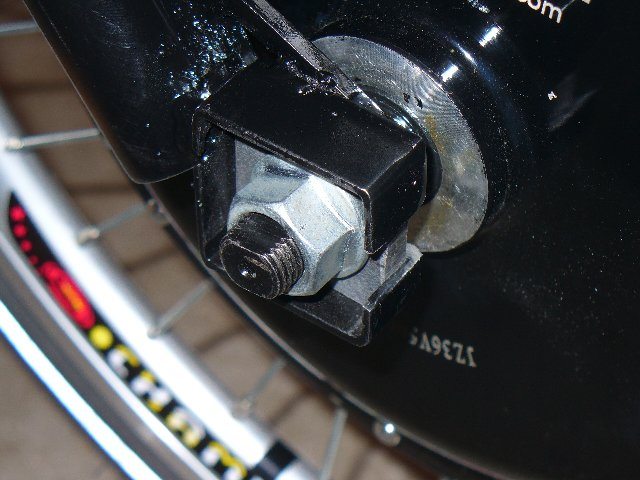
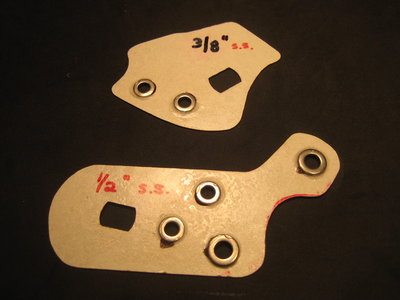
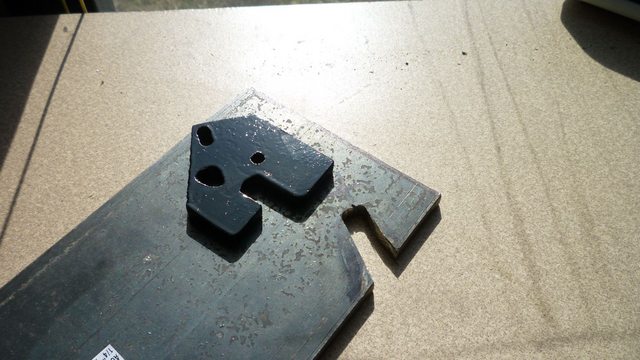
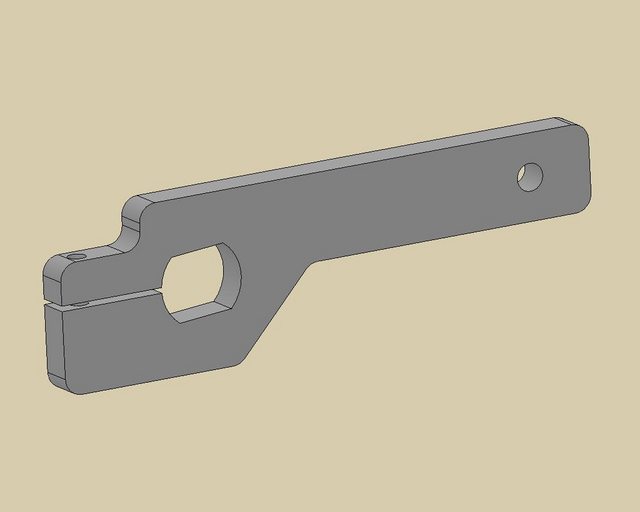
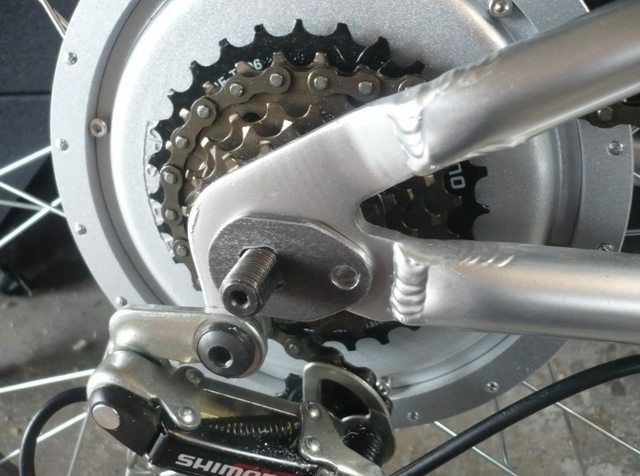
Here is the album link: http://imgur.com/a/ff1DI
 
Great idea, I searched everywhere for a pre-made compatible torque plate for my GT Avalanche 1. In the end it was easier for me to make a template out of cardboard and get it cut at a local laser/plasma cutter's.

file.php


file.php
 
What do ya'll think of this universal clamping torque arm?


The shaft fits into the clamp lack the amped bikes design, but it's long enough to adjust for fork, brake, or chainstay clearance.
 
Farfle for the win! 8)

I just bought these from Magudaman in the for sale new section. CNC thread. He can make em any size, mine are 4x4 in 1/4 steel. You can get em made small, then file to the perfect tight fit. CIMG0250.JPG

Re the above, I'd rather have two bolts than the spline. Customer would drill holes and bolt to his angle, or just weld it.
 
Re the above, I'd rather have two bolts than the spline. Customer would drill holes and bolt to his angle, or just weld it.

That'd be easier,cheaper, and work just as well. You could even stack some washers in between the shaft and the plate to solve clearance issues.
 
Don't let me design stuff, it would all be cheap, simple, bombproof, and weigh a ton.
 
For those in the Uk wanting to get something laser cut I found this site that shows all the laser cutters in the Uk:

http://www.hotfrog.co.uk/Products/laser-cutting/Wiltshire
 
These are Magudaman CNC specials. I just painted.

torqueplateleftside.jpg


torqueplateleft.jpg
 
Ebikes.ca torque arm. Homemade torque strut from torque arm end to rack screw. Torque strut is 6061 T6 threaded one end, drilled undersize and reamed on the other to a precise fit. Same setup on both sides. Frame is 7005 aluminum. Washers are Nord-Lock. Motor is 9C 6x10 at 75V. Build is linked in sig below.

DSC_5269.JPG
 
Anyone who thinks their torque arms are sufficient should consider this. After almost 2.5 years my dropouts, which are 1/2" thick steel each side with a snug tap in fit to the axle, recently developed a hint of play due to 9 months of regen braking. I needed to dismantle the bike for an overhaul anyway (new brake shoes, change out the cheapie freewheel that has been freewheeling 99.9% of the time for about 10k miles with only a squirt of oil a couple of times in 2.5 years, etc.).

The slightly wallowed out dropouts will get an upgrade to clamping type. It's nowhere near loose enough to spin, but the tiny bit of back and forth movement loosens axle nuts.

Another upgrade will be to add a jackshaft in the pedal line, so I can:
1. Seriously steepen the pedal gearing so I can add a bit of pedal assist.
2. Add a 2nd freewheel in my chainline. Some recent freewheel failures convince me of this necessity, because a suddenly locked freewheel could easily create a lethal failure at the traffic matching speeds I ride. While the odds of that kind of failure may be pretty low, the odds of 2 freewheels in series failing and locking up at the same time to be effectively 0. The odds of a single lockup type failure are probably greater than 1000 to 1, which is unacceptable considering there is a simple solution
 
John in CR said:
Anyone who thinks their torque arms are sufficient should consider this. After almost 2.5 years my dropouts, which are 1/2" thick steel each side with a snug tap in fit to the axle, recently developed a hint of play due to 9 months of regen braking.

This probably just means the steel you use wasn't hard enough. Heat treatment or using a different allow would prevent the shaft from biting into the torque arm. As mild steel is a bit too soft for an application like this. The proper material could increase the lifespan by a factor or two.

http://en.wikipedia.org/wiki/Indentation_hardness Might help you get some idea on how to select what material you want.


On the other hand, you don't want to go too hard on your material, since the harder a metal is, the more brittle it is also and a strong shock could shatter it. So i'd try experimenting with a little bit harder of a material and see if that fixes your wear problem.
 
Many of the motor axles are pretty soft too, so hard steel in the torque arm or dropouts may not help. Thickness for more contact area is what matters, and if you have regen, you better have a clamping type.

My first hub motor ride ended after 10ft due to an axle spin. Sure I had torque arms, but torque arm design wasn't very advanced 3 years ago. Mine were a nice strong stainless steel, thinking that was better. They were too thin and cut a groove in the axle like it was butter.

I haven't taken it down yet. It could be a bit of corrosion got in there, or maybe a recent impact from my son laying it down, but what I used to think was indestructible isn't, so I thought I should share. I'm the biggest advocate around for overkill when it comes to hubmotor/bike connection, because what comes from the factory isn't really adequate even for low powered ebikes, and regen braking compounds the issue many times over. Plus I've yet to see a store-bought torque arm I'd want on my bike.
 
If that's the case, harden the shaft as well. :D

Granted that would be a fair bit harder to do because of the threads on the shaft, it is possible via Selective Case Hardening. You can do this either by plating the threads with copper before you perform the case-hardening process. Or the other option would be to use laser hardening or some other highly localized heat source.

Granted these processes are either time consuming or expensive, so you would really just be better off making your own shaft. :lol:


But, that 1" of steel should be more than sufficient, as the motor was biting into torque arm a fair amount it would be worth hardening the surfaces of the torque arm. It would increase the lifespan of the torque arm, and so long as you don't exceed the hardness of the shaft you wont endanger the shaft when you harden it.

But your correct a tensioning bolt would go a long way to spreading out the force on the torque arm.

So if you both hardened (or selected a slightly harder material) and added a tentioning bolt, that would create about the most sturdy torque arm you are feasibly going to get.

If your motor still destroys that it might be worth considering upgrading the bicycle :wink:
 
Has anyone used an adapter claw as a torque arm? These were used to mount older rear derailleurs to older frames that had no derailleur mounts. The fact that they are stampings makes me doubt their resistance to torque deformation.

attachment=0]Derailleur_Hanger_Short.jpg[/attachment]
 

Attachments

  • Derailleur_Hanger_Short.jpg
    Derailleur_Hanger_Short.jpg
    47 KB · Views: 26,773
That derailluer hanger looks like butter compared to my 1/4" steel torque plate of approximently the same size that only lasted half a mile.

Many of the motor axles are pretty soft too, so hard steel in the torque arm or dropouts may not help. Thickness for more contact area is what matters, and if you have regen, you better have a clamping type.

John, it seems like you are the resident expert for using high powered hubs safely and reliably. If you say clamping torque arms are the only option, I will believe you and start planning a clamping torque arm design on my next bike. I know you've covered it hundreds of time by now, so I feel bad suggesting it, but you should consider doing a FAQ on making them for everyone else.
 
I wholly agree with john, thick 3/8"+ clamping torque arms are the only way to go, When I get some time I am going to try machining axles with axle flats that extend past the threaded portion of the axle, giving it a MASSIVE decrease in PSI on the axle shaft.
 
auraslip said:
That derailluer hanger looks like butter compared to my 1/4" steel torque plate of approximently the same size that only lasted half a mile.

Many of the motor axles are pretty soft too, so hard steel in the torque arm or dropouts may not help. Thickness for more contact area is what matters, and if you have regen, you better have a clamping type.

John, it seems like you are the resident expert for using high powered hubs safely and reliably. If you say clamping torque arms are the only option, I will believe you and start planning a clamping torque arm design on my next bike. I know you've covered it hundreds of time by now, so I feel bad suggesting it, but you should consider doing a FAQ on making them for everyone else.

Just because I harp on something doesn't make me an expert, but I do make sure my hubmotor wheel can't fall off. I make torque dropouts, not add-on torque arms, but the concept is the same. Here are some pic. Some are 5/8" per side and some 9/16" per side:
Clamping dropouts.JPG
View attachment 2
Front and rear .625in dropouts c.JPG
Front and rear .625in dropouts d.JPG
 
Few more:
Front and rear .625in dropouts e.JPG
Torque arm on axle 2.JPG

Here's one of my clamping type next to what at first glance seems like a nice thick through hole type torque arm until you see that the axle is about to spin even before the motor is turned on.
Torque arm idea.JPG

About the only non-obvious hint I can add is that I used 2 hacksaw blades mounted on a single saw to geta wide cut between the dropout slot and the pressure relief hole. How necessary that cut and hole are I have no idea, but I feel safer with the single piece type like these than I would a 2 or more bolt 2 piece clamping dropout that relies 100% on the bolts. Even if my bolts fell off, it's unlikely that the dropout would spread with such thick material.
 
Thanks John. I think you won this thread :D

Figuring out how to make this for a reasonably experienced guy should be cake.
One question though: Do you think It'd be acceptable to drill the bolt hole all the way through and secure the bolt with a nut on the other end? A good tap and die set can be.... expensive.
 
John in CR said:
...

Here's one of my clamping type next to what at first glance seems like a nice thick through hole type torque arm until you see that the axle is about to spin even before the motor is turned on.


....

That axle in the curved torque arm appears to be smaller than 10mm. The 10mm axles I have are a very tight fit in those arms, needing to be tapped on in some cases.

The clamping torque arms are great, but not always necessary.
 
auraslip said:
Thanks John. I think you won this thread :D

Figuring out how to make this for a reasonably experienced guy should be cake.
One question though: Do you think It'd be acceptable to drill the bolt hole all the way through and secure the bolt with a nut on the other end? A good tap and die set can be.... expensive.

Yes of course. I've done them both ways, and always use the blue loctite either way. The experienced metal working guys can make something pretty and 100% effective quite easily, but with just a hacksaw, drill and angle grinder an inexperienced guy can do something absolutely effective too.
 
Back
Top