Newb questions about 1st ebike build ??

MTBcruzer

100 µW
Joined
Jul 12, 2020
Messages
8
Newbie here, hope this is posted in the correct section. I'm doing my my first ebike build, using (2) old school Jamis MTB's and the Bafang BBSHD kit. I've watched a bunch of videos and googled a bit, hoping to get some final advice before I start.

- The Bafang kit comes with the standard installation wrench...but one thing I've read a few times (and one instructional video) is that some people have trouble getting the BB NUT tight enough with the supplied Bafang tool. I'm only doing (2) bikes, but is it worth getting the $55 (ouch) Luna socket? https://lunacycle.com/bafang-mid-drive-installation-tool-kit
It's spendy, but I could get a proper grip on the nut and use a torque wrench if necessary.

- Chain Line: Read a lot about using the proper front chain ring (or motor spacers) to get a good chain line with the rear cassette. Should the chain line "target" be the middle geat of the rear cassette?

- Wire management: Bundle up and zip tie? Or cut to proper length, butt splice, and hear shrink for a clean installation?

- Brake sensors or NO brake sensors? We'll be doing a combo of street, trails, and a tiny bit of technical riding. I grew up on dirt bikes, so Im thinking maybe I don't need the brake cutoffs for myself?....but maybe a desirable safety feature for my wife? I'm assuming the levers that come with the bafang kit are less than stellear...Has anyone had any luck adapting brake sensors to their existing brake levers? (in this case older Deore XT)

- I'm sure it comes down to personal preference, but any pros and cons on throttle type and location? First guess is left side with "included" Bafang throttle, since the front derailleur shifter can be removed....BUT I grew on on motorcycles, so will be expecting my throttle on the right hand. Any feedback on the half-twist throttles?

- Is there such a thing as an acceptable & cheap bike stand? The YAHEETECH stand ($55 on Walmart and $72 on Amazon) get decent reviews, but I'm sure the weight of an ebilke only magnifies the flimsiness of the stand....Any better suggestions?

Thanks to all...any other advice or tips would be appreciated !
 
Since you have experience riding gassers dirt bikes, I believe most of those questions you answered yourself.

Half grip twist thottles are the favorite of riders with motorcycle experience and yes, you want it on the right. Some are better than others, with integrated switches or plain simple but, the choice of one is very personal and you will have to try and choose your favorite.

Cut-off brake is an important safety, or at least an on-off power switch that is conveniently placed for quick shut-off. There are some better e-brake levers than those included in ebike kits. It is up to you, to decide if you prefer switched brakes or to install a separate switch and use the brake that you like.

The chain line must be straight with the middle cog, to have the least offset at both ends. Using less gears does limit chain line offset.

Wiring is best arranged as a clean job, leaving minimal chances of accidental damage.

Riding off road does require a better bike than pavement. Most of all it does require to match the rider’s style. If you like jumping and speeding through rock gardens, you need a very good frame and quality suspension components but, you know that already.
 
Brake cutoffs are vital if you have pedal assist instead of a throttle. Don't connect pedal assist, and you can skip the E brakes IMO.

You can have a runaway motor, but its pretty rare with brushless controllers. E brakes became the norm when brushed motors were highly likely to run away if the controller failed. brushless controllers that fail just stop.

Kill switch still a good idea of course.

You won't need that front derailleur so it's shifter won't be in the way of the throttle. The mid drive has just one front gear.

I like to bundle up extra wire length under my seat, but that works best when you mount a controller just behind the seat. Keep it neat with lots of zip ties, particularly as it passes a tire where a loop could rub.
 
I'm about to start my 1st build too and from what I read the break sensor is a wire that you glue/stick to your existing brakes with a magnet, when you brake the sensor and magnet separate and activates. Check this video: https://www.youtube.com/watch?v=BreUrFgHRCw

The other option is to buy brakes with integrated sensors.
 
I did fine with the cheap wrench.

Keeping the chain on was a challenge early on, but I fitted a cheap front chain guide (similar to front derailleur) and haven't dropped a chain since.

I removed the shift sensor as it would sometimes cut out at bad times due to rough vibration such as climbing challenging hills.

I just upgraded my brakes and those sensors not hooked up yet. Not a big deal, I just try to shift mostly at low power settings. A while back I bought a dedicated button for it but haven't installed yet. I kind of don't like them on the brakes, again because it cuts all power.

Wire management I have a stem bag that has tools, charger, and most of the extra wire hidden in there.

I just use the cheap thumb throttle on the left, good enough. I like my lock-on grips too much to go to a twist throttle.

I was just again looking at bike stands, but instead I designed and 3D printed some little horns that bolt to my bars so when I flip the bike upside down the horns are supporting it, not the controls, they work pretty great.
 
Good stuff guys, thank you.

It seems like everyone removes the front derailleur, but I was wondering about leaving it on as a chain guide and "mini" chain guard (offers a little protection at the chain-ring engagement point?)

Maybe i should look for a front chain guide like jpacadd...
 
MTBcruzer said:
It seems like everyone removes the front derailleur, but I was wondering about leaving it on as a chain guide and "mini" chain guard (offers a little protection at the chain-ring engagement point?)

The derailleur inner plate will foul the BBSHD gear case.

Easiest and best is probably to use the cheesy looking plastic guard that comes with the Bafang ring, and add a little clamp-on chain stop to the inside.

xaD23G8tiZtKOYTZ_7YXD04ZviIPeNCmNsH0Jcq2Cu9ilKSJ0vRwW6MMUTfdBcn5zadgXl-B9r4wHo9ceNB7u_89Cr8lb22KCJGRf3O_B-eAjiLYR0m6oAS6RdeNQJR4OY2pgWMm6RqmKCo9mdjqKYPAWoZid0z2_PZ8ZCkT7Caf4xYGkGEC21yGM-KMCQ


Using a narrow-wide front ring and a clutched rear derailleur seems to work okay, but at a much higher cost.
 
Balmorhea said:
MTBcruzer said:
It seems like everyone removes the front derailleur, but I was wondering about leaving it on as a chain guide and "mini" chain guard (offers a little protection at the chain-ring engagement point?)

The derailleur inner plate will foul the BBSHD gear case.

Easiest and best is probably to use the cheesy looking plastic guard that comes with the Bafang ring, and add a little clamp-on chain stop to the inside.

xaD23G8tiZtKOYTZ_7YXD04ZviIPeNCmNsH0Jcq2Cu9ilKSJ0vRwW6MMUTfdBcn5zadgXl-B9r4wHo9ceNB7u_89Cr8lb22KCJGRf3O_B-eAjiLYR0m6oAS6RdeNQJR4OY2pgWMm6RqmKCo9mdjqKYPAWoZid0z2_PZ8ZCkT7Caf4xYGkGEC21yGM-KMCQ


Using a narrow-wide front ring and a clutched rear derailleur seems to work okay, but at a much higher cost.

Great info, thanks for the photo!
 
I'm ordering up my tools now....did you guys get the Bafang bottom bracket nut tight enough with the Bafang supplied tool? Or did you have to buy one of the special sockets?
 
MTBcruzer said:
Good stuff guys, thank you.

It seems like everyone removes the front derailleur, but I was wondering about leaving it on as a chain guide and "mini" chain guard (offers a little protection at the chain-ring engagement point?)

Maybe i should look for a front chain guide like jpacadd...

I initially tried using the front derailleur as the guide, but it didn't work well, I think the guide was not narrow enough, plus being metal it was noisy when the chain relied on it. The one I bolted on is plastic where it contacts the chain.

https://smile.amazon.com/gp/product/B07VQ6Y6VF/ref=ppx_yo_dt_b_search_asin_title?ie=UTF8&psc=1

I had to modify it a bit, as my 52T chainring was too big, so I cut off the lowest portion that goes under the chain, the very bottom left in the first image in the ad.
 
Hey thanks again!

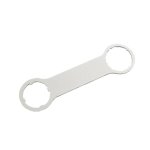
I saw and Bafang installation sticky somewhere that said the main bottom bracket nut needs be tightened to 60 - 90 ft-lbs.

Not sure if I can can get that done with the Bafang tool included with my kit.

s-l640.jpg

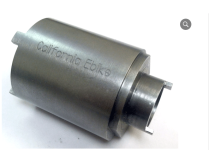
Seems like I need on of the custom sockets that run anywhere from $35 to $55 (ouch) to get that amount if torque?
https://california-ebike.com/shop/bafang-professional-bb-tool-bpt-1

Screen Shot 2020-07-15 at 8.06.16 AM.png
 
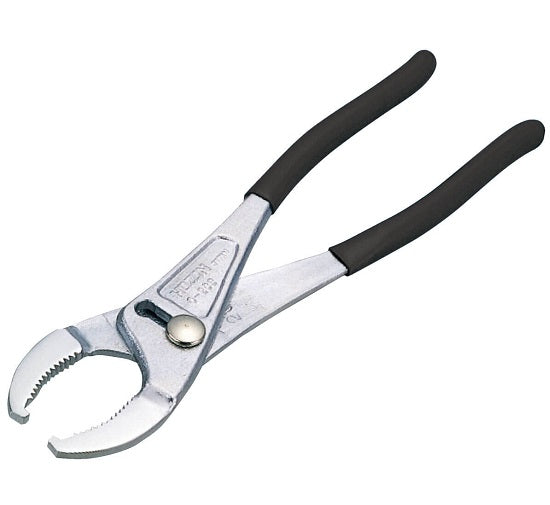
Most folks use the plate wrench. I use lockring pliers that I have available at the bike shop. Put grease on the mounting threads, rotate the motor all the way up against the frame before tightening (opposite direction that the motor turns the wheel), and get the second nut good and tight too, and it will stay.

You can’t use a torque wrench with either the plate wrench or with a lockring pliers, but it’s not implausible to get 60+ lbs-ft of torque that way.

Hozan C-203 lockring pliers:
hozan-c-203-long-ring-pliers.jpg
 
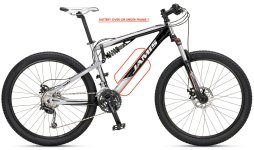
Next question for me --- mount battery over or under frame?

I believe both options are possible on my bike, but still waiting for the battery to arrive, and check battery to motor clearance on the undermount option.

over frame - Seems like gravity is on your side, regarding support. Hitting bumps or small jumps, battery weight will be supported by frame member below. Battery is more protected from rocks, etc.

under frame - Lower center of gravity, leaves top water bottle location open for intended use.....but don't feel as good about a large battery (52v 17ah) being held on by (2) water bottle screws, might need an additional strap towards the top of the mount? Battery more susceptible to damage? not sure, as motor will already be hanging lower.

Not sure if either setup offers a cable mounting-management advantage over the other?

jamis_dakarxcsport_10_z.jpg
 
If you mount it upside down, you will need to add a drain hole or two at the low point of the battery case. The usual cases are well designed to shed and drain moisture when mounted right side up, but they can collect and pool water when upside down. That location is subject to wheel spray and splashes.
 
Balmorhea said:
If you mount it upside down, you will need to add a drain hole or two at the low point of the battery case. The usual cases are well designed to shed and drain moisture when mounted right side up, but they can collect and pool water when upside down. That location is subject to wheel spray and splashes.

Excellent point, thank you. I never bike in the rain (its SoCal) so wouldn't have thought of that.
But may or may not cross small streams, depending on how this experiment works out.
 
MTBcruzer said:
Excellent point, thank you. I never bike in the rain (its SoCal) so wouldn't have thought of that.
But may or may not cross small streams, depending on how this experiment works out.

The Los Angeles river aint small, after all its called a river for a reason.

Look at that trickle, L.A. RIVER
Is Los Angeles even considered SoCal?
la river.jpg
 
I would give it a try with the bafang wrench, if you don't feel it's tourged enough you could order the socket later. You could also attach a regular torque wrench to the bafang tool by modifying the bafang wrench. I had a mechanic friend with a sensitive elbow torque it for me by hand until his elbow clicked. :lol:

I had no problem with the chainline but I didn't calculate the difference in the new front chainring vs the old one so my chain was to short to reach first gear. Who need first gear on an ebike anyway :wink: .

I wouldn't be comfortable cutting the wiring harness because the sensor wires are tiny. Here's what I did, since the harness has waterproof connectors I put a dab of dielectric grease on the male pins before joining them together. I then wrapped the connectors with self fusing silicone tape and then wrapped the harness and connectors with uv resistant spiral wrap. I secured the wires using uv resistant zip ties. I ended up with nice clean weatherproof and abrasion resistant wiring.

I opted for the e-brake levers for my kit and they seem fine to me, at least as good as the stock levers. I couldn't imagine riding without them and the gearsensor.

I have no experience with twist throttles so I went with the thumb throttle. I was worried my thumb would get tired but I find I use pas levels more than the throttle as a way to control speed. Throttle usage for me is for times when I need a quick burst of speed such as through an intersection or for help starting off.

I faced the same dilemma as you regarding bike stands. I knew they would make the job easier but the ones with enough capacity for a e-bike were out of my price range. The only time I really would have NEEDED one was when I was adjusting the brakes and shifter after installing the sensors. For me the perfect tool were these handlebar jacks. Basically they're little tripods that strap to your handlebars so they're off the ground when you flip the bike over. This allowed me adjust the derailleur and brakes without removing anything from my handlebars. They also go with me for emergency repairs.

Good luck!
 
kauaicycler said:
I would give it a try with the bafang wrench, if you don't feel it's tourged enough you could order the socket later. You could also attach a regular torque wrench to the bafang tool by modifying the bafang wrench. I had a mechanic friend with a sensitive elbow torque it for me by hand until his elbow clicked. :lol:

I had no problem with the chainline but I didn't calculate the difference in the new front chainring vs the old one so my chain was to short to reach first gear. Who need first gear on an ebike anyway :wink: .

I wouldn't be comfortable cutting the wiring harness because the sensor wires are tiny. Here's what I did, since the harness has waterproof connectors I put a dab of dielectric grease on the male pins before joining them together. I then wrapped the connectors with self fusing silicone tape and then wrapped the harness and connectors with uv resistant spiral wrap. I secured the wires using uv resistant zip ties. I ended up with nice clean weatherproof and abrasion resistant wiring.

I opted for the e-brake levers for my kit and they seem fine to me, at least as good as the stock levers. I couldn't imagine riding without them and the gearsensor.

I have no experience with twist throttles so I went with the thumb throttle. I was worried my thumb would get tired but I find I use pas levels more than the throttle as a way to control speed. Throttle usage for me is for times when I need a quick burst of speed such as through an intersection or for help starting off.

I faced the same dilemma as you regarding bike stands. I knew they would make the job easier but the ones with enough capacity for a e-bike were out of my price range. The only time I really would have NEEDED one was when I was adjusting the brakes and shifter after installing the sensors. For me the perfect tool were these handlebar jacks. Basically they're little tripods that strap to your handlebars so they're off the ground when you flip the bike over. This allowed me adjust the derailleur and brakes without removing anything from my handlebars. They also go with me for emergency repairs.

Good luck!

Lots of good tips, thank you!

BTW - Are you on Kauai?
 
MTBcruzer said:
- Brake sensors or NO brake sensors? We'll be doing a combo of street, trails, and a tiny bit of technical riding.

Here's a good explanation why you need brake sensors on trails, not sure how much of delay the bafang has but every split second counts on trails https://www.youtube.com/watch?v=7EFM3zOpEMs&feature=youtu.be&t=549
 
forcefed said:
Here's a good explanation why you need brake sensors on trails, not sure how much of delay the bafang has but every split second counts on trails https://www.youtube.com/watch?v=7EFM3zOpEMs&feature=youtu.be&t=549

That looks like a better argument for throttle-only operation on trails.
 
Balmorhea said:
forcefed said:
Here's a good explanation why you need brake sensors on trails, not sure how much of delay the bafang has but every split second counts on trails https://www.youtube.com/watch?v=7EFM3zOpEMs&feature=youtu.be&t=549

That looks like a better argument for throttle-only operation on trails.
Yep. Throttle only, and power enough to ride single freewheel. Then you can focus on the trail and avoid hitting trees with the handlebar. :D
 
Balmorhea said:
forcefed said:
Here's a good explanation why you need brake sensors on trails, not sure how much of delay the bafang has but every split second counts on trails https://www.youtube.com/watch?v=7EFM3zOpEMs&feature=youtu.be&t=549

That looks like a better argument for throttle-only operation on trails.
I can't imagine doing throttle only with a 3kw cyclone, a bit too much twist and you're flying lol
 
forcefed said:
I can't imagine doing throttle only with a 3kw cyclone, a bit too much twist and you're flying lol

Maybe you feel that you are more precise with your feet?

3kw is lame for many here, who would not even think about controlling the power of their bike with PAS.
 
MadRhino said:
forcefed said:
I can't imagine doing throttle only with a 3kw cyclone, a bit too much twist and you're flying lol

Maybe you feel that you are more precise with your feet?

3kw is lame for many here, who would not even think about controlling the power of their bike with PAS.
Everyone's different.
 
Back
Top