Hub Motor Rust Protection

Doctorbass

100 GW
Joined
Apr 8, 2007
Messages
7,496
Location
Quebec, Canada East
Hello Guys,

Yes!.. why this is so important....

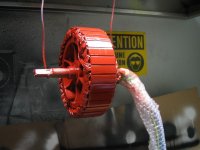
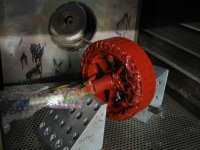
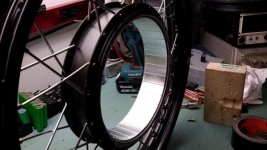
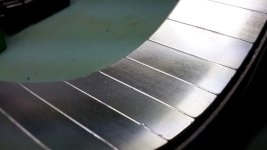
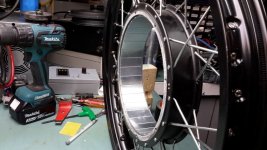
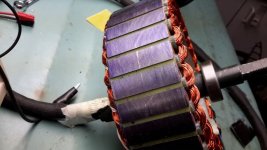
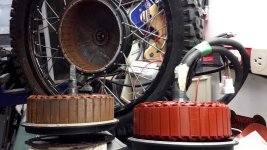
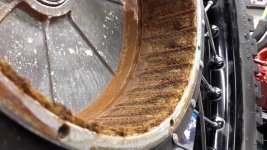
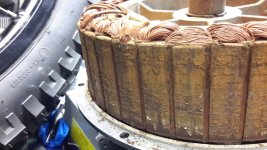
Well curiously i'm preparing the motor for my 2nd NYX that i'm building for the friends that will visit me... and the reason why i'm actually protecting that future motor, is to avoid exactly the one like a motor i got to repair that at first had apparently a problem of shorted wires, but when i opened it i was all that rust!!!

So there are ALOT good reasons why you should add protection to the inside of our motor!.. when your ebike is exposed to rain, it will one day or another be affected by water intrusion and results often the lost of your motor or require several hours to repair the damages. on the other hand if you apply the proper coating inside it will prevent rust and make your great motor to last longer! I have 10 years of experience in ebike diy and this advice will save you money and extend your ebike motor life!


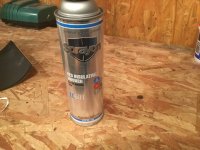
THE MOTOR PROTECTIVE COATING PRODUCT i use: SPRAYON EL601


WHERE TO BUY:https://www.sprayon.com/where-to-buy/

I only use one brand as this is the most popular and professional product i have acces to. It is SPECIALY made for that purpose and is specialy formuled to wistand the worst environment. In Canada we develop and produce alot of motor and transformer in different brands and the Sprayon is the product the most availlable/popular. The actual version i use is the EL601. It is a epoxy based coating.

SPECS:
Dielectritic Strength: 2,600VPM
Dielectric Strength: 2,600 Volts per Meter
NEMA & UL Temperature Class
310°F / 155°C
National Electrical Manufacturers Association (NEMA) & Underwriters Laboratories (UL) Temperature Class: F (310°F/155°C) Maximum Hot Spot Temperature Allowed
Color: Red
Nozzle Type: EZ-Touch™ for superior coverage and control with a conical spray
HMIS Rating: 2,4,0
Hazardous Materials Identification System (HMIS) Rating: Health - 2, Flammability - 4, Reactivity - 0

At a Glance

•Air dries In 10 minutes
•Meets NEMA & UL Class F Requirements
Resists oil, moisture, acids and alkalis
Meets performance requirements of ASTM D115-07 4.2

Uses :
Small field and magnet coils, motor windings, field coils, transformers, armatures, commutator ends, stator windings, ring and frames, bus bars, sealing electrical, switchboard parts and electronic components.

% Solids = 0.228%
% VOC = 0.5517%
Base Type = Phenolic Epoxy
Color = Red
Consistency = Liquid
Dielectric Strength = 2600Volts
Evaporation Rate = Fast
Film Type = Semi-Solid
Flammable = Yes
Flashpoint = <0°F
HMIS Rating = 2,4,0
Plastic Safe = No
Propellant = Hydrocarbon
Sheen = Semi-Gloss
Specific Gravity = 0.79
Spray Pattern = Danvern
Temp High = 400°F
Temp Low = 310°F
Temperature Class = Class F (155°C / 310°)
See more at: https://www.sprayon.com/product-categories/electrical-and-electronic-cleaners-and-degreasers/red-insulating-varnish-aerosol-el601#sthash.u2KncnEB.dpuf

https://www.sprayon.com/product-cat...greasers/red-insulating-varnish-aerosol-el601


I attached pictures of my current motor being prepared for the protection... and also pictures of my friend's motor that was completly jammed inside due to ALOT of rust!.. and the motor is nearly not repairrable due to the dammage to the magnets... this is difficult to describe HOW MUCH FORCE MY AXEL PULLER had to apply force on the axel to push the stator out of the rotor !!! even with both perfectly aligned and guided axially...

If these pictures can not convince you then nothing else can!! :wink:

[youtube]1UmA5xmzgsM[/youtube]

Doc
 

Attachments

  • 20170312_192752 (Personnalisé).jpg
    20170312_192752 (Personnalisé).jpg
    133.8 KB · Views: 7,374
  • 20170312_192804 (Personnalisé).jpg
    20170312_192804 (Personnalisé).jpg
    127.3 KB · Views: 7,371
  • 20170312_192810 (Personnalisé).jpg
    20170312_192810 (Personnalisé).jpg
    98.8 KB · Views: 7,373
  • 20170312_192818 (Personnalisé).jpg
    20170312_192818 (Personnalisé).jpg
    64.9 KB · Views: 7,371
  • 20170312_192828 (Personnalisé).jpg
    20170312_192828 (Personnalisé).jpg
    114.4 KB · Views: 7,371
  • 20170312_192836 (Personnalisé).jpg
    20170312_192836 (Personnalisé).jpg
    95.1 KB · Views: 7,373
  • 20170324_001647 (Personnalisé).jpg
    20170324_001647 (Personnalisé).jpg
    123.4 KB · Views: 7,376
  • 20170324_001709 (Personnalisé).jpg
    20170324_001709 (Personnalisé).jpg
    80.6 KB · Views: 7,373
  • 20170324_001721 (Personnalisé).jpg
    20170324_001721 (Personnalisé).jpg
    76.4 KB · Views: 7,373
Ouuuchh!

I know this had been discussed many times in the past. Justin originally mentioned that having a couple of vent holes, or adding a gore vent of some type could help, as it allows moisture to escape.

Given where the corrosion is, I wonder if an appropriate amount of ferrofluid would help. It would help drive the water. However, it would be hard to remove and replace if it were to be contaminated with road salt etc.

EDIT:

ATF fluid would help too. It would be easier to replace after it gets contaminated and becomes corrosive.
 
grindz145 said:
Ouuuchh!

I know this had been discussed many times in the past. Justin originally mentioned that having a couple of vent holes, or adding a gore vent of some type could help, as it allows moisture to escape.

Given where the corrosion is, I wonder if an appropriate amount of ferrofluid would help. It would help drive the water. However, it would be hard to remove and replace if it were to be contaminated with road salt etc.

EDIT:

ATF fluid would help too. It would be easier to replace after it gets contaminated and becomes corrosive.

that rusted motor come from a NYX bike owner. i think he left it many times at rain. The rest of the bike is waterproof but the motor was unprotected.

ATF shold help but motor MUST be perfectly sealed on the sid ecove rjoint to avoid leak and make some mess in the garage or the driveway.


one interesting thing is that all my previous motor had holes in the sid ecover to vent these.. And they also had my special protection red varnish to block water from makig damages.

It happneed many times that i took the water hose to cool the motor directly with water spray insid ethe motor!!... occasionally there was steam :twisted: .. but motor never rusted even if i force water to go in... The only thing i take care of is to let the motor still have some heat inside to let the rest of the water to evaporate if the re is still some.

Also the holes that i made was made so that it is imposible to get any water accumulation on the lower part of the rotor.. as the side cover holes was machined very close to these edges.

Doc
 
Nice thread, yes the time taken to protect a motor is well worth it for longevity.

I live by the ocean, and we got salty humid air that will attack anything not covered and sealed from corrosion, not to mention in the winter time they spray the roads with salt to prevent slippery icy roads, melting the snow and ice and leaving nothing but salt slush and salt water to penetrate anthing driven across the salt. I too painted the internal and cooked the magnet at 45 degrees celsius over the course of a weekend. Very time consuming, because I didn't dare to set higher temp as I was worried about heat might de magnetize the magnets.

I was told yesterday about a epoxy that works well with spray guns and the epoxy cures well even in room temperature, so curing and baking should be redundant. I think next time I will try that epoxy to speed up the process. Epoxy should seal in the magnets very well to prevent corrosion/rust. Have you ever tried epoxy over the magnet rather then the varnish?
 
Doc,

Do we know if this spray works in conjunction with ferrofluid? I do not ride in the rain but the summers here are very humid. I pulled the motor after running about 3 months to put the ferrofluid in and there was nothing so far. I've never had a rusty motor before but the others were painted metal V1 motors MXUS and Clyte.

I have that exact same stuff.....

I probably don't need it but sure like the looks of it when it's done. What held me off from already using it is hall replacement....I had to replace them on every motor prior to this one and adding this coating looks like an added mess.

Tom

BTW....I have a QS 205 3.5T......really wanting a 273 now.
 

Attachments

  • IMG_1124.JPG
    IMG_1124.JPG
    67.3 KB · Views: 7,246
I had received a front hub motor for free which was seized and enjoyed the process of taking it apart.

I cleaned it up nicely after a couple hours of scrubbing, job well done I thought until I reinstalled the rotor and heard a scratching sound on the side cover.
In the process of pushing the rotor out with the axle puller which took a bit of force I must have bent the rotor. I removed the rotor and could see a noticeable wobble.

A word of advice which I will try in the future, is once the side cover is off the hub motor I will pour some ATF fluid? to loosen up the rust prior to pushing the rotor out.

Hopes it helps someone out in the future.
 
macribs said:
Nice thread, yes the time taken to protect a motor is well worth it for longevity.

I live by the ocean, and we got salty humid air that will attack anything not covered and sealed from corrosion, not to mention in the winter time they spray the roads with salt to prevent slippery icy roads, melting the snow and ice and leaving nothing but salt slush and salt water to penetrate anthing driven across the salt. I too painted the internal and cooked the magnet at 45 degrees celsius over the course of a weekend. Very time consuming, because I didn't dare to set higher temp as I was worried about heat might de magnetize the magnets.

I was told yesterday about a epoxy that works well with spray guns and the epoxy cures well even in room temperature, so curing and baking should be redundant. I think next time I will try that epoxy to speed up the process. Epoxy should seal in the magnets very well to prevent corrosion/rust. Have you ever tried epoxy over the magnet rather then the varnish?


Yes, that's what i described too, I also added epoxy to the magnets, a very thin layer. this seal any holes and prevent from water intrusion to create rust and push magnet out of the metal ring.

Varnisk stick well on that epoxy. i used the DP420 from 3M... as usual !

Doc
 
That won't happen until we can drum up enough response to make a custom ES edition motor a reality. Then we will get rust protection along with lighter motors, thicker wires, custom axle, custom side covers with spoke flanges, wire exits from bearing spacer and even room for liquid cooling pipes.

But it seems hard to make the thread about such motor stay alive and keep ideas and momentum going forward.
What would features would you need in a custom ES edition motor? https://endless-sphere.com/forums/viewtopic.php?f=30&t=87007
 
Hey I dont know if this has been mentioned or not, just read OP..... I remember reading a fellow using Ferrofluid and the varnish and/or paint came off. Now I dont know if the fella used an ebay mystery version (toner?) or a legit product from a reputable commercial supplier or Justins.

Just thought I'd give ya'll a heads up.
 
markz said:
Hey I dont know if this has been mentioned or not, just read OP..... I remember reading a fellow using Ferrofluid and the varnish and/or paint came off. Now I dont know if the fella used an ebay mystery version (toner?) or a legit product from a reputable commercial supplier or Justins.

Just thought I'd give ya'll a heads up.


That's good to knwo Markz. It would be very usefull to know the entire story.. and WITCh ferrofluid he bought. The quality motor protectino coating is a epoxy based type and a good adhesion of ANY coating require proper cleaning on teh surface to paint before painting.

Doc
 
Yeah I can not recall exactly but he posted up pictures. I will try to find it.
Found it
https://endless-sphere.com/forums/viewtopic.php?f=2&t=48753&p=1260566&hilit=red+varnish+ferrofluid#p1260566
 
markz said:
Yeah I can not recall exactly but he posted up pictures. I will try to find it.
Found it
https://endless-sphere.com/forums/viewtopic.php?f=2&t=48753&p=1260566&hilit=red+varnish+ferrofluid#p1260566


Markz, The Ferrofluid DID NOT wiped off the red insulating varnish. :wink:

If you read carefully all the thread posted about that you will discover that the second motor , the one with smaller holes on the side covers had way less paint wiped off.. and that is due to the holes in the side covers that let less dust to enter and mix with FF.. In fact these holes let dust and sand and particules to enter and merge with the ferrofluid.. wicth make it more ABRASIVE.... just like waterjet cutter and sand in that water... without sand the jet is less abrasive..

So:.... motor where the red insulating varnish wiped off IS NOT because of the ferrofluid.. but because of the HOLES in the side covers that have cought dust and sand that made the ferrofluid more abrasive and THIS wiped off the varnish... not the ferrofluid itself. As a proof, the second motor with less damage have smaller holes to let sand and dust particules to stick to the magnet and ferrodluid.. so the paint is LESS abrasive this way.

THAT'S the answer you need!

conclusion: Ferrofluid or ATF will become more ABRASIVE IF mixed with dust , sand or various particules that enter thru the side cover that have holes in it... and that can wipe the paint... but motor with Ferrodluid only will not.

btw this is very unusual to have motor with drilled side cover AND ferrofluid or ATF... that's like removing the valve cover on a ICE engine and let it run this way :lol:

Doc


https://endless-sphere.com/forums/viewtopic.php?f=2&t=48753&p=1279216#p1279216
 
Ok i have repaired that fully rusted motor!

Alot of hours of work!!

My idea was to use duct tape to remove magnetic particules from teh magnets .. but it was very innefficient, i was only able to remove a very thin layer of particules at a time and would have wasted $$$ of duct tape and hours of hopes!.. I finally took that motor at work and used high pressure 125psi compressed air, protective glasses and respiratory mask and it worked like a charm!! the pressurized air jet was more powerfull than magnets was to retain these!

btw.. NEVER forget to wear ears protections!!! :shock: in fact the compressed air jet was not so loud.. but once you hit one of the threaded holes for the side cover screw... OUTCH !!! the wistle was so loud and high frequency contnents and all harmonics than i tought i had partialy lost hearing !! in fact these hig frequency burst are VERY dangerous!!! lesson learned!! glasses, mask AND ears protection !!

there was no rust on the magnet rotor, most of it was on the stator outher diameter as well.. i used a orbital wityh 120 grit abrasive disk to remove it all and it worked very well and the surface finish is in fact better than original.

Then i painted these parts with teh red insulating varnish after cleaning every surface with isopropylic alcool.

The green phase wire was alst dented and had to be repaired It probably hit the sharp edge of the axel hole end too many times.
 

Attachments

  • IMG_0101 (Personnalisé).JPG
    IMG_0101 (Personnalisé).JPG
    64.5 KB · Views: 7,050
  • IMG_0105 (Personnalisé).JPG
    IMG_0105 (Personnalisé).JPG
    80 KB · Views: 7,047
I think this thread will safe me many houres of working for a new motor one day... The only problem is, that I have already ff on my rotor (QS 205 50H). I could theoretically remove it with a syringe/injection but I wonder if I would be able to remove all of it... Also I would have to get it baken somewhere.. Do you think a hair dryer would do this job? It will take longer for sure, but my good old parents will propably kick my ass, if I would put that motor inside their oven... What do you think?

2.) Or would be some extra sealing on the side and on the axle be the answer to let the motor least about 3 years or more? I think until then I will have no problem, affording a new hubbi..
 
DB have you got to ride that newly repaired and resprayed motor yet? Did you cook it in a pro powder coating oven?
I am very curious to know if you notice any hints of demagnetization after the cooking at 100 celsius. If not that will save a lot of time compared to what I did at 45 celsius.
 
DasDouble said:
I think this thread will safe me many houres of working for a new motor one day... The only problem is, that I have already ff on my rotor (QS 205 50H). I could theoretically remove it with a syringe/injection but I wonder if I would be able to remove all of it... Also I would have to get it baken somewhere.. Do you think a hair dryer would do this job? It will take longer for sure, but my good old parents will propably kick my ass, if I would put that motor inside their oven... What do you think?

2.) Or would be some extra sealing on the side and on the axle be the answer to let the motor least about 3 years or more? I think until then I will have no problem, affording a new hubbi..

If you use the right solvent you could remove the ferrofluid (maybe do a search on ferrofluid removal on google) or contact Ferrotech directly.

You can buld you a poor man oven easy. Use a simple cardbaord box and a hair dryer. it should raise temp at up to 70-80 celsius easy depending on the vent you put on the box. Notice that the hair dryer MUST remain outside the box!

Doc
 
Hey,
I recently had my very own experience with rust in a front wheel motor :evil: and thus found your very helpful post. :thumb:

However I was wondering, why has it to be insulating varnish?
On the stator (with the windings) everything is already isolated and on the rotor (with the magnets) there is no current flowing at all.

So should't this be achievable with any weather proof / tough varnish?

Thanks again!
 
IT doesn't have to be insulating varnish. But that stuff is designed for the purpose, and usually capable of handling higher temperatures and worse conditions tahn plain paints.
 
Doc
I have my 5403 apart, obviously its 10 years old and needed a birthday, phase wires fubar so new harness and cleaned up the housings.
Should I paint the magnets too?

Some very minor marks from corrosion and basic corrosion on the stator (are they 0.35mm lams all the way back then? they look thin).

re-tapping the side cover holes as guessing from factory were shit. New hardware in the mail for reassembly.

I ran 10ml statorade last 3000kms before taking it apart and little if anything left of it.

I know i'm 10 years too late to this thread but hey! here we are


THANKS Karl
 
Will be trying this product but the sprayon 600 instead of the sprayon 601

Resistance Properties for the 600
“”Abrasion Resistant””, Chemical Resistant, Moisture Resistant, Oil Resistant, Water Resistant
https://www.grainger.com/product/SPRAYON-Insulating-Varnish-Clear-1D268


Resistance Properties for the 601
Chemical Resistant, Moisture Resistant, Oil Resistant, Water Resistant
https://www.grainger.com/product/SPRAYON-Insulating-Varnish-Red-1D276

It looks like the Sprayon 600 is the better option because of the abrasion resistance. Especially using statoraid because risk of abrasion affect on the enamel overtime.

Also the 600 Is Use On
Concrete, Fabric, Fiberglass, Foam, Glass, Masonry, Metal, Most Plastics, Rubber, Wood

The 601 is only designed for metals. So the 600 would do a better job of sticking to the other parts that’s on the stator not considered metal.
 
Eastwood said:
It looks like the Sprayon 600 is the better option because of the abrasion resistance.

If anything is rubbing against your stator or magnets, your motor has more serious problems than rust.
 
Back
Top