Scratch built 33" Kicktail Monocoque longboard

Ohbse

10 kW
Joined
Dec 26, 2013
Messages
886
Location
Auckland, New Zealand
A few people expressed an interest in what I've been cooking - so I thought I should keep a log and maybe inspire some others to jump in.

I've long wanted to build an electric skateboard, mostly for fun and to make for the occasional short trip around the CBD or to and from the train station. Unlike my daily ride Giant DH which is hideous but purely practical, I wanted this to be more 'finished' and maybe even beautiful.

Design considerations in no particular order:

Moderate speed - while I might be a bit of a speed freak on two wheels, I have little desire to push it on 4 tiny ones. Physics isn't on my side, plus I haven't got a ton of skate experience and something that does 40mph would probably get me hurt. Target here is ability to cruise at 30km/h safely.

Kicktail - I wanted one for low speed maneuverability and kinda for looks too.

Hub motors - I don't want to deal with belts and pulleys, they suck for packaging, visuals, maintenance and noise. Hub motors have come a long way in the e-skate world with some pretty okay-ish chinese offerings. I'm not going for absolute performance, ride quality or lots of distance, so starting with a cost effective option should be fine. I bought a set of 90mm x 52mm "1000watt" hubs from diyeboard

Internal battery/controller etc - I don't like the look or the practicalities of having a pregnant guppy enclosure bolted to the bottom of the board. Water ingress is a pain.

18650's - I built a 10s3p pack of Samsung 30Q's - this will comfortably do 1500watt of output which I figured should be plenty for my moderate speed and range requirements.

Smooth silent controllable power - I didn't want something that was slow, strained or unreliable. Control is everything and FOC was highly desirable from a sound perspective. I bought a dual VESC 4.2 from Flipsky

Maple veneer, vacuum bag over mold deck - I was inspired by decks like the Evolve Carbon GT with a top mounted access hatch, but I didn't want to get into the potential pitfalls of composite construction - you can look around to see lots of people have had issues with the carbon decks with a variety of cracking issues or even catastrophic failure - no thanks! I opted for a more forgiving and traditional skateboard building material, Canadian rock maple veneers. I also wanted to learn about the molding and vacuum layup process. As an entry point I bought a full kit from Roarockit, 3x longboard 'kits' of 7 ply each, vacuum bag and a hand pump.

More to come (with pics!)
 
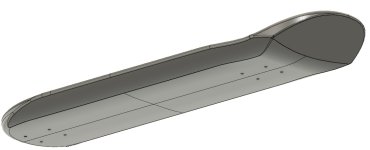
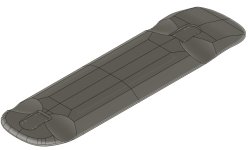
So I started with CAD on the deck design. Because I wanted the battery and controller internally mounted I knew I was going to end up with quite a substantial thickness. I wanted to slim down everything outside of the battery area rather than leave the entire deck as a gigantic slab. Here's a shot of attempt number 1:

View attachment 9
Deck v1 2.JPG

This was quite short, about 29" total length - pretty much as short as it can be while still having the internal 30 cell pack and controller. This is also not quite thick enough - by the time I machine out a 20mm deep pocket for the battery there's not a lot of material left. It's also missing a critical feature for wheel clearance.

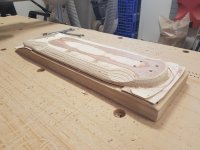
I carved this out of a block of scrap bits of MDF:

View attachment 8
Deck v1 mockup 2.jpg

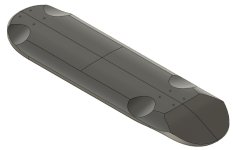
From this I was able to figure out how much I was going to need to relieve for wheel clearance:
Wheel clearance 1.JPG

So I made up a mold from laminated MDF. I also made this prototype about 1.5" longer than my first mockup.

View attachment 5

I vacuum bagged up a blank of cheap 4mm plywood
View attachment 4

Then roughed out the prototype
Rough prototype 1.jpg

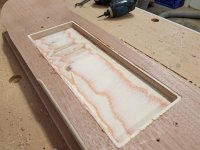
Flipped it over and machined out the battery volume

Rough prototype Battery 1.jpg

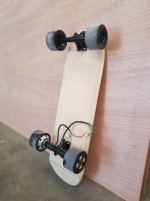
I slapped in battery, controller and soldered up phase/hall connections.
View attachment 1

I cut out a battery cover from the same 4mm ply and pre-drilled for screws around the circumference.
Cover.jpeg
Configured the VESC and was away! I threw some random settings on the VESC - it turns out that was probably much too much power.

First impressions - these bushings are rubbish, the throttle is very controllable and it's fast as hell - it literally power wheelies even with a significant weight shift forward. I handed the controller to a friend of mine who daily rides an evolve and he put it through its paces, hitting 43km/h on my workshops street. We did some side by side drag races and there's no comparison, this thing at 40% SOC was many metres ahead after no time.

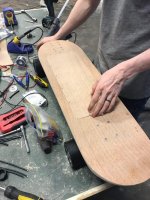
I threw on some temporary grip tape (dollar store sandpaper and some spray adhesive) and literally halved all of the power settings in the VESC - that delivered a much less sketchy ride. In this form I gave quite a few test rides to people and rode it around myself to get a feel for where I wanted to go with the final design.

Eagle eyed will spot those prototype boards aren't quite the same, there ended up being a couple of them, also changed up the truck mounting point. I had some failed layups and scrapped some crappy ply - like everything there's a learning curve and some iteration
 
After riding around the prototype for a while, I had a bit of a wish list

  • Slightly more wheel clearance, the relief for wheel clearance was one of the coolest parts - carving through the layers of the board
  • Slightly more wheel base
  • Carve away more material, in particular improve the appearance of the snub nose leading edge
  • Sink the truck mounts into the deck to decrease the ride height
  • Slightly more concavity
  • Shallower angle kick tail

I tried to get a more organic surface rather than a plank with rounded off edges - you can see this on the profile view in particular

View attachment 6
Deck v5 bottom view.JPG
Deck v5 Profile.JPG

I made another MDF scrap mockup board

View attachment 5

After tweaking a couple minor things around wheel cutout placement I machined another mold

Mk5 Mold.jpg

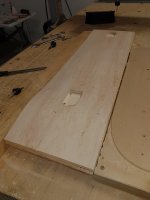
and laid up a total of 21 maple veneers

View attachment 3

This is quite a nerve wracking process and I split it up in to three groups of 7 layers. There's a lot of glue, lots of things to go wrong. I had a tiny pinhole air leak on the last glue up and by the time I came back to the bag it wasn't holding a vacuum at all - I was pissed, but apparently it held long enough to adhere and get the shape in place - the blank was usable.

I clamped it down to the mold on the CNC and then pocketed out down to the truck mounting surface and then drilled the truck mounting holes. I then used these to hold down the blank to the mold while machining the other surfaces.

Mk5 Machining start.jpg

Then roughing, then parallel passes

https://gfycat.com/DecimalClutteredImperialeagle
https://gfycat.com/MemorableLeanCornsnake

and the underside off the CNC
Mk5 Post parallel.jpg

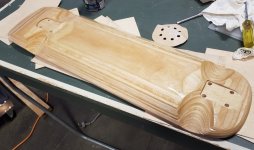
After rough sanding
Mk5 After Sanding.jpg

There's a little more material to remove to clean up the last of the machining marks, but overall its come up really nice. There's some really minor chip out that I'll need to tidy up

I need to finish up the battery cutout on the top side of the board and decide on what I'm going to use for a charger connector
 
Nice work mate!

That's so cool how you can make you own deck just like that. Made that look far too easy.
This thing will be practical as hell being fairly lightweight and not too long. And sounds like decent performance as well.

Did you hook up a bluetooth module to your VESC?
 
Haha cheers man, the write up does make it seem easier than reality. Like anything I start off with saying 'how hard can it be?' and just learning as I go.

If there's any interest I can make more of these, they're not going to be cheap though between the material cost (3x a normal deck!) and then machine time plus finishing.

There's a few reasons why this style of deck isn't readily commercially available, the biggest one is simply price which is time and complexity embodied. I have some ideas for making another design that's very similar in plan view to an evolve bamboo, but with reduced material cost and machining complexity, keeping the top accessed internal volume. We will see...
 
Oh, re Bluetooth - I ordered the module, but flipsky never delivered it with the controller - I need to hit them up about that.

Today I've got a set of the Enertion R-spec hubs and focbox unity set up on the mock-up deck for testing. First impressions: this stuff is serious! Motors are much larger than my China special hubs, controller is a much more finished product.
 
Some proper skills with your 3D CAD design and CNC machining. Is that what you do for work?

Getting a bit more serious with the Enertion kit. So that's to build a prototype of a board that you're going to sell?
 
Woops didn't spot I had a reply :)

CAD/CNC is a hobby for me but a business for my wife - I built the router myself, most of the mechanical stuff is kit from CNCrouterparts, but I ended up doing all the motion control/wiring etc from scratch. Day job I run datacenters in various places round the world.

Regarding building these for sale - maybe. Only way it would be feasible would be to have a small batch of pre-orders and then I could somewhat 'productionise' the construction. The first one took me a ludicrous amount of time.

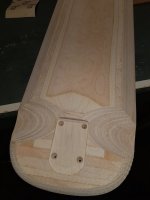
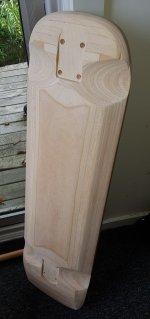
Update on the deck! It got finished with many coats of high gloss varnish:
View attachment 4
Underside finish2.jpg

This takes forever, coating one half of the deck at a time, waiting 6+ hours for it to dry, flip and repeat with some sanding thrown in. Looks and feels great, but ridiculous amounts of time.

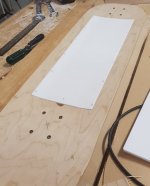
I kicked around loads of ideas for doing the cover for the electronics. In then end I arrived at acrylic which is held in place with recessed neodymium magnets. I tried a few different sizes and quantities of the magnets, starting off with a handful of 4mm diameter banggood magnets which were of highly questionable quality. That worked, but the hold down force was too low.

Cover testing.jpg

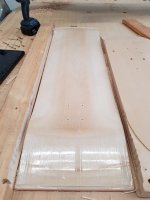
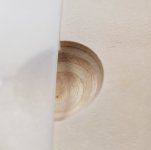
I purchased some much stronger, much pricier rectangular magnets - these worked much better, I could now have the full weight of the battery, turn the board upside down and shake and it won't come out. In the event of a big crash where the board goes flying I think there's still a good chance this will come off - but honestly I'm going to have other bigger problems if that ever happens. The cover is removed by getting a finger into this little hemispherical cutout on the edge which I quite like. Here it is straight off the CNC:

Cover Pull.jpg

I machined a few covers from opaque white acrylic before I arrived at the final magnet spec, final one I made transparent - because why not. I didn't want it to be perfectly transparent so I sanded inside and out after machining to give a subtly frosted look.

View attachment 5

I built a new battery - Spot welded with 0.6mm nickel, 8s 4p of Samsung 30Q - 32 cells. I opted for this configuration over 10S because the higher voltage was unnecessary for the speed I wanted to achieve and I still had plenty of additional amps available on the controller limits to dial up performance once I'm more comfortable with the ride. It also meant I could get another two cells in there compared to a 10s3p pack. It also means I can plug it into my Powerlab8 for balance charging when required. Here it is mocked up in the deck to give you an idea of how tight it is.

View attachment 8

Final pack is further insulated with silicone sheet between the two series strings, more Kapton and then heatshrink with XT150 bullets soldered directly on the outputs.

I put everything together and tried it out - feels great! I changed bushings for some Bones Integrated stuff (sounded fancy) and that made a very big improvement. The additional wheelbase is good from a stability and ergonomic perspective. Biggest issue now is that it's slippery as hell, especially if you have any sort of moisture on your shoes.

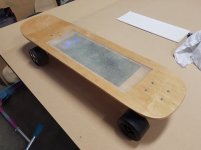
I didn't really want to cover up the deck surface or the transparent cover, so I ordered some Lucid Grip - this is a two part product with a clear paint/adhesive and a grit made from recycled glass. I actually got the glow in the dark version which I really love the look of in the dark.

Here's just the cover done:

View attachment 2

and here's an example of what it looks like in the dark:
Glow2_1800x.jpg

Here it is all together as it sat yesterday before I masked it up and gripped the rest of the top surface

Complete before grip.jpg
 
So with the exception of the motor wiring that penetrates the deck right at the rear edge of the battery enclosure, there are zero holes or external controls at all. It has no power button, no external charge connector - the flipsky vesc powers itself on after the wheels move only a few inches and times out after a while - I've measured the quiescent current on this and it's pretty low, not enough to bother me at all. If I'm planning on storing the board for more than a couple weeks I'll just unplug one of the battery leads.

The charge connector is attached right on the edge of the VESC between the battery leads, you can get to it by popping off the cover in a couple of seconds - it's honestly easier than trying to plug in a conventional barrel connector on the underside of the board.

I'm already working on the CAD for the next one - this one more of a longboard, essentially the same wheelbase and rough shape as an evolve bamboo from the top.

Split battery volume with a central spine that's contiguous from truck to truck, inspired by Hummies deck and the Haya integrated deck. Capable of 10s4p, plus BMS, controllers etc internal. Fully hidden motor wiring. Hopefully a bit more flex for a more comfy ride. A LOT more easily manufactured which less material wastage. Similar magnet attached lid (with a few more magnets)

Sneak peak
 
Wow that looks good with the glossy varnish finish. Nicely done!

I like the idea of having your cover held on by magnets, so convenient. And because its so convenient, completely removes the need for externally mounted power button, charge port, ect. Could always install some kind of retaining brackets to hold down the battery if you don't want it flying out in a crash.

Does the acrylic cover flex much underfoot?
 
Stielz said:
Wow that looks good with the glossy varnish finish. Nicely done!

I like the idea of having your cover held on by magnets, so convenient. And because its so convenient, completely removes the need for externally mounted power button, charge port, ect. Could always install some kind of retaining brackets to hold down the battery if you don't want it flying out in a crash.

Does the acrylic cover flex much underfoot?

Cheers. No it doesn't, feels rock solid when the battery is in place - with the enclosure empty there's a degree of flex, but obviously you won't be riding far without a battery in there! The cover is 3d contoured to the same curvature of the deck but the bottom is flat and the battery is very precisely the exact size of the internal volume, so what little of your weight hits the pack directly is very evenly distributed.

I'm going to add some little brackets that hold down the pack directly just in case. I thought about integrating some velcro straps, but they would take up too much height.
 
Back
Top