Winter Project... Design and Build an eScooter

ronncat

100 mW
Joined
Nov 24, 2018
Messages
36
This all started with a trip to San Diego late last year. It was impossible for me to not notice the hoards of eScooters everywhere. They were parked on every corner and there were people tooling around on them downtown and at the waterfront. I thought to myself that it would be neat to have a scooter again. My last one was a HEAVILY modified goped that I gave away when I moved to a new neighborhood some 16 years ago. Didn't think the CC&Rs would allow such a noisy beast :?

Well, one thing lead to another and I decided that rather than buy one, I would build my own. Something I've done several times in the past with a plethora of Multicopters, gimbals, CNC machines, golf carts, etc. The first thing I do when I decide I want to undertake something of this nature is that I research the project as much as I can. Thank the lord (and Al Gore) for the internet. And that leads me here to ES. What better source of info than a forum on electric vehicles???

I began to devour all of the info I could cull from this site. I was especially blown away by the threads on Emoto's Scootabot and alex_2d's VOSTOK 1 :) I wish I had the skills that those two display in their builds. Unfortunately, I don't, so what I will be chronicling is a build by a regular guy with a few tools in his garage, imagination, and a desire to learn whatever I need to to succeed in this undertaking...

First thing I did was to use my feeble skills with Visio to design a 2D version of my scooter. I would love to use Solidworks or Shark FX to design in 3D, but no matter how hard I try I can't even begin to get the hang of it. So after a few attempts, this is what I came up with.View attachment 3

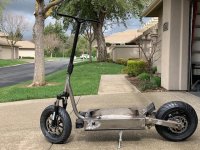
As you can see, hub motor, front and rear suspension, and much larger diameter tires than the ones I saw in San Diego. So I started to order parts. A 20" suspension fork, some riser bars, a headset, 10" 1000 watt hub motor, disc brakes, tires, front wheel, pod lights, etc...IMG_0130.jpg

For the frame... Would love to make it out of aluminum like Emoto and alex_2d, but I can't tig and my mig is barely acceptable, so steel it is...View attachment 1

Using the measurement from my Visio, I started cutting up the steel...IMG_0133.jpg
 
Next I needed to create the downtube. Using BendTech software, I came up with a plan.IMG_0149.jpg

Tried to get close with my tubing bender, but made a few changes and ended up with this.IMG_0206.jpg

Notice you don't see it until after I ground the welds?? :oops:


Oh well... went to mount the front wheel on the fork but what... no axle on the wheel. Had to order that. When it came, problem #2. The wheel is made for a scooter or moped, not a bicycle, so the width was all wrong to fit on to the fork. The disc would have ended inside one of the fork legs. So, I mounted the wheel up in my mill and removed enough to make things work.View attachment 2

Next I had to drill and tap mounting holes for the disk. Only enough hub for three bolts... hope it's enough :confused: View attachment 1

Finally fitted the whole assembly to the fork...
 
So now the battery/control box was all welded up and attached to the front end. Started to look like something. Had to visualize what the rear would look like...View attachment 2

Enough thinking about rear end. I needed to just build it. First the swingarm and dropouts. Milled the dropouts out of solid 1X2" cold roll. The metal is about 0.6" thick where the wheel clamps on. Don't think I'll need torque arms for that :wink: Welded the dropouts to 1X2 1/8" rectangular tubing, drilled the ends to accept some big ol flanged bearings, and the swingarm was done.

Now the challenging part was to create the suspension. I decided early on that I was going to place a vertical shock on each side of the swingarm. So I went and ordered some cheapo Chinese shocks. Then I decided I wanted to use a linkage rear suspension, so I ordered a new (and better) monoshock for that purpose. About the same time I decided that the handlebars, even though they had a 9" rise and I added a stem with rise and I added a stem extension... were too low. So I redesigned the front end and this time ordered scooter bars and the required attachments for them. I also decided that the voltage meter that I was planning on incorporating into the "dashboard" needed to be upgraded, so I ordered a Cycle Analyst V3 to replace it...

Starting to see a pattern here???? As with most of my builds, I get an idea and order all the necessary parts for them. Then I either forget what my idea was, or change it and then have a bunch of extra parts that I don't have any use for.

Anyhow, back to the linkage suspension. I spent many hours over several weeks researching this type of suspension. Tried to understand the math behind it all. I looked at all the motorcycle forums to try to gain some knowledge. Even ordered some dogbones from ebay for the build. Well, in the end I just flew by the seat of my pants and came up with this.IMG_0388.jpgIMG_0447.jpg
 
So now I had a rolling chassis. Had the neighbor take it out for a spin...View attachment 3

Decided it was time to install the CNC kickstand I bought from ebay for $12.50 including shipping. Don't know how the Chinese can ship it to me for that... It costs me that much to send a couple of pounds of my fresh roasted coffee to friends that live only a few hundred miles away. :roll:

Unfortunately, the only thing that comes is the kickstand itself. No mounting bracket or springs. The quality of the machining is pretty lame too and that's coming from a rank amateur. So I remachined the kickstand a bit to improve it, then I designed and built the mounting bracket... and for the spring???? Amazon Prime to the rescue.

Welded it onto the battery box and modified the HDPE bottomIMG_0456.jpgView attachment 1

And Wala... Kickstand is done
 
Final post to catch up on my progress to this point. One reason I post is so that years from now if something goes wrong with my scooter (heaven forbid) then I can access my thread to see what the heck I did. Much easier than trying to remember.

Given that, a few notes. Originally I mounted 90/65 tires on my rims. They rims happen to be 2.15" wide. The rolling diameter is a bit under 15". My neighbor commented that the tires looked awfully skinny (about 3.5" wide) so I decided to order some wider tires. Again Amazon Prime will be sending me a 100/80-10 tire for the front and a 130/50-10 for the rear. The new rolling diameter will be a bit more than 16" which luckily I have the room for as I built adjustability into the rear dropouts and the forks will take up to a 20" tire :wink: Once again, more spare parts...to the tune of 4 brand new 90/65-10 tires. I hope that the rear tire fits on the rim so I don't have to buy a wider one...

Also, I am still waiting and waiting and waiting for my battery pack and charger to be built and delivered. I ordered this early in the game... 48V 25aH Li ion and a Cycle Satiator. The individual that is building this has gone through some very interesting (rough) times. So much so that I recently decided to have him build it to 60V instead of 48V. I think I just picked up 25% more speed :D That is.... if I ever get the darn thing. I've waited so long that I've even begun to research building my own with 18650's. Doesn't look too hard and it would be a good excuse to buy a kWeld :wink: Well, hopefully he'll come through...he better... he has $725 of my cash....

So, last week, I was in Florida and saw a bunch of Lime and Bird scooters parked about. It was getting a bit dark and I happened to notice the LED ground effects on those scooters. Decided right then and there that I needed that as well. Amazon Prime to the rescue!!!IMG_0441.jpg

Ordered a half dozen pod lights then milled some relief into the bottom piece of the scooter....IMG_0442.jpg

Then I bolted on the lights and ran the wiring.
IMG_0443.jpgIMG_0444.jpg

Soldered it all up then attached a 3S lipo to test it
View attachment 1

There you have it. Everything I've done up to date. I still need to design the tail/brakelight assembly. It will attach onto the 45 degree steel tube that the upper shock attaches to. Then a dashboard that will incorporate the CA, keyswitch, and control buttons. I've already modified the brake levers with miniature reed switches so they will activate the regenerative braking and brake lights on my Kelly 7212. Need to bend a 45 degree tail onto the 3/16" aluminum diamond plate that sits on top of the battery box. I think I'll take the frame to the powdercoater when its all done. It's too big to fit in my little powder coating toaster oven and it's too cold to paint it. I will hopefully continue to post as I get further along.

Once again thank you to Endless Sphere and to all the great posters on the forum. Has made my project much more feasible and I sincerely appreciate all of the knowledge I have gained from the forum
 
WOW! Nice build! :bigthumb: :bigthumb: :bigthumb:

I have a few suggestions of you don't mind.

1. You may want to strengthen the part where the 'goose neck' of the scooter connects to the rectangular box (circled in red). This area will be subjected to heavy bending load during braking and when riding over bump/pothole.

2. If you make the box a little deeper, you will have room to put more batteries in the future. You will need more batteries should you want to upgrade the motor or have extra range later on.

 
armandd and Dui,

Thank you for your nice comments :)

One reason I decided to post the build on the forum is so that I could elicit suggestions and advice from my fellow members. I wholeheartedly accept any and all tips that you may provide. Remember, I'm just a regular guy with no training whatsoever, flying by the seat of my pants and designing what seems to be "right" to me. I usually tend to overbuild my stuff which results in bulletproof things that weigh a ton :roll: Thats probably why some of my early multicopters had such a short flight time.

Anyhow, in response to armandd, I too have wondered about strengthening the connection fo the down tube. Not only to the battery box, but also where it connects to the head tube. I have considered gusseting the connections with triangular tabs or welding tubes to either side on the down tube and then to the battery box. What you may not have seen in my design is that the downtube is not just welded to the end of the box. The ends are actually 2X4 rectangular tubing. I bored a 1-1/2" hole thru both sides and the downtube penetrates from outside to inside, then it is welded on both sides :) IMG_0460.jpg

I plan to use this as a conduit to run my rear brake cable and the wiring from the Cycle Analyst into the battery box. Sort of like internal cable runs in a bicycle.

As far as capacity of the battery box, it has usable dimensions of 20X12X4 inches. This will house my controller a DC-DC converter and the battery. The original battery I ordered was 48V 25aH and measures 9.5X5X3. Since I changed that to 60V 25aH, I figure it will be about 12X5X3 or so. That means I could fit 3 of these batteries and still have room for the controller and other stuff!!! So the capacity now sits at 60V and 75aH. I think my wallet would go dry before the batteries :lol: I guess that's all the more reason to think about building my own packs...
 
ronncat said:
As far as capacity of the battery box, it has usable dimensions of 20X12X4 inches. This will house my controller a DC-DC converter and the battery. The original battery I ordered was 48V 25aH and measures 9.5X5X3. Since I changed that to 60V 25aH, I figure it will be about 12X5X3 or so. That means I could fit 3 of these batteries and still have room for the controller and other stuff!!! So the capacity now sits at 60V and 75aH. I think my wallet would go dry before the batteries :lol: I guess that's all the more reason to think about building my own packs...

Don't forget to leave enough space for your battery monitoring system as well as the power wires. Those things are often forgotten during the design stage but they tend to occupy a fair bit of space.

I think your goose neck should hold just fine, it might be a good thing if it actually flexes a little, could make for a more comfortable ride.
In my opinion, the weak point of the frame would be the center of the box. If it bends, it will certainly be there.
Let's say you apply a huge weight on the center of your box, then the side walls will tend to be pushed towards the outside. Too much force and they can collapse. But that might be an unlikely scenario, depending how much you weight, plus it's easy to solve (just weld some little tabs on all the lenght of the box -- they could be useful to attach your deck too by the way).
See here what I'm talking about:


The only "real" issue I see with your build would be the weight: a steel frame is heavy.
Maybe you could drill some holes all around the box and the swingarm to save a little bit, then insulate them with some kind of lightweight plastic. It would make the frame look less massive too, so it might be a nice design feature.
Also, use aluminum screws and nuts wherever you can, those things seem lightweight individually but they add up pretty fast.
 
Dui,
Appreciate your comments :) They are a great help to me.

As far as battery box size, it should be sufficient (for now anyhow) as I only intend to run a single 60V 25aH pack. That will leave the other 75% of the available space for controller, bms, DC converters, wiring, lunch :lol: , etc.

Good to see you think the downtube connection to the box will be sufficiently strong. I might still add some bracing to be safe.

I am not too concerned with the box flexing. Like I said before the box is entirely welded from 1/8" steel. The two ends are 2X4 rectanguar tubing and they are connected by lengths of 4" flat bar on the sides and the bottom. Then the top was strengthened with triangular tabs in the corners. 1/2" HDPE is bolted onto the base to create a solid bottom and 3/16" aluminum tread plate will be bolted to the top to complete the sandwich. No way in heck this will ever flex. Could be crushed if a tank rolled over it though :wink:

That brings us to your final point...WEIGHT....

Yes, this thing is a pig. This is not one of those little scooters that you can fold up and take on the bus with you. Matter of fact it might be bore effective as a battering ram. All kidding aside, you made me curious so I weighted the rolling chassis. No batteries or electronics, just what is in the picture.... :shock: :shock: :shock:

79 POUNDS!!! No wonder I hurt my back last weekend lifting it....

I think with the full complement of batteries, lights, and electronics it will tip the scales just north of 100 lbs. I hope it can even work when I'm done. Some of the heavy duty scooters I see online like the Works Electric Hollyburn at 86 lbs and the Dualtron Thunder at 95 lbs are in the ballpark, yet they have more powerful motors. We'll just have to wait and see. If I ever build another scooter, I guess I'll have to learn to tig weld. Could drop quite a bit of weight if the thing was built of aluminum and carbon fiber :wink:
 
ronncat said:
79 POUNDS!!! No wonder I hurt my back last weekend lifting it....

Wow. That's massive, be careful you might create a black hole if you keep adding more steel ! :lol:

Do you know how much the hub motor weights by itself?

You'll really want to lighten this thing, too much weight is hard on batteries and motors (they have to deliver more current for a longer time to reach their speed, so they heat up). Not critical in your case since you plan on a big 26Ah battery, but it would be better.
 
Dui said:
ronncat said:
79 POUNDS!!! No wonder I hurt my back last weekend lifting it....

Wow. That's massive, be careful you might create a black hole if you keep adding more steel ! :lol:

Do you know how much the hub motor weights by itself?

You'll really want to lighten this thing, too much weight is hard on batteries and motors (they have to deliver more current for a longer time to reach their speed, so they heat up). Not critical in your case since you plan on a big 26Ah battery, but it would be better.

Haven't actually put the hub motor on a scale, but according to the QS website, it weighs around 35 lbs. Yea, I know, this thing is gonna be a pig :roll:
 
Not a lot of progress lately... Lot's of other things to do in life.

I did manage to design a build the rear LED taillight/stoplight, and added a couple of pod lights up front as headlights. Along with my ground effects, there's no way you won't see me comingView attachment 1IMG_0482.jpg

With lots of cussing and spitting, I managed to shoehorn bigger tires onto my hubmotor and front wheel. Gained about 1-1/2" in width on the back going from 90/65-10 to 130/60-10. Also changed to a 100/80-10 on the front. A little problem there as the tire is stuck between the fork legs... got a 90/90-10 on the way. With the increase in rolling diameter, I'll probably pick up a couple of MPH's as well :D

Lastly, my battery situation. I ordered and paid for a custom built 48V 25aH battery from an ebay builder back in November. When I hadn't heard anything by the middle of January, I contacted the builder and was given a whole lot of excuses and hard luck stories. Well, being a softie, I asked him to upgrade my build to a 60V 25aH battery...AND I SEND HIM MORE MONEY TOO!!!! Still haven't seen my battery. Hope he hasn't skipped town with my $725 :cry: ... (Supposed to get a slightly used Cycle Satiator as well) Anyhow, I've decided to build my own battery, so I've ordered 200 18650s from a seller with a good reputation on this forum. Also ordered a K-Weld and other supplies which have already arrived. I have laid things out and I can fit a 60V 35Ah battery in my box and still have a ton of room lift for everything else :wink:
 

Attachments

  • IMG_0480.jpg
    IMG_0480.jpg
    86.7 KB · Views: 4,135
Frame went off to powder coaters.. Was gone for a couple of weeks. Unfortunately the scooter was just a bit too big to fit in my toaster oven sized powder coat rig. I did the smaller pieces and left the big ones to the pros :wink:

Anyhow, while it was gone, I started to design and CNC the "dashboard/control center". Took apart my CA and mounted into its new home along with a key switch and a couple of light buttons.View attachment 3

Then I began to wire it up. I did run into a snag though when hooking up the brake lights to function off the ebrake signal from the reed switch I mounted in the brake levers. Will have to research that a bit more (I followed Teklektik's great write up).
View attachment 2IMG_0514.jpg

Finally a picture of the unit closed up with the mounts for the handlebars in placeIMG_0515.jpg

Just need to iron out a few small details and then I can begin wiring this sucker up :D
 
If your battery guy hasn't started the pack build yet, consider 52V / 14S because that is the highest voltage that can run common "48V" inverters (*output 120V AC), 25Ah is big enough to easily run a refrigerator, TV, and some lights during a power outage...just a thought.
 
:D :D :D
Thanks for the advice. Actually, I'm gonna build a 60V 35aHr battery with my own two hands. Figured I might as well get my feet wet.

Already have my K-Weld and building supplies :wink: Just waiting on my cells to arrive on a slow boat from Poland. Unfortunately, I think I'm gonna have to write off the $725 I paid someone to build my battery (including a charger) I think he suckered me with excuse after excuse and one sob story too many. He no longer is answering my texts and inquiries to him... :cry:
 
Thanks fechter...

It's a QS Motor 48V 1000W V3 motor. I will be slightly overvolting it at 60 Volts, but I'm thinking it should be able to handle it :)
 
PP and armandd... Thanks for the props :)

notime... try this for the fork:

https://www.srsuntour.us/products/xct-jr-20?variant=27528615043

and the bars I ultimately ended up using:

https://www.luckyscooters.com/products/toro-pro-scooter-bars?variant=7590429635

Shop around. You're bound to find a deal :thumb:
 
fechter said:
Looks excellent. Did you try riding it yet?
Not yet... I'm still working out the wiring. Had to figure out a good workaround to light the taillight/brakelight and how to interface the Kelly controller to the Cycle Analyst and the hubmotor. Think I have things figured out and hopefully will finish the wiring this weekend.. :? Pics to come.

Then there is the issue of the battery. Still waiting for my 18650's to show up on the slow boat from Poland...or the guy I paid some big $$$ to to build and send me the battery I paid him for 6 months ago. I also have the option to build the battery from some 26650's that my friend and I picked up from someone here on ES. I may hook up a temporary battery using some of the gazillion lipos I have sitting around from my RC and drone building days. Just need the time to do everything :wink:
 
Back
Top