Fat-e Trials Bike

bikerpete

100 W
Joined
Jan 27, 2020
Messages
227
This thread is a spin off from Observed trials bike designing. That thread is around making the design decisions, this one will hopefully chronicle the build.

This bike will be a modified full suspension fat bike, aimed at being a dedicated trials bike. Speed is definitely not a factor, torque, responsiveness and manoeuvrability are.

I currently firmly believe a mechanical clutch is an advantage on a trials bike for a whole lot of reasons, so I'm trying to fit one into this build. If it just gets too hard I'll abandon the clutch and fit an "electronic clutch" - basically a reverse throttle on the clutch lever - definitely not my preferred option though.

Some of my goals are:
* Reasonable reliability - I only want to have to do regular maintenance tasks, not constant rebuilding. I don't want to be overloading the frame so much I'm in constant fear of it breaking. I'll accept a certain amount of breakage of running gear while I dial it in though.
* 45 minutes to 1.5 hour ride time in trials sections. To start I'm aiming at the low end to keep weight, bulk and price down.
* Build cost ideally not over AU$3,500.
* Good safety on the battery - I want a reliable BMS, a well protected battery case and durable internal connections. I ride in areas that have high fire risk.

I'll try to keep the second post in this thread as a record of the components, so it's easier to find the final outcomes as they inevitably change during the process.
 
Build configuration/specifications.

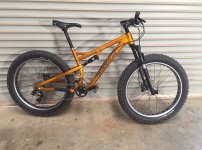
Bike - Salsa Bucksaw dual suspension fatbike. 26" 4 - 4.5" tyre max.
my bucksaw 1.jpg

Motor - LMX 30mm. 2018 model. 0.5mm laminations, thinner windings than 2020 version.

Controller - Nucular 12F

Clutch - Kawasaki KX60/65 wet 5 plate clutch. Input pinion 14mm dia, 4mm key matches LMX shaft. 3.5:1 gear reduction. This is the smallest diameter multi-wet-plate clutch I can find, 110mm dia. (the driven gear is larger diameter than the clutch body). The KX 125 has the same clutch, a bit longer, 7 plates and smaller reduction ratio. Clutch release is push from the outer end.

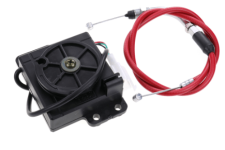
Throttle Box - I want to use a cable throttle to a throttle box so I can make different cam shaped pulleys for the throttle box in order to alter the throttle response. I also don't know if the available electronic throttles have similar short twist as the Domino trials throttle I'm used to.
Throttle box.png

Throttle grip Throttle grip.png

BMS - probably Tiny BMS. Although it's a lot of money compared to the Chinese bluetooth BMS's, I'm erring on the side of safety and reliability.

Battery - Hobby King Rhino 6200mah 4S 50C packs wired 6S2P for a 59.7V 0.74Wh battery.

Final drive - 219 chain. I'll machine a replacement for the freewheel so the rear sprocket is fixed solid to the hub. If the clutch reduction is used then I'll need a 22-26 tooth front sprocket - I've modelled this in Solidworks and will laser cut from 4mm Hardox wearplate. 83 tooth rear go-kart sprocket looks to be the largest I'll be able to fit (large sprocket to keep chain tension & thus force on the swingarm down) due to the seat stays having an inward curve to allow heel clearance for pedalling. Even at that I'll have to run the chain in a guard so the tyre doesn't catch and it doesn't rub on the stays.

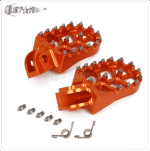
Footpegs - Aliexpress
Pegs.png

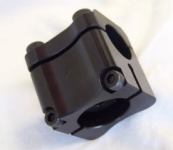
Stem - I'm expecting the top tube to be a bit long for a good trials riding position. I had been looking out for something like this zero offset BMX stem, but then found the weight limit of the Crupi is just 90lb. Probably have to use a regular short stem.
LDC Zero.png

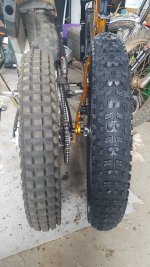
Tyres - I took a punt on a Vee Snowshoe XL 4.8". It just fits in the frame with adequate clearance and has a reasonably Trials pattern tread. A fair bit of ramp on the knobs, but turned backwards it's nice and sharp. It's a few mm wider than a Michelin XLite moto trials tyre! I'd like to try a Snowshoe 4.5" for the front, but that can wait.
 
I ordered a Vee Rubber Snowshoe XL 4.8" tyre but a Bulldozer 4.7" turned up. We're getting that sorted but I tried the Bulldozer on for size just to see how it fitted in a bike specced. for 4" tyres.

Webp.net-resizeimage.jpg

This is the Bulldozer next to a Michelin X11 moto trials tyre. Should be able to run the 4.8" Snowshoe down to 4 or 5 PSI I expect. I think the limiting factor will be the sidewalls buckling under torque.

The motor has arrived and is in pieces on the bench while I CAD the replacement end plates to carry the clutch bearings. Squeezing the clutch onto the motor is proving very tight, but it looks like it's going to work with careful positioning and bearing selection. Considering a sort of composite aluminium/3D printed housing to hold the oil in until the system is proven, when I'll machine a full alloy housing.
Fitting the drive sprocket is looking very interesting as it needs to impinge into the back plate of the motor with an outboard bearing to support the shaft. Doable I think, but not the nicest setup - awkward to remove/replace the chain and sprocket. Possibly a slightly larger clutch would have made this easier.

I've done the CAD for a full ANSI standard 219 sprocket - all table driven so I can make configurations with any number of teeth at will. If anyone want the Solidworks 2010 file I'm happy to share it. I'll laser cut a range of sizes from 4mm Hardox wear plate and hand finish them.

The throttle boxes have arrived and seem well built from the outside. Won't be a problem to make new pulleys in order to alter the throttle curve/response.
The throttle grip has arrived and is very nicely made - a bit heavy but certainly sturdy.
A$ exchange rate is still at horribly low levels so I'm holding off ordering batteries until it improves.
Footpegs are on their way.
Replacement fixed "freehub" is all but finished in CAD so should be able to start machining that soon.

I'm a bit concerned about having enough flywheel weight in the system. I'd like to graft the clutch straight onto the motor shaft to increase the inertia of the system, but it just looks too hard to engineer adequate support to the output shaft. If need be I'll look at adding weight to the clutch or possibly even inside the motor (looks like there's a bit of space in there for a thin internal flywheel in the back of the housing).

Still working out how to achieve a hydraulic clutch actuator - current plan is to buy a low-end Shimano MTB disc brake set (they use mineral oil so the seals will be OK running in the clutch wet bath), pull the caliper in half and use the single piston as the actuator, bolted to the outside of the housing. I'd like to keep levers matched, but the current brakes are Sram (brake fluid) - minor detail really.

Also working on the rear brake master cylinder. Looking like maybe an older Sram Elixir or even Juicy master cylinder so I can retain the existing caliper. Still working on how to mount it and route the hose.

So moving ahead slowly, although yet to cut metal and lots of details still to be resolved.
 
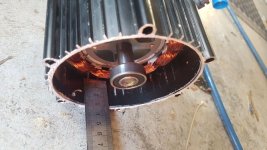
I pushed the rear motor housing off this morning and yes, there's lots of space in the back. It looks like the same housing is used for both the 32mm rotor and the 64mm rotor (I've got the 32mm).
LMX open back sm.jpg

This lets me move along on the design of the drive sprocket setup. I'll be able to create a recess into the back of the motor for the sprocket to run in.

There's also room for roughly a 15mm x 115mm dia flywheel in there, with a 4mm keyway in the shaft. If it was recessed in the centre on one side to go around the bearing housing it could possibly go to 25mm thick, depending how the sprocket recess pans out. Might get a few 5mm plates laser cut so I can add or subtract weight easily to tune the flywheel.
So plenty of scope for adding flywheel mass as needed. Phew, a good amount of flywheel inertia can be helpful for trials riding, particularly on a clutched bike.
 
I worked on the throttle and throttle box today. All looking pretty good.

The throttle is very short throw, shorter than my fast Domino trials throttle. Trivial to modify the internals to give more throw if desired. Both throttle and box run 30mm of cable pull so I'll probably leave it all stock and see how it feels.

Throttle boxes come with cable with a 90 degree elbow. That doesn't work with the throttle, but cut the bend off the thread and drill 5mm to fit the cable housing and it all works nicely. Easy to make new cable pulleys to change the throw and ramp - square shaft with a little moulded key on one face. The cable housing receiver is positioned OK to increase or decrease the diameter maybe 15% either way I'm guessing - not a lot, but might make a difference.

I took the throttle box apart to see how well sealed it is - not bad but not really sealed. Easy to seal the body and cable entry, a little harder to do a proper job of the shaft, but it's fairly well shielded and greased already. Inside is a drum with clockspring behind it and a curved magnet attached at the periphery. Hall sensor hot glued into a cavity. Pretty well greased.

The throttle sleeve has a cable groove that is slightly bigger diameter than the drum in the box, so it would be fairly trivial to put the magnet and hall sensor directly into the throttle if I feel like it later. The whole idea of cable throttle and box was to be able to adjust throttle ramp and rotation, so I'm sticking with that setup initially.

The HobbyKing batteries I'm after came on a good special yesterday - only one in stock in Australia. Grrr. I bought it anyway so I can start laying out the battery box. 7 more to go.
 
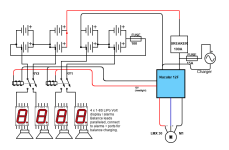
It's taken an inordinate amount of time, but I think I've finalised the battery configuration & wiring.
16S2P made up of HobbyKing Rhino 4S 6.2Ah 50C packs.

Fat-e-Battery.png

I've abandoned the BMS - decided that something worth having (ie extremely reliable) was too costly and anything that had any question marks over it's reliability was simply another potential disaster waiting to happen.

I'm using a DC circuit breaker to deal with over-current. I've tentatively settled on Carling 100A even though it's probably overkill - with a 12.4AH 50C battery it's still well below damaging discharge rates even at short term spike currents. I might drop it to 80A or even 63A to better protect everything downstream.
I'm also planning a fuse mid-pack for a little bit of extra protection. Ideally I'd fuse each pack, but I think that's going to take up too much room for too little gain.

To avoid over discharge I'm fitting 4 x 1-8S LiPo monitor/alarms, one for each parallel 4S pack. These are adjustable voltage and have a piezo alarm. I'll set these slightly above the LVC in the Nucular so I get a warning when it's time to get home. They also allow for cell level monitoring of voltages so I can always see if anything is getting out of balance. Might be a bit noisy with all 4 beepers going off as I head for home!
These checkers draw power from the first cell in the array, so if left on will slowly drain that one cell. Switching the negative wire apparently turns them completely off. I'll test that when they arrive. I've got two small DPST 12v relays that will switch these wires when the controller powers on, via the PWM 12V output. I'd prefer to use the USB 5V output so I can use the 12V for other things, but I already had 12v relays. I may be able to use the controller 12V pin instead.

I'll parallel up the balance lead groups, then branch them to the alarms and to accessible plugs so I can reasonably easily balance charge each P group if needed.
Bulk charging will be via the Nucular, using a Cisco 42V 28A supply.

Yet to order plugs and sockets, but leaning toward CNlinko IP68 for the charger port - 20A rated and nicer than XT's for repeated plugging in and out.
Probably stick with XT90's for connecting the packs so it's easy to replace or reconfigure if needed, I might end up soldering wires if it all gets too messy and bulky with plugs.
Maybe XT150 plugs to the controller and circuit breaker. XT90 are probably OK, but I think I'll have room for the XT150 so why not.
Inclined to change the hall connectors to IP68 rated M14 ones.
Motor connectors will remain XT150's

LMX phase wires seem pretty thin, stiff and generally poor quality, so I'm looking at changing them to thicker more flexible wires.

Physical layout of batteries, breaker, connections, controller and display is finalised. A fair bit of juggling of wooden blocks of the correct sizes to find something that fits everything neatly and is going to be reasonable to make the case from folded Aluminium Composite Panel. I've had to flip the rear shock and file off the compression lock shaft a bit to get enough clearance.
 
Pete, the shortest connectors I found, that have the highest current capacity, are the 8mm bullet connectors from Aliexpress. I insulate them with a piece of shrink tubing.
 
Back
Top