
joshuagore
1 µW
- Joined
- Sep 17, 2014
- Messages
- 2
Long time lurker first time poster. I've been tinkering for awhile and wanted to share. I have included 3d models of the seat and related components in the event anyone else wants to give it a go.
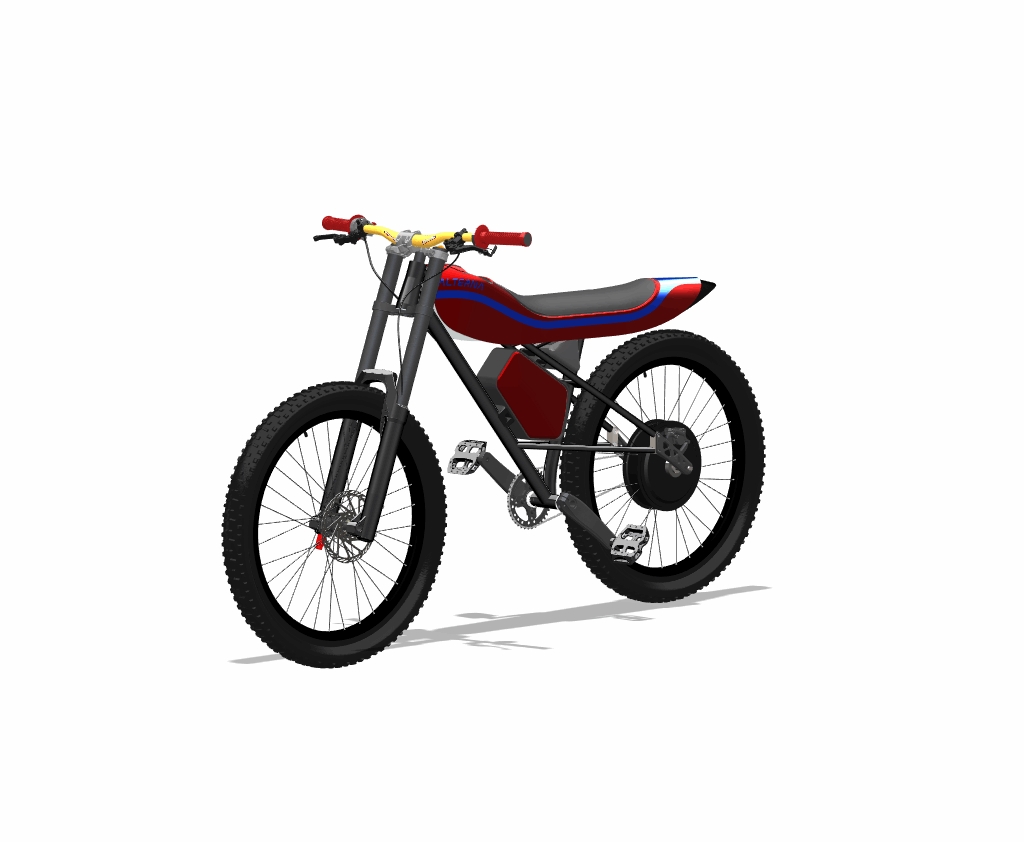
Here is the bike as it was envisioned. It was designed around a custom frame (I never built), but I changed the design to work around a more standard over the counter fat bike frame.
Here is the bike as it was built:
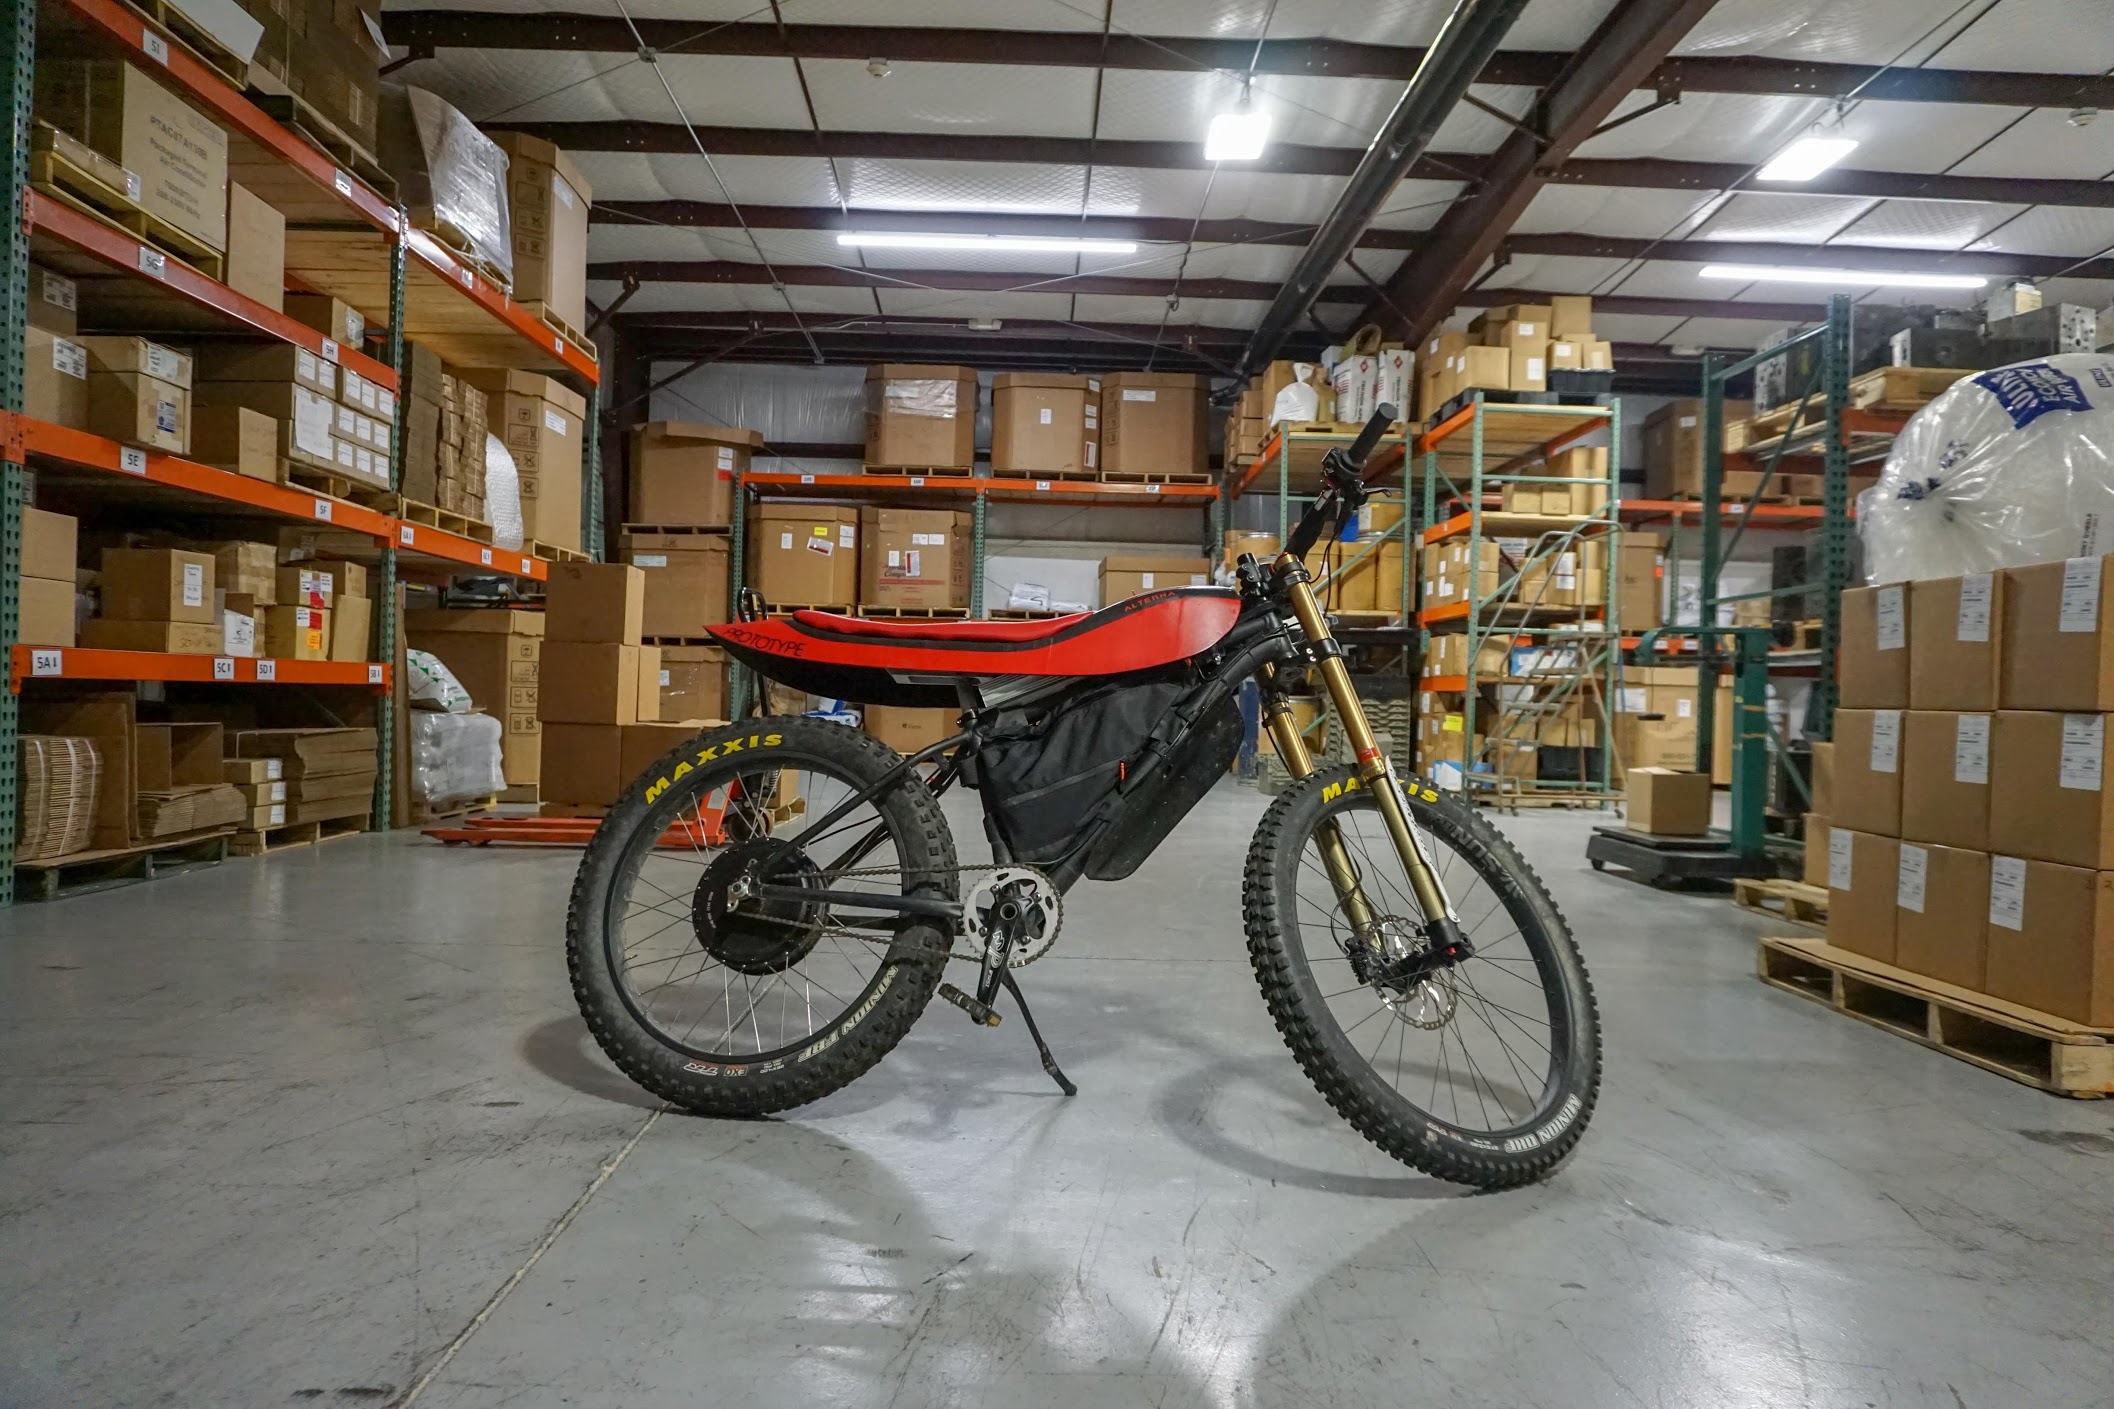
A basic frame from aliexpress, triangle battery, DNM Fork, and a custom seat subframe and generic 3d printed mounting locations for using an existing seatpost, and the top tube of the bike.
If you have an existing frame with a top tube and seatpost, you can build and mount a seat like this after fabricating it following the instructions below. I will leave out generic instructions about hub motor mounting, and torque arms but attach pictures of how I handled those solutions. I will also advise that although I tested this unit with a Tangent mid drive, the frame is not strong enough to handle the power so I don't advise high power mid drives on the frame in the BOM.
Google Documents Bill of Materials: https://docs.google.com/spreadsheets/d/1i0wTuH8I_aUIytGXFfndGpX2reKHqWGpI4hUPVPy9EM/edit?usp=sharing
Grabcad Account for 3d Files: https://grabcad.com/library/alterna-cycles-p1-1
Google Photos Library:https://photos.app.goo.gl/F9ozB1rWJixJADTY7
General Specifications:
Frame - Hardtail aliexpress aluminum fat bike frame (medium)
Motor - MXUS 3k Turbo 4503 with Heavy Duty Spokes and 80mm rim width(not listed with 80mm rim in BOM special order)
Battery - 14s-6p Triangle Battery (ymmv)
Controller - Power Velocity 4kw or 7kw controller(depends on your BMS and speed goals)
Front Wheel - 27.5x2.8 (Mid Fat, Maxxis Tires)
Rear Wheel - 26x4.0 (Full Fat, Maxxis Tires)
Fork - DNM USD-8 Air Fork
Accessories - Cycle Analyst, Domino Throttle, Potentiometer Pot, 3 way switch, and lights.
Performance:
Range 20-30 miles depending on how much you pedal, and how fast you go.
Max speed 38ish mph depending on your weight size and how things are geared for pedaling.
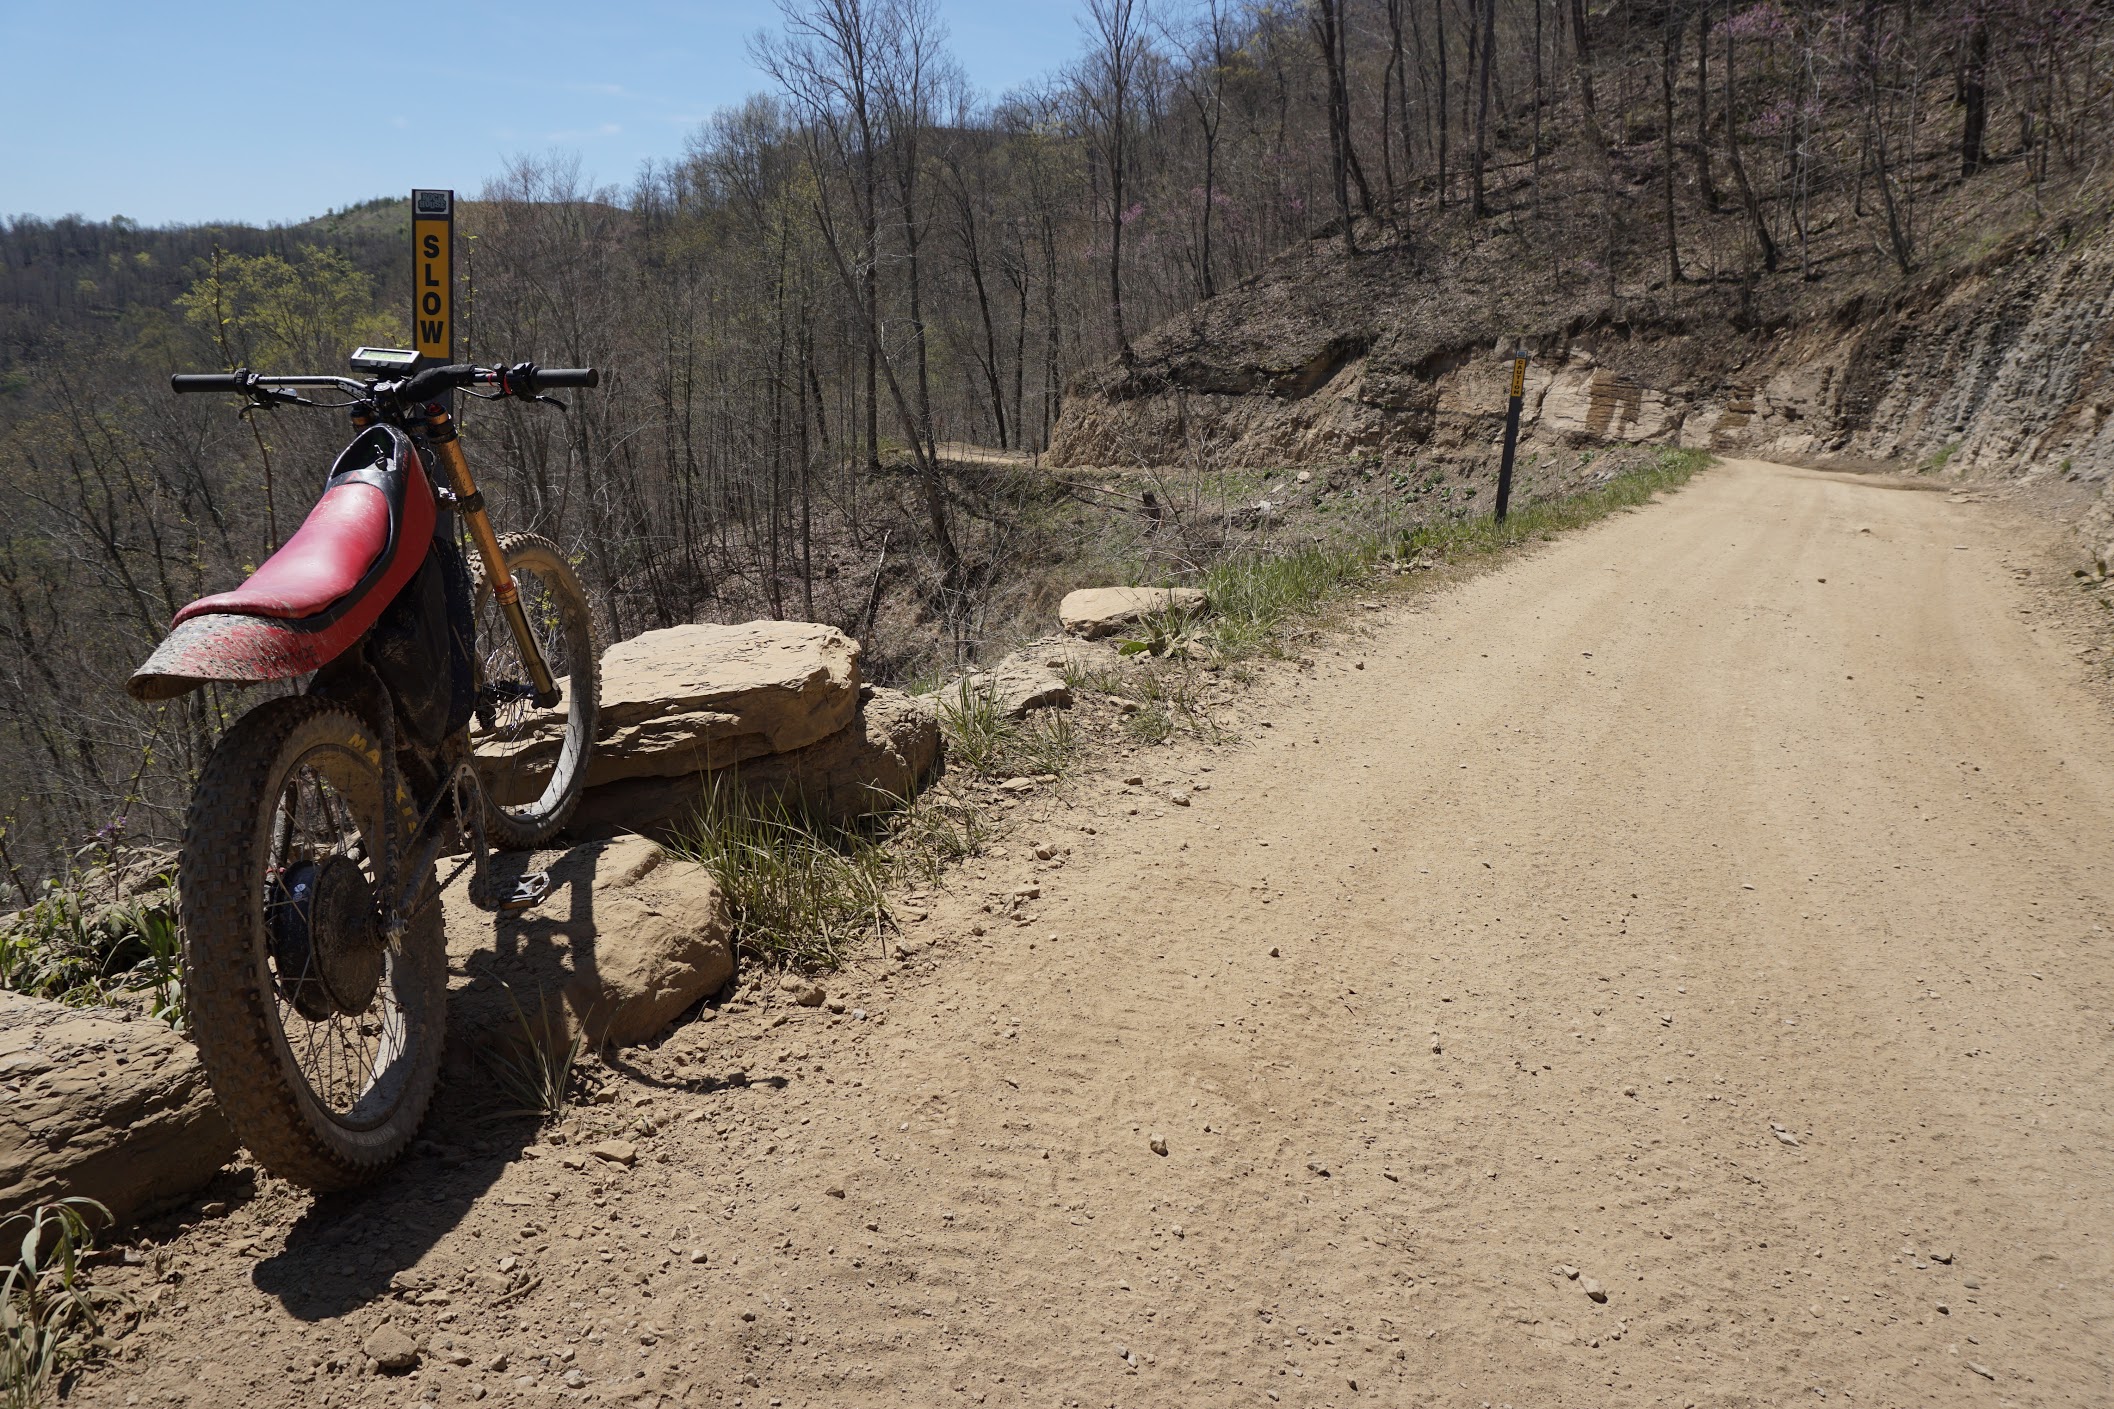
Subjectively its fun offroad and around town, but the seat can get tiring if you put in the miles. Off-road it can handle trail riding but things get a get squirrely when you start landing hard off jumps or going through real rocky terrain. Not really a great commuter, but great fun.
Seat Subframe Construction:
The seat subframe is a composite structure which is created by skinning a 3d printed part with vacuum bagging in a very rudimentary process. This does not create an ultra lightweight composite but it does create a durable structure. There are many other ways to produce a composite part which does the same thing, but often require tooling, or the hand forming of patterns. Below I have linked instructions for the 4 primary parts including links to 3d files for printing.
The seat subframe consists of 4 parts and the instructions are in links below.
1. Composite/3d printed subframe(the physical seat itself and integrated fender)
https://joshgoreworks.com/uncategorized/alterna-p1-seat-subframe-composites/
2. Head tube/steerer tube mount(3d printed connection between frame and seat subframe)
https://joshgoreworks.com/uncategorized/alterna-p1-seat-subframe-head-tube-top-tube-mount/
3. Seatpost mount. (3d printed and assembled with steel tubing for rails)
https://joshgoreworks.com/uncategorized/alterna-p1-seatpost-mount/
4. Seat Pan and Seat Foam (plastic sheet and hardware for gluing foam and stapling vinyl)
https://joshgoreworks.com/uncategorized/alterna-p1-seat-pan-and-seat-foam/
Notes:
1. I started with pouch lipos setup in a 16s, and 12s configuration. I had these mounted in a triangle battery pack which was modified with abs sheet and a physical battery disconnect.
2. Coroplast sheet was used with the final triangle pack to help reinforce the fabric enclosures to put less stress on the zippers. The coroplast was then zip tied through the battery bag around the frame.
3. Some controllers don't fit between the frame and seat subframe at the lowest position.
4. The seat mount was changed from 3d printed mount which uses seat rails, to a aluminum square tube modified to fit a hax sawed seat tube with a thru bolt.
5. A dc to dc converter was added to power lights, it is mounted below the seat subframe and epoxy potted. Additional accessory switches were added to operate the lights.
6. The seat subframe itself feels wide, too wide for comfortable long term pedaling, I suggest modifying the seat to be narrower and have included updated 3d files in the links of the narrower seat(untested).
7. On the non drive dropout an additional steel plate was added and bolted to the stock rack locations to add additional support.
That about sums it up, let me know if you have any questions. I think most builds here are far more advanced, but maybe someone likes the seat and relative simplicity.
Peace.
General Photos/Videos:
Riding Video.. https://photos.app.goo.gl/amnUpqLYNYELQM466
[youtube]https://youtu.be/5pBwjmN8zo4[/youtube]

Here is the bike as it was envisioned. It was designed around a custom frame (I never built), but I changed the design to work around a more standard over the counter fat bike frame.
Here is the bike as it was built:
A basic frame from aliexpress, triangle battery, DNM Fork, and a custom seat subframe and generic 3d printed mounting locations for using an existing seatpost, and the top tube of the bike.
If you have an existing frame with a top tube and seatpost, you can build and mount a seat like this after fabricating it following the instructions below. I will leave out generic instructions about hub motor mounting, and torque arms but attach pictures of how I handled those solutions. I will also advise that although I tested this unit with a Tangent mid drive, the frame is not strong enough to handle the power so I don't advise high power mid drives on the frame in the BOM.
Google Documents Bill of Materials: https://docs.google.com/spreadsheets/d/1i0wTuH8I_aUIytGXFfndGpX2reKHqWGpI4hUPVPy9EM/edit?usp=sharing
Grabcad Account for 3d Files: https://grabcad.com/library/alterna-cycles-p1-1
Google Photos Library:https://photos.app.goo.gl/F9ozB1rWJixJADTY7
General Specifications:
Frame - Hardtail aliexpress aluminum fat bike frame (medium)
Motor - MXUS 3k Turbo 4503 with Heavy Duty Spokes and 80mm rim width(not listed with 80mm rim in BOM special order)
Battery - 14s-6p Triangle Battery (ymmv)
Controller - Power Velocity 4kw or 7kw controller(depends on your BMS and speed goals)
Front Wheel - 27.5x2.8 (Mid Fat, Maxxis Tires)
Rear Wheel - 26x4.0 (Full Fat, Maxxis Tires)
Fork - DNM USD-8 Air Fork
Accessories - Cycle Analyst, Domino Throttle, Potentiometer Pot, 3 way switch, and lights.
Performance:
Range 20-30 miles depending on how much you pedal, and how fast you go.
Max speed 38ish mph depending on your weight size and how things are geared for pedaling.
Subjectively its fun offroad and around town, but the seat can get tiring if you put in the miles. Off-road it can handle trail riding but things get a get squirrely when you start landing hard off jumps or going through real rocky terrain. Not really a great commuter, but great fun.
Seat Subframe Construction:
The seat subframe is a composite structure which is created by skinning a 3d printed part with vacuum bagging in a very rudimentary process. This does not create an ultra lightweight composite but it does create a durable structure. There are many other ways to produce a composite part which does the same thing, but often require tooling, or the hand forming of patterns. Below I have linked instructions for the 4 primary parts including links to 3d files for printing.
The seat subframe consists of 4 parts and the instructions are in links below.
1. Composite/3d printed subframe(the physical seat itself and integrated fender)
https://joshgoreworks.com/uncategorized/alterna-p1-seat-subframe-composites/
2. Head tube/steerer tube mount(3d printed connection between frame and seat subframe)
https://joshgoreworks.com/uncategorized/alterna-p1-seat-subframe-head-tube-top-tube-mount/
3. Seatpost mount. (3d printed and assembled with steel tubing for rails)
https://joshgoreworks.com/uncategorized/alterna-p1-seatpost-mount/
4. Seat Pan and Seat Foam (plastic sheet and hardware for gluing foam and stapling vinyl)
https://joshgoreworks.com/uncategorized/alterna-p1-seat-pan-and-seat-foam/
Notes:
1. I started with pouch lipos setup in a 16s, and 12s configuration. I had these mounted in a triangle battery pack which was modified with abs sheet and a physical battery disconnect.
2. Coroplast sheet was used with the final triangle pack to help reinforce the fabric enclosures to put less stress on the zippers. The coroplast was then zip tied through the battery bag around the frame.
3. Some controllers don't fit between the frame and seat subframe at the lowest position.
4. The seat mount was changed from 3d printed mount which uses seat rails, to a aluminum square tube modified to fit a hax sawed seat tube with a thru bolt.
5. A dc to dc converter was added to power lights, it is mounted below the seat subframe and epoxy potted. Additional accessory switches were added to operate the lights.
6. The seat subframe itself feels wide, too wide for comfortable long term pedaling, I suggest modifying the seat to be narrower and have included updated 3d files in the links of the narrower seat(untested).
7. On the non drive dropout an additional steel plate was added and bolted to the stock rack locations to add additional support.
That about sums it up, let me know if you have any questions. I think most builds here are far more advanced, but maybe someone likes the seat and relative simplicity.
Peace.
General Photos/Videos:
Riding Video.. https://photos.app.goo.gl/amnUpqLYNYELQM466
[youtube]https://youtu.be/5pBwjmN8zo4[/youtube]
