You are using an out of date browser. It may not display this or other websites correctly.
You should upgrade or use an alternative browser.
You should upgrade or use an alternative browser.
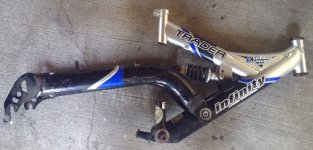
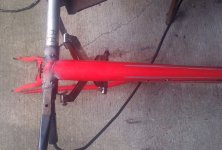
Hub motor mid drive full suspension chopper
- Thread starter Ishikawa
- Start date
Ishikawa
10 W
Ishikawa
10 W
Join two bikes together.
![ATTACH]](/sphere/proxy.php?image=http%3A%2F%2F%5BATTACH+type%3D%22full%22+alt%3D%22PicsArt_01-24-02.55.35.jpg%22%5D286590._xfImport%5B%2FATTACH%5D&hash=5020dddff1ed84fd3a8f2af770da4512)
![ATTACH]](/sphere/proxy.php?image=http%3A%2F%2F%5BATTACH+type%3D%22full%22+alt%3D%22PicsArt_01-24-02.55.35.jpg%22%5D286590._xfImport%5B%2FATTACH%5D&hash=5020dddff1ed84fd3a8f2af770da4512)
Ishikawa
10 W
Motor mounts
![ATTACH]](/sphere/proxy.php?image=http%3A%2F%2F%5BATTACH+type%3D%22full%22+alt%3D%22PicsArt_01-25-10.46.04.jpg%22%5D286664._xfImport%5B%2FATTACH%5D&hash=b6b4984caf70582945095c59005823ab)
Motor brakets
![ATTACH]](/sphere/proxy.php?image=http%3A%2F%2F%5BATTACH+type%3D%22full%22+alt%3D%22PicsArt_01-25-10.47.33.jpg%22%5D286665._xfImport%5B%2FATTACH%5D&hash=a32bd1e68d7adf7e63ee1e67aefa403f)
Ishikawa
10 W
Motor mount's on
![ATTACH]](/sphere/proxy.php?image=http%3A%2F%2F%5BATTACH+type%3D%22full%22+alt%3D%22PicsArt_01-27-10.52.08.jpg%22%5D286800._xfImport%5B%2FATTACH%5D&hash=fb111b1bb3f4db566ac0139b5dc31418)
![ATTACH]](/sphere/proxy.php?image=http%3A%2F%2F%5BATTACH+type%3D%22full%22+alt%3D%22PicsArt_01-27-10.52.08.jpg%22%5D286800._xfImport%5B%2FATTACH%5D&hash=fb111b1bb3f4db566ac0139b5dc31418)
Ishikawa
10 W
Motor, chain and cogs
![ATTACH]](/sphere/proxy.php?image=http%3A%2F%2F%5BATTACH+type%3D%22full%22+alt%3D%22PicsArt_01-28-09.50.16.jpg%22%5D286848._xfImport%5B%2FATTACH%5D&hash=be6445b51eb3ae4866d5445be523e2ab)
![ATTACH]](/sphere/proxy.php?image=http%3A%2F%2F%5BATTACH+type%3D%22full%22+alt%3D%22PicsArt_01-28-09.50.16.jpg%22%5D286848._xfImport%5B%2FATTACH%5D&hash=be6445b51eb3ae4866d5445be523e2ab)
AussieRider
1 kW
G'day Ishigawa, interesting project.
Remember to use some kind of lock nut on the hubmotor sprocket or it will unscrew with motor torque.
On my mid drive chopper, I used a thinned down fixie sprocket for the chain to the rear wheel, then the freewheel sprocket for the pedal chain as a locknut. Works fine.
If I knew how, I'd attach a link to my chopper build thread so you could see the setup.
Looking forward to seeing the finished machine mate!
AussieRider
Ishikawa
10 W
AussieRider said:G'day Ishigawa, interesting project.
Remember to use some kind of lock nut on the hubmotor sprocket or it will unscrew with motor torque.
On my mid drive chopper, I used a thinned down fixie sprocket for the chain to the rear wheel, then the freewheel sprocket for the pedal chain as a locknut. Works fine.
If I knew how, I'd attach a link to my chopper build thread so you could see the setup.
Looking forward to seeing the finished machine mate!
AussieRider
Thanks for your advice, however, since the sprocket will be on the left hand side of the motor. So, as the motor run, the torque actually tighten the cog. No retainer needed. Thank you for your interest.
Ishikawa
10 W
The motor has landed!
![ATTACH]](/sphere/proxy.php?image=http%3A%2F%2F%5BATTACH+type%3D%22full%22+alt%3D%22PicsArt_01-29-10.30.30.jpg%22%5D286899._xfImport%5B%2FATTACH%5D&hash=53fa84241dfb6286b2dd1864b160c1bc)
![ATTACH]](/sphere/proxy.php?image=http%3A%2F%2F%5BATTACH+type%3D%22full%22+alt%3D%22PicsArt_01-29-10.30.30.jpg%22%5D286899._xfImport%5B%2FATTACH%5D&hash=53fa84241dfb6286b2dd1864b160c1bc)
This thread it like opening a present that's in multiple boxes. Can't wait to see it unfold. It's hard to see how sturdy/durable that lower welded piece is that connects the two frames. Are you reinforcing that any more, like maybe another piece from the cutoff seat stay to the second frame? Just seems like that part will be under a lot of stress.
Ishikawa
10 W
E-HP said:This thread it like opening a present that's in multiple boxes. Can't wait to see it unfold. It's hard to see how sturdy/durable that lower welded piece is that connects the two frames. Are you reinforcing that any more, like maybe another piece from the cutoff seat stay to the second frame? Just seems like that part will be under a lot of stress.
HAHAHA, you noticed? I am uploading as I finish the part, so, it may seems a bits and pieces. Also the camera is in my tablet that make it a little difficult to type long sentences.
As for the strength of the connectors, it's made of 3/4" angle not just a flat bar. It is strong enough for now. I will make another braces above the battery box to add more strength but the box is not made yet. Oops, I may have revealed another secret box. Stay tuned there will be more boxes to come.
Ishikawa said:As for the strength of the connectors, it's made of 3/4" angle not just a flat bar. It is strong enough for now. I will make another braces above the battery box to add more strength but the box is not made yet. Oops, I may have revealed another secret box. Stay tuned there will be more boxes to come.
I'll keep watching out. I knew there was something you can't see in the pics. I think if it's 3/4, then maybe consider adding another piece between the cutoff stay, up to above the swingarm pivot, maybe to where the "t" is, to counteract the forces from the swingarm. Just a thought.
What's your ground clearance looking like?
Ishikawa
10 W
E-HP said:Ishikawa said:As for the strength of the connectors, it's made of 3/4" angle not just a flat bar. It is strong enough for now. I will make another braces above the battery box to add more strength but the box is not made yet. Oops, I may have revealed another secret box. Stay tuned there will be more boxes to come.
I'll keep watching out. I knew there was something you can't see in the pics. I think if it's 3/4, then maybe consider adding another piece between the cutoff stay, up to above the swingarm pivot, maybe to where the "t" is, to counteract the forces from the swingarm. Just a thought.
What's your ground clearance looking like?
I just want to put the bracket on the back burner for now and deal with other problems may come up. I will deal with it later.
Ground clearance is about 5" without load. It will be 4" or so with load on. I think that's enough for riding on the street. I am not going to ride this on rough terrain. But if it's too low, I have some stronger springs and longer shocks to increase it. Worse comes worst, I can replace the motor with smaller diameter one to gain more. That's the reason why I put the largest motor first to see the clearance. Worst case first.
Ishikawa said:I just want to put the bracket on the back burner for now and deal with other problems may come up. I will deal with it later.
Ground clearance is about 5" without load. It will be 4" or so with load on. I think that's enough for riding on the street. I am not going to ride this on rough terrain. But if it's too low, I have some stronger springs and longer shocks to increase it. Worse comes worst, I can replace the motor with smaller diameter one to gain more. That's the reason why I put the largest motor first to see the clearance. Worst case first.
With your bracket mount system, looks like you have a lot of options to mount the motor higher and a little more forward if you need to. :thumb:
Dauntless
100 TW
So I'm totally confused. I've gone from thinking the swingarm was going on the back to needing to see the full length pic. This will be the most unusual on the block, I'm sure.
Ishikawa
10 W
Seat, cargo support rail.
![ATTACH]](/sphere/proxy.php?image=http%3A%2F%2F%5BATTACH+type%3D%22full%22+alt%3D%22PicsArt_02-02-09.28.00.jpg%22%5D287103._xfImport%5B%2FATTACH%5D&hash=b50bd9e3379f1e6b672ff406ced0a237)
Made a support for seat, at the same time I replaced rear shock, from 5" to 6". Found the height gone up by 3". Sitting too high. I have to readjust the rail.
Ishikawa
10 W
Mid drive sprockets.
The cog on the left will be driven by the motor. Far right free wheel will be driven by pedals. FW threaded collar to be bolted onto the chain ring through spoke holes. And of course, chain ring drive the rear wheel.
![ATTACH]](/sphere/proxy.php?image=http%3A%2F%2F%5BATTACH+type%3D%22full%22+alt%3D%22PicsArt_02-04-07.24.44.jpg%22%5D287219._xfImport%5B%2FATTACH%5D&hash=369e58daa2d9bfc9d8dc2a7101afbc09)
Ishikawa
10 W
A bit of progress. Set the front chain and related sprockets
![ATTACH]](/sphere/proxy.php?image=http%3A%2F%2F%5BATTACH+type%3D%22full%22+alt%3D%22PicsArt_02-09-09.04.52.jpg%22%5D0%5B%2FATTACH%5D&hash=15c3367a1cf6044ee3ccc98ea19b1942)
![ATTACH]](/sphere/proxy.php?image=http%3A%2F%2F%5BATTACH+type%3D%22full%22+alt%3D%22PicsArt_02-09-09.04.52.jpg%22%5D0%5B%2FATTACH%5D&hash=15c3367a1cf6044ee3ccc98ea19b1942)
Ishikawa
10 W
Is there something wrong? The pic does not show.
Ishikawa
10 W
Made the rear wheel.
Wheel with 20 x 3.0 tire and modified Shimano Mega range.
![ATTACH]](/sphere/proxy.php?image=http%3A%2F%2F%5BATTACH+type%3D%22full%22+alt%3D%22PicsArt_02-17-10.17.24.jpg%22%5D0%5B%2FATTACH%5D&hash=8c89cbd1e152cffed22322a5f55bb9c2)
Wheel with 20 x 3.0 tire and modified Shimano Mega range.
![ATTACH]](/sphere/proxy.php?image=http%3A%2F%2F%5BATTACH+type%3D%22full%22+alt%3D%22PicsArt_02-17-10.17.24.jpg%22%5D0%5B%2FATTACH%5D&hash=8c89cbd1e152cffed22322a5f55bb9c2)
Ishikawa
10 W
Again the pic does not show.
goatman
10 MW
Ishikawa
10 W
goatman said:are you using the attachments like in this picture
IMG_20210219_195115.jpg
you can try imgur.com
my battery test charts have to come in to ES by using imgur.com
theyre the wrong type of file but imgur converts it?
All of my pictures are attached by clicking the picture icon. Then attached as a image I guess.
After I finish up load, I press the Preview to see if the photo is there. Then press Submit. Alas, photo disappear. So I don't know what's wrong. It worked fine up until 4 posts ago.
goatman
10 MW
after clicking attachments
click on add files
it will take you into your computer pictures
select your picture and it will show up in the box like the image i showed above
click on place inline and the image will go wherever the cursor is
click on add files
it will take you into your computer pictures
select your picture and it will show up in the box like the image i showed above
click on place inline and the image will go wherever the cursor is
Ishikawa
10 W
goatman said:after clicking attachments
click on add files
it will take you into your computer pictures
select your picture and it will show up in the box like the image i showed above
click on place inline and the image will go wherever the cursor is
Oh, yes, I am sorry. I skipped to tell you that after added the file, I click Preview to make it sure the photo is there. Then click Submit. After, all that, picture fail to show up. Like I said before, it was working fine up until few posts ago. I think there is some kind of system glitch but I don't know what to do. I hope admin take a look at this problem. If this is keep going on, I think it is futile to post any more update.
Similar threads
- Replies
- 28
- Views
- 853
- Replies
- 10
- Views
- 436
- Replies
- 7
- Views
- 516
- Replies
- 18
- Views
- 745
- Replies
- 7
- Views
- 188


![ATTACH]](/sphere/proxy.php?image=http%3A%2F%2F%5BATTACH+type%3D%22full%22+alt%3D%22PicsArt_10-27-12.43.50.jpg%22%5D286500._xfImport%5B%2FATTACH%5D&hash=903bd0f0f64dc5568459a4541e6829fa)


![ATTACH]](/sphere/proxy.php?image=http%3A%2F%2F%5BATTACH+type%3D%22full%22+alt%3D%22PicsArt_10-27-12.17.39.jpg%22%5D0%5B%2FATTACH%5D&hash=2efed2164b9dc0a9f7f06874bc9e9d44)
