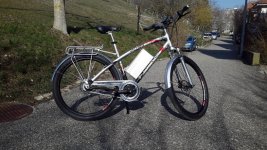
Some pics of my latest build: a bbs02 hill climber an commuter.
View attachment 1
I built 2 light ebikes for the city we used to live in, and they worked very well. Than we moved to the foot of mid-sized mountains (around 1400m). First climb and the city bikes died. So I had to go back to work and design a bike that can do 20% slopes and 20km commuting.
As much as I love hub motors (really), there was really no option around a powerful mid drive if I wanted to climb the hills here. I went with the strongest legal options where I live: bafang bbs02. Smallest available chainring (44T) in PAS mode, since I actually want to pedal.

But than again, for most of us hobby builder out there, an ebike is not so much about the motor than it is about the battery. So this time I chose a stong frame which could hold a large battery.
I found the corratec frame on ebay. 15 Years old, aluminium frame with disc mount, 28" wheel size and a super strong double tube structure. Those german frames are known for there strange geometry (seatpost inclination - high BB and so on) but somehow this frame has just the right dimensions for my body.
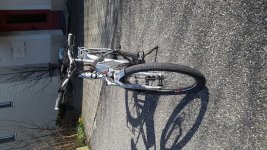
Starting from there, pretty much anything else is new on this bike. I choose smaller wheels with large 27.5x 2.4" schwalbe tires (instead of 28" with 2" tyres) to improve suspension (and it works great!), which I built from scratch. Brakes are shimano hydraulic, with a sensor on the front brake. BTW this was a real pain to adjust, as the magnet distance from the sensor is just way to sensitive. On the right side I dropped the magnet completely, because I just could not figure out a proper distance. That sensor actually worked reverse: with levers open, the sensor would cut power, and start again with levers closed. Weird. Probably a magnetic field orientation problem. Anyway: after some tests, I figured that when you ride the bbs02 even at 1000w in PAS mode only (no throttle) you don't really need brake sensors, as the controller would cut power as soon as you stop pedaling, or reverse pedal.

After reading so much about chain issues on bbs motors, I chose to drop derailleurs completely and went for a nexus 3 speed IGH. To avoid the use of a chain tensioner, I calculated a transmission ratio to match a chain length that would fit exactly into the vertical dropout, and as you can see, it worked better than expected. With 51links and a ratio of 44/22, the chain tension is very good, and there is still some play left in the dropouts for some chain growth, so I expect this chain to last around a year.


The result may look awesome (and feel great: the nexus inter 3 is a beast!) but it turned out too narrow geared for my use. The lowest gear is not low enough to climb anything more than 12-15%, and the highest gear limits speed to around 40Km/h on flats. So I'll probably move to an alfine 8 hub with 307% overall ratio instead of just 186% with the inter 3. I already have an alfine hub; it's quite rugged but a lot more sensitve than a 3 speed. Shifting once under too much loads breaks the little dogs, and you can swap the whole internal unit (150€). As long as you cut power before shifting (much like driving a motorcycle), there is no problem. Here the one brake sensor I managed to set up correctly will prove very useful.
On the the main part: the battery. This is the case I used. Anything but the main aluminium body is crappy, so I dropped it and machined my own covers. The body itself is great: you can squeeze up to 120cells inside! It's just wide enough to accomodate a 18650 cell height + 2 holders (top and bottom) + fishpaper insulation + thin rubber sheet on each side. No play -the pack stays very firmly in place.
Since I hat to plan some room for screw heads inside the box (only way if you want to be able to remove the battery without opening it!), I went for 98cells, or 14s7p 52V config including a smart bms. I found a company that sells 98cells holder in one piece, and went onto to the welding job. Sadly I have no pic from inside. Basically the P groups are joined together by a 28x120mm 0.2mm nickel sheet, and both terminals have large flat 0.2x40mm copper connectors. The pack can easily deliver 50A, but the bbs is configured to 20A max anyway. The nice additions are a hidden power button and the ropd magnetic plug for the charger. Output is 12AWG silicone cable with xt60 connectors. Could probably have done a better job adding a second insulation layer, but this splitted config made it easier to use rubber gaskets to seal the cable outputs, on top of beeing much more flexible. Finally the whole boxed is silicone to death. Should be ip65 waterproof.

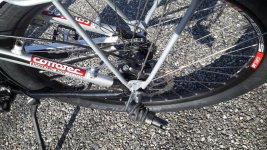
The hardest part was hand-cutting the aluminium parts required to hold the box inside the frame triangle. Lots of grinding, testing the fitting and grinding again. Brackets are made of 1mm thick stainless steel. The result is worth it: even without screws, the box "falls" firmly against the seat tube, and is secured by 4 different holders: one top aluminium counter-block between the 2 frame tubes, one seat tube bracket and 2 downtube brackets. Tube rubber everywhere to protect the frame and add some vibration absorption.


On a sidenote: the second hardest part was cutting and bending a custom chainguard bracket. Took me a whole afternoon to drill the holes at the correct angle to match the chain slope. The nice thing are the m3 holes already drilled on the back of the motor side covered, which I reused to mount the chainguard bracket. But hey: everyone that lost a $100 pair of pants to a bike chain knows the true value of chainguards - so I made it.
View attachment 16
Fenders and light are mandatory in Europe to be street legal, so I hat to add them too. The rack supports 2x heavy duty bags for groceries and on the rear left dropout, you can spot a german made "Weber Kupplung" as they call it, used to attach a trailer, with a special adapter to fit shimano plain axle hubs. The whole point of the bike is actually the trailer, carrying either the kids or construction material....
Soo much for today - hope this inspires some more bikes.
View attachment 1
I built 2 light ebikes for the city we used to live in, and they worked very well. Than we moved to the foot of mid-sized mountains (around 1400m). First climb and the city bikes died. So I had to go back to work and design a bike that can do 20% slopes and 20km commuting.
As much as I love hub motors (really), there was really no option around a powerful mid drive if I wanted to climb the hills here. I went with the strongest legal options where I live: bafang bbs02. Smallest available chainring (44T) in PAS mode, since I actually want to pedal.
But than again, for most of us hobby builder out there, an ebike is not so much about the motor than it is about the battery. So this time I chose a stong frame which could hold a large battery.
I found the corratec frame on ebay. 15 Years old, aluminium frame with disc mount, 28" wheel size and a super strong double tube structure. Those german frames are known for there strange geometry (seatpost inclination - high BB and so on) but somehow this frame has just the right dimensions for my body.
Starting from there, pretty much anything else is new on this bike. I choose smaller wheels with large 27.5x 2.4" schwalbe tires (instead of 28" with 2" tyres) to improve suspension (and it works great!), which I built from scratch. Brakes are shimano hydraulic, with a sensor on the front brake. BTW this was a real pain to adjust, as the magnet distance from the sensor is just way to sensitive. On the right side I dropped the magnet completely, because I just could not figure out a proper distance. That sensor actually worked reverse: with levers open, the sensor would cut power, and start again with levers closed. Weird. Probably a magnetic field orientation problem. Anyway: after some tests, I figured that when you ride the bbs02 even at 1000w in PAS mode only (no throttle) you don't really need brake sensors, as the controller would cut power as soon as you stop pedaling, or reverse pedal.
After reading so much about chain issues on bbs motors, I chose to drop derailleurs completely and went for a nexus 3 speed IGH. To avoid the use of a chain tensioner, I calculated a transmission ratio to match a chain length that would fit exactly into the vertical dropout, and as you can see, it worked better than expected. With 51links and a ratio of 44/22, the chain tension is very good, and there is still some play left in the dropouts for some chain growth, so I expect this chain to last around a year.
The result may look awesome (and feel great: the nexus inter 3 is a beast!) but it turned out too narrow geared for my use. The lowest gear is not low enough to climb anything more than 12-15%, and the highest gear limits speed to around 40Km/h on flats. So I'll probably move to an alfine 8 hub with 307% overall ratio instead of just 186% with the inter 3. I already have an alfine hub; it's quite rugged but a lot more sensitve than a 3 speed. Shifting once under too much loads breaks the little dogs, and you can swap the whole internal unit (150€). As long as you cut power before shifting (much like driving a motorcycle), there is no problem. Here the one brake sensor I managed to set up correctly will prove very useful.
On the the main part: the battery. This is the case I used. Anything but the main aluminium body is crappy, so I dropped it and machined my own covers. The body itself is great: you can squeeze up to 120cells inside! It's just wide enough to accomodate a 18650 cell height + 2 holders (top and bottom) + fishpaper insulation + thin rubber sheet on each side. No play -the pack stays very firmly in place.
Since I hat to plan some room for screw heads inside the box (only way if you want to be able to remove the battery without opening it!), I went for 98cells, or 14s7p 52V config including a smart bms. I found a company that sells 98cells holder in one piece, and went onto to the welding job. Sadly I have no pic from inside. Basically the P groups are joined together by a 28x120mm 0.2mm nickel sheet, and both terminals have large flat 0.2x40mm copper connectors. The pack can easily deliver 50A, but the bbs is configured to 20A max anyway. The nice additions are a hidden power button and the ropd magnetic plug for the charger. Output is 12AWG silicone cable with xt60 connectors. Could probably have done a better job adding a second insulation layer, but this splitted config made it easier to use rubber gaskets to seal the cable outputs, on top of beeing much more flexible. Finally the whole boxed is silicone to death. Should be ip65 waterproof.
The hardest part was hand-cutting the aluminium parts required to hold the box inside the frame triangle. Lots of grinding, testing the fitting and grinding again. Brackets are made of 1mm thick stainless steel. The result is worth it: even without screws, the box "falls" firmly against the seat tube, and is secured by 4 different holders: one top aluminium counter-block between the 2 frame tubes, one seat tube bracket and 2 downtube brackets. Tube rubber everywhere to protect the frame and add some vibration absorption.
On a sidenote: the second hardest part was cutting and bending a custom chainguard bracket. Took me a whole afternoon to drill the holes at the correct angle to match the chain slope. The nice thing are the m3 holes already drilled on the back of the motor side covered, which I reused to mount the chainguard bracket. But hey: everyone that lost a $100 pair of pants to a bike chain knows the true value of chainguards - so I made it.
View attachment 16
Fenders and light are mandatory in Europe to be street legal, so I hat to add them too. The rack supports 2x heavy duty bags for groceries and on the rear left dropout, you can spot a german made "Weber Kupplung" as they call it, used to attach a trailer, with a special adapter to fit shimano plain axle hubs. The whole point of the bike is actually the trailer, carrying either the kids or construction material....
Soo much for today - hope this inspires some more bikes.