2WD Semi-Recumbent Recycled-Parts Cargo eBike: "CrazyBike2"

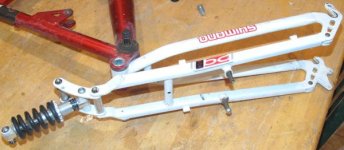
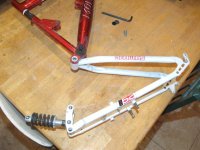
Somewhere around redoing the brakes, I think, is when I decided suddenly to piant the the bike a unified color scheme. I am not sure as I sort of did portions of various things concurrently.

It started out as just touching up some of the red paint on the new rails and the old rails to match them, and as I fixed other things it sort of spread, as I decided on painting hte whole thing at some point in there....

1 035.jpg

I dind't knwo what color(s ) that would be, because I didn't know all of what paint I had left. But I had seen a box of piant earlier that day in a shed, and tha'ts where I'd already found these two cans of red. When i dug it out, there were also two of dayglo orange, a mostly empty dayglo yellow, a teensy bit of white primer, and three cans of satin clearcoat. There were also a bunch of empty cans, or ones that had congealed inside and lost all their pressure.

Wihtout white primer under the dayglo, yo ucan't really see it much, and it shows thru anything that's underneath it (it's sort of a clearcoat, itself). So with only a little bit of that left, I went with the solid red color, as my only practical choice.

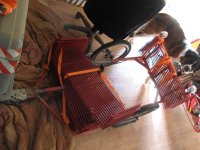
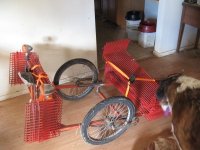
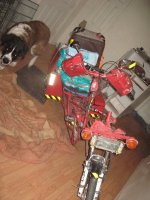
I'm still not sure *why* I wanted to piant it, but I did. so now it's about as "pretty" as it has ever been, in all 5-6 years it's been around. It catches attention better now, and is easier ot see, because I get more heads turning to look at it now than I did with eithe rbare ugly frame or with the "fairing" on it. Both of those things are good enough reaosns to have it one color, by themselves, so we'll call it score 1 for rashness. (I also should've waited till afer I was done with the work, but hey, if I don't do something when I think of it, I probably never will do it!).


1 036.jpg

View attachment 4

1 038.jpg

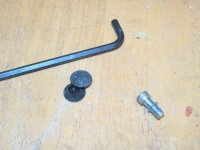
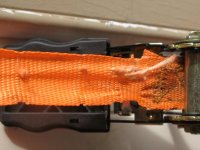
A detail not done till after the painting was to remove the downlight strip that's on the bottom of the steering tie rod, and take off all the broken glass tubing left on it, then grind the plastic lumpy ends off, so I can mount it flat against the tie rod and better light the road beside/beneath me (and the side of the bike itself, in front). While it was off I painted the top of the strip (backside of PCB) red, and clearcoated the frontside to keep water out (since the glass isn't there anymore, and ti's already got two LEDs out from water damage).

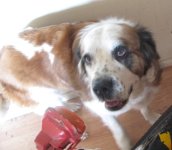
I remvoed all the tape holding ht edog and cat images on the handlebar "brush guards", painted th guards red, too, (and the dashboard while the CA was off), and then I "glued" the images on the guards with the still-tacky paint, plus a heatgun (paint stripper) used to mold the plastic the images are printed on to the shape of the guards, and dry the paint under them. I used a soldering iron ot also melt the corners and other selected points of htem togehter with the coroplast guards. Probably wont' stay on very long this way, and will have to be taped on again later, but have to wait and see on that one.

1 042.jpg

View attachment 1

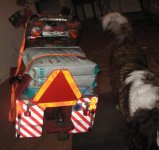
When I was out with Bill yesterday, i also picked up more of that striped relfective tape from harbor freight, and finished the job of covering the rear of hte pods with white/red diagonal stripes, and fixed the yellow/black trim along the bottom of some of he front frame/boxes/etc. Most of it is destined to go on the new trailer when I get that built, though.


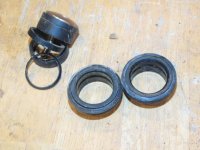
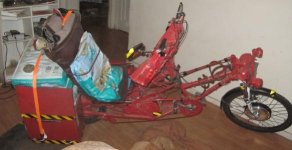
I also finished up painting the pods thesmelves, whcih I had not yet done yesterday. One reason was this sticker:
1 052.jpg
which I wanted to preserve because I don't think I have another (if I did I'd like one on the back, too), but I was afraid of tearing it off. Well, no need to fear, cuz it came right off when the pod got hot enough sitting facing the midday sun. Putting it back on was alittle trickier; after the red paint dried to tacky I sprayed the back fo the sticker with a dusting of clearcoat, then pressed it onto the red paint nad held it there till it stuck. Then I clearcoted the whole pods a while later, and pretty much the rest of the bike too--mostly to keep red from rubbing off on my clothes, as this paint is pretty crappy and comes off way too easy when rubbed with clothing (not completley off, just leaves reddish marks like rust stains, even on paint that's been dry more than a day).
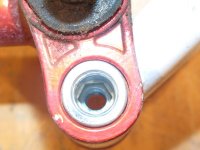
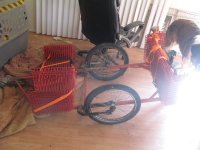
 
The chain problem:


For a long while now I have not even ghost-pedalled, partly cuz it hurts, but even more because the chain keeps coming off due to misalignment front to rear, and lack of tension. Since I had ovoid rings I couldn't just tension it up tight, and I also had anohter problem keeping me from that: the chain runs right up the bottom edge of the battery box and also on the frame, if ti's really tight. Just too small a ring on that rear freewheel (16T, I think), because it's at the left edge of where rings would go, and nromally that has a much larger ring there, if a multi-gear cluster is used (I'm not, just the singlespeed, cuz I have and want no derailer back there cuz it makes dealing with removing the rear wheel very hard).

1 020.jpg


I pondered quite a few solutions, from a chainring on a regular BB in that rear BB behind the pack (cuz it's presently unused), but I'd need to use a longer BB shaft than I have to do that. (well, acutally I have a really long one from Thud, but can't use it with regular chainrings cuz it has no way to mount them; I'd need to put a collar on a chainring and a set screw or something to hold it on..woudn't need to be strong because it's not driving anything, just an idler...but this was yet more work and time I'd rather not use for that). So in the end, I went iwth one I've used before, but never as "easily" as this: A regular derailer (the original off Dayglo Avenger, actually, since it has a problem with it's mounting tab anyway it can't ever be used on a normal bike).
1 031.jpg


Basically it's mounted mid-chain, bottom side, welded to the bottom cargo rail, in such a way that it's top idler feeds straight alinged with the rear freewheel, and it's bottom idler receives straignt aligned with the front chainring (which is farther right than the rear freewheel by a significant amount). Now, I *could* have just taken the freewheel off the rear wheel, and used a gear cluster (taken apart and rebuilt to have just the one gear I want about in the middle of it, and spacers to keep it there), but that wouldn't solve a second issue I have been wanting to fix for a long time.
View attachment 2


That is the next thing: I wanted to be able to shift hte front gears, for those emergencies wher eI might actually *HAVE* to pedal the damn thing (though I probably can't start it up from a stop by myself unless i's downhill :lol:). So I changed to a derailer that actually works for the chainrings I've got ont here (came off the same bike), and also added a ring cut from some pipe to increase the OD of the tube over the BB (not a seattube on this bike!) so it could clamp to it...the BMX the tube came from originally is too narrow otherwise. Then I added a shifter, off my old Schwinn Sierra. It's a lever frction shifter, and I used it specifically because it will fit over the top fo the tube right in front of the steerer which is directly above the chainrings. I have nowere on the bars I could put a shifter, so tha'ts the next best place I can reach while riding that I won't catch antyhing on getting onn and off the bike.
1 032.jpg


It took at least 2-3 hours to get all the bits and swap them out / install them, and set it up and adjust it so tension was right and it would shift and everything.


One problem I ran into that added an additonal hour was finding a solution to the chain ht ehtop derailer jockey wheel rubbing on the bottom fo the bike tube: I pndered and thought and wonderd and hmmmed, and eventually just grabbed one of the leftover droputs off those forks I was modifying for my new trailer (Amberwolf's Flatbed Kennel Trailer Mk III), bent it just a little, then welded it on the lower cargo rail just aove the derailer, so that the derailer's cage pivot hits it and never lets the cage go high enough to rub chain on the frame. Works fine in any of the three gears.

NOw, one other problem I ran into was that I welded the derailer on, as it's hardwae for bolting on was missing...but I neglected to note that it must hav plastic bushings inside the main pivot point above the shifter itself, and so I left myself wiht a wiggle problem that was unnacceptable, as it caused more chain-off events than I had before. :( I ended up (after much pondering, and another wasted hour or more) just using a hose clamp around the top piece and the cargo rail, which keeps the pivot from being used and htus stops all the wigles. Ugly, but what on this bike isnt? :lol:


I had (have) a worry that sharp narrow tall speedbumps are going to be a problem with that thing there, as the derailer sticks way down between the tires, but there's not much to be done aout it. Kinda needs to be like it is to let the chain clear properly in the middle fo the frame. Haven't hit it on anything yet, but I don't expect it to be pretty when I do.
 
I FINALLY (years in the waiting!) replaced the ragged-looking (though apparently sturdy) handle-bar-end of the steering tie-rod mount. Basically that is just an old reflector mount off some old 10-speed (I think) that has since been welded over and over again, first to fix cracking and then just to reinforce it generally. I may at some point have added extra metal to it as well, but it's never been replaced as it needs to be.

1 047.jpg

So now I finally dug out the steel plate/bar off the back of a computer chair that I intended once upon a time to make clamping dropouts from, and never did. I since already did that with some old BMX dropouts, so now I am gonna use some of this as a new pivot tab, completely replacing the old. The markings on there can be ignored, as I didn't do it the same way as the old one, which is what those are for--cut marks to make a duplicate of the existing version, which has a flat horizontal plate welded to the bottom of the steer tube, sticking out to the left, then that goes vertical parallel to the tube, and then it extends leftward again to meet with the tie-rod pivot point. Instead, I just made a simpler single-level tab, which goes directly out from the bottom fo the steerer tube to the tie-rod pivot point, and the tie-rod will bolt to it's top, instead of the bottom like the existing one. It simplifies things and makes it stronger, even if I were not using this ~1/4" plate steel for it.
1 048.jpg


Theoretically it is simple and I meant to do it yesterday, but I ran into issues with adjusting the rear brakes (yes, now it has rear brakes, for the second time in it's history! The first time was when I originally built it, I think, or nearly that far back, and they were crappy pointless caliper brakes that woudlnt' even really grab the rim I used then...I'm sure if I could've set them up correctly and had new shoes (instead of decades old) and whatnot, they'd've actually done some good, but I didn't, so...off they came next time I did work on it I think).


It was both easier and harder than I thought. The actual making of the piece was way easier, as it didn't take as much shaping as I thought it would. The only problem I had was snapping a drillbit trying to use my hand drill (instead of the drillpress) to enlarge the square hole already in the piece into a round hole just big enough for the bolt on the tie-rod-end.

But: getting the area prepared for installation was a huge PITA. :( There is (was) a bolt to clamp the seattube in, on the old Magna frame that is the front end of the bike. The seattube of the Magna holds a seattube that is welded to the steerer headtube of the rear (schwinn) frame, and I used to just have the seattube clamped in place, because I made the bike originally to be taken apart for modifications/etc. however, at some point when I welded the bottom frame together, years back, that bolt became redundant, as it is no longer gonna allow me to take the frame apart anyway. Yet, I didn't remove it, and that caused me no end of grief today.

I have no grinding wheels large enough diameter to reach int ehre to get most of it, and because I'd welded the 1/2" square tubing right under it last year sometime, I coudln't get an yof my other tools, grinders, etc in there either, and couldn't even undo the bolt and nut. So I ground off the nut and bolt head, and tapped out the threaded rod that was left from the hole. I ground off part of the rings that are part of the top of the Magna seattube, but couldn't reach most of them.


In the process of trying, the grinder wheel grabbed good and tried to yank the thing out of my hands twice, and I lost skin on the top of my left thumb knuckle, and my left pointer finger knuckle top a second time (I'd already taken some off that finger a littel further down the day before, the same way but while grinding something else; I forget what).

I ALSO slipped several other times (hands going numb randomly, one at a time), and hit my wiring with the grinder wheel. I only took out the hall wires in the 6FET controller cable, thankfully a spare and not in-use, and the horn wire, and the speedo sensor wires for the CA. Easy enough to fix...but if I were more careful it probably wouldn't have been necessary. Somehwere I also scraped off the plastic on some of the brake cable housing and shifter cable housing that pass by there, too.


I used a 1/2" drillbit to drill out almost all of the rings, and then used the side of the bit to grind away as much as I could, managing not to snap the drillbit in the process by some miracle, but it kept vibrating out of the drill, so I'd have to use a glove to pick i up and put it back in cuz it was too hot to touch. I broke a couple of grinder bits for my old Black&decker "giant dremel" kind of thing, trying to get in there and get the rest of it out.

Eventually i had to use a roundfile rasp to get it out, and that took a couple of hours, cuz my hands kept going numb and I'd drop the thing.


But once the area was cleared, I ground and filed the bottom of the steerer tube flat and level, rewelded the tube to the ring around it from the INSIDE of the tube, with welder on it's second higher setting for amps, (since it's threaded on and originally it's welds were the part that stuck down below the tube, which I just ground off). and a garden hose to cool it off between spots of welding so as not to destroy the bearings inside.


Once that was done and I was sure it was ok, after a bunch of hard knocks to be sure it couldn't come loose, I clamped the plate to the bottom of the steerer, and welded it on in teh same position/angle the original was, so I wouldn't need to adjust the steering angles of fork or handlebars.

Of course, I screwd that up too, cuz when I was done I must've had it almost 10 degrees off from where it shoudl've been, though I don't know how, wiht all the marks and pics and stuff i took to be sure that wouldn't happen. But that's just how stuff always turns out for me, and I cant' figure out why. Something wrong with my perception, I guess.


Anyway, once it was tacked in place, i set the wleder to it's third highest setting, to be sure it would penetrate the thcik plate *and* the thick ring/plate above it, and welded little areas around it, cooling with the hose immediately afterward to prevent damage to the bearings (since I can't get to them to fix anything because it's all welded together...I'd do it all different now if I were to redesign the bke, but since I'm only modifying what's there and fixing big problems, little stuff like this that has worked fine for years is not on the list....).


That done, I bolted the tie rod back on, and tested it and found my offset problem...easily fixed by adjusting hte handlebar end (fork end was fine), but I still don't see how I messed that up.
1 093.jpg

1 094.jpg

1 095.jpg

1 096.jpg


Next came welding on some stops for hte steering, so that I can't move the handlebars too far left or right and cuase th ewheel to "reverse". Preveiously, what I had to prevent that was a tube (front "fork" from a little razor kick scooter) sticking up out of the 1" headtube that's not in use, right behind the 1.125" headtube that's actually being used by the threadless fork. Thus it got in the way of the steering tie rod mechanism and wouldn't allow it's joint to pass the point at which it begins to pull the front wheel so far to the side that it rotates backwards, when turning left.

1 097.jpg

1 098.jpg

Turning right has an automatic limit because the handlebar end hits the frame itself.

1 099.jpg

Then I just filed and ground at those new welded bits to get the steering limits exactly where I wanted them, though I still havne't finished with the right side; I was more concerned with the left as it has to turn just far enough to make typical left turns, but not so far it can reverse the wheel. that would really suck in traffic.
 
My frontleft pod (formerly dayglo colors like this:
1 039.jpg
was repainted bfore reinstalling it, so it matches the rest of the red look.
1 040.jpg

I also finally ground off what little was left of the "seal" on it, which was 70-plus-year-old rubber. It was already so hard and flat that it wouldn't even let the lid stay on (depends on hte seal pusing up against it for latch tension), so the idea was to grind off all that old hard as a rock seal, and replace it with a new seal. But i didn't know where t get a "u-channel" type stuff, excep the suff already at auto parts places, which cost a fortune, so I nixed that. Bill and I wnet ot lunch today, and while out we stopped past HF and then GW, and while at HF I saw a coil of tubing and realized that I already had a roll of drip systme tubing that I hadn't used yet, and I could cut a couple feet off that and split it lengthwise, then gorrilla-glue that onto the lid's edge.

1 085.jpg

I tested that theory, and it works, but I'll also need to glue one on to the box's top edge, too, as it doesnt' *quite* make the complete seal I'd like, and push hard enough aagsint the latches to keep them from coming loose on a ride with vibrations and bumps.

Somehow I've lost the pics of the process itself and the finished job, so I'll retake those when I do the bottom part's edge.


When I remounted the pod, because I ddin't wanna drill thru the cargopod rail again I welded a tab to the bottom to bolt the plate to that the rear controller and pod both bolt to. Then the pod just bolts to the plate (and thru the top rail just like it used to, along with it's previous plastic version).

View attachment 1


controller is bolted to the plate on the back (inside the rails) wiht it's bolthead trapped between the pod and hte plate so I can just undo it's nut to take it off, if I have to take the rear wheel off (becaues the hall wires are / phase wires will be soldered and they're all short, so it has to come off with the wheel).

 
Nothing broke yet, and I have nearly 10 miles on it. :)

It's taking a little getting used to the slight differences in handling wiht the front end being a little taller, and the steering being just slightly different with the new piece in it (guess it isn't *exactly* the same pivot distance/angle/etc, despite attempts to make it so).


Lots more comments on the bike from people I pass or that pass me, or when I am stopped or parked, probably because it's now red and easier to notice as something more than a rolling pile of junk (which it sitll is, just carefully disguised :lol: ). Even had one car in the lane to my left that kept going slightly ahead and then slightly behind me on my way up here, for nearly a mile--must've been really curious cuz it's a 35MPH road where people usually go 40+, and I'm goiong just a shade under 20MPH....


Paint is already scraping off the tops of the pods, though, as expected, from the wheeled laptop bag I'm usually carrying on there.

Brakes still holding up, but I am gonna have to do something about the front U-brace stiffness (take it off and weld across the back, probably, then grind to make it fit the face of the fork legs as closely as possible). Also have to take care of the rear bosses, too, and get them aligned.

Am wondering if I can do it without cutting them off and rewelding them, by simply torquing the bosses outward with a pipe or tube over them. I suspect that won't work and will just damage or destroy them. :(
 
Lots more fun with the revamped version, even just normla riding. tried it out with the new trailer, total around 340lbs of load, and thenew frame/hitch means it doesn't wiggle around, and it's just a way wya better bike overall now.


Still nothing broken yet.

Still gotta redo the brake bosses. :(
 
I may have to modify the hitch ball placement. Sometimes when the road crown is steep (not often around here) or on certain turns into driveways, etc. I can feel the unloaded trailer dragging the back end of the bike a little--not acutally moving the tire but trying to tilt the bike slightly. If it was loaded it'd probably be significant.

I can't actually see the trailer completley while riding, just a little with my mirrors, but I *thinK* that it is tipping onto one wheel when this happens. That would likely not happen if it was loaded, and instead would tilt the bike by force/leverage, and/or twist the trailer tongue (which can still happen now, but won't be able to really once I add the angled bars on that).

The problem appears to be that the edges of the hitch tongue are hitting the bottom fo the ball and/or the rear of the hitch plate itself, at certain bike vs trailer angles and leans of the bike, and this is causing roll torque thru the tongue.


The two main possible solutions are:
A--Raise the trailer tongue up a couple of inches, and angle it downward
B--bend the biek's hitch ball platform downward at the rear, so it is either flat or actually angled down at the back a little bit.

A secondary solution might be to trim some of the edges of the hitch tongue itself, but I don't want to do that unless nothing else works (even though it's already stronger than I need, by about quadruple or more since it's rated for 2000lbs), I'd rather have that safety factor).


Solution B is the most likely to be relatively easy to do. I'd just have to slice from beneath into the square tubing that is the extension of lower cargo rails to make the hitch platform, not all the way thru them, just from bottom thru the sidewalls and leave the top intact. Then bend the platform downward by however much this will allow, and reweld that cut closed. It should be just about as strong as before, that way, but now at a flatter angle, and reduce or eliminate the problem.


FWIW, if this was on a trike that didn't lean, like Delta Tripper, I don't think there would be a problem, or at least not as much.
 
Yesterday, I had to ride thru a medium-heavy rainstorm with fairly high winds, at the peak of the storm, to make it to a required meeting at work. The bike, despite having no covering now over any of the wiring/etc., didn't have any problems of any kind with the water getting wehre it ought not to.

About the only thing 'wrong" with it now is it's a lot cleaner than it was before the storm. :lol:


It was parked under the awning durign the meeting, and rain was done with by the time I left, so ride home was mostly dry except the streets. It worked fine for hte ride home, too, and also today after sitting overnight.


So it does make a difference to solder up (or otherwise waterproof, but I chose to solder) connections like throttle, halls, etc. as those are the ones I have trouble with when they get wet enough (or after they start to dry out and begin corroding). :)


The new CST "kenda kross clone-but stickier" tire in front also dindt' have hte skidding or spinning out problems I had with the Infinity Armadillo (especially in any leaning situation). I had only one spinout with it, and that was starting up from a stop at a traffic light in the downpour, where there was already a puddle across the intersection, and I had my front tire just about in the middle of the old asphalted-over-but-slick crosswalk line, behind the new-but-even-slicker white-painted crosswalk line. Even so, as soon as the rear pushed it past that the front grabbed fine, and it didnt' slide out from under me or side to side, just didn't grab at first.


The rim brakes with the SINZ koolstop clone pads performed jsut as well in wet as they did in dry (and had no squeal like they sometimes do when dry). The tires also grabbed fine for braking too, instead of just sliding along the wet roads.


So all in all, I'm prety happy with the wya it's working now, after all the work (and actual money) put into it recently. Once I redo the brake bridges with stiffer ones, and realign the rear bosses and add a rear brake arch bridge too, I think it'll be really good.


Then there's just the rewiring to tackle....first week of november probably.


This is a stitched panorama of the clouds just before they reached me, about 15 minutes after these shots. They were moving so fast that even with the shots taken only seconds apart, you can see changes in the formations where edges don't meet like they should between shots, and stuff changing (if I posted up the separate shots of the overlapped areas, you'd REALLY be able to see the changes).
 

Attachments

  • panorama storm.JPG
    panorama storm.JPG
    79.8 KB · Views: 2,025
Yesterday I went to pick up an older Crystalyte kit, post is here:
http://www.endless-sphere.com/forums/viewtopic.php?f=4&t=64279&p=962919#p962919

It was a long trip, out to Sun City, about 14 miles each way, total of 27.98 miles.
IMG_0484.JPG

Due to the load I had (my usual stuff, and on the way back the Crystalyte kit including heavy nickel-cell battery and X5304 motor wheel), plus hte extra battery weight (I'd strapped the 10Ah RC LiPo ammocan pack to the side, in additon to the now-built-in 20Ah EIG NMC pack, in case I needed the range),
IMG_0482.JPG
View attachment 10


and the large number of stops and starts because of the route I ended up with, and traffic, total trip Wh/mile was 30.1, about what I usualy get for my work trip. Just the trip out there was 26.4Wh/mile, though, before I added the Crystalyte kit to the weight the bike had to accelerate each time.
IMG_0486.JPG


Typically I might've gotten 22-24Wh/mile on such a long trip, without the extra weight and the extra-numerous stops/starts.

I got down to 50.3V by the end of the trip (started at 56.3V), 16.17Ah used (851.9Wh) (really was 16.4 but some back from regen).
IMG_0485.JPG

Regen was only 1.4%, 0.2268Ah; I tried to coast to stops whenever I could plan them, because more than half the time when i do that in traffic, a red light will change to green, or the congestion will ease and I won't have to actually stop, so this saves me a lot of energy. Best regen was 8.44A.
IMG_0487.JPG
View attachment 5

Vmin was 46.3V, at Amax of 69.55.

Was actually in motion for an hour and 42 minutes, with average speed of 16.4MPH. Peak was 21.6MPH coasting down one of the under-street passages' entry hills, on the canal path from Dunlap to Peoria Ave.

So now there are 10261 miles on the bike. At least. :)
IMG_0492.JPG


But everything worked fine the whole trip, except for the derailer/tensioner I'd welded to the pod rail. That has a little extra metal that sticks down about 1/4" on it's cage, and often catches on teh front doorsill of the house as I push it inside. I never *saw* any damage cuz the cage can still move, but apparently at some point hte welds actually broke, and the only thing keeping it in place was the hose clamp.

Since the weather was good (actually pretty hot for this season, over 100F for most of my trip, where it's usually 90-93F at most),
IMG_0480.JPG

and I didn't hurt as much as usual, I ghost-pedalled the whole way there and back. At startup before I got past the 10MPH or so it's geared for max, I also contributed a tiny bit to the startup push. That part is what got me.

The derailer cage was sliding back a little each time I did that, and a handful of times in, it began rubbing on the rear wheel. I got off teh road and stopped before it got into the spokes, but it was a near thing. :shock:

It took a few minutes to get the hose clamp loosened enough to allow me to slide the derailer forward again to it's spot, and reclamp it down. I also had to twist the cage a little; I guess it was bent some; it was causing the chain to roll off the bottom jockey wheel and catch on the cage--that's what was pulling it backwards. It didn't fail again during the ride, but i'll have to watch for that till I have time to fix it.


The worse problem was cuased on the way back, by a pothole I couldn't see at all, probably because of the angle of the light, around 2pm I guess, sun behind and to my right, and the shape fo the hole, which was basically a sinkhole under the asphalt, so the asphalt is "bowling" down into it,
1023141407-02.jpg

a little more than a foot wide total, but the problematic part was that it was nearly as deep as my celphone case is tall, perhaps 4.5-5":
1023141407-01.jpg
though it doesn't LOOK that deep even in the pic iwth the case in it, cuz of the way the bowl curves out it also looks a lot gentler than it actualy is. :/


and tha'ts what I hit with the front wheel, probably dead on. AFAICT it didnt' hurt the wheel itself, because the new front shock did it's job--but in doing so it rammed the top of the U-brace of the brake arch into the bottom of the headlight, which basically exploded into pieces. :roll:
IMG_0497.JPG

Since I was on a side street I picked up the glass bits I could find (some was shards I couldnt' grip). The headlight still 'works", but it hasn't got much in the way of reflector , lens or diffuser anymore.
1023141407-00.jpg


I have three more of the same type, one more dual-filament like this, and two single-filament, but I only know where one of the single-filaments is (the one on Delta Tripper). So I gotta get DT out and change out the whole unit, but I also first have to bend back the frame of the mount on CB2, since the bottom is caved in.
IMG_0471.JPG


And cut off the problematic part of the brake arch, since I'm not using brakes that need that piece (an extension to give a cable pull tension point).


Now, the dumb thing is, if I'd even thought about it once, I would've seen this coming before it happened, but I didn't. :oops:

The dumber thing is, I had warning: there was a crack in the headlight lens, whcih I didn't know where it had come from, but I knew it was from after I changed the fork out. If I'd put any thougth into it at all, I'd've seen the alignment of the crack and hte bottom fo the frame, and there was probalby arleady a mark or dent on teh frame to show me it was being hit by the arch.... :roll:


Anyway, lesson learned, I hope. :)
 
I got the headlight replaced last night,
View attachment 1


and removed the unneeded cable stay off the brake arch:
IMG_0569.JPG


though I think if I really hit something to bottom out the suspension, it'll still hit the headlight, so I will need to redo the whole headlight mount so it rides *on* the arch instead of the steerer. :/

Since I need to redo the arch anywya to make it stiffer and fit the face of the fork better, I guess I might as well build a lighting mount into it too. :)


Also trimmed off the "extra" bit of derailer cage that was catching on things. Unfortunately the cage is still bent up enough that I need to take it apart and off the bike, straighten it out and put it back on there, this time with a bolt, and replace the plastic bushings or whatever that melted inside it when I tried welding it on the frame. :oops: Or better yet, use a different one entirely, if I can find one that fits it that I am not keeping on a "normal" bike.
IMG_0568.JPG

Also, even with no loading on the chain, just the ghost pedalling for 30 miles wore thru the (HDPE?) tubing I used to run the chain over the battery pack, right up at the front edge of the ammocan. So I'm gonna have to actualy do the diversion/jockey wheels to route the chain completely around the center of the frame, if I ever really wanna be able to pedal with this, without having the chain cut thru things.


But after an initial 15-minute tugowar game between the two of them, in which they dragged each other over nearly every square inch of the backyard, Tiny was very bored, and Yogi was finding things to chew on that weren't his toys or sticks, so it was more prudent to play with the dogs than to work on the bike this morning. :)

IMG_0566.JPG
 
Used the trailer to haul home some empty styrpfoam coolers from work, (the ones the fish come in), that I'm going to use to insluate the sheds, and also to insulate the solar water heater "breadbox".

Even with just the bottom half of the kennel on there, it has enough drag to feel it in the gusty medium-ish winds we had both on my way there and the way back.


The headlight replacemnt worked well, though; it has a slightly different beam than the other, probably because it's a single filament light and the other was the dual-filament (hi/low) off the same side of the same car (the old 85 ford LTD).
IMG_0579.JPG


IMG_0578.JPG
IMG_0580.JPG
IMG_0581.JPG
View attachment 3
IMG_0583.JPG
IMG_0584.JPG
IMG_0585.JPG


Yogi and Tiny waiting as I roll the bike in and park it.
IMG_0587.JPG
 
Yesterday I tested the X5304 on CrazyBike2, and decided its brakes needed fixing while I was working on it anyway.
http://www.endless-sphere.com/forums/viewtopic.php?f=4&t=64279&p=965702#p965702


First up was to take the steel front brake U off of it's clamps and screw, and weld up the edges and back of it so it fits more snugly against the fork, and is less likely to flex during braking (since it can't be welded to the alloy fork, at least not by me). Fork itself isn't a simple flat face either at this point, it's compound curves....
IMG_0681.JPG


I built up the metal by welding a little at a time over it, cooling it, holding it up to the face of the fork, and welding more on there, until it was close enough to start grinding down the high points, and then filling in the lows.
IMG_0682.JPG

After that it was grind-and-fit until it was as close as I had patience for. :oops:
IMG_0683.JPG

I'm sure I coudl've gotten a more perfect fit, but once there was more than 75% apparent contact surface, I called it good enough, and remounted it.
IMG_0685.JPG

I also put the clamps on reversed from how I had them before, because this way will pull them outward at the front, opposing the braking force and stiffening htem more.
IMG_0686.JPG
It absolutely makes a difference, too, though not as much of one as I would like. Before, the bosses were not parallel, but pointed inward at the front end. Now, they are as parallel as I can make them.
IMG_0687.JPG

The biggest difference it makes is in hte pad position before braking and during. Before doing this, then in order to be parallel during braking, the tips of the pads at one end would en dup having to just about touch the rim al lteh time. If I set them parallel when not braking, then they'd never make full rim contact during braking.
IMG_0688.JPG


Now, they are about as parallel in both ways as I can get them, and I can put them a lot lcoser to the rim (less than a mm) so braking force is higher cuz I can squeeze less to get them onto the rims in the first place.
View attachment 2

IMG_0690.JPG


Same with the back brakes, though for those what I had to do was bend the bosses back outwards after cutting the original inner welds, then rewelding.


The back brakes are MUCH better placement, but braking itself isnt' really any better. I suspect it has more to do with teh crappy plastic ebrake lever than anythign else, though the Tektro arms are definitely not as good as the Avid SD5's I ahve on the front, and having to butt two housings end to end on the cable doesnt' help either.


One further issue is that somwehere along the line, probably when i welded the cargo pod frame to the bike frame, I managed to push the rear dropouts out of alignment even worse than they were before, so now the top of the wheel is much more to the left than the bottom (it only used to be a little bit).

It was already dark at this point and I was being eaten by mosquitos so I didn't get any further. Fixing that part will have to wait till next week's vacation. I can do the trailer hitch modification at the same time.


For now, at least it's back to a little better than it was before, for braking, and I'm no longer worried about the thin little tabs of metal supporting the front U/bosses giving way under hard sudden braking, since now it's got thick support all around them, and undersupports across the hollow U.
 
I heard a rattle last night on the way home that wasn't just my cane banging around in the seatframe "cage", and found that hte hitch ball was loose. Apparently it's a bad idea to mount it's bolt thru the plastic layer of the "hitchcover taillight" thing. I should've known that already, but at least it started happening when no trailer was attached.

I think I may weld the ball onto the plate, too, just to further ensure attachment beyond the bolt thru the plate, and when done with that will loctite the bolt in there, too.

Then there will still be the steel cable keeping the trailer attached even if the ball fails....

Can't be too paranoid about stuff like this, given my past history of trailers and dogs. :/
 
(First part is crossposted between here and the trailer thread. )

Between loctite on the bolt threads and inside the hitch ball, and not passing the bolt thru the lower tail/brakelight mounting plastic, it seems to have fixed the problem of the ball wiggling loose. I expect the plastic in there was the real problem, because:

-- There isn't really enough space to properly get a socket or wrench on the bolt head, to fully tighten it, inside the plastic housing of that light.

-- as the hitch of the loaded trailer pulls back and forth on the ball during braking and acceleration, it could allow some compression in the plastic (acting as a kind of spacer in this instance), which could then allow vibration/etc to slightly turn the bolt or the hitch, eventually loosening it noticeably.


Without the light's housing in the way it can be fully tightened, and it doesnt' have any space to move around in to loosen. So I probably won't need to weld it on.

I still havent' actually cut the cable down to a short length, and added the loop-bolts onto it to make it easy and quick to stick the cable on there, but it does definitely still hold the trailer on even without being on the ball (I tested it via leaving it completely unconnected to the ball, nose of hitch sitting behind it, with only the cable connecting them, and hauled a load of stuff around rough areas and did lots of stops and starts, and while it wasn't nearly as controllable as with it on hte hithc ball, it stays on and doesn't quite hit the ground. It DOES hit anything that sticks up, or if I go up or down a driveway, or some of the potholes that let the rear wheel go down more than a small portion of an inch.) Am still searchng for those loop-bolts (essentialy small U-bolts with hardware to clamp a cable to itself), in my stuff in the sheds.


Everything else on the bike has been working pretty well, and I have the new wiring harness maybe a tenth completed. I figured I cna just work on it whenever I have a moment and my hands are working right, and the dogs aren't demanding attention--three things that don't coincide often enough to do it quickly. So I'm making the harness off the bike, passing it all thru some repurposed water-supply hoses with braided stainless steel jackets, and hwen it's done I will connect up all the new wiring, and then remove the old wiring, and tie the new harness down. That will probably be early next year, at the rate things are going.


Ive also been experimenting with new headlight options, from Sylvania halogen bulbs to LEDs, and combinations thereof, but I haven't found a reflector and lens combination that gives me anything better (or even as good) as the present 30-year-old car headlight I have now. The lights are plenty bright enough, but spread over too wide an area, instead of focused onto the road in front of me. Lids and other blocking methods help with keeping it from shining where it would blind others on the road, but don't increase the brightness in the areas I need it, instead simply wasting the light (and thus power) in the shaded areas.


I seem to keep forgetting to note that the wh/mile on the bike as a whole has gone up several wh/mile on average, since I removed most of the power interconnects and soldered them directly, for phase and battery wires. I haven't yet done that on the rear wheel yet and need to, to see what increase I get after that--it still has pp45s on phases and battery. It's presently arond 3-4wh/mile more power usage on my typical work commute, for the same tire inflation/load/etc. I expect that is because of the lower voltage sag across those connections, vs with the pp45 andersons and smaller gauge wires for some sections in place previously, vs the larger gauges of shorter runs and no connectors now. It also allows slightly higher currents, because there is a small but definite increase in startup torque / decrease in acceleration time.
 
I've gotten another pair of free bikes to use for parts; one is a 29er FS frame, cheap mongoose thingy, aluminum frame but steel (crappy) front threadless fork, and steel rear suspension unit (with crappy spring/damper).
IMG_0823.jpg

I might be able to use that rear suspension to add to CB2, though, with the old Suzuki rear spring and damper. I'd have to move the brake bosses on the stays down to the 20" rim position from the 29er they're at now.

Am still pondering the idea; it will probably hae to wait till I can have another few-days-long vacation from work to try to implement, so if it doesn't work out I can undo it and get it back to working it's original way before haing to go back to work.


The other bike is a pink mongoose BMX, same tires but better conditon than the ones on the black BMX I used to test the Crystalyte X5304. Crappy wheels, though, and so is the rest of the bike, but it's heavy steel, and should be useful for something.
View attachment 1

I've been considering making a very small but powerful "regular" bike, out of one of these BMX bikes. No idea when that will happen, if it does, but I might stick the HSR3548 on there, after I get hte X5304 a new axle and on CB2.

SHould be interesting if I ever get it done. :)
 
After geting frustrated with some other things on Bills' bike, I took a break and disassembled as mch as I could of the Mongoose Hatchet FS frame as I could, because I want to try using ti's rear suspension frame pieces (which are steel, vs the aluminum front triangle) on CB2, but with the motorcycle shock instead.

I can't get the last bolt out of the pivot, though--it requires a larger allen key than I have found in my stuff so far. I know I have bigger ones, but cant' find them right now, though i think I saw them when going thru the sheds in November. Just dunno where.


The rest of it is off, though. I'll need to measure stuff and figuroe out a mount for he MC shock on the bike end, then the pivot for he swingarm/frame.


I also pulled the races, bearings, and spacers and cap for hte threadless headset stuff, and am going to try those on CB2 at some point, because they ought to remove the tiny wiggle I"ve always had in the existing threadless setup, becuase the sealed bearings I have in it are not the right diameter for the cups I have on there, and I've never had he right parts to fix the issue other han shims that sort of help.
 

Attachments

  • IMG_0880.jpg
    IMG_0880.jpg
    34.5 KB · Views: 4,214
  • IMG_0881.jpg
    IMG_0881.jpg
    48.4 KB · Views: 4,214
  • IMG_0883.jpg
    IMG_0883.jpg
    45.5 KB · Views: 4,214
  • IMG_0884.jpg
    IMG_0884.jpg
    43.4 KB · Views: 4,214
  • IMG_0885.jpg
    IMG_0885.jpg
    37.8 KB · Views: 4,214
Last night I noticed some wear-thru spots on teh rear ringworm tire:
IMG_0938.JPG

IMG_0940.JPG


This appears to be becuase of either weight distribution (toolbox/etc on left side, plus me putting stuff I carry mostly on that side) causing me to ride slightly tilted (which I think I actually ride tilted the other way), or road crowning/tilt, or more likely the frame on teh back end being "twisted" so the rear wheel is not straight up and down. All three are parts of the problem, most likely.

Not sure how long it will be before I get to fix the frame issue, so my next day off I'm gonna flip the tire over to "even out" the wear, or just swap it out for the other Ringworm tire (I'd bought two for Tiny's trailer when I was at the apartment, and had to use one for my own rear tire when the Hookworm began to come apart / sidewall issues / etc.; I still havent' gotten new stuff for the trailer, just beefed up old existing tires I had here at the house).
 
Alrighty; I got the tire replaced...and a cascade of other fixes. :/

When I pulled off the wheel, with the bike on it's side, and myself sitting on the floor beside it (what would be "under" it if it were upright), I slipped, fell back, and ripped the hall wires inside the insulation (I had soldered them due to connector failures some time ago, though I haven't done the phase wires yet, and they still use PP45s). Of course, I didn't know they were broken until after I had the bike back together, hours later.


Next, I got the tire and tube off, to find the tube's valve stem area delaminating.
IMG_0954.JPG
IMG_0955.JPG

Apparently these XTC thick tubes are made in a stupid way: THey cast a normal thickness tube, then the stick *that* into a mold and inject more rubber around it, and around the stem it's thicker, and stretches less, so it tears around the stem between the layers, and then thru the outer layer, leaving only the thin inner layer to actually keep the valve stem on there, risking herniation of the inner layer thru the outer, at the inner circumference of the tube.

It's hard to see in teh pics, but the blue stripe that's on the outer layer doesnt' line up with the one on the inner layer, which is what shows me it's two separately-molded layers, instead of a single one, so they don't stretch the same--as if you had two balloons one inside the other; with different thick spots and thin spots, some of them overlapping some not....
IMG_0956.JPG

Thankfully I had a SunLite thick tube already in the other Ringworm tire (which I'd had on the X5304 for that road test I'd done a little while back).


I also examined the old tire, and found it had a piece of glass in it that had almost cut thru it; a little more and it might've sliced into the defective XTC tube. Both tire and tube are still usable, if not under a lot of stress, so maybe I will save them for spares on the trailer.
IMG_0957.JPG
View attachment 1
IMG_0959.JPG


Ok, so now the tire was fixed; I decided to tackel the frame problme that caused the tire to wear unevenly in the first place. The frame on the left side for the cargo pods was made to stick down lower than the right, because the bike frame is different on that side.

And that is different becuae I screwed it up when I did the emergency repair in the dark over at Mark's late in 2013, when I found that only one seatstay and two bolts were keeping hte whole rear wheel on the bike--both chainstays and the left seatstay had broken thru, and only two thin bolts connecting the dropouts with the cargo pod rails were preventing the wheel from just bending the remaining seatstay up and out and letting the back of the bike crash down on the road! :oops:


So....

Next I took off the left cargo pod, and disconnected the wiring from i'ts leftside marker/brake light bar from the hitch plate lighting.

I undid the bolt holding the bottom of the toolbox to the lower left cargo pod rail.

I cut thru the rear vertical support on teh left side cargo rails, at it's base where it connects to the lower rail,
IMG_0946.JPG
and took about 3/4 of an inch out of it. Then I cut the left chainstay, taking 1/4" out of that.
IMG_0949.JPG


Then I got out the long HF clamp (free with coupon, and not worth even that) and put it across top and bottom rails, and started to squeeze it's trigger grip with my meager hand strength, whereupon first the far end started to crack on teh plastic of the clamp, and then the grip itself collapsed into the handle, and jammed, with the handle cracked. :roll: P.O.S.

I removed the useless junk clamp and got the attitude adjustment tool (3lb sledgehammer), and proceeded to adjust the attitude of the lower cargo rail upward about 1/2" at the rear end. It didn't move as far as I wanted, but I sure felt better about things. :lol: Though now my already-aching right elbow was throbbing, as were both hands.
View attachment 6

I pondered on how else I might get the rail moved upward, and the dropout (welded at the middle of that rail) and held there while I welded it. Eventually I remembered that when I first found the broken chainstays I'd used cargo straps to clamp the underside of the bike together longitudinally until I could fix it, and I got out a cargo strap and used THAT to crank the lower rail upward, by wrapping it around the chainstay and top and bottom rails and ratcheting them togehter.
IMG_0947.JPG


Bill showed up to do lunch around then, so I left it all like that for the next 3 hours or so while we had lunch and poked around at HF and Goodwill, and yakked.

Eventually once I got home, I got it worked out to line stuff up and make the rear dropouts as level as I could without cutting the whole frame apart, building a jig, and redoing it all.
View attachment 10
I remounted the wheel in there to be sure it would fit and line up, with teh strap still holding it all together.

Then I undid the brake pads, and left them loosely against hte rim; they ahd been at a severe angle before,
IMG_0944.JPG
and I left them so I could compare to the new rim angle, and I think it should be fine now. The pads actually sit vertically now, not parallelogramish, so they should work better without rubbing unlikebefore.


Around then I noticed I'd sliced partway thru the cable for the hitch/pod tailighting when i'd cut the rail support, even though I was sure I'd moved it out fo the way, wans't far enough I guess. Two more wires to fix.


I took the bike out back, setup the welder, and fixed up boht the cut places, and also welded the hitch ball onto the plate as I'd thought about doing for a while now. (just in case the bolt doesn't stay in, don't wanna risk losing a trailer full of dog, even though I also use a cable stuff happens).


I started to bolt the cargo pod back on, then realized halfway thru that of course the lower rail bolt holes no longer align, cuz the rail is higher now. Duh.

Took it back off, and decided if I have to drill new holes for that, I might as well fix the other problem--this pod has always been about an inch forward of the right one, because at some point when I moved them both up to make clearance for turns on a 20" wheel (vs 24 or 26") I drilled one of them wrong. So I drilled new holes to match the present rail positions, but an inche forward of where they were, so it moves the pod back even with the right one. Didn't make any real difference except aesthetics, other than making it easier to bolt stuff directly across the back of the pods now, if I ever need to.


Meant to also add the hinged plate to make a deck over the rear wheel, but it was almost dark already by then, and I didn't remember where I put the plate I was going to use (though I had found the hinges when I wasted about an hour looking for the cutoff discs I'd already had out but forgot).


Then I was going to test ride it, and found the motor wouldn't spin up with a load on it, and guessed lucky and found the hall wires broken inside the cabling/insulation, near the splice point between motor/controller. That took another while to fix, and it was dark. Test rode it ok, feels different since the rear contact patch is now moved leftward, to the center of the bike, about an inch and a half (center of tire actually about two inches) from where it had been before, due to the angle the wheel had been at.

Have to get used to it being "right" again.


While I had the drill out, I added a tiny hole next to the pod light bars, so their wires now go into the pod and then out the inboard side fo them, to join at the hitch light. But while connecting them back up, I broke the resistor string I'd installed there to make the taillight dimmer than the brake light, and that took another hour to fix cuz i can't see or hold the small parts very well anymore.


I'd planned to also change out the headset bearings, cups, spacers, etc., with the parts off that bike in a recent previous post, and make a whole new headlight/horn/etc attachment frame, as well as a new steering tie-rod attachment point for the front (like I had for the rear a while back), but there just wasnt' time, it was already dark outside and I don't have enough good lights to do thsi in the dark anymore, and I couldn't handle the growing cold's effects on my hands and joints.

So those things will happen on another day. Maybe Tuesday since Wayne probably can't make it for the ride this week either (last week was cancelled due to rain, previous week because his trike had a critical structural malfunction).


I also considered working out that rear suspension stuff today, but I know that will not happen easily or quickly, and will probably require the bike to be down for up to several days in a row, depending on how many revisions are needed to make ti actually work well enough to commute with it. So...that has to wait for vacation time, and I don't know when that will be. Ideally I'd like to take a week off when Dogman is coming out this spring; I don't know how many PTO days I have left right now.


Pics will come soon as I can, added inline, but they won't upload due to wifi bandwidth right now, I guess. Just times out.
 
Got some of the pic uploaded. Thoutght I'd also post these pics of the bottom of the right cargo pod, which is my "kickstand" most of the time, and also sees a fair number of asphalt-strikes on hard right turns...I keep telling myself I'm going to "notch" the lower outboard corners but I've never gotten around to it.

Maybe when the wear is so bad stuff starts falling out the hole. :lol:
IMG_0951.JPG
IMG_0952.JPG
 
Fixing that twist definitely helped the bike:

It's gotten significantly better Wh/mile, so now that it's riding on the center fo the tread instead of the left edge of it, same tire pressures, it's getting 25-30Wh/mile again, instead of 30-35Wh/mile on my work commutes. I'll find out what it is on a longer ride at slower speeds than I'd be on the roads with traffic, when I go on the ride with WayneBergman today (see the Buckeye Trail Ride thread http://www.endless-sphere.com/forums/viewtopic.php?f=3&t=65828 ).

I've gotten used to the handling change; the only problem I have now is that I hit the right pod on road more in right turns, probably because the contact patch is to the left slightly more and so the pod hits earlier than it would have before.


Last night my workplace was tossing out wire racks I can use for "basket shelves" in the sheds, so since I got off before closing time, I went home and got the trailer (minus the kennel) to haul them home--too much to fit on the bike safely.

It had only misted and tinkled very occasionally thru the day, but I knew it was going to actually rain sometime after dark, and of course it started this just as I was getting the trailer ready (after greeting the dogs and a little playtime outside), before heading out to get the stuff.

DIdn't rain very hard, more like a heavy drizzle, but it was enough to cause many car drivers to become complete idiots, doing the usual rain-time-things like running many more red lights than usual (as if the rain was going to hurt them sitting there waiting for it to change), going in general a few MPH faster than usual (as if they could outrun it), and getting right up behind me before braking any, and then swerving hard around me, sometimes almost losing control on the wet oily roads (one SUV fishtailed almost halfway around before regaining control, it was just me in the right lane and him halfway between the right and left lanes, no other traffic for about 1/4 mile either way, approaching a red traffic light, which he drove straight thru without even slowing down after recovering control).

And as usual some of them didn't have headlights on, some had no lights other than occasional brake lights or turn signals. It seems to be a common idiocy when riding in the rain at night for drivers to turn OFF their lights as if they can hide from the rain. Instead they're just hiding from other drivers who then hit them cuz they don't know they are there (because drivers often only look for light sources at night, not just anything on the road other than road surface, which is probably why pedestrians and cyclists get hit so often at night).


The most dangerous one for me was when a cadillac sedan sped way up as he approached me from behind just as I was nearing the 28th drive intersection from MetroParkway west, then changed lanes to the left lane not long before he would have had to either brake or run me over. No turn signals at all from him, though I had my right signal going as I turn onto 28th to exit Metrocenter to get to work. The light was still red when we got to it, with traffic going thru north and south on 28th itself, which is probably the only reason he actually stopped--at about a 30 degree angle across the road, partway into the left turn lane with his rear end, across his lane, and partwya into my lane and the mostly into the crosswalk with his front end. I didn't think he was actually going to stop at first, and was just going to keep on and ram me from teh left side, but he did stop a couple feet from my front wheel.

I just kept an eye on the oncoming crosstraffic, where he seemed to be just looking at the traffic light, and I took an opportunity gap and turned off onto 28th while he was "distracted", so I could get out of his way--I figured he would probably just gun the engine when the light turned green, and if I was still there he'd end up running over my front wheel/frame on his way to whereever he was headed. So I decided to not be there. Just after I made my turn and was halfway up to the red light at Peoria and 28th, he did indeed gun it and swerve into and across 28th all the way to the left turn lane there, roaring engine and all. I thought he was going to plow into other cars but he managed to stop in time. :/


The rest of the night was unadventurous. Most poeple seemed to be off the roads by the time (915pmish) that I had gotten everythign tied down and headed towards home. The rain had also gone down to an occasional droplet or three, not even really misting anymore, though that changed as I was nearing my house, and it was going pretty good as I unhooked the trailer to get it and the bike inside.

Tiny and Yogi did go out in the rain since there was no wind or thunder, though they dind't stay long.

I forgot pics of the trailer/cargo, but it's still tied on there so I may get some after the ride with Wayne.
 
Pics of the trailer with the cargo on it, plus Tiny and Yogi investigating it, of course. Forgot to mention that I had it so tightly cranked down on the cargo straps that it didnt' even rattle, and I had to keep checking in the mirror to be sure it was still there. ;)

Also a pic of the cargo strap itself on the front--it is pretty crappy. First use and it deformed and tore near the stitching at teh crankdown ratchet. :(
 

Attachments

  • IMG_0975.JPG
    IMG_0975.JPG
    53.8 KB · Views: 4,072
  • IMG_0976.JPG
    IMG_0976.JPG
    45.1 KB · Views: 4,072
  • IMG_0977.JPG
    IMG_0977.JPG
    50.4 KB · Views: 4,072
  • IMG_0981.JPG
    IMG_0981.JPG
    43.9 KB · Views: 4,072
  • IMG_0979.JPG
    IMG_0979.JPG
    36.9 KB · Views: 4,068
"road trip" with Wayne was fun:
http://www.endless-sphere.com/forums/viewtopic.php?f=3&t=65828&p=999050#p999050

CA stats pics attached.
2 hours and 15 minutes of riding
28.88 miles
22.2Wh/mile
average speed of 12.7MPH
peak of 21.4MPH (probably on one of the several downhills of the underpasses)
12.5Ah used, not including regen back
1.2% regen
0.16Ah regen
647.28Wh
Started at 58.4V
ended at 49.7V
sagged to 44.7V
64.23Amax
10.3Aregen peak

I had my bike lighting off for all of the canal ride to save a little power (about 14-15W off the DC-DC), only using it when on-road.

I ddn't bother with the longer range pack, since Waynes was small and I could probably already outride his powered portion, so no point to the added weight.

No rain, though it had the night before and probably that morning.

Several stretches of sandy stuff, for a few miles of it, couldn't really use the front motor in that until I was at speed--any front acceleration in it would give me squirrely traction/lack of steering. No problems with that on the rear wheel, which has a smoother tire than the front (which has side edge knobbies), but is a little wider and has a lot more weight on it.


No stupid people on the whole trip, which was pretty amazing. Even the walkers/joggers were nice, and the several with dogs either had them on leashes and well-trained, or off-leash but very well-trained. (often dogs on the trail with their people are NOT trained at all, and just let loose to run, and they tend to chase bikes and joggers)


No flats or other tire issues, or any bike isssues at all that I can think of.

Just a fun ride. Wish I could trust Yogi, but he's one of those chaser-dogs still, so I can't take him on rides unless he's in the kennel trailer. :( I don't think Tiny would do well either, but it's more because she doesnt' like noises or things/places that are unusual/different until she gets used to them, which takes a while, and I don't know that she could walk or run along with me for very long (she does great in short bursts, but then she needs a nap. :lol: ).
 

Attachments

  • IMG_0966.JPG
    IMG_0966.JPG
    15.9 KB · Views: 4,041
  • IMG_0968.JPG
    IMG_0968.JPG
    15.3 KB · Views: 4,041
  • IMG_0969.JPG
    IMG_0969.JPG
    21.3 KB · Views: 4,041
  • IMG_0970.JPG
    IMG_0970.JPG
    19 KB · Views: 4,041
  • IMG_0971.JPG
    IMG_0971.JPG
    13.6 KB · Views: 4,041
  • IMG_0972.JPG
    IMG_0972.JPG
    19.8 KB · Views: 4,041
  • IMG_0973.JPG
    IMG_0973.JPG
    22.4 KB · Views: 4,041
  • IMG_0974.JPG
    IMG_0974.JPG
    18.2 KB · Views: 4,041
OOPS. :oops:

I got busy with the dogs, posting up the results of the ride, etc., after I got back from it Tuesday afternoon, and forgot to plug the bike in to recharge it.

I realized that only when I turned it on to head off to work yesterday afternoon, and saw the voltage, thinking "oh, crap" and then "oh, well, I still ougth to have plenty of range for work and back".

Thankfully that turned out to be true, but only *just barely*.

(I did go back in and grab the secondary pack (RC LiPo 10Ah in the 7.62 ammocan) and tossed it in the rigthhand cargo pod, but didn't have time to mount it and hook it up before leaving, and figured I'd do that if I needed it on the way home as I was pretty sure I'd make it *to* work at least. ON the way home I should've mounted it, but by the time I thought of it I'd already put the dog food I'd bought on the top of the pods, and thought, "what the heck, it'll be a good range test").


So...one of the stores in the valley was closed up permanently this week, and they shipped stuff from it to various other stores here. Turns out in the pallet of dog food we got, there was a small amount of it on clearance, so I bought it and determined it'd fit on the bike without going home to get the trailer. (there's more still there that I'll be getting when I'm at work today, but I'll have the trailer with me for that).


By the time I got within half a mile of the house, starting up from a complete stop was sagging the pack below 39V, and could barely get me going at all; I couldn't use full throttle or it was actually worse than just a little throttle, though interestingly it did still work better with both motors and a teeny bit of throttle than one motor and twice that (just the way motors themselves work; another vote for 2WD).

However, I also had 4x 24lb bags of dog food (3 on top of the pods behind the seat, one behind me on the seat) and 18 12oz cans of dog food (in the left cargo pod) on the bike, in addition to it's usual load of me at about 170lbs plus it's own weight (~150lbs IIRC), PLUS the secondary battery pack (10Ah RC LiPo in the 7.62 ammocan, in the right cargo pod).

Total weight at that time would be almost 445lbs or so, as a guesstimate (vs the 320ish it'd normally be).

Once I got started it'd run normally, but the sag during startup was pretty bad since the pack was nearly dead.


I ended up running the cells down to almost exactly 3.0V/cell, 43.8V resting pack voltage, using 15.4Ah out of the pack, with a total of 33.4 miles. I suppose I could've pulled a little more out, but I sure wouldn't want to.

So now I know what it's present range is, at least.


I had *meant* to open up the pack and check cell voltages, balance, etc. both at the near-empty state after the long ride, and then when I didn't get that done I meant to do it last night afer it was really empty, but I forgot the first and last night I dozed as I sat down to eat dinner and read ES, and forgot, even though I woke often as usual, forgetting even to post any of this up till this morning (almost midday, actually). I didn't even remember to plug in and charge until after getting breakfast for the dogs, and there wasn't time to get the pack out of the bike, open it up, measure things, get it back in there, and then charge it up for work trip today.

So that testing will have to wait till my next chance to run the pack down again. I think I will try to do it by not charging after work each day until it's run down again, which should be about 6 roundtrip work commutes, to be safe (should do 7, but might not do all of the last one). Might have to do some manual discharging with a load for the last part.


PIcs of the cargo (and Yogi investigating it; TIny was busy outside when I took the pics), and then of the CA screens.
 

Attachments

  • IMG_0979.JPG
    IMG_0979.JPG
    36.9 KB · Views: 4,036
  • IMG_0983.JPG
    IMG_0983.JPG
    28.9 KB · Views: 4,037
  • IMG_0987.JPG
    IMG_0987.JPG
    52.2 KB · Views: 4,036
  • IMG_0988.JPG
    IMG_0988.JPG
    27.9 KB · Views: 4,037
  • IMG_0990.JPG
    IMG_0990.JPG
    17.6 KB · Views: 4,036
  • IMG_0991.JPG
    IMG_0991.JPG
    18.2 KB · Views: 4,036
  • IMG_0992.JPG
    IMG_0992.JPG
    18.1 KB · Views: 4,036
  • IMG_0993.JPG
    IMG_0993.JPG
    18.5 KB · Views: 4,036
  • IMG_0994.JPG
    IMG_0994.JPG
    17.9 KB · Views: 4,036
  • IMG_0996.JPG
    IMG_0996.JPG
    16.4 KB · Views: 4,036
  • IMG_0997.JPG
    IMG_0997.JPG
    18.9 KB · Views: 4,036
Yesterday I used the trailer to pick up more clearance food, but I seem to have forgotten pics (it's been an exhausting few days, and I don't get a day off until Tuesday...first 7-day workweek I've had in a long while and I'm not used to it).

That was the last of what was on the pallet we got from the store that shutdown, and I figured that would be the last of it, period. Today, though, several more pallets of stuff arrived from there, and there was a little more clearance food on it...and I ddn't have the trailer. :/

So I did the same thing I did the other night, shown in the above post, and strapped it to the bike. It was nto quite as large a bag for any except for one, so I was able to put two bags in the right pod, one half-in the left pod, and one across the tops.

However, after I crossed the really bumpy intersection right after leaving the parking lot at work, that big bag settled down in the middle and rubbed on teh tire, making little holes in it. Not large enough to leak food, thankfully, but I still pulled into another parking lot just past the intersecvtion to reposition it more upright on it's edge, so even if it sags it can't reach the tire.
IMG_1005.JPG

IMG_1006.JPG


(I keep meaning to make a hinged "cover" to bridge from one pod to the other, so that can't happen with "soft" cargo, but I always forget when I have time, and don't have time / parts out where I can get them, etc., when I do think of it, like now--or it's just too late at night to do the cutting and drilling that has to be done outside).

Anyway, the bag literally made it just inside the doorway at home before the tiny kibble started spilling out--Tiny and Yogi were very happy about that, and had a pre-dinner snack. :)

First they investigated the bike, ignoring the stuff actually on the floor:
IMG_0998.JPG

IMG_1003.JPG

And then TIny found some on the floor
IMG_1007.JPG

while Yogi was still chekcing out the bike
IMG_1008.JPG
IMG_1009.JPG


And then Yogi suddenly noticed the floor, too
View attachment 7

and they continued for a while to make sure they got every little piece. :)

IMG_1011.JPG
IMG_1012.JPG


(I love that they can both scarf up stuff like that without competition, and I don't have to worry about either one snapping at the other or anything over food...though somehow I managed to miss getting any pics of BOTH of them in the same pic snarfing it up, nose to nose and feet intermixed as if they were playing doggie twister).


PIcs of just the bike and cargo
IMG_0999.JPG

IMG_1001.JPG

IMG_1002.JPG


There's still a bunch of little bags, but even though it's a huge discount ($4 for a $15-$30 4lb bag of food), it's still over a dollar a pound for the food, and I try to stick with stuff on sale for less than half that. So I probably won't get them...but I might, if no one else does in the next day or two.

There are two 24lb bags that used to cost over $60 each that are now $22, but that's still nearly a dollar a pound, and I debated on whether to get them or not. I probably will end up doing it, just because it's good stuff and they eat significantly less of the good stuff vs the cheap "junk food", so it still comes out cheaper this way in the long run.

Also, there's still several pallets of stuff to go thru, and there might be more that's really worth getting.

So just in case, I'll bring the trailer tomorrow, and the next few days.
 
I didn't get anything last night, I just didn't wanna deal with it by the time my shift was over and we closed. Was just way too tired.

One thing to note is that even with the trailer being empty, it felt like the bike was being "pushed around" or "drifting", usualy to the right . It was wierd, because I hadn't had tha tproblem on the previous trip a few days ago, eithe rloaded or unloaded.

I checked tire pressure on bike and trailer, stills ame as it was before. Checked spokes, all ok. No frame, axle, nut, or dropout problems either. It almost felt like it had when the 3 stays had cracked a bit over a year ago, though if that happened now it shouldn't matter cuz the dropouts are also welded thoroughly to the cargo pod rails, too.

Couldn't find any reason for it...which worries me.

Tonight I was a little better, but still really tired, and we were very pressed for time at closing, so I only grabbed the two largest bags that I knew where they were, since it's been so busy at work this weekend there's been no time to really do much stocking, and there are still many pallets of stuff filling the whole warehouse area, so I cna't even get to most things back there. And I was too tired to try to deal with a bunch of small bags, of which there are a number on clearance, too.


I had the same problem again, both unloaded on the way to work and loaded on the way home. I definitely gotta figure out what the deal is with it.


But this morning was pretty cool, including hte ride to work: It was nice and foggy; hasn't been like that in what seems like years (might actually have been...I just can't remember).

It was really quiet. At the house, it was so quiet in the yard this morning that it was as if the whole city had gone away outside my local block. Tiny and Yogi were actually a little creeped out by it, and didn't wanna stay outside and play much, instead they kept going back to the bedroom to hide on the bed. It was wierd.

I took a few pics, but got interrupted from uploading them before work by them wanting attention, and I set the memory card down somwhere and havent' found it yet. WHen I do I guess I'll upload them...it also means I cna't take new pics till then either. :/
 
Back
Top