The full article with colors and images and links that actually work is located here
https://electricfatbike.wordpress.com/2015/06/26/a-hackers-guide-to-programming-the-bbs02/
A Hackers Guide To Programming The BBS02
Posted on June 26, 2015
One way that the BBS02 middrive unit shines over other competition like the Bosch is the ability to program the controller yourself. Although the process of programming the controller will void any warranty that you got with the unit, to many people the risk of voiding their warranty is outweighed by the possibility of getting more performance or having the PAS settings more to their liking. There are 3 settings that most reputable resellers of the BBS02 will set for you.
Low Voltage Shutoff (in Volts)
Limited Current (in Amps)
Speed Limit
Many US vendors will be resistant to remove the 20mph speed limit as that may make them liable for any accident you are in with their motor. The BBS02 at 750Watts is really only powerful enough for about 25mph or so on level ground, although with a 52T chainring on a downhill stretch I have reached 40mph. At higher speeds your batteries get used up very fast.
It can be somewhat confusing as many of the settings on the drive controller have a setting of ‘By Display’s Command‘ which means the controller on the drive until will defer that setting to whatever the display is set to. There are 3 different displays which all have different settings on them and ways to set different variables like wheel diameter, speed limit and PAS levels. For instruction manuals for all three display types look here. The C965 and C963 are generally set to 5 PAS levels, although the C961 is easily set to 9. You can also adjust the C965 PAS levels up to 9. The last page after the Password has been entered is the PAS page, it can be adjusted up to setting “0-9”.
Before you start programming your controller, here are some important quotes from Paul at em3ev.
“The PAS functions like a switch, it either assists at a certain speed and current percentage or it doesn’t. It is on or off. The motor does not know how hard or how soft you are pedaling, it is not assisting you, it is not reacting to your behavior. It only knows that you are pedaling or you are not. The only change in the so-called assistance, is because the motor has been moved to a different point on the motors power curve and that is not a programmable parameter, it is just a case of pedaling that bit closer to the no load speed of the motor/controller combination, where the motor will deliver less torque and therefore less power. That is why the PAS settings are best left pretty much like they come from the factory, with gradually increasing speed and corresponding increases in current values too, as you go from steps 1 through to 9″
“Users can change the LVC, change the current level (reduce it preferably)”
“Users can also change the speed limit to be controlled by the display (but that does leave the kit more liable to blow).”
“Setting the throttle to 100% and without speed limit is what everyone wants, but is also a good way to blow the controller.”
“Once anything is increased, or the response is made faster, the controller is more liable to blow. Setting every PAS level to 100% is a terrible idea.”
Comes in a wide variety of colors, I recommend black for stealth. You don't want to draw attention to the drive unit.
A smaller chainring is critical for singletrack riding controller conservation. I prefer the 34T Raceface narrow\wide ring.
The biggest problem with the BBS02 is when it is turning under too much load at too low of a speed. The best way to keep the motor spinning fast is to get a smaller chain-ring and to make sure you are in the right gear for any hills you want to climb. The surest way to blow your controller is to use full throttle in too high of a gear on a hill where the pedals are turning too slowly. If you use a large chain-ring on your commuter (mine is a 52T because I like to go fast) make sure you shift down into a lower gear before coming to a stop even on level ground so you are not repeatedly trying to start moving in too low of a gear. Your pedaling cadence should always feel normal to fast, especially on hills.
Another strong recommendation for not frying your controller is to install a temperature probe. Instructions on how to do this are here and it takes about 7 minutes to do and costs $2 shipped.
In order to program your BBS02 you will need a windows PC with a USB port, a programming cable (from Empowered Cycles) and the software. More info on those three items can be found in this article.
Clicking READ FLASH or WRITE FLASH buttons changes or reads values from all 3 tabs at the same time. You should always click READ FLASH, then FILE->SAVE as a .el to make a back up copy before making any changes to your current settings.
There are 3 pages of programming variables. You can click READ for each page but it will only load the current settings on the controller on that page before you change them. Sometimes the serial connection is unreliable and a variable will have a totally wrong setting or garbage in it. I suggest clicking the READ button twice before you start changing the settings to make sure it read the controller settings correctly. I’ve never had garbage persist through 2 READ clicks, it always seems to get it right on the 2nd try. When you edit the variables you want you will then need to click the WRITE button for each page you change or WRITE FLASH for all pages. I would click the READ button again on each page after waiting a few seconds to make sure that the settings you changed were actually written to the controller firmware when you clicked WRITE.
Variables are color coded based on how safe they are to modify
Green variables are safe to change
Orange variables can be changed but there is some risk
Red variables should never be changed unless you know something that I don’t
The color of the variables are what defaults from various drive units as well as the .el configuration file for each vendor. You must save the file to your drive then rename it from .doc to .el then FILE->LOAD it directly into the Bafang program. All variables will be automatically set on all three pages and you need only to WRITE FLASH to write it to the controller.
Black is for em3ev settings. .el File is here
Blue is for Lectric Cycles e-RAD settings.
Brown variables and text is EMPowered Cycles settings & quotes. .el File is here
Purple variables and text is Kepler from Endless-sphere’s settings & quotes. .el File is here
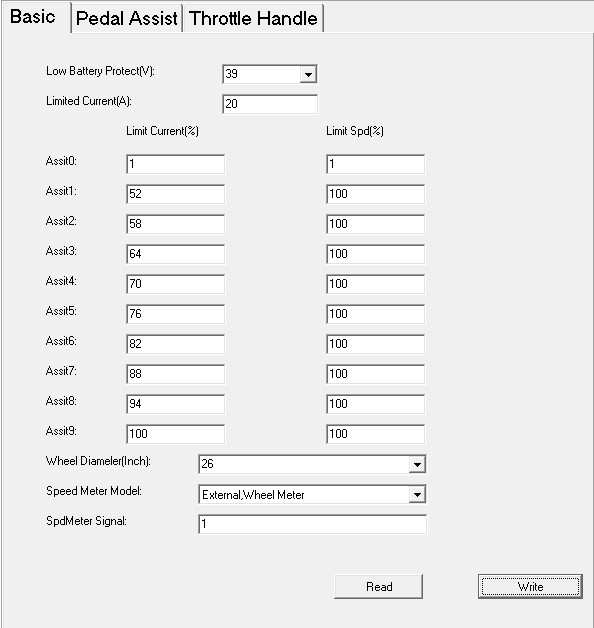
BASIC TAB
Listed are the settings, in bold is the setting I recommend and what little we’ve learned about them. This article will be updates as we experiment more.
Low Battery Protect(Volts): 41/41/41/41 to 43 – This number will change based on the pack size and configuration. Most likely your battery will have a BMS that will shut off power when it gets too low. This setting is mostly useful when you are running a battery setup without a BMS which is not advised. Kepler notes,
“I use 43V on my 14S 4P 18650 pack setup”
Limited Current(Amps): 25/25/18/18 to 20– This sets the power level that the drive unit will pull from the battery pack. Be aware that just because it is set lower, does not mean that it will not draw more amps for brief periods. If you don’t want to stress the BMS you may want to set this number lower than you think it should be by 2-3 amps then slowly increase it over time if your $15 watt meter shows that it is not pulling too much power on a regular basis. This variable will be set lower than 25 if you have a BBS01 or a BBS02 with a lower power level rating than 750W. If this is set lower than 25 from the factory you CANNOT RAISE it safely unless you are sure it is a 750 Watt unit & controller and your battery can handle the draw (it should say on the bottom of the unit). Matt from Empowered Cycles has this to say:
“I recommend 18 amps in most cases. You still get amazing performance, prolonged controller life, more charge cycles from your pack, more range on your rides. If you have an internally geared hub, I recommend 15 amps and changing the “start current” on pedal assist and throttle all the way down to the lowest setting of 1. Even at 18 amps the 750 watt motor keeps up with an 8T geared MAC hub motor that is pulling 1500 watts. You do not need 25 amps for this motor to perform.”
Kepler has this to say
“ I agree that 18 amps is a good all-round setting. I then rely on the Limit Current Assist level to fine tune the max power best suited to bike.”
Asst0 Limit Current(%): 1/0/0/100 – This is the setting for the PAS at level 0. When pedaling at PAS0 you should be able to hear a very low hum and the motor should turn, but with not even enough power to turn the crank if set to 1. The throttle might not work in PAS 0 unless this is set to 1.
Asst0 Limit Spd(%): 1/0/0/1 – At power level 0 causes the controller to lower current gently to maintain motor rpm when 44% of speed limit is hit. Speed limiting is done based on motor RPMs not road speed. The throttle might not work in PAS 0 unless this is set to at least 1, it is really nice to have a hand throttle setting without any PAS intervention.
Asst1 Limit Current(%): 52/20/52/10 – Power cut based on road speed at power level 1.
Asst1 Limit Spd(%): 44/44/36/100 – Power cut based on motor RPM speed at power level 1.
Asst2 Limit Current(%): 58/20/58/20 – Power cut based on road speed at power level 2 if set to 9 power levels.
Asst2 Limit Spd(%): 51/51/44/100 – Power cut based on motor RPM speed at power level 2 if set to 9 power levels.
Asst3 Limit Current(%): 64/30/64/30 – Power cut based on road speed at power level 3 if set to 9 power levels.
Asst3 Limit Spd(%): 58/58/52/100 -Power cut based on motor RPM speed at power level 3 if set to 9 power levels.
Asst4 Limit Current(%): 70/40/70/40 – Power cut based on road speed at power level 4 if set to 9 power levels.
Asst4 Limit Spd(%): 65/65/60/100 -Power cut based on motor RPM speed at power level 4 if set to 9 power levels.
Asst5 Limit Current(%): 76/50/76/50 – Power cut based on road speed at power level 5 if set to 9 power levels.
Asst5 Limit Spd(%): 72/72/68/100 -Power cut based on motor RPM speed at power level 5 if set to 9 power levels.
Asst6 Limit Current(%): 82/60/82/60 – Power cut based on road speed at power level 6 if set to 9 power levels.
Asst6 Limit Spd(%): 79/79/76/100 -Power cut based on motor RPM speed at power level 6 if set to 9 power levels.
Asst7 Limit Current(%): 88/70/88/70 – Power cut based on road speed at power level 7 if set to 9 power levels.
Asst7 Limit Spd(%): 86/86/84/100 – Power cut based on motor RPM speed at power level 7 if set to 9 power levels.
Asst8 Limit Current(%): 94/80/94/85 – Power cut based on road speed at power level 8 if set to 9 power levels.
Asst8 Limit Spd(%): 93/93/92/100 -Power cut based on motor RPM speed at power level 8 if set to 9 power levels.
Asst9 Limit Current(%): 100/100/100/100 – Power cut based on road speed at power level 9 if set to 9 power levels.
Asst9 Limit Spd(%): 100/100/100/100 – Power cut based on motor RPM speed at power level 9 if set to 9 power levels.
A quick note on power levels. If your display is set to only use 3 power levels then the controller uses settings for Asst1, Asst5 and Asst9 and ignores all the rest. If it is set to 5 levels than it ignores every other power level setting (but uses Asst1\3\5\7\9). On the C963 display I have still not figured out how to set the display to 9 power levels, so you may be stuck with only 5 PAS power levels with that unit.
Wheel Diamter(Inch): 26/26/26/26 – Set this to whatever your wheel diameter is.
Speed Meter Model: ExternalWheelMeter / ExternalWheelMeter / ExternalWheelMeter / ExternalWheelMeter – As far as I know this is the only speed sensor that is set up for the BBS02
SpdMeter Signal: 1/1/1/1
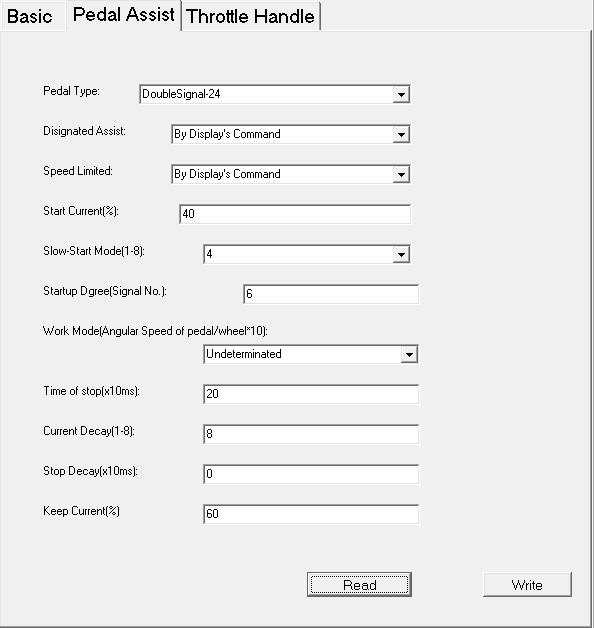
PEDAL ASSIST TAB
This page is for the Pedal Assist Settings. Change conservatively, make small incremental changes and test rather than large ones.
Pedal Type: DoubleSignal-24 \ DoubleSignal-24 \ DoubleSignal-24 \ DoubleSignal-24 – Unknown
Disignated Assist: By Display’s Command \ By Display’s Command \ By Display’s Command \ By Display’s Command – This setting if set will override the Limit Speed setting on the Basic Tab and also overrides the speed limited on the Basic Tab.
Speed Limited: By Display’s Command \ By Display’s Command \ By Display’s Command \ By Display’s Command– Cuts power when the road speed from the mag sensor hits the number set here. If set to By Display’s Command then it uses the Display’s set speed limit.
Start Current (%): 10\50\40\30 -This variable is vital for not killing the controller. The lower the Start Current is set the less power is directed to the PAS system upon startup, this will create less strain on the controller when starting from a standstill, especially if you are in a gear that is too high. 100% Start Current will peak at well over 1kW draw. With Kepler’s settings this should be set to 30% or less. This can be set all the way down to 1, very useful for IGH bikes and for people wanting a more gentle start
Slow-Start Mode(1-8): 3\4\5\6 -Controls how quickly the power ramps and how much it overshoots. If this variable is set too high the PAS start will be jerky, if set too low you risk blowing the controller as with Start Current above. If you are in too low of a gear to start and this variable is set too low it can blow the controller.
Startup Dgree(Signal No.): 4\4\4\4 – The number of sensor steps before the start up commences. The maximum accepted is 20. 24 is a full pedal revolution. Too few makes start-up occur with too slight a pedal movement. Lower number is less pedal movement to start the motor. Does not work with 1 or 0.
Work Mode (angular Speed of Pedal/wheel*10): Undeterminated \ Undeterminated \10\10 — Adjusts the amount of power that can be applied to each pedal rotation. The higher the number the greater the power applied to each rotation. This might affect at what rpm peak power sits in PAS operation, changing it doesn’t seem to be noticeable so we advise to leave it alone.
Time of Stop(x10ms): 25\25\25\25 – This affects how quickly the drive stops after you stop pedaling. Some people report that setting this lower (as low as 5) may affect the startup delay on the throttle. If you set it to 0 the PAS system ceases to work. 25 is probably too high.
Current Decay(1-8): 4\8\6\8 – Determines how high up the pedal cadence rpm range it starts to reduce power, 8 being the highest. There is no detail on actual rpm speeds for the Current Decay setting. The lower this setting is the sooner the drive unit will start cutting back on the power as you pedal faster.
Stop Decay(x10ms): 0\0\0\20 – The amount of time the system takes to cut after pedaling stops. Lower is faster. Kepler says,
“I prefer a smooth stop transition. It is still quite quick to shut the drive down when you stop pedaling”
Keep Current(%): 60\60\60\60 – What this setting does when set at 60% is ramp the current down to 60% of the PAS level selected based on pedal cadence rpm, so at low pedal cadence you get 100% of the level selected but as your pedal cadence increases the power is reduced down to 60%. As you pedal faster the motor does less work down to whatever this number is set to (60% of max current or 15 amps on 25 Amp system).
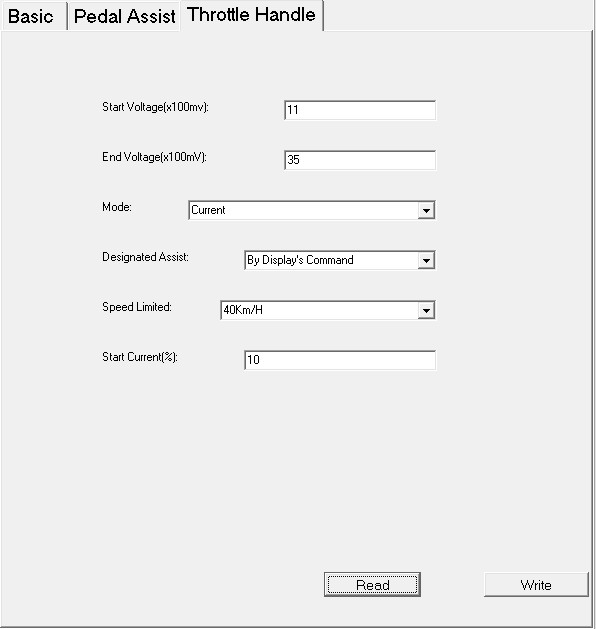
THROTTLE HANDLE TAB
Start Voltage(x100mv): 11\11\11\11 – The is the throttle input starting voltage, the point at which the controller responds to input is at 1.1 volts, so set value to 11 which = 1.1 volts. As you begin to roll on the throttle the voltage moves up from zero and when it reaches 1.1v the motor begins to turn. Best to leave between 10 and 15. Too low and the display will throw an error as the motor will want to run continuously. If you change the throttle you will need to find the new lowest setting.
End Voltage(x100mV): 35\35\42\35 – You can set the max range to 42 which is the max input the controller accepts from throttle input 4.2v. If you set lower than this value your throttle response is not as linear or smooth as it could be. Matt suggests you set start voltage to 11 and end voltage to 4.2 for a wider range of throttle response and smoother control of motor output. If you use an aftermarket throttle you will need to test to see what voltage the hall sensor throttle is giving off at full throttle and set this number slightly lower than that voltage shown on the meter (times 10).
Mode: Current\Speed\Speed\Current – Switching this to Current Mode (instead of Speed mode) has an improvement in the throttle response smoothness. If you change this then set the Start Current % on this page to 10 or less.
Designated Assist: 9\9\9\9 – If you disable the PAS system (step 5 here) then this will give you the same number of levels of throttle power as PAS settings. If you don’t disable the PAS system then you should probably set this to 9. If your bike is in a rental fleet and don’t want to deal with fried controllers then you should set it to something much lower like 6. This setting if set will override the Limit Speed setting on the Basic Tab and also overrides the speed limited on the Basic Tab. If you set this to 9 be aware that you can and will fry your controller if you are in too high of a gear on too steep of a hill and you peg the throttle.
Speed Limited: By Display’s Command\40KmH\40KmH\40KmH – Cuts power when the road speed from the mag sensor hits the number set here. If set to By Display’s Command then it uses the Display’s set speed limit. However this setting can sometimes cause severe Throttle lag in PAS0 so if you set it to 40km/hr the 2-3 second throttle lag should disappear.
There is a lot of ways to disable the speed limit. On the C965 display you can disable it in the programming for the display. You can also set it to a faster speed limit by choosing a smaller wheel size. If you program the Speed Limited to 50km/h on the display then set the display to a smaller wheel size then it will display kph but will really be mph. If you have a 26 inch wheel, set it as 16 inch wheel in the display (i.e. 26/1.61 = 16 – 1.61 is also roughly the same ratio as km to miles, as in 26km is 16miles). If you have a fatbike tire you will want to set it to 18 inch diameter as the 26 inch fat tire is really closer to 29 inches due to its thickness. After making this change, then 25km/h on the display will in actual fact be approximately 25mph in reality. If you set this to a number it will override the Designated Assist variable on the previous Pedal Assist page.
The speed limit only applies to the PAS and in ignored by throttle input, so in other words, if you want to go past the speed limit, just use the throttle. This is a setting that allows the rider to set a pace or cadence when using pedal assist for a comfortable steady pace. Almost like cruise control, when you begin to go past the speed, the motor cuts out to maintain a lower speed. It is a useful way to extend range. The max speed limit of the display is 45 mph.
Start Current(%) : 10\10\10\10 to 20 – Percentage current of available when throttle initially applied. Unwise to raise beyond 20, but fine to lower, however motor will give less power when the throttle is engaged. If you set the throttle Mode to Current (which I think you should) you will want to lower this number substantially or it will be very jerky on startup. 5-10 gives a much smoother startup. This can be set all the way down to 1, great for IGH bikes and smoothing out power delivery.
So what do you recommend?
If I was running a rental fleet of electric bikes I’d probably neuter my controller to 18 Amps like Matt & Kepler do. For smooth throttle control and less delay the Current Mode on the Throttle Handle Tab is the way to go, but you should keep the Start Current % low (below 10 is safe) otherwise the throttle is far too jerky and wheelie prone.
I have 8 BBS02 controllers from various manufacturers and I’ve only had one controller failure from the first one I bought from elifebike. The two I have bought from Lectric Cycles and all the ones I have bought from Paul and Doug at California-Ebikes (which both use em3ev’s settings) have given my absolutely no problems. The Lectric Cycles settings has a jumpy throttle and a little throttle delay which could be corrected by switching the Throttle Mode to Current. I have hundreds of hours beating the living piss out of my drive units with em3ev’s and Lectric Cycles settings with no complaints and no controller failures. I don’t tend to modify the programming just in case I want to try to warranty something, although generally I’m a fix-it-myself kind of guy.
There are plenty of people who say Kelper’s settings are very reliable, but I have not tried them yet so I cannot say. I would not advise using Kepler’s settings at a full 25 Amps, as you are asking for trouble. 100% Limit Speed at every PAS level at is going to put a serious load on the cheap-ass controller mosfets.
In some ways its great that we can get into the software and change so many of the settings for the BBS02. Along with this flexibility comes taking responsibility for the controllers and drive units we end up destroying by tweaking the settings. This guide is a way to share information that others have discovered the hard way, but by no means is definitive. All the information here could be wildly inaccurate as no one that I know of has gotten any real technical guidance from Bafang on how to program these units at all.
Program at your own risk. Don’t program your controller, fry it, then try to get it replaced under warranty pleading innocence. If you fry your own controller then have the common decency to spend the time and energy to fix it yourself or just suck it up and buy another one. Paul has had so many problems with people ripping him off by custom programming and frying their controllers and then trying to get free warranty replacements that he no longer warranties the individual controllers. Can you really blame him?
This article is the culmination of many hours of work and was contributed to by Paul(cellman) from em3ev, Matt from Empowered Cycles, kepler and drprox from Endless-Sphere and this insanely long 37+ page thread on ES. Many thanks to everyone who contributed. I could have done it without you but the results would have been really laughable.
Ride On.

") ))))
))))