Mr. Mik
1 kW
- Joined
- Sep 3, 2008
- Messages
- 390
The deeply discharged NHW10 battery described earlier has now undergone further testing which has shown that it is in in good health, except for a single "stick" out of the 40 sticks (with 6 cells each)!
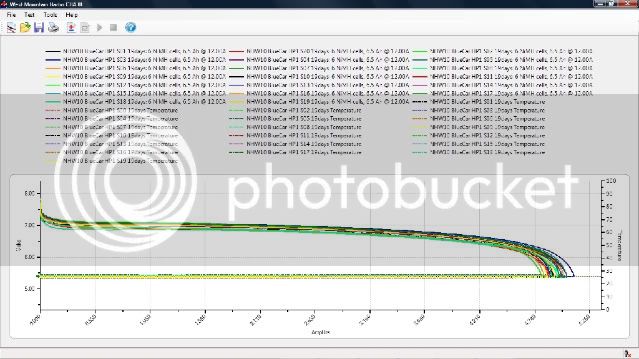
In short, the test is a full charge followed by about 3 weeks rest to allow self-discharge to occur. This is then followed by a stick-level capacity test at 12A with the CBAIII.
Here are the results for HP1:

And here the results for HP2:
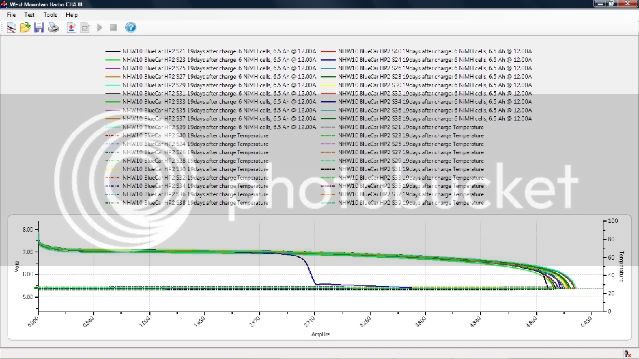

A nice battery except for the one stick (S34) that dropped off early in the self discharge test! And that is most likely due to a single cell in that stick. One cell out of 240, but the NHW10 ECU will detect it and limit vehicle performance severely each time the cell hits empty. And because I have spares, it is easily fixed!
I am quite certain that I will use this sort of test as the main testing procedure for the other batteries I have lying around. It requires a lot of time, but relatively little operator input during this time.
With hindsight this result was already apparent after the first capacity test (after HP2 charge number 5), in which stick S34 was the worst:
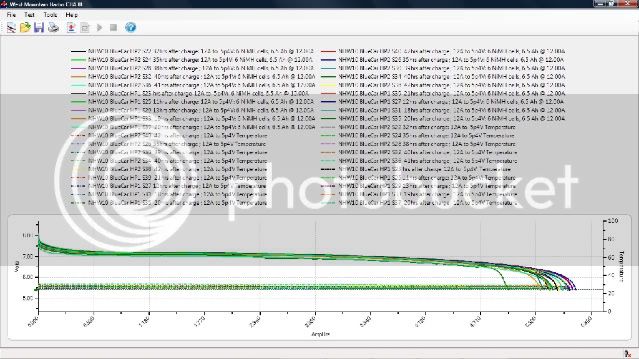

These test were done from 10hrs to 42hrs after end of charging; S34 was tested 40hrs after end of charging.
But the result was not as clearly visible, and I think I would have been worried that there might be other sticks with problems hiding. The three week test satisfies me that this S34 is the only problematic stick in the battery.
The optimised procedure to test an unknown NHW10 battery half-pack:
1) Slow charge to up to 140% capacity. Depending on ability to actively cool the batteries one may use up to C/10 = 0.6A charge current. But it may go up in flames without active cooling at that charge rate! 100mA is much safer until the battery is known to be good. If both half-packs are left in the battery housing, then the cooling impellers can be used to provide powerful active cooling.
2) Discharge half-pack through a 400W incandescent light globe array. Monitor for sudden 1.2V drop (within a minute or so) by recording with a DSO or similar device, drawing a graph.
For a single reversing cell it looks like this on the PoScope monitor graph (in this case in a Vectrix 102s NiMH pack):
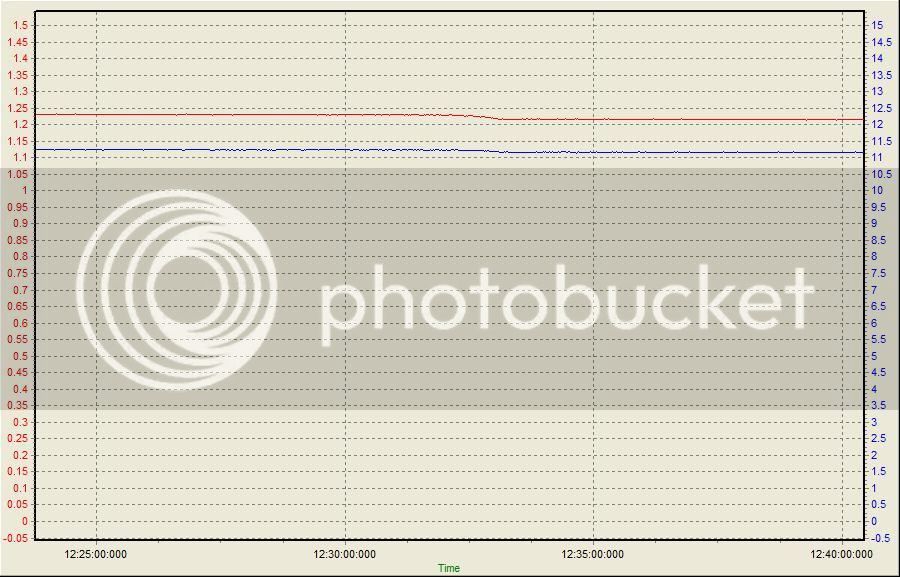
Channel A (red): Voltage measured by x100 probe (1/100 x battery voltage).
Channel B (blue): Voltage measured by x1 probe across a 10 Ohm resistor (10 x discharge current).
X-achsis: time in hrs:min:sec:msec
Using a scope this way makes it clearly visible when a single cell reverses in such a long string! Of course, other forms of monitoring would also work. It is also possible to build a relatively simple circuit which detects such a small voltage drop and automatically terminates the discharge.
3) Repeat 1) and 2) several times to exercise the battery. How often depends on how long it had been left unused (and other factors).
4) Leave battery to rest for several weeks after a full charge (temperature dependent). So far I figure 3 weeks is a good amount of time to wait in 25degC. This test will find out the bad cells which may have good immediate post-charge capacity, but increased self-discharge rate.
5) Capacity test after the rest period. Ideally individual sticks, but one could also discharge Half-packs (to find the weakest stick quickly) whilst monitoring with the scope as above. Once a reversing cell is being detected by the sudden drop in the discharge graph, the 20 sticks of the HP are voltage tested (still under load); the stick with the weakest cell will have a voltage of about 1.2V below all the others.
But only individual stick testing can give you the detailed information you need to decide how to best repair the battery. In the above example of the NHW10 BlueCar battery it is clear that the one outlier stick can be replaced and then the battery will be good. Testing HP's will only find the weakest stick, but will not tell you if another one has only slightly better capacity then the worst one.
With individual stick capacity testing you would also be able to identify the few good sticks in a badly damaged battery.
In short, the test is a full charge followed by about 3 weeks rest to allow self-discharge to occur. This is then followed by a stick-level capacity test at 12A with the CBAIII.
Here are the results for HP1:


And here the results for HP2:


A nice battery except for the one stick (S34) that dropped off early in the self discharge test! And that is most likely due to a single cell in that stick. One cell out of 240, but the NHW10 ECU will detect it and limit vehicle performance severely each time the cell hits empty. And because I have spares, it is easily fixed!
I am quite certain that I will use this sort of test as the main testing procedure for the other batteries I have lying around. It requires a lot of time, but relatively little operator input during this time.
With hindsight this result was already apparent after the first capacity test (after HP2 charge number 5), in which stick S34 was the worst:


These test were done from 10hrs to 42hrs after end of charging; S34 was tested 40hrs after end of charging.
But the result was not as clearly visible, and I think I would have been worried that there might be other sticks with problems hiding. The three week test satisfies me that this S34 is the only problematic stick in the battery.
The optimised procedure to test an unknown NHW10 battery half-pack:
1) Slow charge to up to 140% capacity. Depending on ability to actively cool the batteries one may use up to C/10 = 0.6A charge current. But it may go up in flames without active cooling at that charge rate! 100mA is much safer until the battery is known to be good. If both half-packs are left in the battery housing, then the cooling impellers can be used to provide powerful active cooling.
2) Discharge half-pack through a 400W incandescent light globe array. Monitor for sudden 1.2V drop (within a minute or so) by recording with a DSO or similar device, drawing a graph.
For a single reversing cell it looks like this on the PoScope monitor graph (in this case in a Vectrix 102s NiMH pack):

Channel A (red): Voltage measured by x100 probe (1/100 x battery voltage).
Channel B (blue): Voltage measured by x1 probe across a 10 Ohm resistor (10 x discharge current).
X-achsis: time in hrs:min:sec:msec
Using a scope this way makes it clearly visible when a single cell reverses in such a long string! Of course, other forms of monitoring would also work. It is also possible to build a relatively simple circuit which detects such a small voltage drop and automatically terminates the discharge.
3) Repeat 1) and 2) several times to exercise the battery. How often depends on how long it had been left unused (and other factors).
4) Leave battery to rest for several weeks after a full charge (temperature dependent). So far I figure 3 weeks is a good amount of time to wait in 25degC. This test will find out the bad cells which may have good immediate post-charge capacity, but increased self-discharge rate.
5) Capacity test after the rest period. Ideally individual sticks, but one could also discharge Half-packs (to find the weakest stick quickly) whilst monitoring with the scope as above. Once a reversing cell is being detected by the sudden drop in the discharge graph, the 20 sticks of the HP are voltage tested (still under load); the stick with the weakest cell will have a voltage of about 1.2V below all the others.
But only individual stick testing can give you the detailed information you need to decide how to best repair the battery. In the above example of the NHW10 BlueCar battery it is clear that the one outlier stick can be replaced and then the battery will be good. Testing HP's will only find the weakest stick, but will not tell you if another one has only slightly better capacity then the worst one.
With individual stick capacity testing you would also be able to identify the few good sticks in a badly damaged battery.


