
TyJedi
100 mW
Hey guys!
I have an original stokemonkey set-up on my Xtracycle conversion since early 2014. I bought it used from a forum member named pdf. It has worked fine for years, in fact the original LifeP04 battery still has about 80% capacity.
Problem know is all of a sudden, my speed sensor does not seem to be getting a signal from the rare earth magnet on the spokes. I thought it was positioning and moved it around, but no matter how close I got it, it didn't pick up any motion when I turned the wheel, EXCEPT one time when the magnet was further away than usual and movement registered on my cycle analyst (which is Version 1.0 for Cycle Analyst and from what Justin has told me before, actually predates the first one he mad for grin.)
)
Here is the magnet:

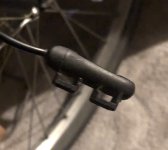
Here is the sensor:
:
Trying to figure out how to troubleshoot this beyond magnet placement. Should I get a new magnet, new sensor for the fork? Could it be a loose wire, the admittedly ancient cycle analyst, or even the controller?
Any suggestion on what to do next would be welcome.
Thanks in advance,
Ty
I have an original stokemonkey set-up on my Xtracycle conversion since early 2014. I bought it used from a forum member named pdf. It has worked fine for years, in fact the original LifeP04 battery still has about 80% capacity.
Problem know is all of a sudden, my speed sensor does not seem to be getting a signal from the rare earth magnet on the spokes. I thought it was positioning and moved it around, but no matter how close I got it, it didn't pick up any motion when I turned the wheel, EXCEPT one time when the magnet was further away than usual and movement registered on my cycle analyst (which is Version 1.0 for Cycle Analyst and from what Justin has told me before, actually predates the first one he mad for grin.)
)
Here is the magnet:
Here is the sensor:
:
Trying to figure out how to troubleshoot this beyond magnet placement. Should I get a new magnet, new sensor for the fork? Could it be a loose wire, the admittedly ancient cycle analyst, or even the controller?
Any suggestion on what to do next would be welcome.
Thanks in advance,
Ty
")


