Adjust LVC on Infineon 18 FET soft-start controller?

Mark_A_W

100 kW
Joined
Jun 23, 2007
Messages
1,493
Location
Sunny Melbourne Australia
Hi guys

I got a Soft Start Infineon Controller from Voicecoils, to use with my MAC Shanghai at 60v nominal (74v off charger). The one with the 100v caps and 18 x 4310 FETS.


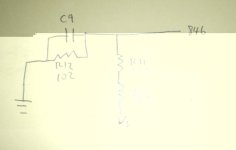
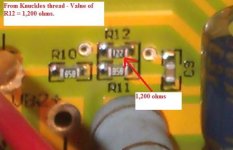
Being a 72V controller, I think the LVC is set at 63v, which is no good for me.


I need to set it to below 50v. Around 40v would be fine.


I was hoping there would be a LVC pot, but there isn't one.


Can I do this? Is it adjustable? Changing components (even smd) is not a problem, I just need to know what to change.

(I will also remove one shunt bar, 45+A at 60v is way too much for the MAC Shanghai, and hotglue down the caps.)

Thanks

Mark
 

Attachments

  • controller.jpg
    controller.jpg
    91.2 KB · Views: 3,367
There is a voltage divider feeding the chip. On the 116 controllers it is R12, it may be the same on your 846.
Basically the this the bottom half of the divider. If you raise the value of this resistor then it will alter the ratio of voltage into the controller.
To lower your LVC you will want to raise R12. When you hit 63V the controller will think it is at 1.X * 63V and wont cut off.
If you are not looking to depend on the LVC of the controller (which hopefully you are not....) then you can just make R12 (or whatever it is on your controller) arbitrary larger.

This will increase the peak regen voltage if you are using it.
EDIT - DECREASE PEAK REGEN

I will look around for some specific numbers for you.

btw - there may be an easier way. In the morning I will have a look at one of my slow start boards and I can tell you where the pot is hooked in.
Probably to the same spot I am talking about.
If you dont get is sorted and you dont hear back from me by lunch tomorrow ping me - I am apt to forget what I am doing in the middle of doing things.

What were we talking about?

-methods
 
Some info on infineons here.

http://endless-sphere.com/forums/viewtopic.php?f=16&t=7361
 
Thanks Methods.

On this controller, R12 is just north of the three big power resistors on the LHS lower corner. Just under the second big cap.


Not sure if that's where you mean, but a track does head towards the 846 chip from there, and it does start at ground, which may seem right to me.


But yes, if you could have a look where the pot hooks in (I noticed Dr Bass had a multi turn pot in his pics kicking around with the half build boards), that would be easiest for me.


And yep, the batteries have a BMS for system LVC. The controller only needs one to protect itself from damage when the power is cut.

And no, no regen, it's a freewheel motor.

Cheers

Mark

PS, I'll hassle you tomorrow...but I can't guarantee it'll be around lunch...there's the odd timezone or seven between us :)

Edit: just seen Biohazardman's link...reading now.
 
This is the one;

http://endless-sphere.com/forums/viewtopic.php?f=4&t=7440
 
This is the circuit around R12 (I think..hard to see and probe).

V+, at bottom, is actually VK2+.

846 is the line to the chip.
 

Attachments

  • circuit.jpg
    circuit.jpg
    50.8 KB · Views: 3,358
yes, your circuit is correct. knuckles talks about the tweaking pot in his dummies thread as i recall, and the correct resistor values for using in parallel with R12. for 49V LVC then use 2k ohm in parallel with R12, for 45V use 3kR, i used 1.69kR to get 52V. and if you wanna go as low as 39V then use 4.3kR. i think i have picture of the graph in my 9 FET 72V upgrade thread.

this is what the graph looks like:

http://endless-sphere.com/forums/viewtopic.php?f=2&t=10222
 
Ok - keywin soldered a 5K pot in parallel with R12.
You can hit one of the many via's on the way to the controller

You all set?

-methods
 
Yes, I think I'm set. Thanks methods/dnmun/biohazardman.


The only thing methods, is earlier you said to raise R12. If I put a resistor in parallel with it I will lower the value.

Typo early on?


Cheers and Happy New Year guys!!

Mark
 
Mark,

You need to raise R12. Looks like R12 is 1k at the mo and you'll need to make it ~1k5, but it depends on R10+R11 (BTW what values are R10 and R11? should be close to 100k each). If you want to solder a pot in parallel wit it you'll need to take it off the board and place a larger value resistor instead first (say 2k2 and a 5k pot). I would advise not to use a pot - they are unreliable.

I can give you a hand when I'm back in the office.

Not a bad schematic for a mech person ;)
 
Hi Dmitrii

R10 and R11 say "858" but measure 4.4 and 4.6k, so nominal 4.7k I guess.

I reckon I can handle a 2.2k + 5k pot in parallel (EDIT: in series, or I get zero with minimum pot), replacing R12, I'll have them in the shed, I have most resistors on hand :)


Did you know I design and build speakers (sometimes for money), and build active crossovers, amps, etc? I'm not completely incompetent, I'm just not good at designing electronics, it's too abstract (like software..), which is why I draw pictures of nuts and bolts and bits of metal and plastic for a living.


Although, I do admit, SMD sometimes gives me the willies...
 
you really should go read knuckles thread. not sure where you got the idea you have to remove R12 or increase it in value to lower the LVC. 102 means 10X10^2=1k ohm.

go look in wikipedia under "equivalent parallel resistance".
 
Methods said to raise the value.

So, yes, I am confused, I am getting conflicting info.

I'm reading the thread...
 
No offence dnmun, but I think you're confusing parallel resistance and voltage dividers.

The ratio at the moment trips at 63V*1k/(4k7+4k7+1k) = 6.05V
The idea is to get that value at 40V. Do your maths and you should get 1.677k

I'm assuming you've measured R10 and R11 correctly (ignore what I said previously about R10 and R11 being 100k)

Mark, the pot and 2k2 would go in parallel. make sure you solder the pot in the highest setting and decrease it afterwards. The 2k2 is the fail safe, without it you'd get full input voltage at the micro-controller in case the pot goes open circuit while you're adjusting it. The micro wont like it.
 
Great - all the post were lost. :?
We were having it out last night...

What it boils down to is this:

To raise LVC you must spoof the controller into thinking the battery voltage is higher than it really is.
To present a higher voltage you must increase the resistance of R12.

R12 is always 1200 ohms on 116 and 846 boards
R10 + R11 always works out to something like 14k-17k

Running a pot in parallel with R12 will never allow you to lower LVC, only raise LVC.


The easiest way to set up variable LVC is to remove R12 and replace it with a 5k potentiometer.
This is unquestionably the easiest and most effective way to perform the mod.

Knuckles has some misleading information in his technical reference thread that might lead one to think that they can run a pot in parallel with R12 to lower LVC. This is not true. What knuckles is actually doing is drilling a hole in the board which lifts R12 off of ground. He then taps into R12 in SERIES with a pot to ground.

In the circuit above that would look like inserting a potentiometer between R12 and ground - running them in SERIES.

Knuckles chose to do it this way as an attempt to keep a fixed inline resistance in series with the potentiometer. The idea is that the user could potentially set the pot to a low enough resistance that the controller LVC could be set so low that it could damage itself. An easier way to do this mod is to avoid all the drilling and just remove R12 as described above. When you add the potentiometer just add a series resistance.

These are the facts - which we can debate if anyone wants to - but I am correct.

-methods

References:

Knuckles thread

Knuckles Quote:
"· R12
The Low Voltage Cut-off (LVC) circuit consists of tiny surface mount transistors and one capacitor.
This circuit connects to an MCU pin-out so the MCU can detect the battery voltage.
The R12 resistor is about 1.2 kohm and connects from the MCU pin-out to ground.
R12 can be disabled and replaced with a potentiometer to allow any LVC value.
It is critical, however, that the LVC protects the controller from a low voltage condition.
If the voltage to the mosfet drivers and MCU is not steady the controller will be damaged. "

Pictures: This is where Knuckles hooks a pot in SERIES with R12

LVC_POT.jpg


-methods
 

Attachments

  • R12.jpg
    R12.jpg
    29.3 KB · Views: 4,004
Thanks Methods - I did read it last night, and I replied, but...

Anyway, it all looks pretty similar to mine, except R12 is definitely 102 and R10 and R11 are 858. But close enough.

I've got all the parts I need now, resistors and pots. Will get stuck in.


Thank you very much for the help.


Mark
 
Yes!

THANKS!!

The motor runs :) It's a big step along the way - before I had a pile of bits, now I have a bike needing assembly.

Not sure about the metal gear though...very noisy...


Tonight I'll read up Knuckles thread and try and find out how to reduce the current, without cutting 1 of the 3 shunts. I'd like about 30amps max. Actually, it would be nice if this was adjustable via a pot, from say 20A to 45A. I could use the CA, not sure which way is better. (Opinions? Voicecoils had some issues with CA control, it all stopped working IIRC...)

This is the simple wiring to connect in the throttle to the CA.

Throttle_Override.png


Don't want much do I? :twisted:
 
Looks like the voltage across the three shunts (which is proportional to the current) is compared to a reference (a votage divider) using LM393. The easiest thing to do would be to change this reference. Could use a pot or a switch to make it adjustable. Has to be a very clean signal (very short connections). A better option would be to use a digital pot.

Or why don't you just use the 48V pack?? You'll have 4 less chargers too ;)
 
Want MORE POWER!!

But less power at the same time...and 48v 45A would still kill it.

Been thinking it through - I'll be unsoldering the shunt wire from the CA anyway, while I'm at it I may as well run the throttle through it. Then I can program it into the CA. The newer version allows a current pot I think...


Whatareyoudoing on the PC? Go over to your Mum's and get the truing stand!! :)
 
I got my CA overriding the throttle, works a treat. I think I followed ElectricEd's advice here.

Mark_A_W said:
Been thinking it through - I'll be unsoldering the shunt wire from the CA anyway, while I'm at it I may as well run the throttle through it. Then I can program it into the CA. The newer version allows a current pot I think...

From memory you can only get a pot to do the current or the speed override. You might be better off using the pot for the speed control. Just set the current so you don't cook the motor, then use the pot to set your "cruise control" then open the throttle.

The ride home was pretty fierce, almost made me want to go slower to cool off. Glad I went straight to the local pool with the kids.
 
Hey, sweet, thanks...that's more detailed than the manual.

I don't have a crystalyte controller...not sure how much applies to me yet, need to read.


It would be nice if I could convert my V2 CA to V2.1 with the current pot, but I don't think that's possible.
 
Why not? Don't you just need to flash it with the new firmware. Maybe John @ emtb or voicecoils could do it.
 
Back
Top