1986 Daelim Trac "Hawk" moped conversion

harrisonpatm

10 kW
Joined
Aug 8, 2022
Messages
824
Alright, why not add another concurrent build to my project list? My EX500 is in good shape mechanically, but to finish it, it needs a motor, controller, and battery, all the expensive junk, and I don't have that budget. It's either going to wait for a great deal for those parts, or I'm going to steal the parts from my current e-moto, next year.

Until then, I had mentioned in my EX500 thread that I got lucky and found some awesome-looking motors at the scrapyard for $6USD each. It turns out they were rated for about 2500w @48v, not enough for a full-sized motorcycle, but plenty for a little scooter or moped that doesn't need to go fast. So I started keeping an eye out on my local classifieds. In the meantime, I found a dirt-cheap 3000w BLDC controller from AliExpress for bench testing, and I confirmed that the first two motors I tried worked great, both at 48 and 72v. Not bad for a scrapyard find.
IMG_20231205_170516.jpg

Then I got lucky again and found a suitable moped on my locals for $50, another steal. Sorry I don't have a picture of what I got before I started taking it apart (i was exciting and wanting to get into it right away), but here's someone else's photo of the same model.
1983-Trac-Hawk.jpg
Weighs less than 110 pounds, so I think 2500-3000w will do the trick for 35ish mph. So, $50 for the bike, $6 for the motor, and $45 shipped for the controller (I know it's aliexpress garbage and isn't going to last, I can always upgrade later, and it works for bench testing at least). Now I just need to keep an eye on BatteryHookup for a good deal on cells to build a (relatively) small battery. There's a couple options on there now that look good, but I'll probably keep checking for a week or two in case something better comes up. I want to overvolt the motor to 72v, because then I can use the same direct-DC-from-solar charging that I have already setup for my current ride. So, assuming 3000w max output limited by both the motor and the controller, 72V nominal, I'll be looking for a pack that only needs to output 45ish amps max. Call it 60 amps max to make it easy on the cells. That will also be nice in that it means the battery itself won't be heavy, so won't add bike weight, and I can make it removable. That way, in the winter months I can use this as an occasional short commuter or errand runner, by charging the battery indoors. My style is rather cramped by not having my e-moto available 3-4 months a year.

So, mid drive, which is something I've never done from scratch before. Good learning experience, and I'll certainly use this build to make a ton of mistakes and do it the wrong way first, so I can learn. I got some good guidance on my other post, and with that I was able to find a company online that should be able to cut sprockets customs. If we assume 5000 max RPM at the shaft (which I'm not totally sure about, because it didn't come with a spec sheet), and 20-inch wheels, to get to 40MPH I need a 7:1 ratio. So I got a type B hub sprocket on order, 14T based on the advice to not go lower that 14 on the motor shaft, and I have two inquires out to see if someone can cut me a 98T rear sprocket that will fit.
IMG_20231205_131522.jpg

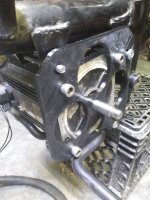
In the meantime, I used my CAD skills (cardboard-aided design) to start working on a motor mount. It's gonna get in the way of my right foot, so I might have to make new footrests, but it's not awful. Plus I basically have the motor sort of resting on the peg mounting bars themselves, meaning the face-type mount that I'll have to make for it won't have to carry the whole 20 pounds of motor against gravity. That's the downside of using a generic, non-specific-to-vehicle motor in the project, but I can't beat the price.
IMG_20231205_101410.jpgIMG_20231205_102011.jpgIMG_20231205_113520.jpgIMG_20231205_114457.jpg

Also I have varnish leftover from detailing my QS273, so might as well get the interior of the motor water resistant. I was very surprised, as dinged up as the exterior of all the motors was, the interior was practically spotless. Couldn't hurt to varnish though.
IMG_20231206_140533.jpgIMG_20231206_152856.jpg

Next up is taking my cardboard stencil and drawing a draft of the motor mount for 3d printing, so I can check the fit. Then I'll cut it out of aluminum: also from the scrapyard I got offcut sheets for a couple bucks each, in 6mm, 8mm, and 11mm thicknesses. The 8mil seems strong enough to me, but I can always go up to the 11mil if I think it won't cut it.

One question I have: what tires are these, for replacement?
IMG_20231203_113303.jpg

The rim is 16in. Can someone suggest what I can get to replace them? They're in bad shape. Tube or tubeless would be fine, I don't have enough experience to know just from looking at the rims whether they'll take tubeless.

I'll post again after I cut a motor mount from a 3d-printed stencil, because if that works out alright, I can start getting the rest of my components together.
IMG_20231206_143639.jpg
 
3d printed motor mount, got the holes in the right space on the 3rd try. I'm sure there's better ways to do it, but I got it in the end.
IMG_20231207_172514.jpgIMG_20231207_172634.jpg

Hard to tell for sure, with it just being a plastic plate for now, but I seem to have it pretty well aligned and squared off. I'd appreciate feedback. One problem that won't go away is that my right foot is going to not have a lot of room; I'll probably end up making a lengthener of sort.
IMG_20231207_172527.jpg
Also got the frame broken down, spot cleaned the rust spots, and getting it ready for touch-up paint next time the weather behaves.
IMG_20231207_154222.jpg

Also really pleased with the speedometer. The threaded connector in the back was totally broken, but I figured out how to print a threaded adapter to hold the cable in the right place, and I got the speedo working again. So I can replace the key in the center hole. Then I'll cut out the two signals on either side, and replace them with a battery voltage display on one side, and motor temp on the other. I like that I'll be able to keep the original housing, adding on aftermarket parts like that isn't always my favorite look.
IMG_20231207_110659.jpg


By any chance, does anybody know a good tire replacement that would work?
IMG_20231203_113303.jpg
 

Attachments

  • IMG_20231207_172518.jpg
    IMG_20231207_172518.jpg
    868.2 KB · Views: 0
Tire replacement, or wheel/rim?

For tires, I can solidly recommend the Shinko SR714 16x2.25 (or wider if you can fit them). I've used them for years on my SB Cruiser's rear wheels; nice and sticky, etc. I use CST tubes, usually the ones from IRC have CST in the box.

If you're tubeless, then no worries about that part, but the SR714 is meant for a tube.
Tires indeed, thanks for the rec! Only $30 each too
 
IIRC, there is a very similar Pirelli tire that was recommended to me that I almost went with years back when I started using the Shinkos, but it cost more than twice as much.... I don't know if it has twice as much of any characteristic to be worth that for me. ;) I don't recall the model, though you can tell by the tread as it looks almost exactly the same.
 
Progressing nicely. I have a dozen or so items on order, basically everything on order, except for the batteries, which I want to wait a week or two on to weight the best options. In the meantime, progressing on the bike as a whole.

3d printed motor mount as a stencil on 7mm aluminum. I concede that steel would be better, but im limited with fabrication tools, and aluminimum is easy to cut and drill, so I just went with a crazy thick piece.
IMG_20231210_140711.jpg
IMG_20231210_142457.jpgIMG_20231210_152955.jpg

Worked out easier than I thought it would. Alignment looks good for now, but I can refine it with washers and spacers, once I get the sprockets and chain. Also waiting on tubes and tires (thanks for the rec @amberwolf ).
IMG_20231210_151807.jpg
At this point I have every single screw, bolt and washer stripped clean and starting to reassemble. Over the next week or two I can start running the 12v electrical, mounting new head- and taillights, and planning the battery mounting system (I want something easily removable).
IMG_20231210_152044.jpg

Drew up a simple gas cap replacement that will incorporate an XT60 for charging. Because it's not a proper electric conversion unless you turn the gas cap into the charging port, right?
IMG_20231210_152031.jpg

I'll probably post again when I get the sprocket, because I'm sure to need help with chain alignment. But after that, I'll be able to bench test the motor and chain drive with a battery and the back wheel off the ground. This project is clipping along nicely!
 
I have the 12v harness all tidied up and have nice mounting points all set for the components. Got new tubes and tires on the rims. Waiting on the custom cut rear sprocket. When that arrives, I can put the rear wheel on, then use a level or straightedge to line up the exact position of the motor in its mounted position, as well as exactly where on the shaft to mount the front 14t sprocket.

The motor sprocket arrived in the mail already, it's going to be a nice tight press fit, which I think bodes well. I have multiple motors to practice on, but my plan is still to flatten part of the shaft, if not 2 parts of the shaft, for the set screws to sit. If I can, I will try to even try to drill into the shaft a bit where the set screw goes, so that the screw isn't just pressing against the shaft, but actually going into it to prevent spinout. If none of that works, I also have the option of cutting a keyway into the shaft, but that will be harder to do by hand, I think.

I think I want to pull the trigger on these cells at batteryclearinghouse.com. According to LYGTE's test info, 10A per cell is actually a reasonable expectation. As mentioned earlier, I can reasonably expect not much more than 3000w out of the motor. At 20s/72v nominal, that's 42A max draw. If I make a 10p20s battery, 10p of those cells should reasonably be capable of 100A max draw, which gives me plenty of headroom. Which is good, because these are used cells, and even though I will be testing them individually upon receipt, 10A per cell might be optimistic. Plus, 200 of those cells will be only about 10 kilos/22 pounds, very manageable for a removable battery, at least for me. What do you guys think?
 
Mounting and placing components has been downright easy on this one compared to my conversion last year and the one I'm doing now. There's a gorgeous flat space right underneath the seat with about 8 inches of headroom, easy enough to drill and tap mounting holes for the controller.
IMG_20231217_151957.jpg
There's even enough space in front of it to mount the DC-DC converter , when that arrives.

Tyco contactor from BatteryHookup gets a 3d-printed housing/shroud because it sticks out in an obvious space. Now it looks more like part of the bike.
IMG_20231217_151923.jpg
On the opposite side I should be able to mount the 100A breaker that I'm also using as a service disconnect.

Speaking of the dumb controller. I know I'm asking for it by getting something cheap on Aliexpress, but the plastic shrouds around the phase and battery terminals are really restrictive. And you obviously want to use somewhat larger terminals for higher current, so restricting their size seems dumb. I didn't want to get small or thin ring terminals, but I have a stash of 6awg copper lugs, and shaving them down into ring terminals was annoying, but worked out.
IMG_20231216_161410.jpg


Rough draft of the 12v wiring harness, which is going to be 90% of total wiring anyway. The 72v wiring won't be so much of a harness as much as it is just a few thick cables.
IMG_20231217_151553.jpg
 
Great work so far! Following along.

On the battery front, I personally wouldn't be reclaiming 18650 cells to build up a new pack. Two years ago, I built an ebike for my partner and wanted to get her going with a decent enough bike and save (her) a few bucks where I could. So I stripped down some medical batteries for 100-odd Panasonic NCR18650B cells to use in a 13S7P ebike battery for my partner. The cool thing about that project was that the cells were cheap as beans -- something like $70 for all the cells. The thought was that if/when the battery eats it, I'll just refill it with cheap, second-life cells.

Do you know what kinda sucked, though? Stripping down 100 cells, removing the nickel, capacity testing all of them (4 at a time!), balancing all of them, organizing them, and grinding down the old welds, before finally starting with the build. All that effort, and I still never bought an IR meter for a second layer of testing. Simply put, it took forever, and I'll never be doing it again. It just doesn't feel worth it because I can tell the cells aren't especially well matched and the battery won't perform, over the long term, like a pack built with either new cells or at least cells that have lived similar lives. Instead, I built a battery with some cells that have 20 cycles and some cells that have 75 cycles -- they're mismatched out of the gate. Some of the cells were heaters, which is a fairly well-established trait about that cell, but it didn't inspire confidence. (Yes, the heaters were left out of the build). In hindsight, I should have just bought some cheap EVE round cells for that build and called it a day. The monetary savings was not even close to being worth the time I spent on this project.

If I were in your shoes and wanted to buy a battery right this instant, I'd get two of these BHU "robot" batteries, as long as they fit in the space you have without being torn down. They're 10S11P, all the cells in a module have lived the same life, and the build is already 3/4 complete for you. I'd get a 20S SmartBMS rather than try to reuse what's currently on there.
Entirely valid opinions, I completely understand and I frankly would not suggest this route for other people. Reason for me going this route, is that I already am in the regular habit of reclaiming, stripping down, and individually testing discarded 18650s and have been for two years. Once a month I go around to 4-5 locations in my area, computer repair shops, and they give me all their "dead" batteries. Could be 100 laptop packs at a time, once a month. My usual once-a-month haul is 200-300 cells. All stripped, nickel removed, self-discharge tested, wait 10 days, capacity test, IR test, capacity sorted, discharge to storage voltage, balance. Their destination is my home's 14s DIY powerwall. So I already have all the equipment setup for it, as well as the habit and the practice to do it quickly and efficiently. I have 4ea 4-cell testers, and in fact, they're solar powered, directly off DC (48v main battery ->12VDC to each tester, as well as a 24v converter to power my Ender 3 directly from DC)
IMG_20231220_144735.jpg

So as you can see, I'm already setup to test and process hundreds of 18650s. If anything, this might be my favorite part of the build, one which I'm very much looking forward to doing. 6ea scooter battery packs, at 52 cells each? I'm accustomed to having to spend a bunch of effort breaking apart 50 laptop packs, only to get 3-9 cells each. 52-cell packs are going to be a breeze by comparision!

In addition to the monetary savings from using reclaimed cells, I like the idea of using second-life cells for this build as it's keeping with the spirit of the build. $6 scrapyard motor, rusty moped frame that was never going to run again, scrapyard copper cabling from an EV, scrapyard aluminum for the motor mount and other spare parts... using reclaimed cells just fits. I totally get the potential decreased performance, and I'm okay with this because this is not going to be my primary transport, just my little secondary neighborhood errand runner and winter work commuter (2 miles one way).

I've decided on 10p20s, 200 cells. For that, I've ordered 312. All will get fully tested individually, and the best 200 go into the moped's battery. All balanced and matched P-groups, according to tested capacity and IR. The remaining 112 will get folded into my home's powerwall (if they pass my minimum requirements for that, that is); I don't need high performers for home, my 1000+ cells in service now only ever see a max of 0.7A discharge current per cell. So I can order more reclaimed cells than what I need and pick the best, without any cells going unused one way or another. This is not something most people will be able to do, most people who want a 200-cell pack from reclaimed cells won't buy 312, they'll buy 210, and when they test under their expectations, they'll either have to order more or they'll be forced to knowingly build a subpar battery pack.

Furthermore, when this upcoming battery starts to loose too much capacity for my liking and is at the end of its life as a moped battery, it can once again be broken down and fed into my testing stream for a third life powering my house. This is why I will only build packs for myself in the future using 18650s, new or used, because it's very important to me to consider the final life of lithium, and having a personal use for as many 18650s as I could possibly find just makes that decision easier. I do have a local recycling location in my area for my tested cells that are actually fully dead and have no usable capacity left (25-50% of the cells I recover from computer repair stores fail my tests and go straight there).

Also, 18650's and other cylindrical cells don't need compression, which means the battery case don't need to be as precisely built. Prismatic cells are better in a lot of ways: nut-and-bolt connections, easier to assemble, higher c-rates. I'm still going with 18650s, they work for me.

If I were in your shoes and wanted to buy a battery right this instant, I'd get two of these BHU "robot" batteries, as long as they fit in the space you have without being torn down.
Those cases as-is were almost, but unlikely, to work for this moped. I did consider getting one of those modules for cell reclimation and rebuild into a new pack. Unfortunately, their advertised 14.4A discharge rating seems to be a bit too optimistic. 7A is more realistic. Also, their temp range seems to be limited to max 75F/24C; above that, you definitely can't expect more than 7A from them. So, 110 cells, means I could do 5p20s. 5p at the more realistic 7A per cells means only 35-40A per cell. Not ideal. Even if I wanted to go with more cells in parallel to increase potential amp draw, I want to keep the battery under 10 kilos because the whole point of this build is an easily removable battery. 7p20s of the M50LTs would weigh 9.6 kilos, and 7p of those still only give me 45-50amp realistic max draw. Plus I would need to purchase 2 of those BatteryHookup modules instead of just 1, so $350. And I wouldn't easily be able to use the leftovers, as they're not 18650s. Purchasing and using 2 in series as-is would have just been too big @ 48 pounds, as well as not being able to easily fit into my teeny little moped frame, as well as still only being realistically capable of 80-85A discharge @ 11p.

But don't worry, I still have my eye on those for my EX500 conversion. Enough of those in parallel might be both cost- and power-efficient.

I'm going with scooter packs that have the INR18650MH1 cells, based on the test info I linked in post #7. I could be wrong, sure. But I believe that my choices have enough headroom built in (100A max discharge on paper = 80A realistic max discharge). They also check my boxes for size and weight in the final build. Time will tell!

I do appreciate your comments. Because I fully agree with you, using reclaimed cells for a high-power DIY pack is not going to be the right decision for 90% of people. So much time and effort for a good chance of disappointing performance. My situation is unique in that I already have an established testing setup and a good use for poorly-testing cells. If you don't have a situation like mine, I certainly wouldn't recommend doing this!
 
Entirely valid opinions, I completely understand and I frankly would not suggest this route for other people. Reason for me going this route, is that I already am in the regular habit of reclaiming, stripping down, and individually testing discarded 18650s and have been for two years. Once a month I go around to 4-5 locations in my area, computer repair shops, and they give me all their "dead" batteries. Could be 100 laptop packs at a time, once a month. My usual once-a-month haul is 200-300 cells. All stripped, nickel removed, self-discharge tested, wait 10 days, capacity test, IR test, capacity sorted, discharge to storage voltage, balance. Their destination is my home's 14s DIY powerwall. So I already have all the equipment setup for it, as well as the habit and the practice to do it quickly and efficiently. I have 4ea 4-cell testers, and in fact, they're solar powered, directly off DC (48v main battery ->12VDC to each tester, as well as a 24v converter to power my Ender 3 directly from DC)
View attachment 344712

So as you can see, I'm already setup to test and process hundreds of 18650s. If anything, this might be my favorite part of the build, one which I'm very much looking forward to doing. 6ea scooter battery packs, at 52 cells each? I'm accustomed to having to spend a bunch of effort breaking apart 50 laptop packs, only to get 3-9 cells each. 52-cell packs are going to be a breeze by comparision!

In addition to the monetary savings from using reclaimed cells, I like the idea of using second-life cells for this build as it's keeping with the spirit of the build. $6 scrapyard motor, rusty moped frame that was never going to run again, scrapyard copper cabling from an EV, scrapyard aluminum for the motor mount and other spare parts... using reclaimed cells just fits. I totally get the potential decreased performance, and I'm okay with this because this is not going to be my primary transport, just my little secondary neighborhood errand runner and winter work commuter (2 miles one way).

I've decided on 10p20s, 200 cells. For that, I've ordered 312. All will get fully tested individually, and the best 200 go into the moped's battery. All balanced and matched P-groups, according to tested capacity and IR. The remaining 112 will get folded into my home's powerwall (if they pass my minimum requirements for that, that is); I don't need high performers for home, my 1000+ cells in service now only ever see a max of 0.7A discharge current per cell. So I can order more reclaimed cells than what I need and pick the best, without any cells going unused one way or another. This is not something most people will be able to do, most people who want a 200-cell pack from reclaimed cells won't buy 312, they'll buy 210, and when they test under their expectations, they'll either have to order more or they'll be forced to knowingly build a subpar battery pack.

Furthermore, when this upcoming battery starts to loose too much capacity for my liking and is at the end of its life as a moped battery, it can once again be broken down and fed into my testing stream for a third life powering my house. This is why I will only build packs for myself in the future using 18650s, new or used, because it's very important to me to consider the final life of lithium, and having a personal use for as many 18650s as I could possibly find just makes that decision easier. I do have a local recycling location in my area for my tested cells that are actually fully dead and have no usable capacity left (25-50% of the cells I recover from computer repair stores fail my tests and go straight there).

Also, 18650's and other cylindrical cells don't need compression, which means the battery case don't need to be as precisely built. Prismatic cells are better in a lot of ways: nut-and-bolt connections, easier to assemble, higher c-rates. I'm still going with 18650s, they work for me.


Those cases as-is were almost, but unlikely, to work for this moped. I did consider getting one of those modules for cell reclimation and rebuild into a new pack. Unfortunately, their advertised 14.4A discharge rating seems to be a bit too optimistic. 7A is more realistic. Also, their temp range seems to be limited to max 75F/24C; above that, you definitely can't expect more than 7A from them. So, 110 cells, means I could do 5p20s. 5p at the more realistic 7A per cells means only 35-40A per cell. Not ideal. Even if I wanted to go with more cells in parallel to increase potential amp draw, I want to keep the battery under 10 kilos because the whole point of this build is an easily removable battery. 7p20s of the M50LTs would weigh 9.6 kilos, and 7p of those still only give me 45-50amp realistic max draw. Plus I would need to purchase 2 of those BatteryHookup modules instead of just 1, so $350. And I wouldn't easily be able to use the leftovers, as they're not 18650s. Purchasing and using 2 in series as-is would have just been too big @ 48 pounds, as well as not being able to easily fit into my teeny little moped frame, as well as still only being realistically capable of 80-85A discharge @ 11p.

But don't worry, I still have my eye on those for my EX500 conversion. Enough of those in parallel might be both cost- and power-efficient.

I'm going with scooter packs that have the INR18650MH1 cells, based on the test info I linked in post #7. I could be wrong, sure. But I believe that my choices have enough headroom built in (100A max discharge on paper = 80A realistic max discharge). They also check my boxes for size and weight in the final build. Time will tell!

I do appreciate your comments. Because I fully agree with you, using reclaimed cells for a high-power DIY pack is not going to be the right decision for 90% of people. So much time and effort for a good chance of disappointing performance. My situation is unique in that I already have an established testing setup and a good use for poorly-testing cells. If you don't have a situation like mine, I certainly wouldn't recommend doing this!
Word! Of course, I didn't expect that you have this beefy testing station set up at your home. I now understand and respect why reusing 18650 makes sense for you!

Really nice job with running some of your tools directly on DC power. Question about your large backs of second-life 18650 for powering your house: how do you sift through those large banks of 18650s to check for really dead end-of-life cells? Like the cells that are dragging on the rest of their parallel group? It would seem to me that it would be challenging to pick out the problematic cells amongst a parallel bank of 100... or 1,000! Do you do an occasional audit? What does this look like?
 
how do you sift through those large banks of 18650s to check for really dead end-of-life cells
The best way to keep low-performing cells from dragging down a whole pack, regardless of 100 cells or 1000, is to not allow it in the pack in the first place. When I process my scooter packs I was going to document my process here anyway, so I'll just do it now. My tests (after primary recovery and sorting) are as follows:

1. Charge cells all the way to 4.20v. Set aside for 7-10 days. Check voltage again. Any cells below 4.10 are self-discharging: discard. You may choose to discard below 4.15v for higher standards; my choice for my home powerwall is above 4.10v, as the discharge curve between 4.1 and 4.2 is pretty steep anyway. But I may decide for this higher-performing EV pack to cutoff below 4.15v

2. Test capacity and compare to original capacity. Actual capacity is of course important, but compared against the cell's new rating is one of the most important indicators of age and remaining lifespan. The cells I'm getting are originally rated for 3200mah. If I test capacity at 2900mah, that's still 90% of lifespan. For the moped, it'll be easy, I keep the 200 highest capacity cells out of 312, regardless of the measurement, and the rest go into my home. For my home powerwall, I accept cells above 75% of rated capacity. A cell testing at 1500mah that was originally rated for 1700mah (88%), is a better find than a 2000mah cell originally rated for 3000mah (66%), even though 2000mah is more capacity. 66% means that 2000mah is going to drop off real fast, real soon, so I don't put it in the powerwall.

(looking up original capacity can be time consuming, if all I have is a random serial number, but usually model numbers of cells include capacity in their digits. For example, the M50LTs have a capacity of 5000mah, or Samsung 30Q has a capacity of 3000mah)

3. IR test. It will be helpful to match this against original spec IR, as this is another useful indicator of cell degradation. And this is what I will do with the scooter batteries, for this high-drain application. But for my home powerwall, where each cell is only expected to deliver .5-.75A, I accept cells under 75milliohms. Above 75, I keep and set aside for individual use outside of my powerwall, like low-drain powerbanks, laser pointers, flashlights, or testing. Some people do IR testing as the first test, and discard or not even bother to capacity test cells with high IR. Since I have some uses for high IR cells, I do IR test last. And anyway, I find self-discharge to be the best indicator of cell health.

4. Balance and store at 3.7V. By doing this as part of the testing process, before sorting and storing cells, I know that I can sit on cells for a year or more before getting around to them. Plus, all my cells will be at the same voltage before whatever pack I put them in. I have built a 40p discharge rig for this; slot in 40 cells, turn on the resistor, wait until voltage reaches 3.7, unplug and store.

5. Build balanced packs to start. This is obvious to us, but also answers @From-A-To-B 's question:

to check for really dead end-of-life cells? Like the cells that are dragging on the rest of their parallel group? It would seem to me that it would be challenging to pick out the problematic cells amongst a parallel bank of 100... or 1,000! Do you do an occasional audit? What does this look like?
I don't use active balancing. My packs are balanced to within 20mv. If they're not, it's because there's a problem. Active balancing hides a symptom of a problem, and I want to know when there's a symptom. When I add cells to my wall, I do so evenly, i.e., I add 14 p groups, each with the exact same capacity (within 50-100mah), all at the same time. Once they're in parallel, it's electrically one cell. But, if there were to be a problem, I use 24p packs, so I would only need to find the group of 24 that's underperforming. I've only had the powerwall for a year, so I'm far from an expert, but I've had no problems of that kind yet. And anyway, this year, I need to dissasemble and rebuild the physical structure for it, because I've had much better ideas for that project. So when I disassemble the 24p packs, I intend to retest everything before putting it back into service. At that time I will be able to see, cell by cell, how my powerwall has aged over 1 year.
 
Another couple items checked off the list. All connectors done, so I'm basically done with wiring. Waiting on the rear sprocket to work on the transmission. I modified the cable on the original throttle to work with one of those generic cable-driven potentiometer throttles from AliExpress.
IMG_20231221_160455.jpg
Also got a couple cheap meters to modify the speedometer display:
IMG_20231221_200228.jpg
Battery voltage will display on the right, motor temp on the left. I should label them somehow...
 
I modified the cable on the original throttle to work with one of those generic cable-driven potentiometer throttles from AliExpress.
If you go designing a printable bracket for that COT, lemme know, because that's one of the things on my list is to make a couple of them to secure the physically-similar (identical?) hall-based ones I use on the throttle and brake control of SB Cruiser; they're presently just ziptied thru their mounting holes to the tiller tube. ;)

If you haven't designed one by the time I get around to mine, I'll have it posted in my printer and SBC threads (no idea when that will be, though).
 
f you go designing a printable bracket for that COT, lemme know,
By COT, do you mean that square throttle twist thing, that gets pulled by the throttle cable?

Because of course I've already printed one! It's mounted to that tube in the picture. What's the diameter of the tube you'll be mounting it to?
 
By COT, do you mean that square throttle twist thing, that gets pulled by the throttle cable?
Yes, (cable operated throttle, COT ;) ).


Because of course I've already printed one! It's mounted to that tube in the picture. What's the diameter of the tube you'll be mounting it to?
If so, here you go: https://www.printables.com/model/690070-bracket-mount-for-electronic-throttle

Let me know if you want it to fit a different tube diameter, mine was 26mm

Thanks--I don't know the diameter off the top of my head, it used to be a kid's "BMX" fork leg, and the toptube or downtube of some random bike frame IIRC. But with the model, I can just modify it to fit whatever I'm using. I also want to model a cover that will keep my neoprene "envelope" from touching the cable-reel/pulley, so it can't affect the retraction of the cable / return-to-zero (RTZ) of the unit.
https://endless-sphere.com/sphere/t...vy-cargo-trike-dog-carrier.67833/post-1349263
1703301135632.png 1703301258595.png
https://endless-sphere.com/sphere/t...vy-cargo-trike-dog-carrier.67833/post-1785068

20231217_141109.jpg20231217_141125.jpg
 
Last edited:
Warning: long winded description of particulars about risky cell recovery processes below. Skip if that's boring to you!

Background for context: as mentioned earlier, I have a couple years regular experience harvesting and testing 18650s from "dead" laptop, ebike and tool packs. All conditions you can imagine, literally hundreds of different manufacturers of cells. The first step after breaking the cells out of their housing is a primary voltage check. If you find a cell at 2.5v or above, you can perform the first charge at 500-700ma, because a cell recovered at that voltage is likely healthy enough to charge and discharge normally, regardless of remaining capacity. If you find cells at 1.5-2.5v, it's still likely to recover them, but the first charge should be at a lower current, carefully, in case there's dendrite buildup from age or a tiny internal short. 250ma or less. If you find a cell at lower than 1.5v, the general consensus is that this cell is unlikely to be recovered at all, as lower than 1.5v is danger zone for lithium ion and the cell is probably internally damaged. It's well-documented that li-ion can and does get damaged if discharged to too low voltage. If you do attempt recovery from that voltage, the first charge should be done at an even lower current, and you're unlikely to see any usable capacity remaining. That's what's recommended. Most people just discard those cells if they see a voltage lower than 1.5 or 1.0.

I, however, have found some interesting data in the last couple years. With cells recovered from 1.5v and above, the tested capacity of the recovered cell can range from anywhere between 20-90% of original capacity. It's all across the board, basically random. I haven't graphed it, but if I had to guess, it'd probably follow a standard statistical bell curve. I don't use 50% of cells recovered over 1.5v, based on my criteria of only using cells with 80% of their rated capacity remaining. This makes sense logically, as a used cell from a laptop pack sitting at a usable voltage was, well, used. So it's only natural to expect that it's not going to perform as new.

Two years ago I thought I'd attempt recovery and full testing of cells whose recovered voltage was lower than 1.5v. I would perform the initial charge very slowly, in the range of 25-50ma per cell (this could take a week or so, patience required). This really is very important, because despite this post, attempting to charge damaged cells could cause fireworks. Just because it hasn't happened to me yet doesn't mean it won't. After initial charge to 4.2v, they get my usual process of 7-10 day rest, check for self-discharge, capacity test, then IR test.

The results were surprising. Instead of a usable recovery rate of 50% like all the other cells, I was getting a 95% usable return on cells recovered below 1.5V. In both tested capacity and IR. This rate persisted; I collect and test monthly, and it got to the point where I got more excited about recovering cells below 1.5v, because I could statistically expect them to test way better than all other cells. This did not apply to cells below about 0.2v. Anything below that would consistently test at literally less than 100mah capacity. Some outliers, but not many.

I can't explain definitively, but again, it's logical to think about. A laptop, ebike, or tool battery pack that is at a "usable" voltage was very likely used. Meaning, maybe had a few hundred cycles to it. So it's reasonable to expect less-than-rated capacity. Whereas, a cell that was allowed to drop below 1.5v was done so because of a problem, likely unrelated to normal use. I don't think any BMS would allow that as normal operation. In fact, maybe it was a faulty BMS that allowed a laptop to drain and the LVC failed. Then the BMS turned off because operating voltage dropped too low to run the IC, or something. "I just bought this battery and it stopped working!" Or perhaps someone bought a new e-scooter, used it a dozen times, stuck it in the garage for a couple years, and the BMS self-drained too low. Or a scooter rideshare company put too many scooters in service in a city that didn't want them, then they sat outside too long and self-drained. My recovery is mostly laptop cells, but this behavior persisted evenly across all cell brands, all laptop pack brands, not particular to one manufacturer or another.

My theory, then, is that if a cell drops below 1.5v, once, then it is damaged. But if you can carefully and safely coax it back into working voltage, then said damage is minimized and limited to that one occasion. Not great, not ideal for normal usage, but not trash either. Same school of thought as "one cigarette won't kill you!"

Tl;dr despite the generally accepted consensus, I have consistently found that reclaimed Li-Ion cells recovered at 1.5v or lower test and perform as nearly new 95% of the time. As long as proper safety precautions are taken; don't eff around with lithium.

In the next post I'll explain the relevance to this moped build!
 
I had originally found and was going to by these used packs from Battery Clearing House. INR18650MH1 cells, and for this product they have this guarantee:
These cells have our 80/80 guarantee:
"Specifically we guarantee that at least 80% of the cells will have at least 80% of their rated capacity.
That's not bad. If I got the lot of 10 packs for $230, that's $0.77 per cell, probably 80% capacity and higher. These are used packs, so probably a few hundred cycles, not heavy usage.

But then I saw this listing on their site: 52-cell packs, same INR18650MH1 cells. This time the pack is meter tested at a low voltage, between 12 and 25v for a 13s pack, or 1.9 to 0.9v per cell. No guarantee of any capacity. Since this is a "bad pack" on paper, they're being sold in 3 packs for $90, or $0.57 per cell. 25% less cost. And if you took the time to read my above post, you'll see that my personal experience at cell recovery meant that while there was no guarantee, I had a good feeling that getting the low volt pack, for less money per cell, could potentially result in higher performing cells. I rolled the dice.
Packs shipped in 3 days, nice.
IMG_20231222_163035.jpg
Lid popped off with 4 screws
IMG_20231222_163220.jpg
A dremel and tin snips to the nickel connections lifted the BMS off the cells easily
IMG_20231222_180826.jpg
Hidden screws underneath the label on the bottom, and the cells just fell right out.
IMG_20231222_182316.jpg
IMG_20231222_170256.jpg
As you can see they just dropped off in 3s4p packs. Which is great for the rest of the workload, as I can handle them easily and I don't have to deal with high voltage anymore.

Then on these particular packs, the nickle pried off with almost no effort (at least compared to the thousands of laptop packs I've done)
IMG_20231222_170330.jpg
IMG_20231222_171956.jpg

All cells tested as advertised: between 0.9 and 1.9v. More importantly, each cell in pack of 52 was at identical voltage throughout; perfectly balanced. So it's unlikely that these were "dead" packs because of a single P group bringing down the rest of the pack. My above theory of a faulty BMS or a scooter stuck in storage too long was holding up.

Next to my low-voltage recovery rig: 40p slots connected in parallel to a single TP4056.
IMG_20231222_173920.jpg
It can charge at 1000ma, divided by 40 cells, meaning each cell only gets 25ma. Nice and slow. Took about 12 hours for the first batch of 40 to get to 3.0v, even with the steep charge curve at that lower voltage. This a good thing. Then off to my row of Liitokala 4-slot chargers for normal charging. Still charging relatively slowly above 3.0v, at 300ma (about 1/10 C with this cell's specs). This takes 10-11 hours. Which is another good thing, and when I started to get excited about this haul: it meant that my first 16 cells actually took 3200mah to charge fully. Plus these first 16 all charged identically.

This is just preliminary, because it just was yesterday's testing, and I still need to do a 10 day rest for self-discharge test, followed by a proper charge-discharge-charge test. But they're pretty damn good preliminary results. Oh and I checked IR on everything already: the spec sheet lists them at 40milliohms, and every single one of the 312 I got was 35-38 milliohms.

I also got curious and picked a single cell at random to do a 9A discharge test it (they're rated for 10A).
IMG_20231223_084810.jpgIMG_20231223_090510.jpg
Performed it fine, stayed under 50 degrees C (it's rated for 60), and discharged 95% of it's rated capacity, at 3C. Pretty frickin great.

As described above, testing all 312 properly is going to take about a month to get final results, but I'm pretty excited at what seems to be a great find.
 
Last edited:
Sprocket arrived from ElectricScooterParts.com - Visit the Electric Scooter Parts store.. I knew it was going to be large, it had to be to meet my 7:1 ratio requirement, with 98 teeth, but damn! Old sprocket for reference.
IMG_20231226_135619.jpgIMG_20231226_135638.jpg

But it's going to be manageable. I'll have to make some sort of new rear chain guard to make sure it doesn't take off my leg.
IMG_20231226_143549.jpg
I'll need a bit of guidance before I start modifying my motor shaft. Can someone tell me if this is an appropriate method for determining the position of the front sprocket on the shaft:?

-Align the rear wheel
-Mount the motor
-Clamp a long straight bar onto the sprocket
-Position the front sprocket so it hits the bar.
-Mark front sprocket position and mount

I've never done this before and this seems like it should put the teeth of both sprockets on the same level. Am I right enough to go ahead?
IMG_20231226_144624.jpgIMG_20231226_144559.jpgIMG_20231226_144611.jpg

Thanks in advance!
 
Sprocket arrived from ElectricScooterParts.com - Visit the Electric Scooter Parts store.. I knew it was going to be large, it had to be to meet my 7:1 ratio requirement, with 98 teeth, but damn! Old sprocket for reference.

Now you can make side covers, seat cover, etc., out of red flannel, put your favorite circular saw company's logo on the sprocket, then take a thin section of a log and secure it by the shock, so it looks like it's sawing thru wood as you go down the road, and call it The Lumberjack. ;)

The log can be your chainguard, too. :lol:


-Align the rear wheel
-Mount the motor
-Clamp a long straight bar onto the sprocket
-Position the front sprocket so it hits the bar.
-Mark front sprocket position and mount

I've never done this before and this seems like it should put the teeth of both sprockets on the same level. Am I right enough to go ahead?

I'm not sure of the exact method, but you basically want to setup the front sprocket position so that the chain will not strike anything on the bike as the swingarm moves up and down.

You also don't want the chain to be stretched and slacked as this happens. If there isn't a spot this will work for, you'll want a spring-loaded chain tensioner close to the drive sprocket to keep it from being slack.

Ideally you also want it to be far enough away from the rear sprocket such that you have the most possible tooth engagement (the fewer teeth engage, the less torque can be transferred, and the more wear on the teeth).
 
Thanks, I'll keep those points in mind. Not too worried about the swingarm hitting, as the new motor shaft is in the same relative position as the old. Just concerned to make sure I have an aligned chain path
 
I've never done this before and this seems like it should put the teeth of both sprockets on the same level. Am I right enough to go ahead?
Basically, yes. However, I would suggest that you firmly press your aluminum alignment bar against the smaller (pink) drive sprocket instead... and aimed (but not quite touching) the driven rear sprocket. Why?
In your image above, I see a clamp retaining the alignment bar to the larger driven (rear) sprocket - that method makes it more difficult to confirm the two axis are accurately parallel (because the small drive sprocket has a much small outer surface area to confirm true parallel with the rear sprocket) The smaller drive sprocket being plastic (read questionable precision)? doesn't help either. Make sense?
 
Last edited:
Basically, yes. However, I would suggest that you firmly press your aluminum alignment bar against the smaller (pink) drive sprocket instead... and aimed (but not quite touching) the driven rear sprocket. Why?
In your image above, I see a clamp retaining the alignment bar to the larger driven (rear) sprocket - that method makes it more difficult to confirm the two axis are accurately parallel (because the small drive sprocket has a much small outer surface area to confirm true parallel with the rear sprocket) The smaller drive sprocket being plastic (read questionable precision)? doesn't help either. Make sense?
Thank you, this does make sense. I will go back and do it that way. Front sprocket is pink and plastic because while I do have a proper front sprocket, it's a press fit onto the shaft. I don't want to have to put it on the shaft and remove it, several times, while determining it's proper position. Unnecessary wear and tear on both the sprocket and shaft. So I printed a copy of the sprocket with the same dimensions, except slightly larger bore, so I can use that for making position. Then when I have the shaft ready, I can press fit the actual sprocket.

The rear wheel does have proper alignment hardware as well for final adjustments.

and aimed (but not quite touching) the driven rear sprocket.
Why not quite touching?
 
Back
Top