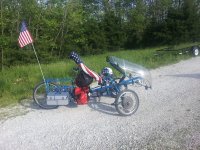
2WD (dual motor, two wheel drive) Trike build.

Great news: pull to the right vanished when I got both front tires aired up properly. I had them too low, but I finally coughed up enough dough to get a pressure gauge (Duh!?!) after all these years of using my thumb.

Getting a better handle on Range Anxiety.

20 MPH and 15A limit = 33.7 WH/Mile.

35 MPH and 25A limit = 58 WH/Mile

15MPH and 15A limit = 24 WH/M


I have a set of new batteries on order from Cell Man. He's building a set of custom batteries, 16S2P, 75V 40 AH split into two packs, with a long wire in between, 80A BMS, with his special "no spark" circuit. This is 260% the size of my current battery, and I proved today I can get to town and back on the current batt. (Town is 20 miles away). I now have enough data to show that, if I keep it below top speed, I have enough range to make it there and back. At top speed, I might run out of juice, but I can deal with that problem by dialing it back a little.

Today I was riding into town, sun beating down, wind whistling through my helmet, yelling "You're living the dream, buddy! Living the dream!"
 
llile said:
35 MPH and 25A limit = 58 WH/Mile

20 MPH and 15A limit = 33.7 WH/Mile.


15MPH and 15A limit = 24 WH/M

75V 40 AH pack holds 3000 WH. 80% DOD = 2400 Wh

At the quoted efficiencies, and 80% depth of discharge, I should have a range of 41, 71 and 100 miles, respectively. A 100 mile range might be nice, if I was sagging some non-powered bicyclists' gear on a long trek. Nice use of an e-bike. Heck, with a few opportunity charges, a guy might stretch that to 125 miles or so, and on a comfy recumbent, 8 hours in the saddle isn't really a big deal. Maybe I'll ride up to Northern Missouri and see my buddies up there.
 
Fantastic progress:

Have made two trips to town - 40 miles round trip each. On the old batteries, I have to get an opportunity charge in town to make it back. New batteries are on order. Nothing important fell off. Well, OK one or two important things fell off but I was able to make it not a disaster.

Got a tune-up from two pros today - John Robert Homes worked on it for a while, then my favorite bike shop,Walt's the Owner came out and helped me with a problem with Nexus hubs. Apparently, hooking up a Nexus internal hub cable is non-trivial, or at least beyond my skill after studying the directions for some time. The tiny print doesn't help. Once you have seen someone do it, the explanation makes some sense, but until then, fugheddaboutit. He also gave me some advice on some bearing issues. The whole shop, about eight guys, came out to ogle the bike for a while. This escapade cost me dearly, since I paid for shop time and parts, and left with a pair of Ortlieb panniers in red, to match the American Flag theme of the bike.

Also rode in the rain for the first time. Totally fine. I've got lights (two on the front - flashing or steady, three red flashers on the back, and two spinny spoke lights on the front wheels), carry good rain gear (cheap lightwieght rain pants, and a good Patagonia H2No jacket) a selection of gloves of various weights and watertightness. A standard kit of rain gear and tools fits in a small cheap pannier behind the seat, and two Ortlieb panniers sit right below them, empty and ready to protect two sacks of groceries from any elements or road grime that they encounter on the way home. Fairing really helps keep a lot of rain off, especially out of my shoes. Plenty of tools in a dry bag ready for most any road emergency short of welding (including a vise grips and some zip ties, which are sorta like welding) I've been assembling this kit of rain gear and tools for years, this is the culmination of quite a bit of time slowly collecting some rather expensive stuff. This is shocking since I am usually a cheapskate.

I've never ridden in rain with a motorcycle helmet before. It is a full face model. WIth the visor closed, it fogs up easily, and my glove soon fails as a windshield wiper. But I found that I can open the visor some and use it more like the bill on a cap, keeping rain off my face and out of my eyes. I always carry safety glasses or sunglesses, so I don't get hit in the eye with a bug at 35 MPH.

Getting really close to totally successful!

 
To Do list:

In no particular order:
Add a mechanical stop to control the range of motion in the kingpin bearings. Right now, they can go overcenter and lock up. It isn' t a problem on the road, but is a problem when pushing the bike around. Could theoretically cause a dangerous wreck if it somehow happened at speed.
Add a reversing switch. There is a plug on each controller that reverses the direction of the motor. I could simple add a DPDT switch that would reverse both of them, allowing me to back up under power. Back out of the garage. Sweet!

Play with setting up the CA as a current throttle, instead of the configuration now where the throttle goes directly to the controller but the CA has a throttle override signal.
Tighten up the kingpin bearings. There is a lot of play right now, may have to shim something. Bike shop guy was looking at it, scratching his head.
Re adjust the toe-in

Add 12V distribution via a DC-DC converter.
Add a feature that runs all the lights from 12V. Currently, the lights all have separate batteries.
Upgrade to 1000 lumen LED headlights, ala motorcycle style. Currently, I have two 120 lumen bike style headlights. Might go with Justin's 1000 lumen headlights, or build something myself.
Add a 12V vehicle style accessory plug for 12V stuff.
Add a usb port that can charge my phone to the 12V system. This is not as difficult as it sounds.
Now that I have juice, add some tunes, powered from my smartphone. It would be sweet to be able to press a button and have the bike loudly proclaim " It's Electric!".

replace some gear shift cables that aren't right. They work but need to be routed better, and are too short.
Fix the chainguard, so it protects my pants from grease, doesn't rub the pedal, but can allow the chain to be removed without going out of adjustment. Right now I can only achieve any 2 of those 3 goals.
build battery boxes/bags or what have you for the new batteries. The goal will be to have something that is removeable, but locks onto the bike when in use, both to prevent thievery and prevent jarring loose. Got to be watertight. I will probably include a padded spot for a charger, plus a stationary charger at home. People start gnashing teeth when I say this, but I have carried chargers in a foam lined box for thousands of miles without mishap.
Build a secure mount that holds my briefcase so it cannot fall off, but works without the current system of bungees.
Add a water bottle cage
get a better lock. Maybe a handcuff style lock to fix the wheel, then a cable style that can grab onto the nearest solid object. I hate keyed locks, I always lose the damn keys, but Kryptonite locks are usually keyed, so for now I have a stout combination cable lock only. This is a $5000 ride, it needs good locks.
add a small handlebar compartment for sunglasses, a snack, maybe wallet, etc
Get some soft and warm foam handlebar grips
add some thick rolls of foam padding to areas that I would strike in case of a head-on crash. Perhaps saw some crushable patterns into certain noncritical struts, so they would collapse in case of a crash instead of making me into a voodoo doll.
Add a switch that just runs WOT. Twisting a throttle for miles and miles gets old. This would be a sensitive dead-man style switch, that would go WOT if pressed all the way, so I can relieve my aching left throttle hand after 20 miles or so. Not sure how this will all work yet. Has to be hard to accidentally activate.
reconfigure the back rack. I am not satisfied with it's looks, I think I could build a lighter one that was just as strong, add a plate int he top that keeps the load from rubbing on the wheel. Add more points to attach bungees, for carrying odd loads.

It could do it, so why not: add footpegs so a passenger could ride the rear rack.

I wonder if there is a system that can track your bike if it is stolen? I have heard of such things, I will look into them. Seem to remember one that looks liek an innocent bike light, but can call your cell phone and locate the bike with GPS. This would be a fun hack to build.

Someday I'd like to build a bodystocking fairing - starting with a tailbox. This will become a higher priority as it cools off next winter. Got a sample of Stars and Stripes pattern Lycra on order. Also have some red, white, and blue nylon. Have sewing machine, will make body stocking.
Add pie pan wheel fairings to cover the spokes and make the wheels more aerodynamic, maybe make these out of coroplast. These must also be stars and stripes pattern and feature LEDs.

Strip off all the parts and paint it
 
Add a mechanical stop to control the range of motion in the kingpin bearings. Right now, they can go overcenter and lock up. It isn' t a problem on the road, but is a problem when pushing the bike around. Could theoretically cause a dangerous wreck if it somehow happened at speed.
My TerraTrike Rover turns too sharp also, and sort of binds up when turned to the extreme point, plus the front wheel will then hit my foot. Like you said, not a problem on the road, but a nuisance when pushing the trike around or when making a real sharp u-turn at low speed.

I've been thinking about adding some sort of limiting straps or stops, but haven't really tried to figure it out yet. Maybe some springs that would allow the full turning with a little extra pressure when needing to turn around in a tight spot.

Would like to see your ideas.
 
Here is what you need to protect and expensive E-bike:


http://www.integratedtrackers.com/GPSTrack/Spybike.jsp

Spybike tracker. Disguised as a standard steering tub cap. Installs with a security wrench. Sends you an SMS text showing the location anytime it senses vibration when armed. Remote wakeup via text. $5 a month in SMS text fees. $150.

I may well invest in one of these.
 
Painting! Rattle can special. "Why don't you powder coat it?" asks this dude. Because I never know when it is finished. In all likelyhood, next week I will grind off some paint and weld on another boss or pannier rack. Then the rattle cans come out again!

Rustoleum primer isn't good stuff. One can clogged up right away, no way to get the contents out. $4 wasted. Next can almost did the same thing. Next time I'm getting rattle can primer from an auto parts store instead of a paint store.

Hung three tarps in the garage for a quick-and-dirty paint booth. Have a big light fixture and two spotlights on ladders, strings hanging from the ceiling to suspend items for painting. The frame, handlebars, and so on come apart into about 10 peices. The rest all fits into a carboard box. Stripped the whole bike down to nothing in about two hours, with a break in between to weld a couple of things onto it.

Check off the to-do list: Reinforce kingpin tubes, add stops to keep kingpin from overrotating.

Color is an electric blue.
 
Everything reassembled. Already ground off a bit of paint, welded on a boss, and repainted it. See? You are never done with a custom bike.

Improvements:

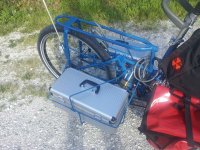
Battery boxes arrived! Aluminum toolboxes bought off ebay : the guy has a zillion of them. Sturdy, fairly watertight, good looking, fit a cell man battery or a PING. Get one yourself!

Batteries have just shipped from Cell Man, not arrived yet. Theoretically should fit in battery boxes with plenty of room, hope I am not mistaken. I can still run on my old set of batteries if need be until the new ones are fitted out. Although the battery boxes didn't leak in the shower, I will probably add an extra waterproof bag inside the battery box, stuff the extra room with foam, and carry an opportunity charger.

Battery boxes are now in a cage/basket instead of being strapped on with straps. This makes them a lot harder to steal and they don't try to fall off when riding over bumps like the last system did. The arm that holds the battery box int the cage also can lock it down. Sure, a guy could cut the cage apart to steal the battery, but a casual knucklehead won't just pick it up and pack it off. Got two heavy cable locks and a big master lock that all fit into the same ring on the bike, securing the batteries and allowing me to lock up to a pole or a bike rack.

Taking it all apart and putting it back together has allowed me to pay better attention to routing cables and wires, getting everything set just so, and using threadlocker on bolts.

Reverse gear! I am making a switch that will reverse the motors. It is really awkward to back up manually out of a bike rack or a garage, easier to just sit on the bike, hit the reverse switch and use the motors. How does this work? The Clytes come with a terminal that switches the direction if you short it out. Normally the left motor runs in reverse, the right forward, and since they are mirror images the bike moves forward. But a DPDT switch can reverse both motors, giving me an electric reverse gear. Sweet! This would be useless on a two-wheeler, but really a nice feature on a trike.


Pics coming soon. This bike really looks nice.
 
OT: I never thought to put the Stars & Stripes on my bike/riding regalia; good idea for additional safety!

Clever. Glad to see this coming together for you :)

Cheers, KF
 
llile said:
Rustoleum primer isn't good stuff. One can clogged up right away, no way to get the contents out. $4 wasted. Next can almost did the same thing. Next time I'm getting rattle can primer from an auto parts store instead of a paint store.
Krylon has yet to fail me--even some 20-plus-year-old cans still work, as I am finding while sorting thru stuff after the house fire.

Rustoleum I used on DayGlo Avenger years back, and found that even following their own directions for their own primer and paint gives a crappy paint job at best, and while the lava-cracking-look is interesting it certainly wasnt' what I wanted. :( Back to Krylon if I ever actually *buy* paint for something again. (well, not strictly true, I did buy some dayglo stuff from I think truevalue hardware store brand, when some of their stores closed down and sold it super cheap. Or maybe that was Ace? I forget. Either way it was WAY better than rustoleum, but not as good as krylon).
 
Here are a couple of views.

20130517_174742.resized.jpg


20130517_174829.resized.jpg

Consistently getting 58-60 WH/Mile, 35 MPH top speed at 26 amps. Reinforcing the kingpin axle was the ticket to stop frame wobble, also makes the motors run mechanically smoother.

Now adding conveniences: Water bottle cage, a velco strip for a parking brake, a little bag for sunglasses.

Reversing switch works great, except it goes just as fast backwards as forwards. I am still learning to back it up into the garage without comically lurching into something at the other end. Just a touch of the throttle is all that it takes to move backwards, any more and you are racing backwards.
 
I had some problems with some Rust-Oleum in the color matching dept.. I gave them a call. They asked for some codes off of the paint/receipts, and issued me a check for twenty bucks. It was actually more than I paid for the paint. When I said something to the girl on the phone, she was like, "so...do you really want to check your numbers and get less?" It was a man-up and take the money before I have to do more paperwork kind of conversation...with deniability angle from her. Very memorable.
 
First broken spoke. This is an endemic problem with tadpole trike, exacerbated by driving like Steve McQueen. I am going to see if John Robert Holmes can fix me up with a bunch of spare spokes, maybe heavier than the stock spokes that came with the Clyte motors. As you know, John Robert makes custom spokes and wheels from scratch for folks all over the place, but happens to be in town here so I can just swing by. He's got really heavy spoke blanks just for us E-bike freaks.

The root of the problem may have been some loose spokes. These teeny wheels (spokes are only 4" long between motor and rim) don't get out of true with loose spokes, unlike a 26" wheel. Hopefully that's it, I would hate to think I have to baby it around corners.

The wife really likes the bike, the first comfy recumbent I have built so she says.
 
Pure said:
I apologize if I missed where you covered this, but what are you going to do about the problem of your motors not being sinked up? Running dual controllers, one motor will always put out more or less effort than the other.

Wide speculation on the motor sync problem proved to be unfounded. It just isn't a problem at all. I had more unbalance from a low tire than from the motors.
 
Spoke-itis this weekend. I went on a big ramble called Pedaler's Jamboree, which involves about 35 miles of riding along a trail with several thousand other bicyclists, listening to live music along the way, and camping out at the end before riding back the next day for another 35 miles.

3 miles from the campsite I noticed two broken front wheel spokes. By the time I arrived at the camp it was four. John Robert Holmes of Volt Riders, although somewhat inebriated, was kind enough to offer some advice and some tools before deciding he'd better pay attention to some better customers. Using the spare spokes we had wisely made, I was able to fix all but two broken ones (by this time 6 had failed). This comes after a very gentle ride - I had the speed limit set at 12 mph so I would not get the bicycle riders excited about some dangerous fool zooming by on an e-bike.

The other problem is the tires. These suckers are already bald, after just a few hundred miles of riding. Clearly I am putting forces on these front wheels that are beyond the capabilities of bicycle parts. Could there be a toe-in problem? Likely that isn't helping matters. I ended up sagging my trike home instead of riding it, figguring it wouldn't make it.

Next Week John Robert and I are planning to pull off the rims and install motorcycle rims. He believes that he can put in 14 gauge spokes (current spokes are 12 gauge) that cross (current spokes are straight out radial from the rim, like they came from Chrystalyte) a DOT rim, and DOT motorbike tires. This is all stuff I am not real familiar with, but he's dealt with motorbike and scooter stuff for years. If you are reading this and considering a tadpole trike or a custom ebike motor in a rim, call him first.

Tadpole trikes are tough on front wheels. At 35 mph, standard bicycle parts just don't make it. John's partner Ryan tells me they deal with building custom wheels all the time for folks souping up e-bikes, and keep recommending they get away from bike rims and use stronger motorcycle rims.
 
llile said:
docnjoj said:
The toe in should be around 1-2mm so 0.1 inch seems good. Otherwise those Big Apples will disappear real soon from grinding rubber. It should still track fine but do not go to toe-out! Vewwy vewwy bad! I use 2 dowels and zip ties to make a sliding wheel allignment tool. Allign at the midpoint of the tire front and rear. Also center point steering (angle of camber) is quite important. The line through the cambering headpieces should go through the center of the tire as it meets the road. Makes steering much smoother.Caster should be about 5-10 degrees positive but don't remember exactly. That is the front to rear angle of the headpieces. Check, ( as always) with Julian Edgar from his column Autospeed. He built some amazing trikes and documented everything including the caster/camber angles and toe-in too. Also made one with a Di-Dion front axle suspension. Cool, helpful stuff.

otherDoc


A picture is worth 2kbytes

I have approximately zero camber, probably too much toe-in, and caster such that the axis of the kingpin leads the contact patch by about 1.5 inches. When I next get out in the shop I'll measure these things more accurately, and set the toe-in lighter as well as getting the tire pressure even.

The line through the cambering headpieces should go through the center of the tire as it meets the road.
I think I have this part correct. Will measure it again to be sure.
Yep that is the stuff. The toe-in should be really small but with the front of the tires pointed in. Maybe 1-2mm. My tadpole also goes through front tires faster than the rear, even with only 1mm toe-in. That is one beautiful job! Enjoy it well! JRH really knows his stuff and makes great wheels. I got my fronts made by him. You may want to consider moped tires to go on those new wheels. DOT stuff is much stronger than bike stuff and may last a lot longer.

Measuring toe-in is easy with 2 dowels about 2 feet long tied with zip ties. They slide in and out and you can mark them when you get the toe correct. I think it is called a trammel? Cheap and effective and Helps me align my wheels.
otherDoc
 
The 12ga spokes on the stock bicycle rim weren't capable of enough tension to keep all spokes tight (woulda been fine with 13/14 spokes with tight hub holes) , so the heads started breaking on interiors.

We ended up settling on 11/12 butted spokes with 16" steel rims and Pirelli tires. The hub flange can take it, so time to beef up the entire situation. I think a radial outer and 1x inner spoke would handle well, but dont have the tools to make the rim fit the plan. A regular single cross will be the pattern.
 
Trike is working great with motorcycle rims/spokes on the motorized front wheels. I have been taking it easy on corners, instead of zooming around trying to flip the bike as I was doing during early testing.

Had an important weld fail yesterday on the tie-rod, but fortunately it was at the end of a 50 mile ride, in my driveway. Welded it back up and had it painted before bedtime. It would actually go down the road fine without a tie rod, but when I stopped the wheels went all goggle-eyed.

I've been making frequent 40-50 mile round trips, often with 2 sacks of groceries on the way back. Bike is really successful, and almost replaces a car. Man I am getting in shape too with all this pedaling.
 
llile said:
Had an important weld fail yesterday on the tie-rod, but fortunately it was at the end of a 50 mile ride, in my driveway. Welded it back up and had it painted before bedtime. It would actually go down the road fine without a tie rod, but when I stopped the wheels went all goggle-eyed.

Tie rod failures can really suck. I had been expecting a problem due to previous failures and increasing wiggle on mine on CrazyBike2, so I built a whole new tie rod for it. I still have to build a new end mount at the handlebar end of the steering, to make it bulletproof, but at the moment I trust it about a zillion times more than v2 (v1 came apart pretty quickly, and was replaced years ago).
http://www.endless-sphere.com/forums/viewtopic.php?f=2&t=12500&start=825#p754760
 
More spoke failures! I have been babying it around corners, but I still have spoke breaking. Four spokes, all on the same wheel, one after the other. I think once one lets go, the next one gets too much stress, then they go like dominoes. Spoke failures are a known and common problem on trikes, I saw a guy in the local shop with a Cattrike with broken spokes just the other day. I've been riding the hell out of this bike, probably put 500 miles on it in 2 weeks. 40-50 miles a day.

I'm using a motorcycle rim and tire, with heavy spokes. The spokes are crossed, which should make them stronger. They did last longer than the previous version. Previous incarnation was on a heavy bike rim, with straight spokes, and they didn't last very long at all. My wheel-buildin' buddy John Robert thinks that we've got several issues.

I always break inside spokes. Outside spokes have never broken. JohnRob thinks that the inside spoke sees more flexing back and forth, while the outside spoke always remains in tension. The push-pull is fatigueing the spoke at the head.

Also, the holes in the hub motor are bigger than the spoke head, allowing more movement than necessary.

Johnrob declaims that old Ford Model A hubs had crossed spokes on the inside, but straight spokes on the outside, and this resulted in less flexing of inside spokes. He is going to drill some new tight-fitting holes and make an arrangement like this.

We had also discussed several more options - double spoking for instance. He thinks he could order a size heavier spoke (we are using 11 gauge I think? ) but his spoke rolling machine won't thread them. We'd have to order them cut to length.

The nuclear option might be to machine a "mag" solid wheel that marries the motor to the rim. This is pretty extreme, and will be extremely expensive too.

Any other ideas?

P.S. - order your custom wheel builds around your favorite motor from these guys: John Robert at Volt Riders
 
The relacing plan is fairly straightforwards. Since the spokes that break are very consistent we can assume the same failure mode. The bracing angle of both outer and inner spokes is not enough, and the axial load on the wheel is causing inner spokes to completely loosen during corners.

We have some limitations on the rebuild. First, the hub flange width is fixed and narrow- and probably the root of the issue because of narrow bracing angle. Second, the spoke length is very short. Ideally I would want longer or thinner spokes to give more elasticity, and a higher brace angle to reduce the change in tension under deflection.


To remedy the wheel we are going my "ideal" route. We will be forming new nipple seats in the rim for the outer spokes to fit with outbound radial lacing and a higher bracing angle. This will greatly reduce axial deflection that is causing the inners to go out of tension and break. Inner spokes may get new holes drilled at the flange to reduce insertion angle and tighten up the head, I need to put a critical eye on the wheel for a few more minutes before deciding it is necessary. With new holes (or spoke washers) we can step down to 12 or 13ga on the inside and increase preload, which will further mitigate inners from loosing tension. Whether we can increase the inner bracing angle is yet to be measured.


A Radial outer and 1x inner is the best chance of licking the problem without increasing spoke count or getting a solid wheel machined. Combined with better bracing angles and higher preload on the inners we will have maxxed out the spoked wheel method usable on this rim and hub combination! If that fails it is time to get a "mag".
 
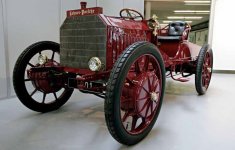
This is basically what we are doing, the same method that was used on wheels of the early 1900s. They had it figured out!

hession3.jpg
 
Back
Top