A123 AMP20 Battery Pack Build...

SlyCayer

100 W
Joined
Sep 6, 2010
Messages
173
Location
Limoges, Ontario
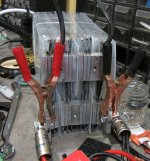
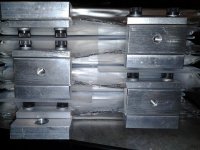
Here is a picture gallery of my AMP20 Battery Pack Build...

Each packs are 5P12S for a total 5P24S when both packs are connected together.

DSCN0084.jpg

DSCN0085.jpg

DSCN0086.jpg

DSCN0087.jpg

DSCN0088.jpg

DSCN0089.jpg

DSCN0090.jpg

DSCN0091.jpg

DSCN0092.jpg

DSCN0093.jpg

DSCN0094.jpg

DSCN0095.jpg

DSCN0104.jpg

DSCN0105.jpg

DSCN0106.jpg

DSCN0130.jpg

DSCN0131.jpg

DSCN0132.jpg

DSCN0133.jpg

DSCN0134.jpg

DSCN0135.jpg

DSCN0140.jpg

DSCN0141.jpg

DSCN0142.jpg

DSCN0143.jpg

DSCN0144.jpg

DSCN0145.jpg

DSCN0146.jpg

DSCN0147.jpg

DSCN0148.jpg

DSCN0149.jpg

DSCN0150.jpg

DSCN0151.jpg

DSCN0152.jpg

DSCN0153.jpg

DSCN0154.jpg

DSCN0155.jpg

DSCN0160.jpg

DSCN0161.jpg

DSCN0162.jpg

DSCN0163.jpg


Let me know your opinions :D
 
What are the outside dimensions of your polycarbonate battery box?

Total weight complete in box w/internal to external connectors?

Really, really, excellent! :D photo documentation. 8)

This is 100ah 80v (top-off surface charge) ...

Ebike or motorcycle or :?: :twisted:

Thank you! :D

My only concern or question is are the pouches supposed to be under full surface compression or support on the outside/outer pack "ends"? Maybe use foam perhaps between the Polycarb & outside pouches? There must be some A123 specification for packaging the pouches under x-compression, since we always hear about the pouch puffing issue being a bad thing? :idea: :?: :?: :?: ...Just throwing this out there in case I'm misunderstanding something about this perceived issue. :shock:
 
SlyCayer said:
Let me know your opinions :D

If this is not a static pack, but one destined for an EV, then I would be a bit worried about vibration, and what sharp edges might do to your cells.

The white support blocks here are the ones that concern me most. Vibration between, and cell expansion/contraction on, the white blocks sharp corners looks like a recipe for punctured cells to me.
DSCN0148.jpg
 
ssooo... what car is it going into? :)
 
Nice pack, well designed and assembled.

I have a couple of suggestion though, with my experience with these cells your end connections with the flat washer as the only thing "clamping" the outer tabs to the blocks. Is it possible to place a 0.125 - 0.1875" block between the washer and the final tab? It will give you much better clamping over the tab surface area. The thicker the better depending on the space you have to work with.

The other suggestion would be to test a module with less blocks between the tabs, the tabs are flexible enough that you might be able to clamp all 5 together without requiring the blocks in between. I switched from a similar but smaller scale version using aluminium spacers between the tabs to a version with one block between the series groups but no blocks between the parallel groups. The IR of the pack measured with the PowerLab 6 is 1/3 of the old pack. The resistance of each connection is small, but they add up quickly.

The benefit of this would be much more pronounced at high currents, if this is just a "low current" 200-300A or less pack it probably wouldn't be worthwhile. If this is a 400-2000A pack then it might be worthwhile pulling it apart and making changes.

I also incorporated Nord-lock washers into the design and they work VERY well.

Old:
12vpack.jpg


New:
new A123 module2.jpg

EDIT... as I look closer, the heavy cables coming off of the blocks to put the groups in series should be connected directly to the tabs and not have a nut in between and NOT have the very small ring terminal between. That tiny ring terminal + the bolt (I assume brass?) will be carrying the full current of the pack, you should rely on direct surface contact of the high current parts without anything in between.

My "old" pack worked great on the bench up to 100A, but after I put it in the car and did some 1000A discharges the issues came to light very quickly as higher than expected voltage drop and warm connections.
 
rwaudio said:
Nice pack, well designed and assembled.

/snip

I agree entirely with these comments! Particularly about the third point- that brass nut and piece of threaded rod is conducting all the pack current- remember the resistivity of brass is over double that of copper.

I would also expect the pack will perform OK at lower amp draws but that you'll start to see some more sag on the output as a result of various higher resistance spots in the pack- accompanied of course by localized heating.

I remember that EVDragRacer's latest pack is built in a similar fashion with copper spacer blocks sandwiched in between the tabs (creating two lap connections where clamping the tabs directly would only make one-) he claimed the silver plate on his blocks was important to keep the resistance low. I would still say that that's a design to avoid, if possible. http://endless-sphere.com/forums/viewtopic.php?f=14&t=38051

I think some simple modifications to the pack on the areas RW pointed out above will greatly increase the performance and safety of the pack! Put some load-spreaders on the end of your tab sandwich and get the main current lug directly against the end of the stack! We don't want to see any burned up tabs!
 
Nice pack and work as well !

I agree with all recommandations regarding the cells compressions and sharp edges and also the connection if using high amps!

thinking about 1000A become alot different than thinking for our usual 100A ebikes !

at 1000A every little connections resistance become huge problem.

We usually think that since the copper, alu or brass bar are thick, they will carry all the pressure of teh screw over the major part of the cell tab.. but this is not :!:

The pressure(claming force) vary alot on the different area of the rectangle spacer. most of the pressure is around the screw and a little bit on the washer but not that much on the rest of the surface.

That's why alot of people will choose more little bolt for the tabs( 2 or 3) than one big bolt.

Overall your pack is looking nice!

Doc
 
Pack definitely needs the RED to BLACK test... with video from at least three different angles. And popcorn... :twisted:
 
And three smaller bolts per tab would be MUCH better than the single mondo biggo bolt...
 
I'm grateful for the pics and you sharing your work but personally i don't like that mass of copper and the weight/cost.
It looks very agricultural IMHO of course. My honest view and i hope not to cause offence.
 
Good points here mate you'd need to consider if you will be pulling some juice. Your box is nice, clean job, but sharp edges one, poor heat transfer of perspex. You could fabricate aluminium box 5mm below tabs and than make 3mm perspex cover to protect from shorts.
My second opinion is that you made 2 mistakes in connecting tabs. First being putting brass blocs in between tabs, and second using one bolt. As mentioned before, brass is less conductive, twice the resistance of copper. So you have little surface area for proper tab contact + lots of resistance between cells. My other suggestion would be to drop a little soldering iron on balancing leads, i would not trust crimp only, there is vibration and something will get loose in time. For the tabs squash all 5P in between 2 brass blocks and use 3 x 5mm bolts. On the end connection just add 3mm copper flat bar this way: brass|tab|tab|copper flat bar|tab|tab|tab|brass and bolt it all together tight. Good luck
 
johnrobholmes said:
Very nice! What size copper bar did you use?

Copper Flat Bar 3/4" X 1/4"

deVries said:
What are the outside dimensions of your polycarbonate battery box?

560mm X 230mm X 280mm

adrian_sm said:
then I would be a bit worried about vibration, and what sharp edges might do to your cells.

No Worries, the white plastic you see is a very very soft plastic, and it will not "Scratch" the cells, I have tested it properly before doing it, but from your suggestions, I am thinking of buying some simple foam to put all around the cells.

neptronix said:
ssooo... what car is it going into? :)

Electric Go-Kart 32Kw

rwaudio said:
It will give you much better clamping over the tab surface area.

EDIT... as I look closer, the heavy cables coming off of the blocks to put the groups in series should be connected directly to the tabs and not have a nut in between and NOT have the very small ring terminal between. That tiny ring terminal + the bolt (I assume brass?) will be carrying the full current of the pack, you should rely on direct surface contact of the high current parts without anything in between.

The bolts are Silicone Bronze, very close to same conductivity has Copper. The Bolts and Nuts will carry a 450A current for short period of time and from my estimation, the nut/bolt conductivity is as much as a 1/0 or 1awg Cable and it's only 1/4" thick...

I am eager to put this pack on the kart to see how it reacts... I will have a programmed BMS working with A/D Inputs and Relay, programmed directly on a tablet wirelessy with Bluetooth.

It will monitor all parallel group voltages, temperatures of certain connections and temp of cells, it will also have a built in GUI on the tablet for RPM, Speed and all the cells voltage and LVC and HVC lights.
 
I honestly don't know anything about silicon bronze but a quick search of it's conductivity say's it's 5-20% as conductive as copper depending on the type.
A 1/4" bolt with even 20% of the conductivity of copper is bad news at 450A.

Your battery box is beautiful and appears to be very well assembled, I hope you can take constructive criticism from the members here and visit other options before you blow some bolts off and either short something out or destroy those nice clear boxes.

If you don't take the warnings please mount a camera on the cart pointed at the boxes so we can at least watch them blow their bolts. :mrgreen:
 
I can't possibly comment on the safety of the pack build as I have never worked with these prismatics, but thanks for taking the time to upload the photographs. It looks good and builds like this attract interest and the helpful suggestions which come from same. Well done.
 
SlyCayer said:
deVries said:
What are the outside dimensions of your polycarbonate battery box?

560mm X 230mm X 280mm
Thanks! :)

adrian_sm said:
then I would be a bit worried about vibration, and what sharp edges might do to your cells.

SlyCayer said:
No Worries, the white plastic you see is a very very soft plastic, and it will not "Scratch" the cells, I have tested it properly before doing it, but from your suggestions, I am thinking of buying some simple foam to put all around the cells.
I'm actually worried about your white plastic spacers. These spacers are *not* providing uniform pressure or support to your stacked cells. It is my opinion with the high vibration & turning forces driving a Go-Cart at high speeds that you will damage your battery unless you provide uniform pressure & support over the *entire* surface area against your "end cap" stacked cells. The white plastic spacers will do just the opposite of providing uniform pressure & support.

Use a good foam with minimal "soft" compression to act as a spacer and "compressor" between the polycarb & your entire surface of these end cap cells, that foam compressor could still be removable, otherwise I think you will damage your cells w/o that additional support over the entire surface area.

The A123 professionally manufactured modules with multiple cells *specify* that these modules provide *Uniform Pressure* against the entire cell surface area. Your module with white plastic is doing just the opposite of that specification, imo. This will likely damage your cells, imo. :shock:

Quoting from one of these A123 modules, perhaps used for the Chevy Volt, it states the module has: "• Uniform compliant compression system"
 
SlyCayer said:
The bolts are Silicone Bronze, very close to same conductivity has Copper. The Bolts and Nuts will carry a 450A current for short period of time and from my estimation, the nut/bolt conductivity is as much as a 1/0 or 1awg Cable and it's only 1/4" thick...

Again, I'm with RW-

http://www.eddy-current.com/condres.htm

Bronzes range between 48% and 7% of the conductivity of copper, the silicon bronzes listed are lower, either 12% or 7%. Might want to recalculate your equivalencies there-

Seems to me that moving the lugs to be directly adjacent to the tab stack and adding a load-spreader to the outside tab instead of having it flying, clamped just under the washer and bolt would be easy things to do to eliminate the worst weak points in the design. Depending on the resistance of these spots in the pack you may be able to determine that they need attention by running some discharge and checking it afterwards with an IR thermometer or thermal camera- or you might blow it up on the first run!

Good luck- please consider making these simple modifications- I think they will be well worth it!
 
adrian_sm said:
I'm actually worried about your white plastic spacers. These spacers are *not* providing uniform pressure or support to your stacked cells. It is my opinion with the high vibration & turning forces driving a Go-Cart at high speeds that you will damage your battery unless you provide uniform pressure & support over the *entire* surface area against your "end cap" stacked cells. The white plastic spacers will do just the opposite of providing uniform pressure & support.

Use a good foam with minimal "soft" compression to act as a spacer and "compressor" between the polycarb & your entire surface of these end cap cells, that foam compressor could still be removable, otherwise I think you will damage your cells w/o that additional support over the entire surface area.

The A123 professionally manufactured modules with multiple cells *specify* that these modules provide *Uniform Pressure* against the entire cell surface area. Your module with white plastic is doing just the opposite of that specification, imo. This will likely damage your cells, imo. :shock:

Quoting from one of these A123 modules, perhaps used for the Chevy Volt, it states the module has: "• Uniform compliant compression system"

I will be using foam for sure, what foam do you recommend?? The foams need to be have some sponger but not to much, so it's hard to gauge what foam I should use... Foam that is used in high school gyms should work?

acuteaero said:
SlyCayer said:
The bolts are Silicone Bronze, very close to same conductivity has Copper. The Bolts and Nuts will carry a 450A current for short period of time and from my estimation, the nut/bolt conductivity is as much as a 1/0 or 1awg Cable and it's only 1/4" thick...

Again, I'm with RW-

http://www.eddy-current.com/condres.htm

Bronzes range between 48% and 7% of the conductivity of copper, the silicon bronzes listed are lower, either 12% or 7%. Might want to recalculate your equivalencies there-

Seems to me that moving the lugs to be directly adjacent to the tab stack and adding a load-spreader to the outside tab instead of having it flying, clamped just under the washer and bolt would be easy things to do to eliminate the worst weak points in the design. Depending on the resistance of these spots in the pack you may be able to determine that they need attention by running some discharge and checking it afterwards with an IR thermometer or thermal camera- or you might blow it up on the first run!

Good luck- please consider making these simple modifications- I think they will be well worth it!

I will be changing the position of my lugs to be the first on top of my end string...

This simple change isn't so simple, to put this extra 1/4" copper bar between the cell will be hard because by putting an extra thickness, it will make my width of my pack over what my box was designed for and will great a cap between each parallel group since an extra 1/2" for both 1/4" bars per pack widens the whole pack by 4"...

I will have to rethink this and see what I can do.
 
SlyCayer said:
deVries said:
I'm actually worried about your white plastic spacers. These spacers are *not* providing uniform pressure or support to your stacked cells. It is my opinion with the high vibration & turning forces driving a Go-Cart at high speeds that you will damage your battery unless you provide uniform pressure & support over the *entire* surface area against your "end cap" stacked cells. The white plastic spacers will do just the opposite of providing uniform pressure & support.

Use a good foam with minimal "soft" compression to act as a spacer and "compressor" between the polycarb & your entire surface of these end cap cells, that foam compressor could still be removable, otherwise I think you will damage your cells w/o that additional support over the entire surface area.

The A123 professionally manufactured modules with multiple cells *specify* that these modules provide *Uniform Pressure* against the entire cell surface area. Your module with white plastic is doing just the opposite of that specification, imo. This will likely damage your cells, imo. :shock:

Quoting from one of these A123 modules, perhaps used for the Chevy Volt, it states the module has: "• Uniform compliant compression system"
I will be using foam for sure, what foam do you recommend?? The foams need to be have some sponger but not to much, so it's hard to gauge what foam I should use... Foam that is used in high school gyms should work?
I've seen some very high density foam used for floor exercise mats. This type of foam is dense & not squishy like a sponge. This high-density foam could be ideal, since it does not flex easy & is slow to press in. A dense exercise mat foam may be ideal if it recoils to press back against the entire surface of the cell. Also, there is dense foam used for packaging too that could be cut and used in layers to build-up the ideal thickness. Perhaps even high quality Styrofoam or "carving foam" might be used too or in combination with these other materials to get the correct thickness & recoil against the cell.

Please document with more pictures your solution, since this will help many of us with our battery builds too. Thank you! :D
 
I've seen a lot of people use camping sleeping mats for battery pack padding foam. The stuff in particular is blue, about 1/2" thick and pretty dense. Available at walmart cheap (I've heard)- I bought mine at REI (less cheap...) According to 2nd hand reports it's even flame retardant (none of my battery packs using it have burned up...)

If you can exchange the three copper bars on the end for 3/16 thick ones (requiring bending the tabs closer to each other) then you can put a 3/16 bar on the outside without changing the outside dimensions of the assembly... As well, that end bar doesn't need to be conductive (except for the one under the end lug!), it just needs to spread the load from the allthread across the tab- you could use something like 1/8 or even 1/16 steel instead for more rigidity with less thickness- even giving it a bit of a curve beforehand to help spread the load most effectively. This is a bit of a similar concept to the one I employed on my recent pouch cell pack build. I used .062 spring steel strip. http://endless-sphere.com/forums/viewtopic.php?f=14&t=38761#p565974

-Henry
 
I hope it works for you long enough to enjoy your project. :)

Here are some observations:

If you suspend any unsupported weight on the tabs of a pouch cell in a high vibration environment, the connection internal in the pouch between the aluminum positive tab and the aluminum foil layers will flex as the unsupported mass bounces around, the foils will fatigue, work-harden, and crack away from the tab internally. Anything connected to a tab MUST be mechanically supported if you wish for a long life on something. In the case of a go-kart, it might not get time to fail, and hopefully works out fine.

DSCN0141.jpg


NEVER conduct through a fastener, and if you're going to for some reason, silicon bronze is the lowest conductivity type of bronze available. It's generally 1/10th or less the conductivity of copper (the stronger alloys often used in fasteners being 1/20th the conductivity). In a go-kart application, you'll be chassis limited to pulling high currents for short periods of time, so it likely won't be an urgent failure point, but it would be wise to check the tension on the nuts, as thermal cycles on relatively slippery bronze fasteners tend to walk the fasteners tension off.

Suspending a cantilevered cable/lug mass unsupported off the tabs is extremely poor practice, in a vibration test I can assure you it would tear the tabs off when the vibe sweep hits the natural freq of that suspended mass. Fortunately, for this go-kart application, it's unlikely to see more than a dozen or two hours of use, so hopefully it doesn't have time to fail.

The clamping area is almost non-existent for tabs on the edges. A 1mm piece of spring steel that is curved to have the concave side facing the tab that needs to be clamped and added to the stack-up would be a good idea for those edges. Similarly, in a future design, using 3 small fasteners, made of good steel (remember, your goal is to never conduct through them, just using them for the clamp load) would be a much better option.

Pouch bodies seem greatly under supported. When these pouches get warm (and they might never get warm if used in a go-kart), they become very soft, almost cooked pasta soft, and require good structural support to keep them from collapsing on themselves.

The box is huge and thick with lots of air space and polycarb is a good insulator. It would not work as an extended high current battery, fortunately, a kart can only use little bursts and cooling is unlikely to be an issue at all. For a kart, low weight is the whole reason they are quick. I think a stack up of cells with some thick aluminum end plates (over sized a bit so the bands dont touch the pouch stacks) tightly snugged band clamps strapping the assembly together would give you a good mechanical retention system that provides good pressure and is low weight. You could slide in 1/16" lexan sheets on the edges of the cells before strapping the steel bands down. Any place that ships equipment on pallets would be able to put some steel band clamps on for you.


Most importantly though, you made a pack! And It's going to get that kart moving and making smiles on your face, which means you're winning, and your future pack designs will be that much better. :)
 
Back
Top