Amberwolf's Recumbent Tadpole Ought-One (ARTOO)

amberwolf

Administrator
Staff member
Joined
Aug 17, 2009
Messages
40,859
Location
Phoenix, AZ, USA, Earth, Sol, Local Bubble, Orion
file.php


Now that it has a smart-ass moniker better than the last bike, lets see about getting the design together. :)

It's based partly on Lee's most recent trike from The Packrat Workshop, after some conversations with him about what might be best adaptable to the parts I have on hand. So it likely won't have suspension, at least in front, for this version.

It'll be a single-tube main frame, probably made from a 2.5" fencepost I have.
FreecycledTubingFullSquare.JPG
That galvanized post with the mangled right end, within the L of square tubing, is the one.

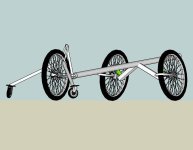
One possible way it could be configured, but probably won't be:
DSC02347 Front End Idea.JPG

Depending on length of things I might use this instead:
DSC02345 Exercycle.JPG
with the load-wheel tubing cut off, at the far right, and most of the mast up top cut off.
DSC02351 Another Front End Idea.JPG


That will go back to a bottom bracket pivot point for any rear suspension. I will probably not have a spring/shock for it by the time I need to ride it, so it will end up with just a solid tube bolted in place of whatever shock I would have used. I still want to build the pivot into it now, though, so it can be much more easily suspended later. :)

The rear triangle will be a modified one off of a 24 bike, probably off the old Roadmaster frame I originally started to use for CrazyBike2's rear end, but swapped out for the much lighter and slightly longer Schwinn frame instead. The main modification will be to make it vertically shorter, by cutting the seat tube down and bending the seatstays to meet it at the much shorter location. Rather like the back end of CB2 already is. This is mainly so that the entire triangle will be "below the deck" of the cargo pods that will run alongside it. Probably a 24" wheel, too, since the best slick tire I have is for that size.


Those pods will be the pods off CB2, mounted on a frame very like the one CB2 has, except that it will all be hanging from the back of the main tube, not connected to the rear triangle. Thus all the cargo pods will be suspended with the rest of the bike frame.

The seat will need to be built from scratch, and will be a lot like the one on CB2, but more form-fitting, if i can bend the tubing this time. I'll be again using tubing off an old bedside potty chair, same as on CB2, since it is small-diameter and extremely strong. The webbing will probably be the same green stuff I used on CB2's seat, simply because I have more of it and it's lasted just fine for more than half a year so far. It'll be tensioned using the same parachute cord lacing I used for CB2.

Like Lee's trike, I'll use tank-style steering, as it's mechanically simple and easy to build. It also doesn't take much space for it's movements, and won't get in the way of getting up and out of it like handlebars would, nor will it get in the way of my leg strokes for pedalling while turning, as can occasionally happen with CB2's bars at extreme turns with my kneecaps. :(

Pedals will be over the main tube and out beyond the front wheel axle, though probably not beyond the whole front wheel. Not completely sure until I finish the 3D sketches of it how the alignment works out.

The front end is where things get different. Because I am going to be forced onto sidewalks sometimes by either traffic or ignorant law-enforcement personnel, I can't make it wider than the sidewalk. Since a number of bike paths have protection poles across them to prevent cars from driving onto them, and those are generally spaced wide enough for wheelchairs, the front end will be no wider than a wheelchair.

Some of the parts I am considering for it:
DSC02346 Some Frames.JPG

Each front wheel will have it's own non-hub motor, most likely a wheelchair motor with it's reduction gearbox, with a V-pulley on the output shaft and another V-pulley on the wheel hub. The gearboxes have a tubular indentation in the top of the mounting plate, which happens to be the same as the steering tubes on a couple of the 26" forks I have.
DSC02360 Front Motor Fork Rear.JPG
So one idea is to clamp the motor to the steering tube, and setup the pulley on the hub and shaft so that they'll line up just outside the tire's sidewall.
DSC02358 Front Motor Fork Top.JPG
The motor would then stick out to the rear of the wheel, parallel to the ground.
DSC02359 Front Motor Fork Side.JPG
It is just one mounting idea, but one that happens to involve the least modification to the fork to do it. There are some serious disadvantages to it, too.

Then another steering tube is welded to the inside-leg of the fork down nearer to the dropout on the side opposite the pulley, at an angle that gives me whatever camber/caster turns out best for this thing (I still have to work out enough of it to then be able to figure out how to calculate that out).

That steering tube will then go into the headstock off a Razor kick scooter. Those things are meant to fold, so a few inches away from the headtube is a pivot point in the square tubing. That headstock is then bolted thru it's original folding pivot point to the end of a square tube welded at a forward/sideways angle out from the main tube, like a very wide Y. Another pivot point is welded to the headtube above that, which will go at first just to another tube welded to a vertical mast on the main tube.
View attachment 1
DSC02362 Razor headstock rear.JPG

Later, part of that horizontal tube will probably be replaced with a suspension of some sort, which is why I want the pivot point there now. If I don't end up putting suspension there, I would like to still end up making some sort of four-bar-linkage so I can make this a tilting trike, to improve stability in tighter turns at speed.

As heavy as each wheel will be, that means that the front end should be fairly stable in turns anyway.

To add to that stability, the SLA batteries (probably 4x 12V 17Ah) will be slung underneath the front end and the seat. That should help keep the weight to 1/3 on each wheel of the trike, but I will need to actually measure everything once I get it mostly designed, to make proper placements for things.

There will be cargo pods up front, too; I don't know what their shape is yet as I am not certain what spacing I will have up there.

Behind the seat on it's rear brace will be a vertical post sticking up to windshield level on the average car. A box will be mounted atop that with front, rear, and side lighting appropriate to the direction it faces. There will also be separate lights at the outermost corners of the cargo pods in the rear and the forks up front, for markers, signals, and emergency flashers. I don't yet have a set of lights to put on here, so I will probably be custom-building them. The lenses will likely be made from various bike reflectors glued together, with LED (for any flashing lights) and CFL (for any steady lights) lighting behind them.

Brakes will probably be disk brakes, donated by the very generous AussieJester. I have to fabricate adapters for them, and thus will probably be using some 48-spoke rear hubs I have on some 48-spoke 20-inch rims. The rear hubs are freewheel threaded on the right, but I will flip them over to put that on the left side, and make disc adapters out of something already threaded to that. I might be able to use the bottom bracket tube from an old cottered-crank frame I have, if the threads are the same pitch and the correct handedness. Then weld the tube to plates, face them on the lathe, and drill boltholes to match the disks. Basically they would do the same thing as these:
http://www.choppersus.com/store/product/308/Disc-Brake-Rotor-Converter/

If I can come up with the cash, I'd rather order a couple of these from Choppers US, as they'd also make mounting the pulleys much easier, too, since they're made for dual-disk, one on each side:
http://www.choppersus.com/store/product/874/Front-Hub---Dual-Disc-CP/
It would also mean I could have both discs on the inside or both on the outside of the wheels, rather than both on the left side, which results in the left wheel's brake on the outside and the right wheel's on the inside. I don't imagine it would make a difference in performance to be the latter way, but it might make fabricating the forks a little harder since they won't be identical nor mirror images.

The catch is those dual-disk hubs are 36-hole, and I really want to use the 48-spoke wheels to help more with the side-loads and weight on this thing.

That's it for the moment, until I can get some pics of parts I have and some 3D sketches done up. Or at least some pencil versions scanned in.

Now, hopefully this little guy won't get shot in the head when I do the trench run. :roll:
 
Looking good so far, resourceful as always i see! I will be waiting to see what you do with that pivot-section later :)
 
I might end up not doing anything with it, which would be a shame. But probably it will be a pivot for the front shocks.

And now for some concept images, created in Google Sketchup mostly using existing bike parts from things found in their 3D warehouse.

The wheels are 20", for visual scale. The main tube is 2.5" O.D.

The side view looks a little long. I am not sure if it will need to be this long or not yet.
Copy of ARTOO 100011 right side.png
There's no detail to anything yet as I am still working out positions, angles, etc.

The top view makes it easier to see the camber of the wheels, which is 7.2 degrees in the drawing but I don't yet know what it has to be in reality. It just "looked right".
View attachment 1
The wheel supports angle back because that is the direction of pressure in a turn and it is also the direction I would want it to angle to during shock absorption if I ever get that far.

Front view shows camber clearly. The green bits are the Razor scooter headstocks.

I intend to have the line thru the headstock it pivots around point directly at the tire contact patch. If I understand how steering should work, that should give no scrubbing of the wheel during a turn, for better traction. I am not *certain*, but I do not think trail matters much in the case of a tadpole trike, based on the way I see it working in my head. Thus, there is no trail on this steering setup.

An iso view.
Copy of ARTOO 100011 iso.png
The steering pivots are behind the wheel pointing forward and outward at the contact patch. It is possible I will have to make it point forward of the patch instead.
 
A little redrawing needed. I found the article by Julian Edgar I had been thinking of that explained this stuff, which reminded me of a few things:
http://www.speedpedal.com.au/cms/A_108424/title_Steering-Angles-/article.html

The "steering inclination angle" for scrub radius is indeed pointing at the center*line* of the tire, but not the contact patch itself. I still need to have caster (trail) so it needs to point ahead of the contact patch. ;)

I also came up with a couple of possible ways to add the motors to the front wheels, but I am thinking I might want to have shiftable gears, at least two of them, since I end up in stop-and-go traffic often enough to make the power usage horrible, since it will use a lot more current at slower speeds if it's geared high enough for 20MPH.

Apologies for the incoherence of the sketches; I did them while eating dinner since I had the ideas in the middle of that. So they're not pretty. Later they'll be translated into Sketchup if worthwhile.

One issue I have is that i need to get about 5:1 gearing if I use only 24V to drive each motor, because they were originally designed to drive a 10" wheel at 8MPH. To get a 20" wheel up to 20MPH, I need 5 times the output RPM from the motor. On CrazyBike2, that's partly acheived by running it at 36V (now 48V), and partly by the bike drivetrain. Plus, the motor on there runs about 200RPM at 24V IIRC, and these only run about 135RPM or less. So it is a challenge either way, if I use a series wiring setup as the electrical equivalent to a "differential".

One of the ideas uses rear triangles on the front, with the old style one-piece cranks for the triple, and a 5-speed cassette on the back. Only the back gets a derailer, because the triple isn't used for shifting, just as a jackshaft. The left side triangle keeps it's triple. Only a single large ring will be used on the right side's triangle instead of a triple, with a granny ring welded on to the left end of the shaft.
Trike Motor Mounts Uisng Rear Triangles.JPG
The motor would bolt to a bracket fixed to the triangle in a way that leaves it below the chainstays (for COG reasons) and on the "inside" of whichever side it's on. On the left side wheel it's on the right side of the stays, so that the chainring mounted on the axle hub will be lined up with the granny ring of the triple. The right side wheel will have the motor on the left side of the stays, running to the welded-on granny. The large ring of either side will run to the wheel, shiftable to each of the cassette rings by the derailer. Both derailers would be operated at the same time, by a ganged shifter setup.

Has to be a ganged setup so I can properly adjust each derailer for shifting, while still shifting at as close to the same time as possible. Will also have to shift while not under load, cutting throttle way back during the shift, so that I don't end up being pulled back and forth on the road by the difference in speed while one wheel is shifted but the other is not.


I fully expect this to be too complex to pull off well, so an alternative is to use the regular front fork, and set up the wheelchair motors themselves as if they were the bottom bracket with two rings and a front derailer. This would require putting the U of the fork in front of the wheel instead of behind, and might require putting the righthand motor on the outside of the wheel, which I don't want to do.
Trike Motor Mounts Using triple on motor.JPG

Now, I know the reports on the internally-geared hubs under motor power aren't good, but if I used one for each wheel, and ensured no shifting under load and no sudden starts, I might get away with using them. This would make it a LOT simpler to use these wheelchair motors and gearboxes to drive the front wheels. Ganging their shifters would present the only real challenge. Besides actually acquiring two identical ones as part of scrapped bikes, that is. ;)


If I don't use a shiftable transmission, then I can go with a simple chain and ring, but I will probably have to use a two-stage to do it, due to the large ratio required, with the largest ring on the motor, and the smallest on the wheel, with an intermediate jackshaft making the second stage. I could do a 48 to 21 first stage, and another 48 to 21 second stage. Alternately, a 48 to 16 first stage, and 34 or 32 to 16 second stage, to keep stuff a little smaller with a little less chain weight.


Any way I do it, I will need to widen the U forks to accomodate a regular freewheeling cassette, even if I only use one of the rings on it, with no shifter.

The original thought before i realized the ratio needed was just to use a belt and pulleys:
Trike Motor Mounts Using belt.JPG

The tank style steering:
Trike Steering.JPG

More later as I think of it.
 
Good to see some progress mate, i have a spare 'shockie' its not an actual
shock absorber just one of them springs seen on cheap MTB bikes will send it
with the Meter for you if you haven't found one before hand.

KiM
 
Wierd--I didn't get a notification there'd been any replies to this thread. :(

Anyhow, sure, I can use any shocks/springs/etc, that you can think of. Gas struts/springs too, since weak ones can be used as steering dampers, and good ones can be used as bigger shocks/dampers.


A few more ideas for the trike's drive:

spinningmagnets is looking out for internally-geared hubs, which would greatly simplify the switching-gears on the front wheels, and ought to be able to take the nominally 300-350W per wheel I would be putting thru them, as long as I set it up to cut power during shifting.

So I will probably build the front setups simply using regular rear hubs on both front wheels, and any mulit-gear drivetrain I come up with for temporary use will be easily removable. I still need a ratio change of around 1:5 to get the 20MPH top speed, from the gearbox output that's intended to directly drive wheels half the size of the ones I'm using for 8MPH.

I have been pondering a way to swap the gears in the gearboxes so that they output closer to what I want to start with. I cannot remember exactly what ratios they are inside for which parts, but basically the main reduction is from the motor shaft's helical gear to the first right-angle gear in the box. Then that has another gear on the same shaft that meshes with the output gear, which is on a lever-type clutch to disengage the gearbox for manually pushing the wheelchairs these came from. I'm pretty sure that the last two gears are different sizes, with the larger of the two on the output shaft.

If the shaft diameters are the same between the output shaft and the first shaft, I can swap the gears so the larger one is on the first shaft, which will give me some amount of anti-reduction (gain?) within the gearbox itself. If they're not the same ID but I have or can make a collar adapter for the difference, I can still use the gears swapped; just have to lathe out the smaller one to fit.

Then I have just that much less anti-reduction to do from the gearbox to the wheels. If the gears are the same OD/teeth or the larger is already on the first shaft, I'll have to do all the work outside the gearbox.


I've also considered taking the motors off the gearboxes and affixing a timing-type pulley directly to the motor shaft but this would require creating a drive-end plate for the motor that supported the shaft, as right now that bearing is part of the gearbox. This is not that trivial a matter to do, for me.

I would then need a much larger pulley on the wheel itself. I can't recall offhand the motor RPM, but somewhere in the 3000 range, I think. That would be a ratio of about 9:1. The smallest belt pulley I have around here is for a V-groove, and it's around 1.5". So I'd need a 13.5" diameter pulley on the wheel!

I can't recall the way to figure minimum number of teeth I'd need engaged for a timing pulley, but I suspect it'd be at least an inch or two in diameter.

Can't really use chain; at 3000RPM at the motor end that would be a helluva noise.


Basically, at 9:1 reduction, compared to 1:5 anti-reduction, I'm better off sticking with the gearboxes and using bike chain/sprockets for output shaft to wheel transmission. It's not as "efficient" as less stages of changing ratios around would be, and it's heavier, but it is a lot easier to do, with less stuff I have to build from scratch to make it work.


Now, one problem I have is that for the right side wheel, to get power from the motor to the wheel, I need the motor on the right side of the wheel, just like it will be on the left side wheel. But that would be problematic for reasons of safety, clearance, and keeping the motor itself safe from damage. So the motor must go on the left side of the right side wheel.

That leaves the issue of how to get power to it. To use a regular bike hub for it isn't that big a deal, as I can just bolt a sprocket (or weld it) to the left side of the hub. But I will want to use the internally-geared hubs for this later, and those will need the sprocket on the right side of the hub. Meaning I have to get power around the wheel somehow.

Thus, I will probably end up using an extra hub at the rear of the fork, to act as a jackshaft and pass motor power thru to the other side of the wheel. I can simply use a front hub since I don't need to put any freewheels on there, or spoke a wheel to it, and just bolt the sprockets on thru drilled-out spoke holes if they line up right. An adapter plate if they don't. Or weld them on, one on each end.

I just weld on some little dropout tabs to the fork near the U end of it, just clear of the wheel.


For the fork itself, I'm going to need to take some 24" or 26" U-forks, and cut them in half at the stem end. Then weld a tube across there to space them far enough apart for a rear hub to fit in the dropouts up front. But since the internally-geared hubs need dropouts that are slotted to fit them, and I will need enough dropout length to use to adjust chain tension (no derailers), I'll need to remove the original dropouts and put on some from scratch or from BMX bike frames.

Alternately, I can just build the forks from scratch, which would simplify making them significantly, and give me control over every part of their design, as well as make them the same for each side, mirrored. (well, mostly)


Another thing I've been pondering, and that is which way to make the forks--vertical or horizontal.

Horizontal will keep more weight down low, which is very good for a trike. But it means the motor mounted on there will have to have it's weight swung back and forth on the pivot every time I turn, which will act as a pendulum weight and make steering a tad more difficult--it will tend to resist starting to change the wheels direction, and resist stopping that change, too.

Vertical will essentially fix the latter, but will place at least a little more weight up higher. I can still mount the motor itself so that it is centered about the axle, and that will keep most of it's weight low, but the fork will still be higher up and that weight will be above the centerline, giving the trike just that much more susceptibility to tipping in turns, especially if I use the kingpins/pivots up at the top end of the forks.

If I mount the motor vertically on a horizontal fork, it will end up as the best compromise, but it will interfere with the steering pivots and kingpins, unless I move it farther forward, and then the pendulum problem reappears.

Probably I will go with the horizontal fork, and change it if it doesn't work out right.


I've been going back to my old trike research and rereading info I found then but didn't apparently fully comprehend at the time. Now I have seen enough stuff in action and worked with various things in steering, and I understand them better. I think if I had built a trike before, unless I had simply copied someone else's design, I would have ended up with an unsafe or unrideable trike. :( Now I think I know enough to make a passable first shot at it. ;)


I am certain that I got lucky with CrazyBike2, in that it's configuration ended up working fantastically well for something so randomly chosen at each point in the process. I'm fairly good at the by-guess-and-by-gosh process, but it doesn't always work. :roll: The trike needs more thought put into it, and more choices of parts based on design rather than just whatever I have laying around. That said, I think I have a handle on it, and might be able to start building it in a month or so. Less if I'm lucky enough to figure the rest of the design out sooner.
 
amberwolf said:
That said, I think I have a handle on it, and might be able to start building it in a month or so. Less if I'm lucky enough to figure the rest of the design out sooner.

Good to hear that, i have held off sending the box of goodies as i figured why send too parcels (another when the Turnigy gets here) So i ripped open the box, have added the "shock" to the box (also a scooter throttle not sure if i mentioned this?) the meter SHOULD be here mid week its left HobbyCity last Wednesday, when that turns up the WattsUp can be added to the box of goodies and sent all in one hit... Thus far we have

3 cable pull disk brake callipers
2 6in rotors
1 ~4in rotor
1 throttle
1 dual pull brake lever
2 EXTRA LONG brake cables
1 shockie (spring)
1 WattsUp (to be added)

I think that was it...? Will PM you when the meter arrives and give you the tracking number for the parcel to mate..

KiM
 
I think you'd mentioned a cd, too.

That winning unclaimed lottery ticket could be helpful. :p

Did I mention how much I appreciate this? :)
 
Oh Yes!!! SketchUP Pro...ill top the dvd off additional software you might find useful, seems a waste of 15cents not filing up a DVD hehe

KiM

EDIT:

DVD Burnt Programs added

Capture.JPG

Few 3D appz plus pic/Video Editing software along with CNC software for whenz you need it :mrgreen:
 
Responding to another thread I had some more thoughts about the trike:

It will be only as wide as a wheelchair, if I can manage it, so that I can both fit it thru the house door and so that I can pass between anti-car posts that are across the entrances to many bike trails and paths.

The narrow track width will increase the problems with sharp turns, but there is another solution to that, besides increasing track width.

Since I will have cargo pods on the sides of the rear wheel anyway, which themselves will stick out to the same width as the front wheels, I can simply bolt on some large casters to the bottom rear corners of the pods in such a way that if the trike should tip during a turn, the caster on the opposite corner would help prevent flipping over, as it would touch the ground first and roll along, instead of having the cargo pod touch and catch and drag.

If the caster is spring loaded so that it's default direction is canted trailing back towards the rear of the trike's centerline, it will already be in position to catch ground and roll rather than drag, in most situations a tip might occur.

Since neither caster would ride on the ground unless one of the front wheels was no longer on the ground, it also would not violate the AZ law specifying that a bicycle can only have at most three wheels in contact with the ground (worded in such a way as to allow training wheels and such, I imagine).
ARTOO anti-tip casters 2.png


Any trike without cargo pods back there could simply have arms bolted or welded to the rear triangle to do the same thing--put casters out there at the opposite diagonal positions to the front wheels. Theoretically a good anti-tipping mechanism, as long as the casters' diameter is large enough.
View attachment 1
 

Attachments

  • ARTOO  anti tip poles 1.png
    ARTOO anti tip poles 1.png
    24 KB · Views: 6,191
Seeing your building this from scrath why not incorporate a tilting design into the front two wheels? this would negate the need for rear castor wheels entirely along with making a heap of people jealous of your tilting taddy trike LoL..

KiM
 
It's definitely one of the things I'd like to do, and something I've considered. But I am not sure yet that I can design it to work properly yet--I am not even sure I can design a working trike suspension system that will safely steer, too. ;)

Did you notice those little Razor headstocks (in green in the Sketchup stuff)? They are intended to be pivot points for whatever use I can find there. That might just be suspension or rideheight adjustment with some gas struts I have, or it might be tilting trike if i can figure out how to make it actually work.

One complication with tilting is that I can't put the cargo pods as low to the ground, or they'll strike during turns (just as they do with CrazyBike2), unless I use beveled bottoms that downslope toward the center (like a boat bottom).
 
There was a pommie guy building a tilting tad poll trike around the time i started the cruiser, i dont recal his name, he had a very clever tilting mechanism though you might want too check it, i think if you search around the 10th page of my worklog you will find the guy im talking about, havent heard a peep out of him for a while and i forget the title of his thread sorry...

KiM
 
Not sure if this is the one (couldn't find the reference in your thread even several pages up or down from 10):
http://www.endless-sphere.com/forums/viewtopic.php?f=6&t=12572&hilit=tilt+trike
by Paul.............D

If so, there's a point at which he emailed you a copy of the pic but didn't post it to the thread.

Also in Paul's thread, Carv'n Marv'n posted a link to a thread in the AEVA forum that I suppose was supposed to have pics of his design, but they're not there anymore, just some blank posts and stuff.

I posted what I *thought* he intended:
amberwolf said:
"If I understand correctly all Paul will have to do is shift weight over to one side (or grab and pull tilting poles that pull the center frame to an angle on it's roll axis), which will make the wishbones pull the wheels at angles along *their* roll axis parallel to the frame, which will steer it. The third wheel (front or rear) will, if not on a separate part of the frame with a roll-axis bearing joining it to the main frame (like the flevo), tilt with the main frame.

Depending on caster/camber and other angles of the suspension, tilting the wheels will also rotate them a bit about their yaw axis, actually pointing them in the direction of the turn (in the case of a tadpole design) or away from the direction of the turn (in the case of a delta design)."
but Paul never replied to say if that was right or not.

I also turned up this thread:
http://www.endless-sphere.com/forums/viewtopic.php?f=2&t=11271
to browse thru.
 
YUP thats the one...and yes Simon (CarvinMarvin) has removed all pics of his design, he is
attmepting to have it mass produced so is keeping the details quiet now.

Best PM Paul D and see if he can send through the diagrams, i havent got them anymore and dont recall the exact method he was using other than it was seas simple...

KiM
 
Will do. :)


On transmission thoughts, I think that at least for now I will setup a system to switch the motors from series to parallel depending on A) speed and B) steering. It is far easier to do this than to mechanically deal with huge reductions and shiftable drivetrains (other than an internally geared hub).

So series wired for startups and slower speeds. Once past a certain speed, will switch automatically to parallel, and not drop back to series until a couple MPH slower than that setpoint. The hysteresis will prevent the switching system from chattering and blowing stuff up. :)

I will need to learn to drop the throttle when the shift occurs, so I don't end up with sudden bursts of speed. I will probably put a light and maybe a beeper on there to alert me to an imminent shift, maybe 1/2 second before it happens, which should be enough to react to until I get a feel for it.

Since the main reason I wanted series motors was so that I could get an electronic differential for turns, it means that turning would need to be done at slower speeds in order to get that differential. For gradual curves it may not matter; have to test that. For sharper turns, such as from a N-S road onto an E-W one, I will probably need that differential.


Hmm....maybe a much better idea would be to build up the second 2QD and tweak them both to run identically when matched with their own motors, then use separate controllers with one throttle, compensated for an electronic differential by having a steering sensor that changes the proportions of left vs right motor throttle. It'd be more electrically complex, but also simpler in a number of other ways. It also leaves me with redundant controllers as well as motors and drivetrains, which is a nice feature.

I think I already have all the parts for a second one, including another metal enclosure (from an old external harddisk) similar to the Jensen inverter case I am installing the first one into.

This also means I can leave the Curtis on the CrazyBike2's motor, to which it is more suited (given that motor's short-term power capability).


I could not sleep last night (again, it's a common problem) so in between dozing just long enough to know I dozed as my head hit the keyboard, I looked up tilt-steering (leaning) trikes, all over the web.

I found a little information here on ES, which eventually got me links to links to links to a place called Jetrike, an open-source recumbent bike / trike project. The creator of it has plans and construction notes for a bike and a couple of tested trikes there, and some of the stuff looks very interesting. The most interesting part is that he has run simulations for the designs to see what would "really happen" before actually building anything. And has data tables and stuff for a few critical types of dimensions and how to work them out for a particular design. The trikes are deltas, but he started on a tadpole according to his pages there. I'd be super-interested in seeing what he comes up with.

However, the link to that project is broken, and there are no updates to the site that I could find since late-ish 2007. There is also a discussion link, but skimming thru it's archives I don't see any indication that he has proceeded with that project at all, which is very disappointing, as he did good work on the previous versions, and has hard data on why some things should or shouldn't be done, and how they might be improved to fix problems reported with various ways of building trikes (including fixes for rear-steering trikes, which are notoriously unstable and potentially very dangerous, due to flaws in layout of the tested versions, apparently).

Anyhow, I have many more ideas on a tilting trike, but I am still not confident at all that I could design something around that concept and make it work safely and reliably. Not with the stuff I just happen to have laying around, anyway.

There are others around as well, and many images and a few clear videos of some in action. I may be able to learn enough to actually design one of my own, though first I need to learn enough about the math involved to grasp the solutions in my head so I can come up with stuff without having to actually sit down and do all that math (at which I really suck).


I think I need to just build the thing first and get experience with a trike, then start working out version two that will have more features on it, probably including tilting.

I might even go ahead and build a pedal-only trike first, just so I can get that part working, and get a feel for ergonomics of the design based around my riding, and THEN work out a replacement for the front wheels/forks that lets me use the motors on there. I've been putting off this trike thing for so long because I didn't have this or that or a way to figure such and such out, etc., and I am really wanting to just get it STARTED!
 
Well, life, work, and some injuries and illness have kept me from doing much on the trike for a bit, but have still been pondering things in the back of my head.

In the meantime, Spinningmagnets has sent me three internally-geared hubs rescued from the dump to pick thru for the two I need for the front wheels, and forward on the one I don't use to Enoob.

There are also some interesting reflectors, made in Germany.
DSC02499.JPG

Two of the hubs appear to be old Sachs 3-speed Torpedo Dregangs, stamped 36 (for 36-hole).
EDIT: Some info threads I found about it, including this one with a reply from Sheldon Brown:
http://www.cyclingforums.com/rec-bicycles-tech-archive/42375-sachs-tornado-3-speed-hub-repair-advice-needed.html
some service manuals:
http://vancruisers.ca/tech/manuals/sram-sachs-f-s-service-manuals
This page: http://yarchive.net/bike/torpedo_hubs.html describes the black-shiftered units I have here as potentially unusable for power applications, but I'll have to open them up to see if the parts it notes are the good kind or the bad kind. Apparently if the shifter is red or blue they're known to be good.

DSC02500.JPG
DSC02505.JPG
which also have brake arms attached, so they have coaster type brakes inside.

They have the shifters still attached.
DSC02501.JPG
Both seem to function normally, and seem to be well-oiled.


One I haven't found the manufacturer of yet, but are only marked "333", Three Speed Hub F, and a USA Patent number.
EDIT: Apparently this is an old Shimano hub, according to Sheldon Brown's site. http://sheldonbrown.com/shimano333.html Indications are it might not be usable for motor power.
Found a flickr page that shows it mounted on a bike, so a shifter can be fixed up for it http://www.flickr.com/photos/34767893@N08/4224210109/in/set-72157613466850918/

View attachment 3
View attachment 2
It was dried out inside from the feel of it, and kind of gritty-feeling when rotated, so it'll need to be opened up and checked out, then relubricated before using it in anything.

It has a little problem with the shifter input, with a crack in the chromed metal, but still functions. That crack may not ever keep it from functioning, but a hose clamp around it would probably prevent further issues.
DSC02504.JPG

The only potential issue I see with the Sachs hubs is that due to the coaster brake mechanism on the left side, the hub shell is completely open on that end for rotation, so there is nothing except the spoke flange to affix a disc brake rotor adapter to. Because of the size of the flange, that'd mean completely boring out the rotor itself, which might not be possible depending on how it's designed (due to most of them having large amounts of material already removed for lightening them up).

I might be able to use some old 5.25" harddisk platters, though, bored out in the center and then mounted on an adapter ring that's fixed to the spoke flange. Probably just have to remove the media surface first, for better braking (otherwise it's an awfully smooth surface).


There is another internally geared hub on it's way, due here Wed or so, from Ejonness, don't have any details on it yet. Probably similar to the above.
 
The other hub arrived, and is also a Shimano 333 hub but is in better shape than the one above.
DSC02507.JPG
View attachment 1
DSC02509.JPG
Probably this one would be better to forward on to enoob than the other one, as I think it's in better shape, but I need to take them all apart, clean and relube them, and test them first. No point in sending on stuff that's not gonna work. :)

At a bike swap meet, I also found--along with a junkbox of stuff (see the DGA Mk II thread for pics of all that)--this Sturmey Archer 3 speed AW hub, and it's shifter and handlebars just like the ones on my CrazyBike2:
sa 3 speed hub.JPG
Seems to be in ok shape, from 1978 if the 78 stamp on it is a year.
 
Amberwolf,

Starting to build a nice collection of 3 speeds there... :)

It appears that SHimano has kept up with the pushrod shifter design, whereas SA has
kept the pull rod/chain design over the years.

How does the SACHs shift?
 
12p3phPMDC said:
Starting to build a nice collection of 3 speeds there... :)
From never having even touched one in my life to having five in my hand within two weeks...yeah. :) Hopefully at least two of them are useful for the trike's front wheels. I think the SA is probably good, and the Sachs seem to be, too, at first check. The second Shimano probably is, but the first one has that crack in the shifter.

I'd like to use a third one that doesn't have to work the same in the rear wheel, too, so I can have three times as many gears for pedalling when I need it, which will probably happen a lot during the first experimental stages, at least. ;)

Once I am sure I have at least two that work, I can send along a good one to enoob for his experiments.

Also, I am considering using one for some experiments regarding the "IVT" based on a planetary system with two motor inputs, and output on the planet carrier.

It appears that SHimano has kept up with the pushrod shifter design, whereas SA has
kept the pull rod/chain design over the years.
Yeah, it's interesting that they are different. I think I like the pushrod better, because I could rig a shifter for it easier. Well, maybe. I only have the SA / Sachs type shifters, but perhaps they will work (in reverse) on the Shimano.

How does the SACHs shift?
Appears to be *exactly* the same as the SA. I suspect one of them duplicated the other, though I don't know which company made theirs first. Maybe both copied someone else. :)
 
Ahhh......planetary goodness!! :mrgreen:

I suspect if you lock out the freewheels like the S3X, then coupling a CVT and 3 speed together may produce some interesting results....
 
Well, I don't have a CVT (and using the 3speed as an IVT won't make it one), so that's something I can't really try.

But if one of the 3speeds will work as an IVT, with one motor input on sun (axle), one on ring (hub), then the planet carrier when in 1:1 should give me a variable-speed output based on the difference in speeds between the two always-fast-spinning motors.

Then I can convert speed to torque via another method after this if I have to.
 
Normally, yes, however this IVT doesn't work like a normal CVT, which converts speed to torque or torque to speed--all it does is take the difference in speed between the two motors and output that, at the same torque level that is input to it.

So that's why I'm not calling it a CVT. Maybe it shouldn't even be called an IVT. :) If early computers had not already used this name, I would call it a "difference engine". ;)
 
Back
Top