Build help for a newbie

yenemy

100 µW
Joined
Nov 10, 2023
Messages
8
Location
San Diego, California
I am trying to install a grin GMAC rear hub kit onto my Trek multitrack 750 bike. Being a complete novice to bicycle maintenance and/or repair of any kind, I should probably have chosen something simpler, but I'm looking forward to getting to grips with this. Hopefully I'm asking this in the right forum!

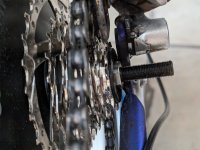
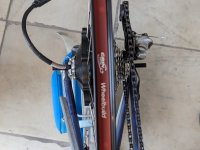
I'm doing some test fitting of pieces together, and it appears that the rear hub + cassette don't quite fit into my rear dropouts (pictures attached). This is a 7-speed cassette, which matches the rear wheel the hub is replacing. I'm wondering what I can do to remedy this... do I just need a smaller cassette?

I have been googling around, but can't seem to find specs for my frame; rough measurements (I only have a tape measure in inches) indicates the internal rear dropout width is about 140mm.

Really hoping I haven't screwed myself here, thank you in advance for any help and advice!
 

Attachments

  • PXL_20231111_000429193.MP.jpg
    PXL_20231111_000429193.MP.jpg
    3.7 MB · Views: 20
  • PXL_20231111_000424093.jpg
    PXL_20231111_000424093.jpg
    1.8 MB · Views: 20
For that ~1-2mm-ish amount, you could slightly spread your dropouts, keeping in mind that while steel frames are very forgiving of this, aluminum ones are less so, if you need much more than this amount

Spreading them also makes the dropout faces non-parallel, so there is then some bending load on their connection to the frame once you tighten down all the axle hardware.

But...it will probably be fine for this small amount.

Make sure you follow the motor installation manual's procedure for installing the torque arm and securing it to your frame; it's very important. ;)

Also, be careful with the motor cable so it stays completely within the dropout space and doesn't get smushed up by the frame or edge of the dropouts, and isn't tightly bent to route it up to the frame for tie-down.


Be aware the GMAC (and most other geared hubs) is kinda noisy the faster it spins.

Which controller / etc are you running it with?
Hi! Yes it's a steel frame, so I guess spreading the dropouts could work. I'll try to look up the best/safest way to do that... I have some reversible trigger clamps that might do the trick.

I was trying to test fit the torque arm assembly, which was how I discovered this 😂 if I need another 1-2mm to fit the torque arm as well, would I be better served by having one or two fewer gears in the cassette? I'm in this for the long haul so if I need to change shifters etc too, then so be it 😁

I'm using it with Grin's Baserunner controller!
 
Hi! Yes it's a steel frame, so I guess spreading the dropouts could work. I'll try to look up the best/safest way to do that... I have some reversible trigger clamps that might do the trick.
The "best" way I know of (short of building or buying a dropout alignment fixture) is using an threaded rod with washer stack and nuts on the inboard sides of the dropouts, turning the nuts to push the dropouts apart somewhat past the point you need them to be at when done, as the steel will bend back as you release the pressure from the nuts.


I was trying to test fit the torque arm assembly, which was how I discovered this if I need another 1-2mm to fit the torque arm as well, would I be better served by having one or two fewer gears in the cassette? I'm in this for the long haul so if I need to change shifters etc too, then so be it

Less gears in the cassette won't really help much, because you still have the nut/spacer out past the cassette itself, and you have the cassette locknut/sprocket, neither of which are optional. ;)


I'm using it with Grin's Baserunner controller!

That should work fine with it (I have one I paired with the Phaserunner). Once it's setup correctly for the GMAC it runs it pretty nicely.

ONce connected to the motor and battery, and turned on, connect the USB-serial cable to your computer and start the Phaserummer Setup Suite and pick the right com port, it should autodetect the BR.

Choose the proper profile for the GMAC winding version you have and the controller version you have, then run the autotune. If that comes up with no errors, then change all the battery parameters to match yours for full and empty, etc, then you can change the throttle settings to match your actual throttle voltage ranges (if they don't already). Then Save Parameters to write all that to the controlller, and slowly move the throttle up with motor offground to verify it's working. If it is, then use the flie menus to save all of this to a local file on your computer, choosing to save all settings, so you can restore them later if you need to.

The throttle doesn't control speed, it controls torque, so very little throttle will spin the wheel full speed when offground.

For battery full, use the real full value. For empty, use higher than the BMS LVC to minimize stress on the battery.
 
would I be better served by having one or two fewer gears in the cassette?
AFAIK all the cassettes are the same width - the spacing between sprockets is changed to accommodate, but I'll admit I'm not knowledegeable about 7 speed. Is it a cassette on a freehub or a freewheel that is threaded on to the hub? No, wait - the GMAC will not accept a thread-on freewheel.

Regardless, the GMAC is about 137-138mm, which matches your reported 140 measurement. With respect to spreading the dropouts, you may find you don't need to make a permanent bend - just hold the dropouts apart when putting the hub in. I expect you won't have great difficulty doing this.

I would try this rather than attempting a permanent bend. I don't expect you need to and you can avoid making a permanent mistake in the process of trying to make a permanent bend. Let us know how that goes.
 
Hi! Yes it's a steel frame, so I guess spreading the dropouts could work. I'll try to look up the best/safest way to do that... I have some reversible trigger clamps that might do the trick.
In case you need to more permanently spread the rear dropouts:

 
Thank you all for the advice! I'll be trying the RJ method with a threaded rod and nuts, once I can get out to the hardware store for some parts. I tried just spreading the dropouts by hand but couldn't get the job done comfortably. Will update once I've given it a shot!
 
Be aware of the possibility that the small gear on the cassette will rub on the frame after you spread the frame and install the wheel. To remedy this, I install a "half-washer" (usually used to accommodate the lawyer lips on front installations, but ground flat) between the rear cassette and the dropout.
 
Be aware of the possibility that the small gear on the cassette will rub on the frame after you spread the frame and install the wheel. To remedy this, I install a "half-washer" (usually used to accommodate the lawyer lips on front installations, but ground flat) between the rear cassette and the dropout.
Oh wow, thank you! I was just puzzling about the possibility of this because the angle of the frame seemed like it would touch both on the cassette and the torque arm sides when I was eyeballing it. I'll look for half-washers!
 
Okay, so I'm a little puzzled as to how to continue here. After doing a LOT of measuring, it really does seem like I only needed an extra 2-3mm or so. I gave it a go with RJ's method from Youtube, and that seemed to do the trick; I am sitting at around 138mm between the dropouts, from 135mm initially. But now I see that the torque arm "wing" is touching the arm of the non-drive-side dropout (1st pic), and preventing the wheel from dropping in even though it looks like I have enough clearance on the drive side (2nd pic). I'm going to ask Grin about this too, but any ideas?

I tried looking for "half-washers" that 2old mentioned, but I can't find anything that looks suitable with that search phrase. And that would mean I'd want to widen the dropouts a little bit more -- however thick the washers are, right?

1700085875766.png1700085932470.png
 
Will the arm still reach the mounting "T" that clamps to the frame, if you install the arm one key "down" rotated from where it is now? Or simply rotate the axle "down" to do the same thing, until the arm clears the frame?

If it wont' reach, if you can make a small connecting bar that is stiff enough, you can put this bar between the arm and the T that clamps to the frame, and bolt those together, that should do the same job. Or make a new T that is longer to reach down to the arm.


The washers are usually called C washers, which Ebikes.ca and many other places carry; it's open on one side to clear cabling coming out of axles. If you don't need ti to clear cabling, you can use a regular washer, but if your spacing was like mine on SB Cruiser you probably need the opening. I just used vise-grips to hold a regular flatwasher and an angle grinder to cut out one side, and filed all the sharp edges down afterward.

1700087738372.png
 
Last edited:
But now I see that the torque arm "wing" is touching the arm of the non-drive-side dropout (1st pic), and preventing the wheel from dropping in...
Is this the interference point you are talking about?

1700085875766.png
 
Yeah, you all were right; after I spread the dropouts out to 138mm, I just needed to spread everything and jiggle it about a bit and the wheel slid nicely into place. The gears and torque arm juuuust clear the dropouts. I'm just overthinking things. Thank you all!
 
Back
Top