E-S Greyborg owners' pics

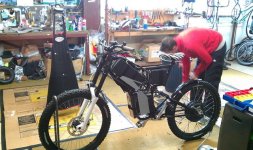
Hello Gborgs, here is my bike close to be finished,
very soon I will give you some more infos.
Most interesting stuff I guess is about batteries so I'll give to you that now:
I run a Cell_man setup
I produced dozens of cardboard boxes simulating battery sizes in A123 flavor,
when finally happy I placed my order to Cell_man for first pack to go in the upper part:
(24S4pbattery split A+B pack ,315x140x55mm each of 2 bricks),
then a different one after few weeks to go in the bottom and rear part :
(24S4pbattery split A+B pack ,160x140x110mm each of 2 bricks)
A total of 192 A123 cells, 79.2 volts 9.2Ah per pack, each managed by a 24S BMS making
79.2volts 18.4 ah.
Packs in this fancy sizes have been finalized with just a layer of foam and heat shrink,
Cell_man, a very serious trader i would recommend, required guarantee I was taking care of producing mechanically safe enclosures hosting his packs.
He also charged an extra for the custom size of both packs but I didn't mind that, he helped me a lot to make my dreambike come true, he gave me so many options trying to answer my requirements and then we ended up with the first thing he suggested.
Packs (A+B7.5kgs each) where perfectly boxed and foamed for freight,
high quality finishing in details and came to New Zealand with no issues.
I had to do some planned modify on frame and gain few millimeters here and there to host this two packs, but this was my best option after weeks of pondering.
Frame has been re-coated after welding a new designed slim in-frame support,
made to preserve the structural function of the original one.

God bless you all, ES was my Bible to build my project, thanks specially to Hal, Accountant , Cell_man,
and of course Kiwi, without him I was lost.
 

Attachments

  • PICT0906.JPG
    PICT0906.JPG
    57.8 KB · Views: 4,784
  • stage 2.JPG
    stage 2.JPG
    123.4 KB · Views: 4,784
  • IMG_1361.JPG
    IMG_1361.JPG
    97.4 KB · Views: 4,784
Hello again,
I am actually experiencing some weirdness with this new Cromotor set up (bike was running smooth since I had the 9C 2808).
I am sending 80V limited at 60A on the CA for now.
I believe I found the good combo between Crystalllyte (18 FET) and the Greyborg motor, but for some reason bike is very pulsy at either low and high speed.
Also with the wheel lifted up the hub noise is not smooth at all...

...any tips? What could possibly be wrong?
Thanks
cicada
 
Hi,

Re-Cicada's bike, no, its not the CA, or the throttle.
Still might be a hall issue yet.
Heres a pic of his bike
IMAG0450.jpg

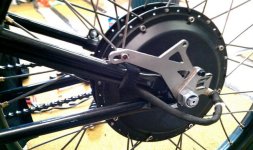
The new torque arm is available, from 5mm Stainless steel, to fit all motors, with double up to 10mm on the axle.
I may design a disk brake for it if I get 5+ people asking me.
The new adapters are $60USD delivered.
IMAG0451.jpg
 
Alan B said:
Very nice Kiwi.

I'll take an adapter and disc if it will fit my motor. I have one from the previous batch. How will the disc fit the motor and clear the frame?


Maybe make a bigger disk like 350mm and bolt it to the motor perimeter using the the bolts that hold the motor cover.
 
Yep Gensem, big disk on perimeter was the original plan for what I know.
I wouldn't dislike the regen braking too much if it was associated with some kind of ABS,
we know how fast the wheel spin from the hall sensors and from the CA, we could cross the data with the bike speed... we have all the information needed , what are the engineers doing?!!! :D
 
from my measurements a can do a 280mm disk. It will have its own adapter plate that bolts to the 6 disk mounting holes, (remove the greyborg one).
A adapter plate will fit to the current torque arm to move the calliper out to 280mm.
 
Kiwi said:
from my measurements a can do a 280mm disk. It will have its own adapter plate that bolts to the 6 disk mounting holes, (remove the greyborg one).
A adapter plate will fit to the current torque arm to move the calliper out to 280mm.

Excellent. I like that better than the perimeter disc which looks odd and places the disc too far away from the caliper mount. Even better might be do avoid the adapter and put the disc on the motor's flange. I don't see much room for the adapter or the disc will hit the swingarm.
 
yep, i thought about that. The adapter will be thin and actually cause the disk to sit closer to the motor to clear the frame.
Magic.
 
How are you guys painting the covers?

I went to a motorcycle painter and he asked me a fortune to paint the covers.
 
I was planning to use Krylon Fusion in a rattle can. Am open for suggestions, though I need to do it soon before my eyes sustain damage from the bright white. Looks like my camera is already having problems with it. :)

DSC_9779.JPG


Since this is the picture thread, did we want a 'before' photo?

DSC_7231.JPG


Anxiously awaiting the rear brake adapter. I had to brake on a 12% grade this morning, and then turn down the side street into work which has some gravel and this always sets off the ABS in my truck. Would be nice to have rear braking soon...
 
Looks like I wont be able to charge at my building garage, how are you guys fixing the side covers? Need ideas for quick removal.
 
Hi Gensem

I used rivnuts and machine screws, sturdy but not quick removal.

I am trying to place an external charging socket on the frame to preclude removing the panals but have not yet worked out a solution I am happy with :cry:

She's lookin' real good!
 
Thus far I've left off the lower right panel, and covered most of the area with coroplast and gaffer's tape, leaving a gap to tuck the charge cabling into:

DSC_5511.JPG


Here you can see the charging cables for the three 6S sections of the battery (18S 20AH). One section is being balance charged in this view.

For the final system I have been considering making a hole in the panel to accomodate a DB25 for all the balance lines, and a 6 pin PowerPole arranged 2x3 to bring out the three 6S bulk charging connections. This way I can balance charge each 6S section, or I can bulk charge each 6S section, or I can bulk charge the whole pack. I charge all three ways depending on the situation. I was planning to put a small door over the hole to keep out moisture and dirt when not charging or checking balance. It might be nice to have a key lock on that little door to insure it is secure and not flopping around. I have not worked out the details of this door, the current solution is working fine for the moment.

I made a pc board to adapt the DB25 to and from the JST-XH 7 pin connections so no custom cables are required. Methods has some double-female extensions that make this work nicely.

I would also note that the upper side covers can be held pretty securely with just two or three screws plus the lower section to tuck the bottom part into.
 
wow yea free samples look good - checking em out now. how many will they send you ? thanks for the tip.
looks like they want the part # and everythign your interested in
also does it include male/female on each part # ?

these look nice might really need to buy some.
 
Here's mine...............

HS3540 on 18s2p Lipo right now........was going to paint covers satin red, but changed my mind last mintue to flat black. Will probably repaint in red at some point over the winter.....

 
Thanks Alan! Have followed your build from the start. Looks nice and neat under the hood.

One of my side covers is screwed on with rivnuts. That is the panel facing the camera. The Key switch is on this panel, (on the underside, by the strap nearest the seat) The straps are 3M Double sided Velcro, they work really well. I now slide just them on them up/across and the cover comes off. These are the main reason I chose to paint it black, I could not find the velcro in red. I liked your idea of magnets, may try that.
 
Cicada said:
I think I will first try to attach canopies with some powerful magnetic clip (it's StEEL for Lord sake!!!Should work??!! :roll: ),
Rivnuts is for sure the most strong and elegant build solution so far. I'll go that way after failing with magnets.
Cheers

Just out of interest did you ever try the magnets? Anyone else have a good for an easy opening canopy?

Edit, just saw the velcro strap, might give that a try. Do you think one side needs to be rivnutted or will the velcro hold both sides on?
 
I am using velcro strap for the two upper side parts,
as you can see on this video rather than go around the entire body the Velcro stripes go in a fissure (like a coin slot) one per each side,
holding internally around the frame, and getting out the opposite fissure on the other side cover.

http://vimeo.com/51900545

They are centered, the offset you can see there is just because I left some extra length to pull the stripe on/off.

I have drilled 4 per side,
one in the top tube front part (the one in the video),
a second one on the top tube near the seat tube,
another one in the lower part close to the rear shock mount,
last one in the down tube upper part near the angle.

Work fantastic, it only takes 2 minutes to remove both side,
I can sit on it with all my 85kg and it doesn't even shift a bit,
my lady was sitting on the top tube to try the GB experience in tandem with me :shock: ,
and worked fantastic. :lol:

I have also added rubber sealing (off a car door) between frame and side covers, you need at least two of them to do both sides, they split upper and lower part in my case.
This helps to add strength to the entire thing and protect a little better what is underneath (MY PRRRRRRRRREEEEECIOUS) ,in case the bike drops, make the bike a little bit more splashproof, it worked for the upper parts and left side lower part.

Rubber seal DOESN"T work for the drive lower part where you need all the available space to mount it, I am actually sealing that piece with a different piece of rubber off a house window, can post more pictures if someone is interested.
I think I am going to do drill some fissures in the lower side covers as well at some point.

Just one tip if you decide to go this way: do not drill the fissures in correspondence of the frame battery supports (I did that :oops: )
because you can't hold on the frame with the velcro stripe anymore, maybe is just my high degree of stupidity, but I thought that worth to share this.
 

Attachments

  • cicada.JPG
    cicada.JPG
    83 KB · Views: 1,371
Back
Top