Hyper Explorer 29er

Barncat

1 kW
Joined
Oct 26, 2020
Messages
368
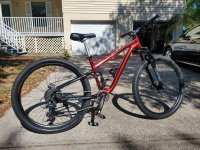
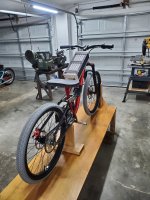
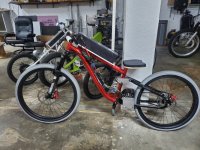
Picked this up the other day for 170 bucks. Another budget brand ride with actually a very good donor frame.

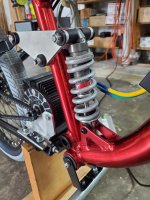
Nice TIGed aluminum front triangle with a stylish formed top tube and cool red anodizing. Steel 4-bar linkage rear suspension of my favorite design, and great to weld a motor mount to.

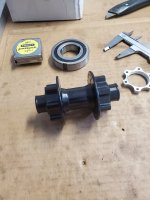
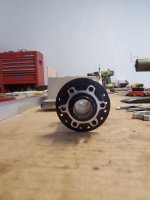
The 29" wheels and stretched layout make this bike tower over the rest in the stable. Hadn't ridden these large hoops before; they roll really well but would probably cost you a few tenths in spinning them up every time... decent disc brake wheels etc, but plan is to go 26" front, 24" rear to get gearing in range. Will likely need to build the rear wheel, and may try to turn a one-way sprag bearing into a freewheel- my White Whale of street performance power transmission. Instant engagement, silent coasting- which IMO yields a bit more range than regen in flat terrain.

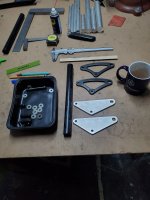
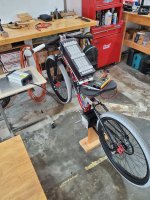
The fork is junk, but 1-1/8" headset, so easy fork swap to a lighter air unit. Nice alloy stem and bars. Will probably invert both on final assembly for a cafe bike look. Will find a better shock for back end.

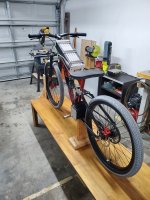
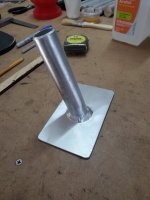
Seat tube will be lopped off for a padded platform as per my other bikes. Bicycle drive train, gone. Not that there's anything wrong with pedaling, did maybe 100k miles of that.

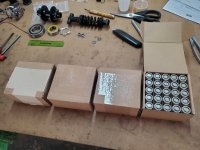
Layout will mimic the Blackcomb, with probably a 12090 outrunner motor, a Maker-x G300, and a new 20s5p p42a Barncat Battery with copper screws.
 

Attachments

  • 20230407_163924.jpg
    20230407_163924.jpg
    5.1 MB · Views: 67
A very rough mock up with 26" front and 24" rear wheels to check proportions. Adequate room in front of rear wheel on top of swingarm for a 5" diameter motor. 3" longer wheelbase than the Blackcomb so it'll be a tad slower handling but more stable also factoring in the relatively larger wheels. Any air fork swap will be nearly identical size to the heavy stock unit.

I found a dual disc front hub that may be adaptable for a custom rear wheel build with my sprag bearing concept.
 

Attachments

  • 20230409_123911.jpg
    20230409_123911.jpg
    2.3 MB · Views: 49
Yes, we'll see how this one goes... as you know I'm in a quandary re motor selection over on your 12070 thread. Though I have pretty much ruled out a qs165 since it won't fit on top of the swingarm in front of the tire, plus the 16lb weight and high price with shipping. I also want to maintain the resemblance to a bicycle in the event a cop is ever curious enough to pull me over. I ride all over the streets here on 4 bikes with thus far zero interference.

Another possibility is try the U15 or a 12090 with a different controller than the Flipsky 75200. You and apparently BV had expressed reservations about one facet of that design. I don't think my failure to get the top end tuned was entirely user error.

I did buy an oddball hub to experiment with the sprag bearing freewheel idea. Disc brake on the left, and I'd make a custom machined welded flange that bolts to right side to accept a 30*62mm CSK double keyed bearing. A 90T or so sprocket would then need to be modded to press onto the bearing.
 

Attachments

  • 20230412_104957.jpg
    20230412_104957.jpg
    1.6 MB · Views: 8
  • 20230412_105025.jpg
    20230412_105025.jpg
    924.3 KB · Views: 9
Last edited:
I found a motor that for me at this point is the best balance of weight, performance, and ease of control. The Electro&Co EC4P. They did a nice 11 minute youtube advert/ teardown of it. Would hyperlink if I knew how. Based on how far I can already push an MY1020 this would be at least 75% better, and a cinch to program in vesc-tool for a Flipsky 75200. So I'd pull that controller off the Blackcomb and put the U15 back on that bike to try with a different controller...

Anyhoo, gotta migrate north to take care of other matters for the summer... guess I better order stuff before Xi invades Taiwan............
 
Hey Spheroids- another project more or less done. Needs a few minor refinements as they all do in the course of test riding.

Tops out right around 50mph with my 15s5p Barncat battery. Next item up is to build a new 20s5p battery case- have the additional Molicel p42a's in hand. This will bring top end to just at or above 60mph design target. It's an EC4P motor with 11T/62T T8f sprockets and chain driving a 24 inch rear wheel. 26 inch front wheel with 203mm disc brake, 160mm disc on rear. Great braking and smooth stable handling. Flipsky 75200 controller running sensorless FOC.
 

Attachments

  • 20240121_120822.jpg
    20240121_120822.jpg
    1.8 MB · Views: 35
  • 20240121_120813.jpg
    20240121_120813.jpg
    1.9 MB · Views: 32
  • 20240121_120948.jpg
    20240121_120948.jpg
    3.9 MB · Views: 37
  • 20240121_121000.jpg
    20240121_121000.jpg
    4.9 MB · Views: 36
  • 20240121_121013.jpg
    20240121_121013.jpg
    3.1 MB · Views: 27
  • 20240121_121111.jpg
    20240121_121111.jpg
    4.7 MB · Views: 31
  • 20240121_121056.jpg
    20240121_121056.jpg
    4.1 MB · Views: 35
Last edited:
Since I have my lathe here now I spent some time improving the rear suspension pivots. Made new delrin bushings and swapped in stainless steel hex bolts with the correct amount of unthreaded shank, with nylock nuts, as opposed to barrel bolts that can come loose. The heavy worthless front fork was tossed for a new air fork.

Hardest part of the project was the motor mount plate. Left/right alignment and all slotted adjuster calculations must be perfect prior to TIG welding. I decided to make the motor move fore/aft rather than modify the dropouts. There is a chain adjuster bolt to keep motor from slipping.

Made 2 new aluminum shock pivot plates to leverage the shock a bit more and lift the back end slightly to add motor clearance. Also lighter than stock steel plates.

A section of electrical conduit and a bracket with wooden dowel function as footpegs, which will easily support my entire weight and also pivot backwards in the unlikely event of ever hitting some curb or something...

Cut off and modified the aluminum seat post to work with a padded seat platform.

Handlebar is a cheapo steel unit, ok for now, but didn't have enough sweep to be comfortable. Cut some thin wedges in each side without cutting all the way through and rewelded.

The rear sprocket is mounted on a Hornet high engagement 3 degree freewheel, a mod I've described elsewhere. Didn't get around to designing a sprag bearing freewheel, yet.
 

Attachments

  • 20240114_135231.jpg
    20240114_135231.jpg
    2.2 MB · Views: 10
  • 20240112_125309.jpg
    20240112_125309.jpg
    6.8 MB · Views: 8
  • 20240110_152504.jpg
    20240110_152504.jpg
    1.8 MB · Views: 8
  • 20231229_162346.jpg
    20231229_162346.jpg
    1.8 MB · Views: 8
  • 20231229_140953.jpg
    20231229_140953.jpg
    1.7 MB · Views: 7
  • 20231229_135005.jpg
    20231229_135005.jpg
    6.8 MB · Views: 7
  • 20231227_140102.jpg
    20231227_140102.jpg
    1.3 MB · Views: 10
  • 20231227_140025.jpg
    20231227_140025.jpg
    6.9 MB · Views: 10
Didn't take much riding to blow out the cheapo rear shock. Fortunately I anticipated this and had a vintage Fox unit on hand. Turned some new bushings on the lathe and now have a good quality lash-free rear suspension.

Unfortunately the brand new Chinese air fork seals also crapped out. They were seeping a bit of oil right out of the box, and it's not holding full air pressure either. Exchanging it hassle free in BezosLand, but still a pain... I have two of these forks on previous builds that are still fine.

Flipped the bars upside down. More comfortable. Coke bottle grip on left side, will swap the matching grip on throttle soon.

(100) brand new Molicel p42a ready for a 20s Barncat Battery. This bike already has a serious top end on 15s. I'm no stranger to high speed with all my motorcycle builds, but not having a clutch to instantly disengage the motor in an emergency is disconcerting. And ya gotta remember that drivers don't expect a "bicycle" to be doing 60mph.
 

Attachments

  • 20240127_120132.jpg
    20240127_120132.jpg
    1.8 MB · Views: 21
  • 20240127_120155.jpg
    20240127_120155.jpg
    4.3 MB · Views: 21
  • 20240127_120356.jpg
    20240127_120356.jpg
    3.7 MB · Views: 21
And ya gotta remember that drivers don't expect a "bicycle" to be doing 60mph.
60? More like 20mph. I get cars jumping out in front of me all the time. They're looking right at me and-- zupp-- barge right out into my path.
 
Yes, there's a small percentage of drivers who are a dangerous menace to cyclists. Can't be bothered to wait 5 seconds to yield obvious right of way, while looking right at you.

Always assume the worst, that you can't be seen, leave yourself an out, and have a left side mirror that you check- a lot.
 
For the most part, if there was 5 seconds they'd have to wait, they would have plenty of time to actually do whatever before I got there. Most problematic encounters I'd be clear in less than two seconds; longer than that and I could brake enough for them to clear me or even stop.

FWIW, I have a LOT less of that since I started using large-surface area headlights (especially actual car headlights, but even when I was riding DayGlo Avenger with DIY ones) and other lighting, both in daytime and at night, but especially at night, when all they can really see clearly is the lights--they see something that doesn't look like a bicycle light, it looks like a car light, and it gives them that momentary pause while I go by.


And while not applicable to most cyclists: since I started riding SB Cruiser (a large trike), it gives almost every single one of them pause before they pull out in front of me, since it doesn't look like anything else they expect to see on the road, and it looks big enough to maybe do some damage if they did that and forced me to smash into them. (it probably wouldn't, but...).


When I used regular bike lights I had all the usual problems at night, and when I rode regular-looking bikes I had all the usual problems in daytime. Only ever hit from behind glancing blows as assholes swerved right to hit me on purpose, a few times, but paying attention prevented my squishtication.

Since riding more unusual bikes and trikes, almost no problems with that sort of thing.


Also, since I ride in the road, not on the sidewalk, more people pay attention to me (in general, those coming out of or going into driveways do not appear to even glance at the sidewalk for cross-traffic). Long ago when I mostly used the sidewalks, I had a lot more problems regardless of speed (anywhere from walking speed to jogging; any faster isn't usually safe on sidewalks).


But...I still assume no one can see me, and ride appropriately.
 
Work on my third and most powerful Barncat Battery is well underway. As mentioned earlier, 20s5p Molicel p42a, which are of course the 21700 format.

3/8" HDPE base, 1/2" HDPE end walls for stiffness, poplar sidewalls thinned to 5/8" thickness. Poplar is stiff, lightweight, non conductive, and most importantly holds screws very well.

Table saw work holding thousandths tolerances is required. Finished up the business end wall with brass threaded inserts this afternoon. One mistake would ruin the whole part. The grid layout must be very accurate, and the inserts must be plumb. There's a little wood block with a sliding screw in pic 4 that acts as a pilot.

Considerable number of copper parts to make yet, etc... Will write this up soon in the site Battery section, adding to my Barncat Battery thread. If interested you can read an explanation of how it works there.
 

Attachments

  • 20240208_172955.jpg
    20240208_172955.jpg
    2.8 MB · Views: 6
  • 20240208_172934.jpg
    20240208_172934.jpg
    7.1 MB · Views: 6
  • 20240208_145703.jpg
    20240208_145703.jpg
    1.3 MB · Views: 7
  • 20240208_145645.jpg
    20240208_145645.jpg
    6.9 MB · Views: 7
  • 20240207_163828.jpg
    20240207_163828.jpg
    7 MB · Views: 7
Last edited:
Various buss bars completed. The thin plates on left were dimpled with a hammer and punch on top of a plywood scrap, then re-straightened. They go inside the case opposite the end that holds all the screws.

The other 3 bars fit over the reversed protruding screws, with the minus lead on bottom and plus lead on top, and are secured by adjusting nuts.

I ordered a 25 pack of solid copper 8-32 screws from China months ago. Unfortunately the screw heads are a bit smaller in diameter than anticipated. For comparison see the nickel plated lamp screws in pic- which work great and will never corrode, but their conductivity is of course way lower than copper. I'm going to turn a few custom copper screws on the lathe and see how tedious that is... surface area is very important so as not to deform the mating lithium cell ends when adjusting the pack. I'm using aluminum nylock nuts with the nylon mostly drilled out- again for higher conductivity over steel.

Also must cut 16 pcs of braided copper in pic to length. Don't recall how i did that last time... and ends must be tinned to eliminate fraying. These parts just lay in crosswise to parallel every 5 cells.
 

Attachments

  • 20240210_140150.jpg
    20240210_140150.jpg
    4.1 MB · Views: 11
Lost most of last week to repairing my 1977 Jet 1024P lathe. The original 47 year old motor finally (i believe) burned up the start winding. Smelled a burning odor a couple weeks ago and it would just hum without kicking in several days back, despite trying 2 brand new capacitors, testing the switch, and checking all accessible wiring and the centrifugal switch. Put a new 1hp Vevor on it and runs great again.

Made 20 custom solid copper lamp style screws. Took close to 4 hours... should minimize any sag when twisting the throttle.

Pictured is a simple wooden jig for tinning the braided copper- flux and tin both ends to eliminate fraying then just snip with the wire cutters. Wipe down with alcohol to clean.

New battery should be done in a few days.
 

Attachments

  • 20240218_181812.jpg
    20240218_181812.jpg
    3 MB · Views: 12
  • 20240218_172923.jpg
    20240218_172923.jpg
    1.9 MB · Views: 11
  • 20240218_172828.jpg
    20240218_172828.jpg
    6.1 MB · Views: 12
  • 20240218_172730.jpg
    20240218_172730.jpg
    1.8 MB · Views: 11
  • 20240218_174621.jpg
    20240218_174621.jpg
    1.7 MB · Views: 12
Battery is finished and installed, with double paired zip ties to aluminum brackets at the front and a rubber covered U bolt at the rear.

It's on a new 84V 5A charger for the first time. Every parallel group is dead even and rising nicely. Will be test riding shortly. The extra 21V over the 15s pack are really going to surprise drivers when I can hang with them at 60mph- though I'm careful about where and when I max it out, and check the mirror a lot. I'll have 7 or 8 more miles of range too to bring it to 35+.

So that's about it for this build other than making a slightly larger seat pan...
 

Attachments

  • 20240301_132830.jpg
    20240301_132830.jpg
    2.4 MB · Views: 20
  • 20240301_132859.jpg
    20240301_132859.jpg
    3.4 MB · Views: 22
Interested to see how your cable brakes and rotors hold up if your suspension has already bit the dust. I don't really need much of a push to swap on hydraulic brakes but I think that $30 upgrade is well worth it above 25 mph.

cool build, I was considering doing the mods to the my1020 motor I have to make it similar to the electro&co upgraded motor but their EC4P obviously has all of those upgrades already included in the finished package. Looks to be plenty for a bike
 
MOK- suspension was all promptly fixed up as per previous posts. I am still getting a single rattle out of the fork over sharper bumps that I can't pinpoint. I think the fork is topping out. It's not the headset. (Edit- turns out it was the battery pack making occasional noise against the top tube, despite being pretty firmly attached. Added some thin padding and a heavy duty zip tie.)

I use simple mechanical disc brakes on all my rides, which have plenty of stopping power. Not worth the hassle of bleeding brake lines to go hydraulic. Frequent wear adjustment is required though, and brake pads are dirt cheap fortunately.

The EC4P is an order of magnitude more capable than the MY1020. Larger diameter rotor, more torque, thinner lams, runs much cooler, can be fed more amps. But it does have a lot of cogging torque and needs to be run with a freewheel. You have to be really smooth with throttle roll ons to keep from thwacking the rear sprocket engagement even with a Hornet 3 degree freewheel. My next project is to adapt a CSK sprag bearing/front sprocket overrunning assembly capable of 60lbft of torque to the motor output shaft. It occurred to me that it's an easier approach than modifying a rear freewheel hub.

They're coming out with the EC5P, a 5 pole IPM rotor that'll be similar to a TopPower motor but in the same Razor style housing. I'll likely try that next.

I carefully chopped out the angled bracket that braced the seat post tube so i could lower the seat pan about 1-1/2". Better fit and handling.

The new battery really rips. Target max speed achieved.
 

Attachments

  • 20240323_195122.jpg
    20240323_195122.jpg
    3.6 MB · Views: 11
Last edited:
A very rough mock up with 26" front and 24" rear wheels to check proportions. Adequate room in front of rear wheel on top of swingarm for a 5" diameter motor. 3" longer wheelbase than the Blackcomb so it'll be a tad slower handling but more stable also factoring in the relatively larger wheels. Any air fork swap will be nearly identical size to the heavy stock unit.

I found a dual disc front hub that may be adaptable for a custom rear wheel build with my sprag bearing concept.
 
I'm very excited to see what you do to this cause I just purchased this same bike and that's what I want to do is make it electric but I'm new to this whole thing and your the first person I've seen that's doing it to this bike and I'm so very excited to see how you do this. You definitely know another more than myself but I can't wait to see your final badass Cafe racer my friend.
 
I'm very excited to see what you do to this cause I just purchased this same bike and that's what I want to do is make it electric but I'm new to this whole thing

Please don't. It's hideous junk that's only marginally roadworthy at the anticipated 8 mph. To modify it enough to make it safe and durable at traffic speeds would cost you more than the price of a good bike.
 
@Chalo: Under the durest of your utter demise. lol. If you were to recommend a full suspension frame, what frame would that be.
I am an old person who need all the ride cushioning possible
 
@Chalo: Under the durest of your utter demise. lol. If you were to recommend a full suspension frame, what frame would that be.
I am an old person who need all the ride cushioning possible
Then use a full suspension bike. Don't use something that was designed to fool people into thinking it's a functioning FS bike.

Department store bikes' entire job is finished the moment somebody pays money for them. It's not a coincidence that nobody who sells them will service one.
 
Ok.......... the last 3 comments either didn't make much sense, or were not helpful, to anyone.

This build, my 5th, exceeds the performance of almost all street ebikes out there, custom or otherwise, and required a considerable skill set to execute. That should speak for itself.
 
Last edited:
... required a considerable skill set to execute. That should speak for itself.
Yes! You have considerable and voluminous design and fabricating skills. I aspire to reach near those levels. Thanks for sharing!
 
Back
Top