whatsaheadwind
1 mW
- Joined
- Jun 27, 2020
- Messages
- 14
PROBLEM: PEDALS LOCKED UP WHILE RIDING
CAUSE: GEARBOX WAS LOCKED UP BY A BOLT THAT HAD COME FREE FROM THE BIGGEST GEAR.
TOOLS REQUIRED:
⦁ Set of allen keys
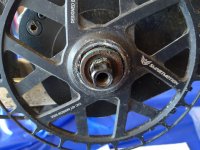
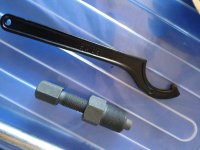
⦁ Pedal puller to remove the pedal arm from the drive shaft (see photo)
⦁ C wrench to remove the circular nut holding the front sprocket on (see photo)
⦁ Possibly a gear puller to remove the front sprocket
⦁ Possibly some RP7, WD40, or other thin lubricant good for freeing up tight bolts
HOW TO FIX IT:
I decided to leave the motor bolted into the frame of the bike for the entire job, and I experienced no difficulties consequential to doing that. The front sprocket needed a gear-puller to remove it, but once freed up a little, it popped off easily by itself. One of the small bolts holding the cover on the gearbox was tight and needed RP7.
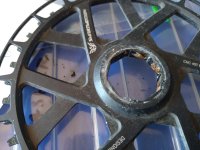
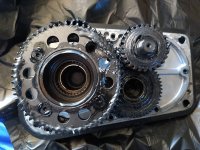
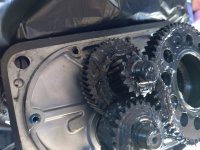
I brushed down the gearbox with a toothbrush before removing the gearbox cover, to minimise the amount of foreign matter that might end up in the gearbox during the job. The gearbox was packed with black grease, with a little white grease around the pedal shaft for the seal. I assume the black grease was molybdenum disulphide base, and that the white grease was vaseline.
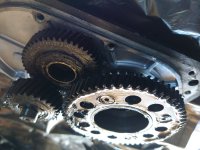
I lifted out the gears (that was easy) and removed all of the black grease that I could, and quickly discovered that the reason that the gearbox had locked up was that one of the bolts holding the main gear together had come out, been mangled, and had jammed up the gearbox. A quick trip to my local specialist bolt supplier yielded a replacement bolt. The original bolt was high tensile, but the replacement was low tensile, because the bolt shop didn't have the correct length in either high tensile or low tensile and I had to shorten it, and it's a lot easier to shorten a low tensile bolt than a high tensile one. I gripped the thread of the bolt, at the tip, in a pair of vice grips and gripped the vice grips in a vice, then used a hacksaw to cut the bolt to close to the correct length, then a file to get it to precisely the correct length (as determined by fitting it to the gear and comparing the end of the replacement bolt to the end of the other bolts.) Once I had it down to the correct length, I cleaned the threads of both the gear and the bolt with kerosene, then with metho, and fitted the new bolt using stud-lock loctite. (Any of the high strength loctites will do for the job; you won't ever want to take that bolt out again, so there's no argument for using a low-strength loctite.)
I rescued as much of the white grease as I could and applied it to the shaft at the seal. White grease (usually Vaseline) doesn't cause softening and expansion of rubber seals, as I recall, so that will be the reason the manufacturer used it. I saw no reason to replace the seal, because the grease in the gearbox was clearly still just as the manufacturer had applied it - there was absolutely no evidence of it relocating itself since manufacture, so even if the seal had become damaged, it wasn't really doing anything anyway, and there was negligible chance of melted grease ever leaking past it.
Then came the rude surprise.
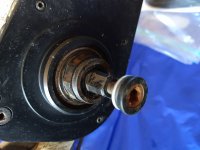
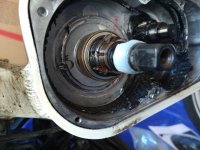
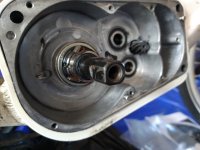
Refitting the main (big) gear turned out to be a real challenge, because there are three spring-loaded levers in the internals of the gear that have to be held down in order to slide the gear into place on the shaft. If you don't succeed in holding them down, the gear won't slide home. There is no mistaking that it hasn't slid home; there's a substantial gap behind the gear, and there's very little of the square end of the pedal shaft visible.
The levers had had a light application of grease applied to them by the manufacturer, so I applied a light coating of wheel bearing grease to them, then racked my brains on how I could temporarily hold down the levers while I slid home the gear, then remove the means of temporarily holding down the pins after the gear had taken over the job of holding down the levers.
How on earth had the manufacturer done it when he manufactured the gearbox in the first place?
It seemed to me that the only way it could have been done during manufacture was to fit the big gear to the shaft prior to fitting the big bearings to the shaft, prior to fitting the shaft (with big bearings) to the gearbox. So I headed for the other side of the bike, removed pedals, motor covers, etc, to get to the four large allen-key bolts around the shaft on the other side of the motor-gearbox housing. Removing those four bolts produced another suprise: it achieved me nothing. I was unable to remove the head that the four bolts held down. It would rotate a little, but I couldn't remove it.
About then I concluded that the manufacturer had designed the gearbox to be assembled easily, but had NOT included repairability in it's design criteria. Like so many other production items today, the gearbox was (almost) unrepairable.
Ok, so I couldn't hold down those levers the way the manufacturer probably had done during manufacture. So how could I hold them down?
I tried all sorts of methods, without success. One method that seemed promising for a while was to lift the spring-wire out of it's groove and bring it forward on the shaft, so that it was no longer applying pressure to the three levers, but was still preventing the levers falling out onto the floor. The theory was that the gear would push the spring-wire back into it's groove when I pushed the gear over the shaft, but when I did that, yes the gear slid all the way home, and yes the spring wire dropped obligingly into it's groove in the shaft, but the three levers didn't end up with the spring wire located in their grooves, with the result that the gear freely rotated in either direction, when the levers were supposed to allow it to rotate in one direction but not the other. So I pulled the gear back off the shaft and thought some more.
I won't bother telling you the other methods that didn't work for me, and I'll jump straight to the method that did work for me. I suspect that I was exceedingly lucky that it worked first time for me; I rather suspect that one should expect multiple attempts before achieving success.
One of the methods I tried that didn't work was using thick lamination sheet cut into strips. It lifted the springwire too far out of the groove, and failed to keep the spring wire in the groove on the levers. (I'm talking about the plastic sleeve that you cover paper with before feeing it into a laminator in order to laminate the piece of paper.) It seemed to me that a thinner sheet of laminate, cut into narrower strips, might work. So I cut three strips of thin lamination sheet, about 2 or 3 mm wide, and about twice as long as the visible length of gear shaft. I prised up the spring-wire in each of three locations, and slid a strip of thin lamination sheet under the wire, just covering the end of the lever that kept wanting to pop up and prevent me sliding the gear home on the shaft. The spring wire remained aligned with the groove it was supposed to sit in, because at sufficient places around the shaft the spring wire still sat inside the groove, by the very tiniest amount. It was probably by hundredths of a millimeter, but it was sufficient to keep the wire in the groove and located above the slot in the levers.I should have taken a photo, but by then many hours of failures had led me to expect yet another failure, and once I did succeed, I sure wasn't going to take the gear off again just to get a photo of how I did it.
Anyway, once I had each of the levers held down inside the shaft by a thin strip of lamination sheet between the lever and the spring clip, I aligned all three strips with the shaft and held them together around the shaft with a little sticky tape. Then I poked the ends of the strips through the seal on the gear, and slid the gear down the shaft. When the gear wouldn't slide any further, I pulled on the lamination strips while continuing to push gently on the gear, and unbelievably, the gear slid home when the lamination strips came fully free! Even more unbelievably, the gear would rotate in only one direction on the shaft, which meant that at least one of the levers was doing it's job correctly!
I decided to go with that, and hope that all three levers would vibrate into correct position if they weren't already in correct position, and proceeded to continue with the reassembly of the gearbox.
With the main gear now in place, I applied copious quantities of wheel-bearing grease to all the gears and refitted them, then bolted home the gearbox cover. I refitted the main sprocket and the circular nut (using the C spanner), the chain, and the pedal. So far so good. Job done! (Although in my case, I had to reassemble the motor side of the assembly as well, but you won't have to do that because you know not to waste your time disassembling that side of the assembly when your only problem is in the gearbox.)
At this point I'll mention that it is well and truly worth using hot melt glue, or silicon sealant, to plug ALL holes that will allow rain to enter the frame of the bike and gravitate down to the motor. I own two Smartmotion Mid City's, and both of them have had enormous (and really wierd) electricial problems that turned out to be caused by my riding them in rain, which resulted in rain-water getting inside the motor.
Problems like the bike behaving as though you have the throttle held down all the time while riding, or the power-assist failing to work (when the cause is not a faulty brake sensor), and the lights coming on all by themselves as soon as you turn on the switch at the battery, are all caused by rain-water having gotten in somewhere where it shouldn't be. If it's a really wierd problem that doesn't make the slightest bit of sense, suspect that rain has gotten in somewhere it shouldn't have. If the really wierd problem goes away after a few days all by itself, then the rain-water causing the problem has evaporated or drained away.
The Mid City is NOT designed to be ridden in rain! There is NO means provided by the manufacturer to prevent rain reaching and penetrating the motor. That is why I have applied hot melt glue, or silicone sealant, to the tiny gap where the motor-gearbox assembly meets the frame of the bike, on both sides of the bike (except at the bottom, because if water does get in, I want it to be able to drain away), PLUS all the holes in the frame where cables (and rain water) enter the frame.
Sooner or later you will be out on the bike when it starts to rain. I strongly advise minimising the use of the bike in rain, and I strongly advise sealing the bike to prevent penetration by rain inside the frame as best you can.
And if you experience gearbox lockup on your Mid City, then I advice anticipating a lot of failures before you finally succeed in getting that main gear back into correct position on the shaft. Fixing the cause of the lockup is easy; reassembling a gearbox that was never designed to be repaired requires perseverence.
The replacement bolt for the gear cost me $1.25. The only alternative was a replacement moto-gearbox assembly, which would have cost me $1000.
CAUSE: GEARBOX WAS LOCKED UP BY A BOLT THAT HAD COME FREE FROM THE BIGGEST GEAR.
TOOLS REQUIRED:
⦁ Set of allen keys
⦁ Pedal puller to remove the pedal arm from the drive shaft (see photo)
⦁ C wrench to remove the circular nut holding the front sprocket on (see photo)
⦁ Possibly a gear puller to remove the front sprocket
⦁ Possibly some RP7, WD40, or other thin lubricant good for freeing up tight bolts
HOW TO FIX IT:
I decided to leave the motor bolted into the frame of the bike for the entire job, and I experienced no difficulties consequential to doing that. The front sprocket needed a gear-puller to remove it, but once freed up a little, it popped off easily by itself. One of the small bolts holding the cover on the gearbox was tight and needed RP7.
I brushed down the gearbox with a toothbrush before removing the gearbox cover, to minimise the amount of foreign matter that might end up in the gearbox during the job. The gearbox was packed with black grease, with a little white grease around the pedal shaft for the seal. I assume the black grease was molybdenum disulphide base, and that the white grease was vaseline.
I lifted out the gears (that was easy) and removed all of the black grease that I could, and quickly discovered that the reason that the gearbox had locked up was that one of the bolts holding the main gear together had come out, been mangled, and had jammed up the gearbox. A quick trip to my local specialist bolt supplier yielded a replacement bolt. The original bolt was high tensile, but the replacement was low tensile, because the bolt shop didn't have the correct length in either high tensile or low tensile and I had to shorten it, and it's a lot easier to shorten a low tensile bolt than a high tensile one. I gripped the thread of the bolt, at the tip, in a pair of vice grips and gripped the vice grips in a vice, then used a hacksaw to cut the bolt to close to the correct length, then a file to get it to precisely the correct length (as determined by fitting it to the gear and comparing the end of the replacement bolt to the end of the other bolts.) Once I had it down to the correct length, I cleaned the threads of both the gear and the bolt with kerosene, then with metho, and fitted the new bolt using stud-lock loctite. (Any of the high strength loctites will do for the job; you won't ever want to take that bolt out again, so there's no argument for using a low-strength loctite.)
I rescued as much of the white grease as I could and applied it to the shaft at the seal. White grease (usually Vaseline) doesn't cause softening and expansion of rubber seals, as I recall, so that will be the reason the manufacturer used it. I saw no reason to replace the seal, because the grease in the gearbox was clearly still just as the manufacturer had applied it - there was absolutely no evidence of it relocating itself since manufacture, so even if the seal had become damaged, it wasn't really doing anything anyway, and there was negligible chance of melted grease ever leaking past it.
Then came the rude surprise.
Refitting the main (big) gear turned out to be a real challenge, because there are three spring-loaded levers in the internals of the gear that have to be held down in order to slide the gear into place on the shaft. If you don't succeed in holding them down, the gear won't slide home. There is no mistaking that it hasn't slid home; there's a substantial gap behind the gear, and there's very little of the square end of the pedal shaft visible.
The levers had had a light application of grease applied to them by the manufacturer, so I applied a light coating of wheel bearing grease to them, then racked my brains on how I could temporarily hold down the levers while I slid home the gear, then remove the means of temporarily holding down the pins after the gear had taken over the job of holding down the levers.
How on earth had the manufacturer done it when he manufactured the gearbox in the first place?
It seemed to me that the only way it could have been done during manufacture was to fit the big gear to the shaft prior to fitting the big bearings to the shaft, prior to fitting the shaft (with big bearings) to the gearbox. So I headed for the other side of the bike, removed pedals, motor covers, etc, to get to the four large allen-key bolts around the shaft on the other side of the motor-gearbox housing. Removing those four bolts produced another suprise: it achieved me nothing. I was unable to remove the head that the four bolts held down. It would rotate a little, but I couldn't remove it.
About then I concluded that the manufacturer had designed the gearbox to be assembled easily, but had NOT included repairability in it's design criteria. Like so many other production items today, the gearbox was (almost) unrepairable.
Ok, so I couldn't hold down those levers the way the manufacturer probably had done during manufacture. So how could I hold them down?
I tried all sorts of methods, without success. One method that seemed promising for a while was to lift the spring-wire out of it's groove and bring it forward on the shaft, so that it was no longer applying pressure to the three levers, but was still preventing the levers falling out onto the floor. The theory was that the gear would push the spring-wire back into it's groove when I pushed the gear over the shaft, but when I did that, yes the gear slid all the way home, and yes the spring wire dropped obligingly into it's groove in the shaft, but the three levers didn't end up with the spring wire located in their grooves, with the result that the gear freely rotated in either direction, when the levers were supposed to allow it to rotate in one direction but not the other. So I pulled the gear back off the shaft and thought some more.
I won't bother telling you the other methods that didn't work for me, and I'll jump straight to the method that did work for me. I suspect that I was exceedingly lucky that it worked first time for me; I rather suspect that one should expect multiple attempts before achieving success.
One of the methods I tried that didn't work was using thick lamination sheet cut into strips. It lifted the springwire too far out of the groove, and failed to keep the spring wire in the groove on the levers. (I'm talking about the plastic sleeve that you cover paper with before feeing it into a laminator in order to laminate the piece of paper.) It seemed to me that a thinner sheet of laminate, cut into narrower strips, might work. So I cut three strips of thin lamination sheet, about 2 or 3 mm wide, and about twice as long as the visible length of gear shaft. I prised up the spring-wire in each of three locations, and slid a strip of thin lamination sheet under the wire, just covering the end of the lever that kept wanting to pop up and prevent me sliding the gear home on the shaft. The spring wire remained aligned with the groove it was supposed to sit in, because at sufficient places around the shaft the spring wire still sat inside the groove, by the very tiniest amount. It was probably by hundredths of a millimeter, but it was sufficient to keep the wire in the groove and located above the slot in the levers.I should have taken a photo, but by then many hours of failures had led me to expect yet another failure, and once I did succeed, I sure wasn't going to take the gear off again just to get a photo of how I did it.
Anyway, once I had each of the levers held down inside the shaft by a thin strip of lamination sheet between the lever and the spring clip, I aligned all three strips with the shaft and held them together around the shaft with a little sticky tape. Then I poked the ends of the strips through the seal on the gear, and slid the gear down the shaft. When the gear wouldn't slide any further, I pulled on the lamination strips while continuing to push gently on the gear, and unbelievably, the gear slid home when the lamination strips came fully free! Even more unbelievably, the gear would rotate in only one direction on the shaft, which meant that at least one of the levers was doing it's job correctly!
I decided to go with that, and hope that all three levers would vibrate into correct position if they weren't already in correct position, and proceeded to continue with the reassembly of the gearbox.
With the main gear now in place, I applied copious quantities of wheel-bearing grease to all the gears and refitted them, then bolted home the gearbox cover. I refitted the main sprocket and the circular nut (using the C spanner), the chain, and the pedal. So far so good. Job done! (Although in my case, I had to reassemble the motor side of the assembly as well, but you won't have to do that because you know not to waste your time disassembling that side of the assembly when your only problem is in the gearbox.)
At this point I'll mention that it is well and truly worth using hot melt glue, or silicon sealant, to plug ALL holes that will allow rain to enter the frame of the bike and gravitate down to the motor. I own two Smartmotion Mid City's, and both of them have had enormous (and really wierd) electricial problems that turned out to be caused by my riding them in rain, which resulted in rain-water getting inside the motor.
Problems like the bike behaving as though you have the throttle held down all the time while riding, or the power-assist failing to work (when the cause is not a faulty brake sensor), and the lights coming on all by themselves as soon as you turn on the switch at the battery, are all caused by rain-water having gotten in somewhere where it shouldn't be. If it's a really wierd problem that doesn't make the slightest bit of sense, suspect that rain has gotten in somewhere it shouldn't have. If the really wierd problem goes away after a few days all by itself, then the rain-water causing the problem has evaporated or drained away.
The Mid City is NOT designed to be ridden in rain! There is NO means provided by the manufacturer to prevent rain reaching and penetrating the motor. That is why I have applied hot melt glue, or silicone sealant, to the tiny gap where the motor-gearbox assembly meets the frame of the bike, on both sides of the bike (except at the bottom, because if water does get in, I want it to be able to drain away), PLUS all the holes in the frame where cables (and rain water) enter the frame.
Sooner or later you will be out on the bike when it starts to rain. I strongly advise minimising the use of the bike in rain, and I strongly advise sealing the bike to prevent penetration by rain inside the frame as best you can.
And if you experience gearbox lockup on your Mid City, then I advice anticipating a lot of failures before you finally succeed in getting that main gear back into correct position on the shaft. Fixing the cause of the lockup is easy; reassembling a gearbox that was never designed to be repaired requires perseverence.
The replacement bolt for the gear cost me $1.25. The only alternative was a replacement moto-gearbox assembly, which would have cost me $1000.