• Howdy! we're looking for donations to finish custom knowledgebase software for this forum. Please see our Funding drive thread

LightningRods mid drive kit

If I was building a new mid drive and going with a derailer system I would lean towards an old school friction shifter lever at the bars so you have a better chance of being exactly lined up to your cogs with your chain line. Just my opinion mind you.

I guess this does not really answer your question however as I have not run such a system with the sprockets and hub combo you are inquiring about. If I had the money I would go with the rolhoff IGH and regular bike chain for under 2000 watts and over 3000 watts just go single speed.
 
I couldn't find rpm ratings for rolhoff, but nuvinci rates at 1000rpm max. Rolhoff looks pretty tough though...a lot of google results were torque tests and ebike+rolhoff reviews.

I run a hefty 1/2x1/8" chain and 16t rear and prefer it over messing with a derailleur. I don't use an igh as a jack shaft though...was thinking about a 3spd in rear.
 
Has anyone run a mid drive with an internal hub with a single chainring

If you are talking about an IGH like the Nexus-7, they cannot take as much power as the external sprockets. Many of them have been broken around here. For 1,000W or LESS...an IGH is an awesome choice, especially if you apply power gradually and don't try to pop wheelies.

When a one gear is driving another gear, all of the power is transmitted from one or two teeth to one or two other teeth. When a chain is wrapped around a sprocket (a newer chain that is not stretched), half of the teeth are pulled by as many links, a 13T sprocket has 6 teeth that are solidly connected to the chain.

And even then, if you apply too much power, the chain will just skip over (bad, but not disastrous). Even if it does get broken, a chain and sprocket are cheaper to replace than a broken IGH.
 
Woo hoo!!! Thanks Mike!! I've been off the board for a little bit, so missed much of the discussion. But I will echo all of the positive comments here about your amazing work and dedication. Really appreciate your passion to this hobby of ours!

I have one quick question for you or anyone else who's already installed the kit. I just noticed that the inside of the "big pulley" that fits over the existing motor shaft/pulley is smooth. The only thing holding it on is the 6mm bolt at the end of the shaft. What keeps this thing spinning? Am I missing something?

Will post pics once I get everything installed!

Cheers,
Jim
 
jimnasium said:
Woo hoo!!! Thanks Mike!! I've been off the board for a little bit, so missed much of the discussion. But I will echo all of the positive comments here about your amazing work and dedication. Really appreciate your passion to this hobby of ours!

I have one quick question for you or anyone else who's already installed the kit. I just noticed that the inside of the "big pulley" that fits over the existing motor shaft/pulley is smooth. The only thing holding it on is the 6mm bolt at the end of the shaft. What keeps this thing spinning? Am I missing something?

Will post pics once I get everything installed!

Cheers,
Jim

Thanks for the good wishes Jim. I'm mostly recovered.

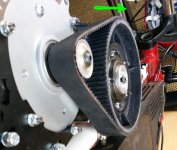
This is the GNG retrofit pulley we're discussing. Originally this was cast out of very tough catalyzed polyurethane. I had continual struggles casting the plastic part with the splined center bore positioned precisely straight. I had to throw a lot of them out because they wobbled when installed. The final straw was when Skyungjae reported back that his driver pulley wore out in about 400 miles. That's not good enough. So I switched to aluminum billet pulley material that is CNCed for me in the Midwest. Steve then cuts it to length and lathe bores a center hole .002" smaller than the GNG steel pulley. It's held in place by that interference fit and metal reinforced epoxy (like JB Weld).

I got started on this journey trying to unscrew what GNG had screwed up. Solutions like this press on pulley are also meant for people who don't have the resources or inclination to pull their motor apart. For people who do feel like diving into the innards of their motors I have replacement motor shafts with a keyed 12mm output on it. A better solution but more time and money.
 
jimnasium said:
Woo hoo!!! Thanks Mike!! I've been off the board for a little bit, so missed much of the discussion. But I will echo all of the positive comments here about your amazing work and dedication. Really appreciate your passion to this hobby of ours!

I have one quick question for you or anyone else who's already installed the kit. I just noticed that the inside of the "big pulley" that fits over the existing motor shaft/pulley is smooth. The only thing holding it on is the 6mm bolt at the end of the shaft. What keeps this thing spinning? Am I missing something?

Will post pics once I get everything installed!

Cheers,
Jim

I hammered mine in slowly, using a piece of wood to absorb the direct impacts. I got myself a cylinder piece of wood that fit precisely over the pulley and did not overlap on the lip, which is press fitted on the pulley. So not to damage it. As long as you have the other side properly braced on something hard and solid. It slowly goes in. The squeeze itself is probably enough to keep it from spinning. You can use some JB Weld and jam it in there before you press fit the pulley on. You are guaranteed it will never spin. I didn't have some JB Weld so i used some Automative Clear Goop. I like that stuff, it holds solid and has the advantage of absorbing vibrations. I didn't even put the screw and it held well at 3kw.

Wishes
 
Thanks for the feedback, Wishes. If driveline parts hold for you I don't worry about anyone else.

If users want to make starting the install easier they can spin the GNG pulley under motor power and file a bevel on the end. Don't take off any more than necessary though because the interference is the most secure force holding the two parts together.

Wishes made a valuable comment about using a wood block or similar to drive the aluminum pulley on. The pulley flange is aluminum and doesn't take kindly to being wanged on by a hammer.

Wishes also reported to me that because he was in a hurry to try out his new upper sheets and pulleys he ran around with too short a secondary chain and the jackshaft cocked at an angle. This puts a lot of side force on the small pulley flange and will pop it off. Once he got the correct length chain he didn't even need the flange. Properly installed there should be very little pressure.
 
Just curious... if the upgraded pulley basically "sits" on the flange at the end of the original gear/shaft, is there a worry about "wobble" due to the fact that the inside, open end of the GT gear is unsupported and the bore is much larger than the underlying gear? Maybe just stuff a lot of JB weld in the gap?
 
jimnasium said:
Just curious... if the upgraded pulley basically "sits" on the flange at the end of the original gear/shaft, is there a worry about "wobble" due to the fact that the inside, open end of the GT gear is unsupported and the bore is much larger than the underlying gear? Maybe just stuff a lot of JB weld in the gap?

Oh wait, I think I may have answered my own question. Looks like that flange thing on the shaft is supposed to pop off? Because there's no way in hell it will fit into the GT gear. :shock:
 
jimnasium said:
Just curious... if the upgraded pulley basically "sits" on the flange at the end of the original gear/shaft, is there a worry about "wobble" due to the fact that the inside, open end of the GT gear is unsupported and the bore is much larger than the underlying gear? Maybe just stuff a lot of JB weld in the gap?

The flange on the GNG pulley is sheet metal and has to be removed before the new pulley is driven on. The situation that you're describing would not work at all. The teeth of the original pulley bite into the smooth bore of my cover pulley. The gaps between the teeth are what is filled with JB Weld.
 
jimnasium said:
Oh wait, I think I may have answered my own question. Looks like that flange thing on the shaft is supposed to pop off? Because there's no way in hell it will fit into the GT gear. :shock:

The GNG flange is steel and has to be cut off with a pair of dykes. But it is separate from the machined pulley/shaft itself.
 
Ok, managed to get the new pulley installed and applied JB Weld as directed. Installed the upper and lower sheets on my motor, but not yet on the bike.

I installed belt and gave it a test spin (by hand) just to see if everything was smooth. But then a new problem appeared! The GT pulley's flange popped off! It did not appear "broken" or bent in any way. I pushed it back on as best as I could. At this stage, not sure what I should do. Put some JB Weld on the flange?

Another question. The old GNG kit has a small bracket just under the jackshaft that sits against the bicycle downtube. A hoseclamp goes through this piece to secure the upper portion of the kit to the bike. But, the LR upper sheet doesn't seem to have that feature. What to do?

Thanks,
Jim
 
jimnasium said:
Ok, managed to get the new pulley installed and applied JB Weld as directed. Installed the upper and lower sheets on my motor, but not yet on the bike.

I installed belt and gave it a test spin (by hand) just to see if everything was smooth. But then a new problem appeared! The GT pulley's flange popped off! It did not appear "broken" or bent in any way. I pushed it back on as best as I could. At this stage, not sure what I should do. Put some JB Weld on the flange?

Another question. The old GNG kit has a small bracket just under the jackshaft that sits against the bicycle downtube. A hoseclamp goes through this piece to secure the upper portion of the kit to the bike. But, the LR upper sheet doesn't seem to have that feature. What to do?

Thanks,
Jim

Re-use that piece you have from the stock kit for the tube bracket.

As for the flange, although it is better to have it, it is not essential. If your jackshaft is straight, the belt will stay in place.

Wishes
 
Wishes said:
Re-use that piece you have from the stock kit for the tube bracket.

Wishes, thanks. It wasn't obvious because the LR upper sheet doesn't have a dedicated hole for that piece. Looks like I'll just install the support bolt for the frame bracket at the end of the upper slot where the jackshaft support bolt is also installed.

Wishes said:
As for the flange, although it is better to have it, it is not essential. If your jackshaft is straight, the belt will stay in place. Wishes

Ok boss! 8)
 
jimnasium said:
I installed belt and gave it a test spin (by hand) just to see if everything was smooth. But then a new problem appeared! The GT pulley's flange popped off!

It sounds like I need to beat my machinist (again). Steve uses our big press to create a lip that is supposed to hold the flange in place. It sounds like the lip is too shallow.

I'll reinforce the rest of this batch of pulleys with epoxy. Thanks for the feedback.

Dr. Wishes is correct on the rear hanger. Just reinstall the GNG hanger on the upper sheet's rear M6 jackshaft bolt.
 
LightningRods said:
jimnasium said:
I installed belt and gave it a test spin (by hand) just to see if everything was smooth. But then a new problem appeared! The GT pulley's flange popped off!

It sounds like I need to beat my machinist (again). Steve uses our big press to create a lip that is supposed to hold the flange in place. It sounds like the lip is too shallow.

I'll reinforce the rest of this batch of pulleys with epoxy. Thanks for the feedback.

Dr. Wishes is correct on the rear hanger. Just re-install the GNG hanger on the upper sheet's rear M6 jackshaft bolt.

and suddenly i'm happy again that my kits is still in the making :)

in regards to IGH, i've been running with alfine 11 for 2 years, only just now gave to LBS as it started skipping, but i can't say for sure that it didn't hold up, as part of the time if wasn't tuned correctly due to my lack of experience and able template tool, i gave it to my LBS (after i took apart the motor, battery and controller not to scare them off, i left the ecospeed brackets and now i have wild paranoia they might take it off for ideological reasons..)

rholoff is considered strongest my frame maker kept insisting i should try it, but since it doesn't have rapid file shiftes, i stayed clear as it doesn't give me concourrent access to the brakes (and if you use ergonomic grips, that's a big no no too).
nuvinci fully declare their hubs wil not work with anything stronger then 250 watts, and that it will shorten their life by 75%. they also don't have thumb shifters , so i never looked any further.
 
I took the crankset down to my LBS, who is "E-bike friendly" (Big Poppi in Manhattan, Kansas). They had a socket for the "Shimano 8-Notch Bottom Bracket Wrench" but...the long spindle on the mid-drive 148mm ISIS won't allow it to reach, so...I ordered a wrench.

This one is from "Pedro's" (Park Tool has the socket, but not the wrench). I just recieved the wrench, and verified it is the correct one. I have tightened/loosened lockrings with a straight screwdriver as a chisel, and tapping on it with a hammer. On this drive, I wanted to do it the right way...

Be aware, when I first tried to get the wrench onto the mating parts on the crankset, it was a VERY tight fit, but...that is a good thing.

Here's a link for this wrench @ $10, but I've never used them before, the web shows many sources sell this for $20. http://www.cambriabike.com/Pedros-Shimano-Bottom-Braket-Tool-8-Notch.asp?gclid=CM75n_Dx5b8CFWoR7AodHSsASA

 
LightningRods said:
jimnasium said:
I installed belt and gave it a test spin (by hand) just to see if everything was smooth. But then a new problem appeared! The GT pulley's flange popped off!

It sounds like I need to beat my machinist (again). Steve uses our big press to create a lip that is supposed to hold the flange in place. It sounds like the lip is too shallow.

I'll reinforce the rest of this batch of pulleys with epoxy. Thanks for the feedback.

Dr. Wishes is correct on the rear hanger. Just reinstall the GNG hanger on the upper sheet's rear M6 jackshaft bolt.

I'm not too confident that the belt will stay on. Mine keeps wanting to "creep" off when turned. I've tried adjusting the jackshaft angle, and think it's pretty square, but it seems like it would be better if there was some kind of cover piece as in the original GnG kit (see attached photo).

GNGBracket.jpg
 
jimnasium said:
I'm not too confident that the belt will stay on. Mine keeps wanting to "creep" off when turned. I've tried adjusting the jackshaft angle, and think it's pretty square, but it seems like it would be better if there was some kind of cover piece as in the original GnG kit (see attached photo).

You didn't attach the photo but I know what you're referring to. That guard is meant to keep clothing and body parts out of the belt. It's not meant to keep the belt on and the belt should not rub it.

Do you still have the flange? I'd try reattaching it with epoxy. If you are able get the pulley off I'll repair it for you myself. I fear that once the press on pulleys are pressed on, it's a done deal even without JB Weld.

I'm going to both look for a more secure physical attachment for the flange and reinforce the attachment with epoxy. The belt should not run against the flange constantly but it's still good to have as a 'fence' for the belt.
 
If the belt is walking in that direction it typically means that the jackshaft is down on that side. It is MUCH easier to adjust the belt tension with the secondary chain in place on the other end of the jackshaft. Otherwise the resistance of the belt will cause the secondary side of the jackshaft to lift.

A future version of the upper adjuster will allow you to apply pressure in both directions with the adjusters.
 
While I don't have a kit at my disposal, couldn't you just put a "fender" washer on for a flange?

Edit: I think I misunderstood.....you are referring to the large pulley..? Beltguard?
 
jimnasium said:
By the way, you didn't send me the "chain guard" option with my order. I thought you had something similar?

View attachment 1

You didn't order a chain guard. I gave the early buyers of the complete kits free chain and pulley guards. When you order parts a la carte you get what you order.
 
Back
Top