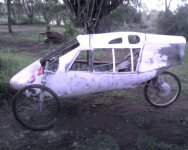
modified slingshot trike from 1970's

solarbbq2003 said:
might be ok for very lightweight fairing just a single layer of resin onto a backing material
Yea, you're only trying to keep dry and improve the airflow aren't you, so the lighter the better, eh?
 
yes but needs to have enough strength to withstand high speed windflow, so needs to be non flexible finish,
should be able to take a few knocks just for longevity, stones hitting it off the road etc,
some pics of progress, not intending to use it as a high speed vehicle normally ( but will do a few fast runs with x5 motor on higher voltages/amps at some stage), looking at what other guys are doing on endlessphere, it would be technically possible to do some really insane speeds ( eg x5303 with star/delta switch, running 130v approx and say 60 to 80amps) would be a little bit more than slightly scary.
 

Attachments

  • slingshot090309 1.jpg
    slingshot090309 1.jpg
    86.4 KB · Views: 3,343
  • slingshot090309 2.jpg
    slingshot090309 2.jpg
    54.9 KB · Views: 3,346
Hey Brett! Maybe stick that 3 speed motor on the back, if it can take the voltage!
otherDoc
 
not a bad idea doc, that 3 speed geared motor is for 16 or 18" tyre, so i would need to raise the back up a bit, but would probably be ideal, it may well be possible to overvolt it, I think would be very suitable.
 
Yup! It sure looks like a Velo! Keep up the good work! That front suspension is giving me thoughts of my ski suspension, but it's ridin' season here and I dont want to take my Trike off the road forever! Maybe the winter? Any more news on the 3 speed internal transmission motor?
otherDoc
 
hi doc, ya the gear change motors, I got some torque graphs ( damn odd looking torque graphs too), but in first gear looks like up around 110Nm torque, I think it was 48v a bit over 20amp controller, motor weighs 10kg, , needs 20cm width to fit into frame, not really suited to an easy instal! Probably will suit some projects needing really good hill climbing, and a bit of speed also, but isn't going to fit into the average bike frame easily, rims are made for the moped style 18 and 16" fat type tyres. They say 48v controller they supply is 27amp max, usually there alot of room for overvolting/overamping, so I think would make a hell of a motor for some applications. Will be some time though before I get a chance to test one, i have someone wants to try one so will get some feedback on them after they install/test. I try collate the info and put a page up on my website ( now moved to www.ebike.biz)
gear ratios are : 1:1.7, 1:2.92, 1:4.1
so approx 1:2......1:3..........1:4
would be ideal in the slingshot but quite a bit of reworking the rear frame to fit one in, pretty likely though at some time in future I'll put one in there, cant see me doing it in the near future though, would make a very versatile vehicle. Wont have any idea on how noisy the gear drive is until a motor is tested, but there is an oil sump, so I dont think it will be too loud.
 
That's brilliant, solarbbq! I'd be very interested in WattHrs per mile figures Before and After on that machine, because the aerodrag must be greatly improved.
 
will be quite a while before its back on the road, but will certainly post some results when up and running, quite alot to do before it will be ready for use
 
update pic: found cheaper alternative to fibreglass, UPol ultralight body filler, very cheap alternative results very good,slingshot 090509.jpg
 
Well done, SolarBBQ! Can you post a link for UPol, please?
 
That's really impressive. I never thought of using aluminum screen.

I wonder if you could use a thin layer of fabric over the screen and then epoxy it. You might be able to use less epoxy without having any holes in the fill. This could make it lighter as well.

What's UPol?
 
I did one side using some fibreglass resin over the flyscreen mesh initially, but didnt' have very much resin only a very small tin ( 250ml) of it, but I found that just letting the resin run down with gravity, it tends to run in lines, instead of trying to smooth it over a large surface I sort of let it run, those runs gave quite a bit of strength. Then a thin layer of upol is very much adequate strength, the other side was done just with the upol and flyscreen, strength is still ok but not as good as where there are some runs of fibreglass included ( hope makes sense).
Upol is a car body filler, a 4litre tin weights 3kg, in australia a 4 litre tin costs $33aud ( extremely cheap), its made in the uk so should be readily available over there. I found it while searching the net for alternatives to fibreglass, there were some ebay sellers but I found a local supplier was much cheaper way to get it.
Its an extremely labour intensive way to make a fairing, but also low cost, many many hours taken to do it this way, I've just been sanding back the upol to get a smooth finish, also very time consuming but results are looking very good. Its certainly a very rigid fairing and light weight, the downside is the time involved to do it. The aluminium mesh takes a long time to put in place, well took me a long time, could no doubt quicken the process if I do another fairing, is a bit of a learning curve as I go along. The mesh really makes alot of difference to the strength of the upol, a bit like reinforced concrete i guess.............but lighter. Ideally fibreglass and carbon fibre mesh would be the ideal way to go, but very expensive option, pretty happy with the results using this method.
As a way to try explain the strength of the fairing, its extremely rigid, theres no noticeable flex in it, I can hit the sides hard with an open palm without damaging it, a hard hit with a closed fist would likely cause cracking ( not that i'm going to try it), would certainly withstand windflow at highspeeds no problems, I doubt stones flying up from say a passing car would do any damage. If involved in an accident I dont think the fairing would be much use.
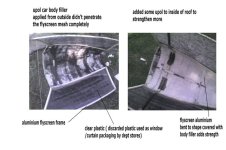
 
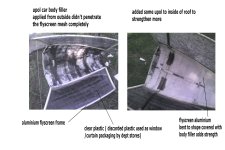
A recent seller on UK ebay offers 3.5 litre tins for £13.80
http://cgi.ebay.com/ws/eBayISAPI.dll?ViewItem&item=330324050100
 
a pic of the roof
roof2.jpg
no fibreglass used, one layer of aluminium mesh, and a layer of nylon flyscreen ( ran out of aluminium mesh ), was difficult to apply the car filler from outside and push through the mesh as the mesh was flexible ( only one layer of aluminium mesh),
so needed to apply some from the inside also to get adequate strength. Theres no flexing of the finished roof, very solid,
also not very heavy. Has also lost quite a bit of weight during sanding the outside smooth.
Windows are from clear plastic that they use as packaging for curtains/window shutters, very common in large chain stores, some friends got new curtains and thought i might use it for something. Had to flatten out the plastic as it has fold lines where they make the packaging shapes. but fairly easy to fold back flat ( near flat).
Frame for windows in aluminium used for flyscreens, a bit tricky to get the curves in it, method is tapping with a hammer ( not bending by hand) can get very nice curves, a bit of a technique involved. Theres certainly a bit of technique needed to get the finished result, and alot of time.

same pic as above just larger file size
roof1.jpg
 
progress pic
have to replace side window plastic, other plastic too fragile, old microwave oven doors have nice strong but flexible plastic will try a couple of those,
maybe another 3 or 4 weeks before road tests, still alot to do on fairing and to get windows in, and nice smooth finish for good airflow, results are looking good though, fairing very satisfactory as far as strength is concerded, weight is not too bad, would be better in fibreglass and carbonfibre matting, but toooo expensive, for a cheap alternative I think very suitable, a very thin layer of fibreglass resin I think necessary to finish it, will likely get cracking of the car bog in places with road use if not finished with a resin coat
230609.jpg
 
Solarbbq, microwave doors sound heavy. Could you make a double layer of the material you have previously used and space the two layers apart with. say, transparent plastic washers (perhaps one-eighth slices of transparent plastic pipe?)? Just a thought.
Maybe you could run thin pipe around the edges of each "window" to support the edges. You might be able to drill and screw that pipe to secure it to the rest of the bodywork.
 
the previous material was actually ok, I dropped the roof section a couple of times, and damaged the plastic, for lightweight its quite good, but wouldn't take any impacts without cracking or damage, just something a bit stronger would be good, two layers would work, but still likely will crack if something hits its, I'll try get a couple of microwave doors, the older ones look like might be useable, maybe a little heavy but I think that bit more strength needed.
 
Just a note on a small discovery
if you add brake fluid to upol car bog, it can be made thinner and drying time is slower, so more time to work with the bog.
I tried a number of different substances to see if any would work, since running out of the car bog I wanted it to go further,
I'm not sure if it was dangerous to add different chemicals to the car bog but no reactions happened, the brake fluid I used was 'castrol response super dot 4" i'm guessing that different brake fluids might not all be the same material but no idea really. It also means that you can work with the car body filler much easier since it can be made more 'runny'. Its very useful if wanting to do a very thin layer. Also drying times are increased so there is not the pressure to use what body filler has been mixed in a quick manner. I did find though that the brake fluid must be mixed quite thoroughly into the car bog, and then the hardener mixed very thoroughly also, but you can pretty much make the car bog whatever consistency you like with the brake fluid.
 
Back
Top