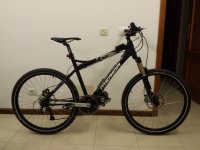
My 1st Ebike :) - project photos

andrenoites

100 W
Joined
Aug 29, 2013
Messages
149
Location
Portugal
Hello all

I just finish my first ebike and want to share with you guys so you can comment on my project.

Without this forum I just couldn't do it :)
Tks to all the people that helped me, you know who you are.

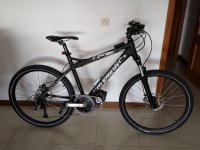
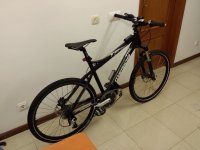
The bike is a Hardtail Merida Matts 350D
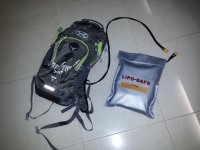
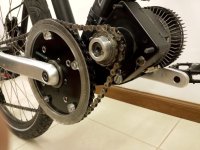
Motor Cyclone 1680W @ 48v 10mah Lipos in backpack
External Kelly controler
48T double chain plate with 8 rear gears

The photos:

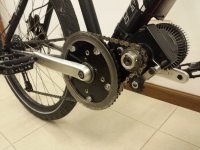
The motor with BB mounts:
https://googledrive.com/host/0BwPEKfhCRmSAZEFyR3ctcVVvZXM/20130921_233038.jpg

The throttle and the power plug to the backpack:
https://googledrive.com/host/0BwPEKfhCRmSAZEFyR3ctcVVvZXM/20130922_133802.jpg

The battery with the cable to plug onto the bike:
https://googledrive.com/host/0BwPEKfhCRmSAZEFyR3ctcVVvZXM/20130925_004033.jpg

Hiding the wires:
https://googledrive.com/host/0BwPEKfhCRmSAZEFyR3ctcVVvZXM/20130926_204038.jpg

The final product without the chain:
https://googledrive.com/host/0BwPEKfhCRmSAZEFyR3ctcVVvZXM/20130926_204209.jpg


More to came, next I will try to configure the kelly controler :)

Tks,
André
 
Clean Build, I like the hidden kabels. Maybe you could mount the Controller also under the Motormount. And paint it black.

Why did you put the battery plug in the front end of the bike. Hi had it under the saddle and liked that.
 
--freeride-- said:
Clean Build, I like the hidden kabels. Maybe you could mount the Controller also under the Motormount. And paint it black.

Why did you put the battery plug in the front end of the bike. Hi had it under the saddle and liked that.

The controller didn't fit quite well under the motormount because of the cables stiffness
I ride a lot in standing up position (jumps, stairs, etc) and was afraid to leave too much loosen cable above the chain and transmition so I installed the power plug on front

More photos:

Building the undercover protection:

https://googledrive.com/host/0BwPEKfhCRmSAZEFyR3ctcVVvZXM/20130927_001919.jpg
https://googledrive.com/host/0BwPEKfhCRmSAZEFyR3ctcVVvZXM/20130927_005240.jpg

Video with motor running:

https://googledrive.com/host/0BwPEKfhCRmSAZEFyR3ctcVVvZXM/20130926_201805.mp4
 
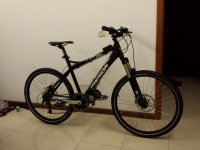
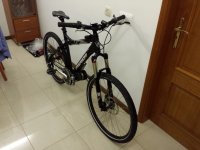
More photos of the finished Bike:

https://googledrive.com/host/0BwPEKfhCRmSAZEFyR3ctcVVvZXM/20130927_194626.jpg
https://googledrive.com/host/0BwPEKfhCRmSAZEFyR3ctcVVvZXM/20130927_194646.jpg
https://googledrive.com/host/0BwPEKfhCRmSAZEFyR3ctcVVvZXM/20130929_010129.jpg
https://googledrive.com/host/0BwPEKfhCRmSAZEFyR3ctcVVvZXM/20130929_010220.jpg
https://googledrive.com/host/0BwPEKfhCRmSAZEFyR3ctcVVvZXM/20130929_010236.jpg

Total weight: 18,2KG
Range: not tested yet, yesterday went for a 20km ride and consumed 1,75 volts from my 48V 10mah lipo backpack battery.
I guess I could do more than 50km easily while peddling.

Now I just need to get a cable to configure the controller :)
 
Hello,

can you please do me a favour and messure the two lengths? From the middle of your bike to the left end of the motor and to the right end of freewheel.

Regards,
Sebastian
 

Attachments

  • mess0.jpg
    mess0.jpg
    76.9 KB · Views: 6,061
Clean BB install with the motor positioned above the BB along the contour of the downtube. Obviously to line up with the chainline drive but also looks better and eliminates clearance issues. Is that a 73mm BB shell on your bike? Would love some performance specs after you have put it through its paces. :D

Have you considered fabricating a custom controller mount so it sits upright and thin at the bottom of your frame triangle (just above the BB)?
 
RoadWrinkle said:
Clean BB install with the motor positioned above the BB along the contour of the downtube. Obviously to line up with the chainline drive but also looks better and eliminates clearance issues. Is that a 73mm BB shell on your bike? Would love some performance specs after you have put it through its paces. :D

Have you considered fabricating a custom controller mount so it sits upright and thin at the bottom of your frame triangle (just above the BB)?

Hello

the BB shell is 73mm but the kit could be mounted onto 68mm and 83mm also (this last measure needs a different bb shell that needs to be specified at the purchase).

For now i'm still learning to tweak the controller but I'm getting 45 km/h (28mph) cruising speed with light pedaling and 56km/h (35mph) top speed with the off-road tyres in the pictures.
These tires are really slowing me down so I'm changing them soon to street tyres and hopping of getting a extra 6km/h (4mph) cruising speed

The gears work nice and the bike can climb with good speed (8 speed gear in the rear with 48t chainwheel in the front)

I will post more info after I changed the tires :)
 
As promised, this is how my bike looks like now :)

Getting up to 54km/h cruising at flat road without pedaling. The tires give a hudge boost in speed.
The range is 24km with light peddaling in a hilly road and using lipos from 4,1V to 3,75V (48V 10ah)

20131019_164242.jpg

The only problem I can't seem to solve is to know why my controller cutoff above 22Amp no mater the setting I chose in the software (measure in the battery site)
 
are there any switchs in line with the battery ?had a problem similar years ago was a bad connection on some switch gear ,so under load gave a low bat signal fault?
 
dustyearlobe said:
are there any switchs in line with the battery ?had a problem similar years ago was a bad connection on some switch gear ,so under load gave a low bat signal fault?


The only switch I have is in the throttle. It's a cutoff switch that came with the kit.

I wonder is the problem could be the cable length from the battery to the controller.
I use the batteries in a backpack and have a 1,8mts long 10AWG cable.
Could this be causing the problem my reducing the current output?

Tomorrow will make some tests...
 
Tks for the compliment :)

I'm using 4 x 6S Lipo 5000mAH to make a total 48V 10.000mAh

The batteries are in my backpack
20131022_232201.jpg

The bike is not quite done yet, soon I will be changing the suspension and adding a larger front disk brake with 203mm for more stoppage power.

See you soon
 
andrenoites said:
Tks for the compliment :)

I'm using 4 x 6S Lipo 5000mAH to make a total 48V 10.000mAh

The batteries are in my backpack


The bike is not quite done yet, soon I will be changing the suspension and adding a larger front disk brake with 203mm for more stoppage power.

See you soon

Gotta love the battery in the pack! I do the same. :D
 
More photos with new suspension.
Increased travel from 100mm to 130mm and reduced 1,1Kg
Now the bike weights only 17Kg

20131024_222609.jpg

20131024_222726.jpg

20131024_222838.jpg


Next upgrade will be changing the motor drivetrain from 14T to 13T and invert the position of the tensioner so that the chain could grab more teeth.
Also this will give a better pedaling cadence with motor optimal rpm.

See you soon :)
 
Congratulations, a beautiful E-bike. The Cyclone kit has gained much from the new engine mount.
I'm interested in knowing the way to changing the motor drivetrain from 14T to 13T .
I really like the cyclone but I also like to keep an efficient pedaling.
I'll watch for your post to decide if I buy this kit.
 
Really nice,
just wondering why you didn't take the motor-crank chain round the other side of the idler? - then you'd have more than 3 or 4 teeth doing all the work on the motor freewheel. If you could arrange it, I think it might make that chain last a bit longer.
Not a criticism, just a suggestion - if you saw my bike(s) you'd know I wouldn't dare!!!! :)
cheers
Bob
 
bobc said:
Really nice,
just wondering why you didn't take the motor-crank chain round the other side of the idler? - then you'd have more than 3 or 4 teeth doing all the work on the motor freewheel. If you could arrange it, I think it might make that chain last a bit longer.
Not a criticism, just a suggestion - if you saw my bike(s) you'd know I wouldn't dare!!!! :)
cheers
Bob

Nice Idea Bob
The plan is to invert the tensioner once I receive the 13T motor freewheel (replace to the original 14T)

I have to change the steel spring to work in the inverse direction :)
 
Project update:

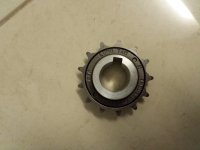
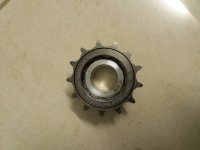
New motor ACS freewheel with 13T
20131101_231246.jpg
20131101_231255.jpg

Also inverted the tensioner:
20131104_205358.jpg
20131104_205249.jpg

Thinking in using the motor chain without tensioner. Did anyone tried?

See you soon :)
 
Update:

Removed the chain tensioner and what a difference :)
Less noise and more efficiency while pedaling

20131105_225640.jpg

To everyone who is thinking in buying cyclone kit with BB mount, the 48T plate in combination with the 13T freewheel its the right size to use without the tensioner.

Cheers
 
Hi Andrenoites.. :mrgreen:

Its a very nice setup! What are the range/speed without any pedaling?
How much did this setup cost you?

Do you think I could mount the same kit on this bike :
 

Attachments

  • bke.gif
    bke.gif
    215.9 KB · Views: 1,568
Hello mate

I have 4 x 6s 5000mAh lipos in 48V 10000mAh setup

With this batteries I got about 20Km with almost no pedaling and in a hilly road (conservative discharge from 4.1v to 3,77V)
In straight road I get easily more that 55km/h and when climbing and I can get about 43Km/h (both without pedaling)

I spend about 650€ + extras (tyres, new chains, new cassete, lights, etc)

About 460€ for the kit, 140€ for the batteries plus 50€ for charger, wires and plugs

That is good bike, I don't think you will have any problems adapting the kit to that frame.
The only catch is to confirm the clearance from the BB to the point where the swing arm joins the frame. Do you have any photo?

Cheers,
André
 
Back
Top