Phat Bike Build

Still too slow and far too sensitive to headwinds. You get too cold when riding below 50f/10C. I need +2 to +4mph speed gain for 20mph average. (I'm at 18.6mph average now). A fairing might help that problem. Looking at this one, your comments invited:
http://www.ebay.com/itm/Scooter-Moped-Windshield-Universal-Handle-Bar-Clamp-Mount-/120841296745

A Laptop P/S DC-DC converter has been proposed as a good way to get 12 volts from the pack to operate 12v lighting (headlights, taillights and turn signals). I've got a tiny DC-DC converter on the headlight already, but I am unsure it will drive enough current to support headlight, taillight and turn signals. So the use of a laptop power supply to get that 12v is still to be investigated.
 
pendragon8000 said:
I got big apple 29x2.35 and reduced power consumption at 60kp by %25

I can see a move to Schwalbe tires soon. You're the second well-informed and specific recommendation I've gotten. I've got the one, a 1.5" Marathon, hanging on the wall. One more and I'd be in business. To think I could get an extra 2-4mph just by swapping tires. Dang.

The Hemisphere tires I'm using currently are an old design that's been changed radically in it's newest incarnation. (Now they sport tread suspiciously similar to a Schwalbe.)

I want to simply put 500 miles on 'em and throw them away with a clear conscience having "gotten my money's worth". But they may suck so much that there's no "payback" to them and discarding them now is the most efficient (Wh AND $$) thing to do.

Bought a windshield from a local vendor today (wanted to support local). The hardware's got to be modified for a bicycle. The $60 it cost pinched me good. So much for supporting local.

Thank you for posting the plugpack video, it's great!
 
I find it near impossible to detect rolling resistance differences at mid-high speed. Its when you start riding 12mph with no motor that you can really tell the difference. I don't think you will see more that a 2mph difference between any two slick bike tires.

How did your ride home go?
 
Veloman, just to clarify, yes I had knob lies then went slicks(semi) and my info was from the CA v3 with speed limit set to 60kph. I would suspect most street tyres may be the same but the smoother and higher pressure the faster/more efficient I think would be agreed.
 
veloman said:
I find it near impossible to detect rolling resistance differences at mid-high speed. Its when you start riding 12mph with no motor that you can really tell the difference. I don't think you will see more that a 2mph difference between any two slick bike tires.

How did your ride home go?

veloman, thanks for asking: the ride both ways went GREAT! For the ride home, I found an alternate route with fewer hills and wow did it make a difference: saved me about 15 minutes on the ride home. The new freewheel and crankset worked great and aside from freezing my "self" off, was able to maintain an average of 21mph across that particular segment of the ride.

The run to/from work was a big deal. I put 66 miles on the ebike and saved 2 gallons of gas, about $7.30 of immediate value (not including pro-rated amounts of "intangibles" like insurance, inspection, oil changes, etc.) Remember that sign from the Exxon station I always photo, with the red LED display for the price of gas? It was exhilarating to pass by it on the way home, reading $3.75/gallon, and not care.

The huge upside is that an 18S3P pack got me to work and back without a hitch. The downside is that I spent a good 3 hours, 25 minutes on the bike and I was very cold. I've got to get there faster and more comfortably. I'm hoping a fairing will fix that problem.

The big 800 lumen light was fantastic. I turned it on about halfway home. I've been taking pics of the CA and will post details later today.
 
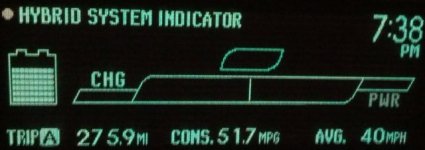
Successful completion of a commute to-and-from work. Here's the stats from the CA:

commute1.jpg
commute2.jpg
commute3.jpg
commute4.jpg
commute5.jpg
 
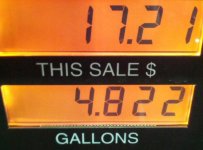
Got gas tonight for the car, here's the big payoff: I spent about $17 to fill up at $3.57/gallon:

commute_gas1.jpg

Here's the odometer stats for the week on the car. About half of normal.

car_mileage_this_week.jpg

This came from doing the one commute on the ebike and running several weekend and evening errands using the ebike and not the car. I'm amazed at the impact the ebike has had on gas consumption: it's far more significant than I expected.
 
I need more speed and higher efficiency. Oh, and yeah: to NOT freeze my butt off when riding.

So: waiting to receive a fairing from ebay. Also considering swapping out the 2" Hemisphere tires for a pair of Schwalbe Marathon 1.5" tires. Maybe lose the pannier and replace it with a top-of-the-rack trunk bag.

I'd like to see another 4mph. I have no clue if that's realistic or not. Another 4mph sustainable would help a great deal on a 66 mile commute: At least 16 minute improvement on the 3 hour, 25 minute time.
 
As a guy that is riding his ebike in Colorado weather I can give you some "not freezing" tips.

1) dress properly. Ive riden in temps as low as -6F. Thermal underwear, wind breaking protection, multiple layers is a must. I ride like Im going snowboarding. Thick boots, snowboarding pants, snowboarding jacket, neck gator, snowboarding helmet (WITH headphones!) goggles. Im usually overheated in 20 F temps.

2) keep pedaling! keep that blood flowing. Just sitting there is like going outside in 20 mph winds in the cold.

3) for your hands, get some of those glove warmers, amazing how well they work. They make some for feet too.

I see you didnt take my advice for the headlight with the plumbers tape but I like the mount you made. Just be sure that super bright headlight doesnt melt the band. I doubt a LED would throw off that much heat tho.

panniers hmm...added wind resistance? maybe the top of rack would be better for that.

Lookin good JKB!
 
A 4mph average speed increase would cut 45 minutes off your commute. 4mph of 19mph is 21%. 21% x 215 minutes = 45 minutes.

That's huge IMO. You are doing good at 20wh/mile. I sort of wish I had a 65 mile commute each day. Rack those miles up FAST!

Check this guy out. Full fairing for an UPRIGHT:

Would fix your 'freezing" problem, but not sure about handling in cross winds.

[youtube]akTv5ZwTBSM[/youtube]
 
pendragon8000 said:
Veloman, just to clarify, yes I had knob lies then went slicks(semi) and my info was from the CA v3 with speed limit set to 60kph. I would suspect most street tyres may be the same but the smoother and higher pressure the faster/more efficient I think would be agreed.

I'm sure there is a reduction in power, I just mean it's not noticeable like it would be if you were at low speed. It's definitely worth it if the ride quality is still okay.
 
LOL at that fairing in the video. Personally I find my EV Falcon bag makes a nice sail in cross winds. Almost been pushed over a few times this winter. Most of my commute is done in a 45 degree cross wind.

Veloman, from a guy that has several bikes, rolling resistance is massively decreased moving from a 26x2.25 knobby to a 700cx25 road slick. The trade-off is traction. At higher speeds, centrifugal force pushes the entire contents of the tire, tube, inserts, sealant to the highest point, creating higher pressure to the high point of it.


Fc = m v2/r

= m (n 2 ? r / 60)2/r

= 0.01097 m r n2 (3)

where

n = revolution per minute - rpm

newtons third law. simple enough so we can see that higher tire pressure AT THE CONTACT POINT at speed = less patch on the road = less friction. Of course your actual tire pressure hasn't changed at the valve, only at the outer part of the tire, The point of contact at the rim has lowered.

A simple experiment to see that this is true. Find a steep hill, lower your tire pressure to around 10 psi. The tire will look noticeably flat, take off and go as fast as you can. The tire now looks correctly inflated. "DISCLAIMER! I don't recommend this :p "

anyways, knob tires create friction no matter the speed. that buzz you hear is energy leaving the tire. more energy lost = less efficiency.

If youre running a commute of pure road I'd run the smallest, highest psi slicks I could get. I have 1/4 mile of trail on my commute, the best part of course, and I ride off road on occasion or Id ride slicks for sure.
 
Kinni,
I completely agree. I've ridden road slicks for 14 years including road racing, mtb knobbies, 26" slicks on the ebike, been testing the effects of pressure and thick tubes on rolling resistance.

My point is that at 10mph, rolling resistance might be 20watts of drag. Wind might be 40watts. 60 watts total or 33%
At 20mph it's 40watts, but wind is 300watts. 340watts total
At 30mph it's 60watts, wind is 700. 760watts. or 8%

So at 10mph you are sure going to notice the knobbie tire more than you would at 30mph, relatively.
 
veloman said:
Kinni,
I completely agree. I've ridden road slicks for 14 years including road racing, mtb knobbies, 26" slicks on the ebike, been testing the effects of pressure and thick tubes on rolling resistance.

My point is that at 10mph, rolling resistance might be 20watts of drag. Wind might be 40watts. 60 watts total or 33%
At 20mph it's 40watts, but wind is 300watts. 340watts total
At 30mph it's 60watts, wind is 700. 760watts. or 8%

So at 10mph you are sure going to notice the knobbie tire more than you would at 30mph, relatively.

That's a good way to express the idea: I've never seen anyone actually quantify the power needed to overcome tire rolling resistance. i wish we had an easy way to do that with our motors. Do you think it might be possible to make a "test stand" out of a set of bicycle rollers???? I know there would be other losses, but seems like it would be a great way to approximate the power cost due to different tires....

JKB
 
The Phat Bike is sensitive to headwinds. Trying to reduce the wind resistance two ways:

1) Move the pannier. I need to find a trunk bag to sit on top of the rack right behind me and move the controller to the seat tube. I'll also have to move the taillight, as it's simply clipped to a pocket on the back end of the pannier. I have ideas for how to attach the controller to the seat tube, (stainless U-bolts and an aluminum plate) but I'm interested in any ideas anyone might have. I need a double-legged kickstand for these mods: I'm sure the kickstand I have right now isn't going to work when the pannier weight shifts upward.

2) Add a windshield. Received the scooter windshield ordered on ebay:
http://www.ebay.com/itm/Scooter-Moped-Windshield-Universal-Handle-Bar-Clamp-Mount-/120841296745
As fairings go, it's not much but it's a start. This arrived last night and I hope to install it tonight, US EST.

If good weather holds out I'll update this posting with pictures of the changes and test results. These aren't big changes - whether or not they help is up in the air. :lol: :roll:
 
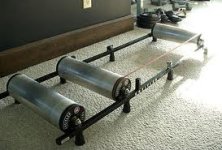
It would be very easy to measure rolling resistance pretty accurately with bike rollers. (used for indoor cycling). I use to have a pair of these, easily got up to 65mph on my road bike on them.

https://www.google.com/search?q=kreitler+rollers&hl=en&client=firefox-a&hs=gKP&rls=org.mozilla:en-US:eek:fficial&source=lnms&tbm=isch&sa=X&ei=Fwo5Ua3WBYi92gW5zoDADw&ved=0CAoQ_AUoAQ&biw=1525&bih=662
 

Attachments

  • rollers.jpg
    rollers.jpg
    11.5 KB · Views: 3,078
jkbrigman said:
I have ideas for how to attach the controller to the seat tube, (stainless U-bolts and an aluminum plate) but I'm interested in any ideas anyone might have.

I'm using hose clamps for my build, wrapped in electrical tape where it makes contact with the frame to avoid scratches. It never moves even in hard off road use. A piece of blown thorn resistant tube in between the frame and controller for anti-rub/shock resistance.

day4011.jpg


ugh that pic could have been better :p
 
Just put a small bolt through a metal clamp so that you can mount your controller on that. That's what i did. Works perfect.
 
Kinni420 said:
jkbrigman said:
I have ideas for how to attach the controller to the seat tube, (stainless U-bolts and an aluminum plate) but I'm interested in any ideas anyone might have.

I'm using hose clamps for my build, wrapped in electrical tape where it makes contact with the frame to avoid scratches. It never moves even in hard off road use. A piece of blown thorn resistant tube in between the frame and controller for anti-rub/shock resistance.

veloman said:
Just put a small bolt through a metal clamp so that you can mount your controller on that. That's what i did. Works perfect.

I was afraid that wouldn't work, that it would be too flimsy. Thanks for your real-world experience, I have some of those clamps and will proceed. Nice pic, kinni! Thanks!
 
btw. On a recent ride in the snow my controller got a short in the switch (faces up on the seat tube) which caused it to not shut off. I created a couple of things to keep rear wheel spray off the controller while still allowing good air flow. The plastic piece I cut out of a food container and is only held on by the velcro strap from the bag and can be removed in 1 minute in dry conditions for added air flow. I covered the triangle on the frame in electrical tape. total cost about 10 cents and time to do about 5 minutes.

snowday2007.jpg
 
got one but its a DH fender. doesnt cover that part. Just keeps spray off my back. seat post mount.
 
any chance you can give an ACTUAL link to that crank set you bought? I still need one but so pricey where Im looking.
 
controller in the triangle bag is really helpful for weather like this, especially considering that water / snow / mud might enter the controller through the wires you have facing upwards.... you've got the reverse of a drip loop goin' on, kinni.
 
Back
Top