You are using an out of date browser. It may not display this or other websites correctly.
You should upgrade or use an alternative browser.
You should upgrade or use an alternative browser.
Storm frame under construction.Xiongda
- Thread starter craiggor
- Start date
Nice! I like the antique-looking headlight. The originals were very dim, they had a flame that burned acetylene. Nice battery box, too!
Did you take any pics of the process of you building the battery box?
Did you take any pics of the process of you building the battery box?
Ebikes4Real
10 mW
- Joined
- Jun 26, 2016
- Messages
- 25
That is a really nice looking build, with some lovely details. Good job 8)
Only the 2 photos of the battery box under construction earlier in the thread.The acetylene lamps I have 3 and a paraffin one are antique.2 Lucas the one with no carbide generater is 1938,the one with is 1924.Don't know the date of the paraffin lamp.And the one in the last photo is a Bauer no date .I have converted them all except the Bauer to led,using fairy lights from the £1 shop and a single 18650.spinningmagnets said:Nice! I like the antique-looking headlight. The originals were very dim, they had a flame that burned acetylene. Nice battery box, too!
Did you take any pics of the process of you building the battery box?
Ebikes4Real
10 mW
- Joined
- Jun 26, 2016
- Messages
- 25
craiggor said:Only the 2 photos of the battery box under construction earlier in the thread.The acetylene lamps I have 3 and a paraffin one are antique.2 Lucas the one with no carbide generater is 1938,the one with is 1924.Don't know the date of the paraffin lamp.And the one in the last photo is a Bauer no date .I have converted them all except the Bauer to led,using fairy lights from the £1 shop and a single 18650.spinningmagnets said:Nice! I like the antique-looking headlight. The originals were very dim, they had a flame that burned acetylene. Nice battery box, too!
Did you take any pics of the process of you building the battery box?
That is really quite ingenious, as is the rest of the bike. If you don't mind me asking, what do you do for a living? Tell to piss off if you like, i just find it interesting to hear people's background when they come up with such professional results from their diy projects
Just factory work.Skills for the build come from metal work in school,self taught welding.Biggest design and engineering influence Valarie Singleton from the British children's program blue peter.Ebikes4Real said:craiggor said:Only the 2 photos of the battery box under construction earlier in the thread.The acetylene lamps I have 3 and a paraffin one are antique.2 Lucas the one with no carbide generater is 1938,the one with is 1924.Don't know the date of the paraffin lamp.And the one in the last photo is a Bauer no date .I have converted them all except the Bauer to led,using fairy lights from the £1 shop and a single 18650.spinningmagnets said:Nice! I like the antique-looking headlight. The originals were very dim, they had a flame that burned acetylene. Nice battery box, too!
Did you take any pics of the process of you building the battery box?
That is really quite ingenious, as is the rest of the bike. If you don't mind me asking, what do you do for a living? Tell to piss off if you like, i just find it interesting to hear people's background when they come up with such professional results from their diy projects
Sent from my D101 using Tapatalk
If that battery box were actually for gasoline, that would be exactly why this bicycles came with a dual top-bar. There was a time when it was common for someone to buy a bicycle, and at a later time, purchase a small one-cylinder engine to add.
This guy got carried away.spinningmagnets said:If that battery box were actually for gasoline, that would be exactly why this bicycles came with a dual top-bar. There was s time when it was common for someone to buy a bicycle, and at a later time, purchase a small one-cylinder engine to add.

whereswally606
100 kW
So I too bought a load of macallister batteries when B&Q was closing out on their stock.
I made a wooden (mdf) version of craigors idea for one and attached a DC DC to give me a portable variable supply. worked a treat an actually meant we had power for a bunch of cell phones on a retreat to powerless cabins in a wood one weekend. Turned out handy cause one lady (drunk) fell onto the hot wood burner and needed medical attention which required phoning the owners of the cabins to locate the medical box (still don't know why there wasn't one in every cabin and placed obviously for the stay).
Anyway now to the new bits. for ages I've been trying to get my design plastic printer. I basically copied the top of the charger using a ruler to measure the dimensions. (should have used verniers but we shall see). My mate Kev has done a print for me which he will post to me and I will test it before tweaking the design for a production of 5 of them.
so here is the proof.
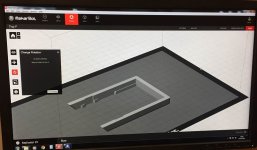
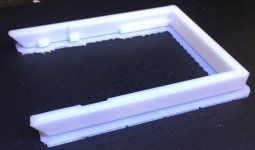
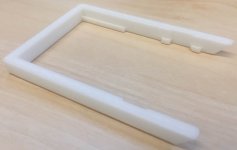
this is upside down but anyway hopefully this this will work for holding the batteries
I made a wooden (mdf) version of craigors idea for one and attached a DC DC to give me a portable variable supply. worked a treat an actually meant we had power for a bunch of cell phones on a retreat to powerless cabins in a wood one weekend. Turned out handy cause one lady (drunk) fell onto the hot wood burner and needed medical attention which required phoning the owners of the cabins to locate the medical box (still don't know why there wasn't one in every cabin and placed obviously for the stay).
Anyway now to the new bits. for ages I've been trying to get my design plastic printer. I basically copied the top of the charger using a ruler to measure the dimensions. (should have used verniers but we shall see). My mate Kev has done a print for me which he will post to me and I will test it before tweaking the design for a production of 5 of them.
so here is the proof.


this is upside down but anyway hopefully this this will work for holding the batteries
whereswally606
100 kW
So attempt one made it to made door last night. It fit so well. especially considering id used just a plastic transparent ruler and eyeballed most of the measurements.
View attachment 2
I am holding this to prevent the springing forces pushing the sides out
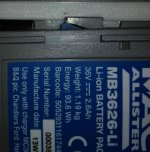
Here is were I went a little wrong but nothing that couldn't be solved without using a file or bandsaw.
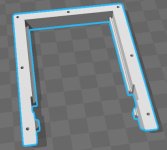
Here is todays ungraded v2. thicker sides (increased the sides by 2mm all the way round, removed some of the fillets on the edges, improved the rails so that they are all the way along and adjusted the length a smidge to improve on the issue in the 2nd photo. Lastly 7 m2 machine countersunk bolts hole to allow it to be bolted and glues securely to a predrilled base.
View attachment 2
I am holding this to prevent the springing forces pushing the sides out

Here is were I went a little wrong but nothing that couldn't be solved without using a file or bandsaw.

Here is todays ungraded v2. thicker sides (increased the sides by 2mm all the way round, removed some of the fillets on the edges, improved the rails so that they are all the way along and adjusted the length a smidge to improve on the issue in the 2nd photo. Lastly 7 m2 machine countersunk bolts hole to allow it to be bolted and glues securely to a predrilled base.
When I made a wooden prototype,it shot off the battery when I pressed the battery release buttons.my plastic chopping board ones are a bit more of a tight fit.whereswally606 said:So attempt one made it to made door last night. It fit so well. especially considering id used just a plastic transparent ruler and eyeballed most of the measurements.
View attachment 2
I am holding this to prevent the springing forces pushing the sides out
View attachment 1
Here is were I went a little wrong but nothing that couldn't be solved without using a file or bandsaw.
Here is todays ungraded v2. thicker sides (increased the sides by 2mm all the way round, removed some of the fillets on the edges, improved the rails so that they are all the way along and adjusted the length a smidge to improve on the issue in the 2nd photo. Lastly 7 m2 machine countersunk bolts hole to allow it to be bolted and glues securely to a predrilled base.


whereswally606
100 kW
So I had my friend send me version two and bought the m2 machine screws off ebay. Amazingly the holes fit very snug and the countersink was just right already for the heads so no rework required. I have requested a few more. I also learnt how to print a 1:1 of the base to help drill out the holes in the acrylic which will be the top for this.
here is the version 2 print
also I have now with the help of another friend constructed an Anet A8 (i3 prussa clone) printer
View attachment 1
so I should be able eventually to produce these myself and other doo hickeys that I design. I have to figure out how to calibrate it first and have already looked in to the "Skynet" self levelling firmware which basically works out the xy plane and recreates it a virtual one and then applies the correct 3d matrix translation to all the gcode so that it essentially compensates for a not orthogonal base (i.e. marginally not level to the nozzle). bloody clever stuff but required an inductive sensor not a mechanical one, which was a few quid from china. If its two far out then you cant compensate for the slope but otherwise its got to be the way forward. for now until my sensor arrives ill have to figure it out manually using a good old sheet of a4, but I do in the future want to print as reliably as possible, as accurately as possible.
Similar threads
- Replies
- 3
- Views
- 353
- Replies
- 0
- Views
- 126
- Replies
- 18
- Views
- 474


