The Grinhill Mk2 RC-motor drive

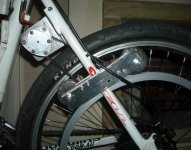
I came up with an improvement for the belt-slip issue a few weeks back, and it's working well (yes, I know it's a bit "ghetto" :oops: ).

rc_proj 092s.jpg

I have seen power up to 3200W on one occasion! It's an old skate wheel (actually came from a suitcase) and the bearings are rubbish, but still works. It's fixed, no spring.

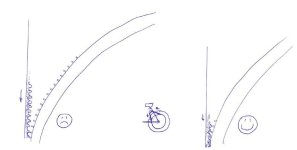
Some further info on the belt - I have observed a clicking noise when running the motor at low revs, which turns out to be twice per revolution. This appears to be the source of my slipping problem as well - the large pulley, not the small one! Because of the pulley design, not using a proper HTD profile for the teeth, and having two quarters of the pulley smooth, the following happens:
file.php


There must be a slight mismatch in the alignment of the belt teeth to the pulley teeth, for whatever reason. After the smooth section, the belt rides on the ridges for a while instead of seating down to engage the pulley. This will cause a momentary increase in tension due to the increased diameter. The belt then engages with a snapping noise, slipping back to where it should be for a while until the next section with no teeth.

This means that it is my large pulley slipping, not the small one. And it's worse at high speed because the belt is travelling at higher speed. It also means that there are some fundamental design issues with the pulley. One possible solution would be to use a longer belt to increase wrap around the large pulley by using an idler. This will keep the belt engaged with the pulley for almost the whole way around, not giving the opportunity for a mismatch to occur.
 

Attachments

  • largepulleysketch.jpg
    largepulleysketch.jpg
    22.9 KB · Views: 1,322
One possible solution would be to use a longer belt to increase wrap around the large pulley by using an idler. This will keep the belt engaged with the pulley for almost the whole way around, not giving the opportunity for a mismatch to occur.

Well, today I tried this solution, and it worked brilliantly - not a single slip!!! :mrgreen:

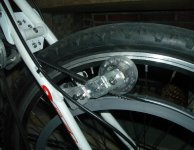
I already had a longer belt (327 teeth) which I bought by mistake a while back. I also had the other skate wheel from the old suitcase. Cut a length of aluminium from a shower screen moulding, a bit of grinding, filing and drilling, and here it is:

rc_proj 099s.jpg

I checked the belt tension and alignment first, adjusted the angle of one a the rollers a bit to keep the belt on track, then gave it a spin with the wheel off the ground. There was slightly more drag, my full-throttle wheel-in-air power increased from 170W to 190W, but it's well worth it. (interestingly at the end of the ride with everything warmed up this figure dropped to around 130W).

It was a little quieter than before, and has alleviated the belt rubbing on the frame in one spot as an added bonus.

Figures from my test ride down the hill and back up:
6.6 km
Max speed 60 km/h (37 mph)
Avg speed 42 km/h (26 mph)
Batt used 4.6 Ah
Efficiency 21.5 Wh/km (34.6 Wh/mi)
Peak power 3200W
 
Thats interesting - the cheap version of the golden eagle bike engine system as available here (sold for $450 as a blackstar on feepay) - has exactly the same style of snap ring - these used to slip as well... Golden eagle use an idler wheel as well, sprung onto the belt to try and combat this.
 
Grin, I've been following every post of yours. I'd like a bike to be 30-MPH (48-kph) capable, even though I'd probably ride at 25 most of the time (40-kph). Would it be better for range and torque if I just...

A. Copy your build and use less throttle
B. Get a smaller motor pulley (might not be possible)
C. Use a lower system voltage. (29V now, yes?)
D. Spec a motor with a different kV (if yes, which one?)

Any input is appreciated...
 
Grin,

Nice fix on with the Roller (Skate) Tensioner... I have seen dozens of these at auto junkyards in nearly billet style and very small - I will look for an easy to adapt model with adjustable tensioner wheels...

Actually - now that I write it, it might be even easier to just build it a new using current roller skate wheels (hack saw them into 1/3 width but leave bearing cup), drop in some swiss bearings (or reds) and make a simple, smaller self tensioning unit by using a simliar plate design but cut slots for the roller wheel axles, add tensioner spring and bolt (to increase tension).

Forget it, that would be the long way - I'll check the yards for auto source parts that will be compatible, bolt on and self tensioning.

-Mike
 
spinningmagnets said:
Would it be better for range and torque if I just...

A. Copy your build and use less throttle
B. Get a smaller motor pulley (might not be possible)
C. Use a lower system voltage. (29V now, yes?)
D. Spec a motor with a different kV (if yes, which one?)

spinning, I have recently been giving this very issue some thought, thinking about a slower bike for my wife.

I don't recommend A, will increase controller heat. I tend to ride on full throttle for most of the time.

B is best, since the motor won't be working as hard. You can do this easily if you leave out the one-way bearing. Will increase reliability also.

C would be OK, but you won't get as much power.

D also good, the 63-74 (170Kv) would be ideal, but it will stick out an extra 1/2inch on the right. Not an issue where mine is mounted.

Do you have many hills where you ride?
 
Thanks for the reply. I just moved to Kansas, and there seems to be no place that is flat or mountainous. The entire state seems to be gentle rolling hills. None long or steep, just a constant shoot up a gentle short hill, and coast down the other side.

I drifted to other system theories when you started posting about slipping issues because the big pulley on the spokes only has two options...take it, or leave it. I'd want the motor-pulley you are now using with the freewheeling roller-clutch to isolate the motor when just pedaling, you seem to be using the smallest one possible that allows the freewheeling. So, higher voltage with a lower kV motor is better, than high kV and low volts...thanks.

I was considering one of Matts single-stage drives with a small #219 sprocket attached to the side of an ENO freewheel (possible?). The Extrons are all cheap regardless of tooth-count ($20 for 72T to 92T). A solid disc to adapt the Extrons to a left-side 6-hole disc brake mount would be easy to make. Somewhat similar to the recent Sockman build. But now that you seem to have solved the slipping, a "Grinhill Drive" is back to looking good for the next build.

Everton+to+Marshfield_0196.jpg
 
That's a great photo!

I was also recently looking at #219 sprockets for the supercommuter. The only thing I found was very small motor sprockets (e.g. 16 teeth) and large stuff (50-100 teeth), but nothing in the 20-40 tooth range which would be a good size for attaching to a freewheel.

Has anyone else found something suitable?
 
You could save some friction and boost efficiency a bit if you removed the top side idler wheel, and tucked the lower wheel up further. When increaseing the wrap on a pulley, you want nothing between the drive and load, and the idler should be wrapping from the non-torque transfer side of the belt alone.

But, hey, if it's working well, no reason to mess with it, cause it's only one of those 1-2% sorts of things, and likely not worth the effort of changing a good working system around.

Build looks great as always Grinhill!

Best Wishes,
-Luke
 
Thanks Luke, I agree that would be ideal. The main reason for keeping the load-side roller is that I ran out of room on my present motor bracket to keep the belt down lower.

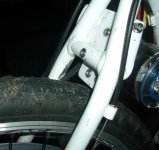
Note on this photo where the belt was previously rubbing the frame, due to very tight clearances and angled frame tubes.

rc_proj 106s.jpg
 
In that case, slick way to solve the belt rub problem, and the belt skip problem :) I had figured you had a good reason, as most of the things you do are well thought out and well excecuted.

I think your bike build is a fantastic example of what an RC powered bike build can be.


Spinningmagnets- Go for a lower KV motor. It simply makes the most sense.
 
It's funny how we do silly things, even when we know we shouldn't. Like mixing water and electricity.

I blew up my controller yesterday, after a heavy rainstorm. I rode home, and the motor started jerking around and lost power. There was a lot of water still on the road which was thrown up.

So I switched off, pedalled home, then looked at the damage after I got inside.
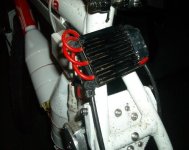
rc_proj 101s.jpg

Looked like the water ran in along the 3 motor wires. I mopped up the obvious water, blew some air through to clear the water, and thought I'd give it another spin. Silly me.

The motor still jerked backwards and forwards a few times, then a little flash from the innards and a funny smell told me that the magic smoke had been set free. :oops:

I then did what I should have earlier, and took the lid off. There was some muddy water wicked between the case and the pcb, and now some blackened looking components.
 
Clean it up and send it back to HC :) Tell them it burned up and caused your $2,000 helicopter to crash ;)
 
How do RC boats deal with water ? Is there anything to be transferred to bikes in the rain?

Greg
 
I have gotten MANY RC components wet and merely hosed them down (internally) with WD40 and let them dry for a day. Almost always they come back to life. :D

RC boaters typically mount their components inside encosures. The ESC and motors are watercooled through sealed water tubes. That way they can seal up the components without heat issues.

Matt
 
I've been using my 25V 80A controller for the past few weeks (from my first build). Power is around the 1200W mark, and speed is noticeably less. I also have to use my 6S battery which is only 5ah, so back to recharging at work.

On the upside, I'm probably getting fitter than when running the higher power rig.

Hobbycity has received the unit back, but they are out of stock of replacements. Will wait and see what happens.
 
Grinhill said:
I've been using my 25V 80A controller for the past few weeks (from my first build). Power is around the 1200W mark, and speed is noticeably less. I also have to use my 6S battery which is only 5ah, so back to recharging at work.

On the upside, I'm probably getting fitter than when running the higher power rig.

Hobbycity has received the unit back, but they are out of stock of replacements. Will wait and see what happens.


Grinhill,

So basically your running on a 6S pack just above the legal power limit in the US. What is your top speed at this power level, how is the hill climbing?

Honestly 1200w on a light weight bike would be enough for my skinny ass to run to the market or LBS and on a folder it would be quite adequate for commuting to and from the train station.

All on 6S packs? I don't know what your efficiency at this power level is? but heck... I have about 6 6S packs laying around here (broken down from a previous 12S3P pack) and 1200w @ 10-15AH sounds good (and light).

-Mike
 
Hi Mike
With pedalling, this setup does 42 km/h on the flat and 32 km/h up a 10% grade. Uses about 8 Whr/km downhill and 13 Whr/km uphill.

Unfortunately I only have one 6S pack, which I almost cooked yesterday, drawing 4.6 Ahr from it on the uphill run. It was very warm, and had expanded noticeably. I clamped the sides togethr as it was cooling, and it charged back up OK. 10 or 15 Ahr would be much better! :mrgreen:
 
Grinhill said:
Hi Mike
With pedalling, this setup does 42 km/h on the flat and 32 km/h up a 10% grade. Uses about 8 Whr/km downhill and 13 Whr/km uphill.

Unfortunately I only have one 6S pack, which I almost cooked yesterday, drawing 4.6 Ahr from it on the uphill run. It was very warm, and had expanded noticeably. I clamped the sides togethr as it was cooling, and it charged back up OK. 10 or 15 Ahr would be much better! :mrgreen:


You're a wise man to clamp that pack. Pressure on the pack reduces the spacing and gaps between those hundreds of layers of copper foil and aluminum foil, and lowers Ri a bit, so packs run cooler. Looks like somebody needs to splurge on some 30c LiPo, or at least run another pack in parallel with that poor lone over worked pack :)
 
Grin,

That's not too bad on a single 6S pack!

Luke has a point... it may be time to sink another 59 into a new pack...

also as odd as this may sound to some people, I have begun using 2 pieces of 1/16" ABS plastic when I build my packs... I clamp the packs within these ABS plastic "end caps" really just rectangular pieces the length of the packs then I wrap them in extreme duct tape before releasing the clamps.

End result is that since Ive begun this "process" (ghetto as it is) i've not had a single expanding battery due to heat and the temperature of my newer packs is 10-15 degrees f cooler than my old loose sided packs.

I assume this is due to the factors luke mentions above but I had no idea when I started doing it, I just didn't want to see the outter cells swell anymore = )_

-Mike
 
Thanks guys.
The plan for my next build is to buy four 6S packs, and then combine them with my existing 8S2p pack to build a 4p10s pack.

This pack is my very first LiPo pack. It's already served me very well, even if it died tomorrow. I'm going to regret writing that aren't I? :oops:
 
Grinhill said:
It's already served me very well, even if it died tomorrow. I'm going to regret writing that aren't I? :oops:
I hope not! But if it does, can I buy the BMS from you? :p
 
Back
Top