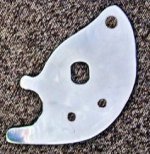
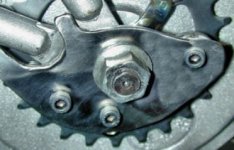
Torque arm for Front Hub Motor Review

knightmb said:
Miles said:
I think it's really up to the makers of hub motors to provide something better to fix a torque arm to....

I agree completely. Unless you really lock washer the crap out of it, the defaults provided are not close to enough for anything over 36 volts (maybe 24 for some hub motors with a lot more toque)

In my pictures at the beginning, I'm using over sized lock bolts for more grip area, double flat washers on the outside of the fork arm and the torque arm you'll notice is on the inside near the motor instead of the outside for more leverage control. The motor is also a 406, so it's not a low end torque monster to further help negate an axial spin from a stop.

I'm a little unclear on the order of washers/lockwashers etc....
How does it go exactly from left to right? Did you have to spread the fork with all that sandwiched in there?

Is it like this? (from left to right)

Nut/lockwasher/washer/dropout/extra washer /extra lockwasher/ hubmotor /extra lock washer/extra washer/ torque arm/ dropout/ washer/lock washer /nut :?:

Was the axel keyway in the way of any of this?
 
i'm not perfectly sure but i don't think you need the 2 inner lock washer. Might want to replace that with regular too. I think lock washer is so the nut doesn't come loose. Again check and recheck. I'm also in experimental stages so don't quote me on it.
 
D-Man said:
I'm a little unclear on the order of washers/lockwashers etc....
How does it go exactly from left to right? Did you have to spread the fork with all that sandwiched in there?

Is it like this? (from left to right)

Nut/lockwasher/washer/dropout/extra washer /extra lockwasher/ hubmotor /extra lock washer/extra washer/ torque arm/ dropout/ washer/lock washer /nut :?:

Was the axel keyway in the way of any of this?

I see now, it's confusing after reading my own post.

From the outside to instead of axial order.
Locking Nut, Flat Washer, Lock Washer

The reason I had to do was that the locking nut was too big, so I used a lock washer on the fork arm (smaller), then up to a flat washer (bigger), then the locking nut would snug against it. So basically, the flat washer was a sandwich between the lock washer on the fork and the locking nut.
 
Errr...No i meant from the outside in it should be nut,lock washer, flat washer, torque arm, dropout. I'm thinking the lock washer should contact the nut so it doesn't loosen.
 
ngocthach1130 said:
Errr...No i meant from the outside in it should be nut,lock washer, flat washer, torque arm, dropout. I'm thinking the lock washer should contact the nut so it doesn't loosen.

Ah ok :)
Yeah, the nut has the grooved pattern on it, so it can lock to the flat washer. I see what you mean, the locking washers are usually the ones that have the groves on them. The lock washer I used against the frame was the kind they cut in half, not the one with the groves. Sorry about the confusion. I guess it depends on how big the area is around where the axial comes out.

In mine, the nut is too big to screw down without hitting part of the frame which would cause it to come in sideways, so the extra washers help push it out so it doesn't contact the frame sideways, but still gets a square push on the frame.
 
Knightmb, from the looks of the picture, it seems you installed the torque arm on the inside of the fork up against the motor. I assume this was because of the extended steel tab that sticks out from the hub motor right side axel which usually indexes into the dropout (The real reason why the right side dropout always breaks) How thick is the torque arm?

Edit: I decided not to use "washers" or anything on the inside bosses of my suspension fork due to the fact that spreading the legs of the fork puts the bushings in a "bind" and will cause premature wear as well as more friction.
 
You are correct, on the inside. In the pictures you can see that my shocks come down so far that if I put it on the outside, well it won't fit because of the shocks in the way, that's why I partly had to do that. The other reason was to help center the wheel. Because it's a Frankenstein of a bicycle now, the wheel was to far to one side (MTB shock fork for 26" wheel, putting a 700C wheel in it, LOL)
 
Yeah, I figured they wouldn't fit on the outside of offset forks so I made my own torque arms.
http://endless-sphere.com/forums/viewtopic.php?f=6&t=200&st=0&sk=t&sd=a&start=15
 
I ordered a pair of those commercial torque arms like Knightmb did (for the front of my 2WD bike project), to save myself some time.

The design is nice, but the execution is not: Both of them had the slots milled so wide (~11.5mm between the flats) that the axle would twist in them with only about 10 in./oz. of torque. What a disappointment: Am RMAing them even though the return shipping and 'restocking fee' will cost half of what I paid for them. I feel sorry to the next sucker they ship them to..

So, I'm going to have to take the time and make my own after all. Probably steal Mark_A_W's idea since it will also strengthen the forks as well as the dropouts.
 
It isn't hard to make these yourself.

Get a piece of 1" flat bar, about 1/8" thick.
Measure the axle flat with calipers, and drill a hole of that diameter about 3/4 inch from the end of the bar.
Use a cutoff wheel in a grinder (or a bandsaw or a jigaw or a sawzall or whatever) to cut in from the end of the bar, so you have slot instead of a hole.
Trim the slot piece so it fits your dropout and (if your fork is steel) braze it against the dropout. The result should be a dropout which is twice (3x or whatever you need) as thick as it was originally.

If the tab's slot is too tight, file or grind it out, rechecking frequently.

If you make it too big, weld or braze along the sides of the slot and grind and file it back so the axle just slips in.
 
Yeah, I already made a set of torque plates for the rear. Used some O-1 steel left over from my knifemaking days. Still have to harden and temper them... Well, I probably don't HAVE to harden them, but I'll feel better if I do. I just thought I'd save myself some time by buying something pre-made for the front.

If I was just building something for the streets and keeping it under 750 watts, I'd probably just do something like this:


A standard one - two dollar 10MM open end wrench fits the axle of my WE hubmotor and my fork / dropout profile nearly perfectly. For a more perfect fit,You could either grind off the box end and use a couple of screw clamps like in the photo, Or leave it in and run a U-bolt through the box end.

If you are only worried about torque twisting the axle, (rather than reinforcing the shear strength of the dropout and fork tubes too), that should be more than enough.
 
Except that:

http://www.users.bigpond.com/solarbbq/torquearmsandwashers.htm
torquediagram1small.jpg
 
Well, I wasn't implying that it was the best way to provide complete structural reinforcement; I was just offering it as a cheap and easy way to prevent the axle from spinning inside the dropouts, for a low powered street bike.

Seems to me that it would be better than nothing; doesn't require much in the way of tools or metalworking skills; Just a few $, a trip to the local car parts or hardware store and ten minutes to assemble it.

And as I said earlier; Since my current project is going to be undergoing just about every possible stress my front forks are going to get a similar setup as Mark_A_W's :
http://endless-sphere.com/forums/download/file.php?id=3613

Here is the start of my rear torque reinforcement The outside torque plate. (similar one for other side):RTA2.jpg
RTA.jpg
Going to have to reshape the arm part of the rear setup though.... I did both sides upside down :oops: and can't simply flip them over because of the 'dumb' way the WE motors have the power wires coming out of the hub alongside the axle rather than through the axle.
 
Oh, sorry I was looking at that thinking it was holding against nothing, I see it seems to be leaning on the fork though.
 
RLT said:
I feel sorry to the next sucker they ship them to..
Hi everyone!!! I'm that next sucker that they shipped them to, lol!! :lol: Too bad I didn't see your post before I ordered them!!! I don't know what type of hub motor they are for, but they do NOT fit a Wilderness Energy motor!! :? Oh well! This isn't the first time I've been disappointed about a item I ordered on the net!!
 
Here is my torque arm install on an aotema hub at 48v using a hardened steel arm from ampedbkike and a rivnut installed to inside fork arm. Works great so far, no issues after 250 mi.
 

Attachments

  • DSC00228.JPG
    DSC00228.JPG
    70.6 KB · Views: 6,571
  • DSC00226.JPG
    DSC00226.JPG
    57 KB · Views: 6,570
I use the amped bikes torque arm. It fits all kits and there is no need to clamp a wrench or add an oddly angled torque arm to your bike
torquearm1.jpg

4s.jpg
 
I bought a torque arm for my Aptema Brushless 36v & 48 v as the front fork dropouts have those lawyer lips/ridges.
The only other alternative is to grind down the outer part of a regular toque washer such that it is not renderd askew by the
lawyer lips.
I have already stripped the flat parts on several torque washers. I'm told most lower powered bikes don't need
torque arms, rather the lawyer lips problem must be fixed with smaller washers. My $19.95 torque arm with a hose clamp looks ugly on the bike and makes it difficult to install torque washers to supplement torque arm because the are not
synchronized. Torque arm has already lost some of its' inner shape.
 
turoczi said:
I use the amped bikes torque arm. It fits all kits and there is no need to clamp a wrench or add an oddly angled torque arm to your bike
torquearm1.jpg

4s.jpg
Very cool, wish I had found those years ago. Until my torque arm finally kills over, at least I know where to get some good replacements. :mrgreen:
 
AmpedBike torque arm didn't fit on a rear of Specialized RockHopper (2007). I've used this torque arm before on other bikes but because of the shape of Rockhopper rear (its not straight, rather its shaped), it was no go. Amazingly enough, TexasEV torque arm, which is fixed did. It had to do with angle of the torque arm.
 
Even though it's not on the front, it is a front hub motor on an aluminum frame........ :D

Since I have a bizarre setup on my Diggler, I had some custom (double-armed) torque and nut retention arms CNCed out of 1/4" steel. A pair on each side, and this baby isn't going anywhere!!!! :twisted:

torqueArmFinal.jpg


Diggler (still had the stock Xlite arms in this pic)

SSPX0088.jpg


SSPX0086.jpg
 
Not really, but some hate the spin on a front wheel, and maybe it is a no no if you plan on 50 watts of 100 volt. But when an x5 rips itself out of the bike, having it happen on the rear is probobally a lot more survivable crash.
 
dogman said:
Not really, but some hate the spin on a front wheel, and maybe it is a no no if you plan on 50 watts of 100 volt. But when an x5 rips itself out of the bike, having it happen on the rear is probobally a lot more survivable crash.

Oh, for sure.

I am still toying with the idea of a dual build.

I am not worried about my own safety- I always wear helmet and armour when on my Ebikes....but with people coming up and "asking for a go", you know how it is, friends and stuff. Nobody wants to spend 15 minutes changing into Moto-Cross gear, because they "just want a quick go"....and thats when someone gets hurt.
 
Back
Top