--Wayne's Mac Giant DH to mid drive--

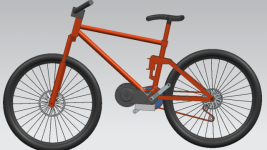
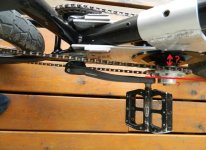
looks great, the mounts from spinningmagnets are quite nice! I would first built your down tube stripes, then drive a little and push into the pedals hard. After that, just put lubricant on your downtube from underneath and fasten your motor addidionally with epoxy putty. After this your motor cannot move up or down and it is fastened with so little play that it wont make sound due vibration. I fastened my motor like this ;)
 
Screen Shot 2013-06-17 at 6.41.28 PM.jpgScreen Shot 2013-06-17 at 6.37.41 PM.jpgThanks crossbread for the tips. I will keep this in mind when I get around to mounting the motor. I have my milling attachment up and running now so I am good to go for making key slots in my new axle. I have also shortened my aluminum side plate mounts to get the motor a little closer to the BB shell.
 
Screen Shot 2013-06-17 at 9.24.26 PM.jpgScreen Shot 2013-06-17 at 9.24.14 PM.jpg

Making some progress now that my axle and motor sprockets are sort of in place . Trying to rough fit things for a fairly tight chain (but not too tight) on the FW side. I am using 3/16" ss rivets to hold the ali plates to the steel BB plate mounts for holding things in place before I pull off the vise grips and string.
 
Screen Shot 2013-06-18 at 8.23.47 PM.jpgScreen Shot 2013-06-18 at 8.24.07 PM.jpgScreen Shot 2013-06-18 at 8.24.23 PM.jpg
Looks like the controller and the battery pack will fit into the main triangle.
 
nice work. this part looks similar to the one I made, but I just bend it why did you weld? Also it got very long, so the motor does not sit tight to the donwtube. That is not so stiff :?

It would be very good if you could screw it to the holes for the bottle holder in the frame. Another option would be do use a clamp from underneath. Make sure your motor sits tight to the frame, otherwise it will vibrate and struggle. Or use epoxy putty like I wrote above :)

Just an idea:

bz1gdm9o0j1a9c6cd.jpg


The controller could still fit below motor and BB:
 

Attachments

  • BPM_conversion.png
    BPM_conversion.png
    49.1 KB · Views: 4,406
Hi Crossbreak
Yes I have a hole drilled out on the top of this last bracket so it can be attached to the water bottle rivnut on the down tube.
The reason I welded this last bracket is I had some tubing that was 1.75" ID that was an exact fit to the down tube OD of 1.75". I ripped the tube length wise to give me the snug fitting top part of the bracket and then just welded on the side plates. It does make for a nice snug fit and should not stretch or bend much. I will drill out the aluminum side plates of this bracket where it rests on the hub shell. I will then drill these holes @ 1/8" through the side plate of the bracket and right on through the hub flanges. I will offset these holes to miss the existing spoke holes and just blast some rivets in there to hold the hub flanges to the down tube bracket. I may also add a hose clamp or two if needed. IF I need a hose clamp I have saved the other half of the 1.75" tubing that I had sliced in half.....I will take an additional 1/2" off its width so it can slide under the down tube and fit inside the side plates of this new bracket. By doing this I figure it will spread out the crushing loads of the hose clamps on the bike tubing and help to hold things in place. I will test it all out first with out the hose clamps so this would be my back up plan if needed. It most likely will be needed but I just want to get the bike running first and then take things apart and fix what needs fixing. I can also see I will need a chain tensioner on FW side but I wont need it till I get some chain stretch so I can add that later. For now I just want to do what I need to so I can see how it works.
 
Screen Shot 2013-06-19 at 5.14.32 PM.jpgScreen Shot 2013-06-19 at 5.14.47 PM.jpgScreen Shot 2013-06-19 at 5.15.05 PM.jpgScreen Shot 2013-06-19 at 5.15.13 PM.jpg

FW sprocket, motor drive sprocket and chains installed now. Pedal assist to FW works really well. Nice chain line on the left side from 365t crank assembly to the FW. Ride hand side is also working well under pedal power. Its kind of weird looking down on the drive system while riding the bike and seeing this very long chain. I looked through the old chain pile and found a spare chain that had similar chain stretch to match the main length of chain I used for the drive side. A normal length of chain is not long enough for the rights side with this mid drive configuration so you have to add a foot or more of chain to the drive side.

I just had to take it for a quick ride to see how the pedal assist works and it seems to be working well. The motor mounts are solid and I am sure once things are under electric power it will also stand up.
 
As I'm sure everyone can see now, when the motor powers up, it will want to pull to the right. If the motor was mounted in the frames triangle, it would experience twisting loads, however...when it is mounted inline with the BB and the rear wheel axle: the left side chain actually anchors the entire drive to resist any sideways movement to the right.

The GNG Gen1 has been performing well for off-road builds, but it is only 4-1/2 inches in diameter, and the 6-1/2 inch MAC/BPM/BMC size of motors are the largest that will fit in that location on the increasingly popular DH frames. No replacement for more copper mass when it comes to high performance. If you want a BB-drive, a MAC/BPM/BMC will likely prove to be the most powerful motor that can still use bicycle parts in the driveline. Bigger motors have been tried, and it's the bike parts that eventually break.

When using more power than 2,200W (3-HP), the next step up for a reliable system is a left-side drive direct to the wheel as a one-speed using a 415 or 420 chain...or a large rear hub-motor.
 
true word, spinningmagnets. waynebergman already considered this i think. We already talked about gearing, battery setup and controller settings. Really nice BB mount you designed, spinningmagnets!

Nice to hear that your drive works. I added a plate to the motor output sprocket to prevent the chain to fall off. I adore your down tube mount, still I would shorten it a bit if chain line is fine with that. I'm keen to see your idea of left side chain tensioner next :p Why not just use the stretched holes that spinningmagnets cut into the BB mount sheet for exactly that purpose?? :p

If you cut both of your mounts shorter, they will become more stiff, your drive becomes more compact ;)
 
Crossbreak if I shorten the assembly much more than it is the crank arms will bump into sprocket and freewheel adapters etc. Regarding the slots in the steel BB mounting plates I am not sure about this but I just felt if I used rivets there would be no chance of any slippage in the connection between the steel plates and the aluminum ones. So this means no adjustment for chain growth but I am OK with this for now. I may go back and take out the rivets and add some 5/16" nuts and bolts down the road we will see.

I have noticed my first gear is way taller than it used to be before the conversion which makes sense as the mid drive will of course let me pedal assist in to the motors top speeds.

I weighed the bike yesterday piling on the batteries and DH tubes etc on the scale with me and the bike. The bike will weigh in at 60lbs with 48v 14.3ah complete with the mid drive assembly shown. This would be based on the tires and tube on the bike now. Add a few extra lbs for the DH tubes and dirt tires and I will be around 63lbs for the trail. Not bad but not great. I feel the weight is in all the right places and the frame is really well built. The frame is built by Deep Cove Bikes and its model name is "Stiffee", I have had a few of these frames over the years and they make good bikes.

So even though It is over 60lbs and its hard tail if it stands up and is reliable I will be happy.
 
my motor fits between the cranks with the sprockets. Shorten the shaft should make the motor fit. Should also make a better chain line if you keep the original path of your chain, even if theis doesnt matter so much with a hard tail. This way you can also get rid of some weight :p still it is your first built, and may not be 100% perfect. As long as it's fun toi ride it doesn't matter.

I drive only with back pack battery in the woods, since I dislike bikes over 45lbs. Always try to stay belos that. My bafang SWXB built is still below, hope my next BPM built will be either. I designed a new dual sprocket adapter for both input freewheel and output sprocket on the right for that one. This way there should be no more space issues even with larger width these larger motors.

Your 36/16*24T drive is a virtual 54T chain wheel. If you drove 44T before your bike should be fun :p
 

Attachments

  • löschen.jpg
    löschen.jpg
    76.5 KB · Views: 4,301
Thanks for the tips crossbreak. Yes it would be a neater package if the motor was closer to the BB shell for sure. I think my choice of FW adapter and drive sprocket adaptor has caused me the spacing issues as shown on my last pictures posted.At the time of ordering all the sprockets and adapters it was hard to picture it all for me until it was all in my hands. In the end I am fine with it, as it seems plenty strong and the weight is nice and low but not too low to be hitting obstacles on the trail.

On the FW side because I am going with a 36t, this 36t needs to be mounted on the middle ring mounts from my crank assembly.The 36t would scrape on the chain stay if mounted any further inbound on the crank assembly. So this means that for a clean chain line from this 36t I am forced to have the FW outbound as shown. I also am wanting the motor centered on the frame so just these two factors mean my mount must be as shown and also means it must be out of the reach of my crank 175mm arms. Also regarding the annotations you have shown in red on one of my previous photos that space could be cleaned up a bit but the grub screw for keystock lock is quite far outbound on that little adapter. Also I am still snookered on the FW side of things so for now I will leave it and see how it works and maybe modify things down the road. I for sure wont be spending a bunch of money and time just to shorten the space between the motor and the BB shell. It just doesn't seem worth it at this point. It was so helpful to get the sprocket teeth count from you Crossbreak. This saved me a huge uncertainty that saved me buying the wrong mix of tooth count for sure.

I have now set aside the motor mount issues and will focus on battery and controller mounts. Then on to soldering up some connectors etc. I am hoping the color codding on the hall sensor wires from this mac I originally bought from SF bikes is the same color coding as the hall sensor wires coming off my new controller from cell man. Pretty sure if will work but it is an unknown at this point.
 
Nice build.
subscribed!
 
Screen Shot 2013-06-24 at 9.36.38 PM.jpgScreen Shot 2013-06-24 at 9.36.30 PM.jpgScreen Shot 2013-06-24 at 9.36.04 PM.jpgScreen Shot 2013-06-24 at 9.33.46 PM.jpg

Battery compartment/holder is coming along. I will add more fasteners from this compartment/holder going back to the seat stay gussets tomorrow. I will place 1/4" foam on the inside of the aluminum housing for the battery receive some cushioning also. It looks like the controller will sit on top of the battery no problem up close to the seat tube. I love the size of this 14.3ah from cellman. I am sure it would fit most bikes in the main triangle shown as I have placed mine. I may just velcro the controller to the top of the battery pack for now. I have found on my last build the heavy duty 2" wide velcro is very capable at holding things in place with out a lot of fuss. Stator etc is back on the bench now getting some connections soldered so things are getting closer to the big day for me. Lots of stuff will get stripped down and beefed up after the initial try out and testing of the bike like this battery holder, but as this is all experimental at this stage I just want to make sure it all works and is worth the effort before getting too carried away with making everything overkill.
 

Its alive! I will enter my parameters into the V3 CA tomorrow and do some testing. Once the drive train is confirmed OK and giving smooth power I will take things apart and beef up some of my short cuts .
 
Screen Shot 2013-06-27 at 8.58.02 PM.jpgScreen Shot 2013-06-27 at 8.57.48 PM.jpgScreen Shot 2013-06-27 at 8.57.33 PM.jpgScreen Shot 2013-06-27 at 8.57.15 PM.jpgScreen Shot 2013-06-27 at 8.56.10 PM.jpg
I have got the battery compartment tidied up and the trail tubes and tires on as well. I have had too many ciders this evening to set up the throttle settings for the CA so tomorrow before test ride I will see how much sense I can make of it all.
 
Looks very nice! You will need a chain cover from Fiberglass at least on the left. I recently damaged two of my trousers which was really unnecessary :x You could make it larger and cover all of your battery wire and controller stuff, would look a bit like the e-gnition:
egnition88.jpg
 
Thanks Crossbreak, good idea on the chain guard. Its summer time here in Canada so I will be in short pants for the next 3 months so I can wait for the guards.

Had a productive time with the Throttle set up stuff for the version 3 CA. I have just done the basic stuff for non Legacy operation. It made a difference from the initial test ride wich initially had the bike sputtering at high revs and lag times for initial throttle response. Now with the basic throttle voltages entered into the CA things are working pretty well and the above issues cleared up. I do however have some surging (not really sputtering but more of a surge) when hitting the throttle hard calling on lots of amps when under loads. If the revs are up and I hit the throttle hard, no problem but if in say 7th gear and going slow and hit it hard it kind of surges until I reach higher speeds. This v3CA is very cool, is see now there is limit flags that will alert you on the CA readouts for Current, Power, Speed, LVC, and temp (temp not set up on mine as of yet). With more testing next week when I get the time I am pretty sure with CA settings I can smooth out the surging as well. I did not think to check out the flags on the CA while I was experiencing the surging on my test ride today but will do so next time out now that I realize I can watch this while test driving the bike (very cool).

Crossbreak the tooth count worked out well for me. I can go 32MPH on the flats with good pedal input. I can squeeze it out to 34mph if I pedal hard. I have installed the 12-32 cassette which gives me a pretty good gear range to choose from. I fine with 23mph top speed (10t in hub) but now that it is there working like this with the gears to use I most likely will. I still have to check if the speed-o is accurate comparing it to my car speed-o or something like that.

Climbs real nice in first gear. I can see only really using 3 gears in practise but we will see. One thing I noticed with the mid drive is when shifting I think its best to pedal power only till your chain is on the sprocket it needs to be on and only then hit the power. I was getting some loud clunks when under power during the shifting process. Seems to work much better hitting the power after you are fully in the new gear.

I am pretty impressed at this stage. Lots of little things to clean up and improve but I have a good feeling about this mid drive at this point.

Any body that is using the EB3 controller and a Mac along with the new V3 CA please feel free to comment on how you made out with throttle issues and the set up for making your mac run smooth. I feel I can sort it all out by reading through the technical jargon in the V3 manual and taking my time with it. The manual is well written so I just a matter of sticking with it I am sure.

This new CA is sure good value. I hope Grin Tech can sell lots of them to help with there bottom line.
 
I have a Lyen 12Fet for repair here, maybe I have time to configure my CA V3 for it, should be much the same as EB controller? Yet I have never used a CA in my live so I need to learn that :D
The gear counts were calced for 13T-34T 7-speed cassette ;) chain lasts longer and shifting is smoother, I only let go the throttle when shifting down but not when shifitng up (during acceleration)
 
Screen Shot 2013-07-03 at 4.41.09 PM.jpgScreen Shot 2013-07-03 at 4.41.20 PM.jpgScreen Shot 2013-07-03 at 4.41.34 PM.jpgScreen Shot 2013-07-03 at 4.40.47 PM.jpg

I feel I am now done with the build and its time to ride. I have beefed up the battery tray holder a bit and put a different on/off switch to keep all the wiring connectors and plastic bits into a bit of a smaller package. I will shop for a 34 tooth cassette for even better gearing for hill climbing. A couple of things so far that I am really liking........

1.With the new battery pack I am running I am running more power to the motor than I have been with my other packs on my other bike. Having 400 extra amps is nice. I am running 1800 amps @ full throttle under load and the bike feels pretty snappy compared to my other bike.

2.The gears are nice to have and coupled with the extra amps it powers through the wind pretty good. I have the ability to pedal assist up to 38mph no problem with the gearing I have in place. This 38mph was going down a slight down hill but I mention it as it lets me see how fast I can pedal assist with this gearing. On the flats with no pedal assist I am @ over 30mph no problem and with a pedal assist up to 34mph on the flats. I don't really care if I can go any faster than 25mph but I am impressed with the mid drive efficiency and its fun to see what the bike can do in this format.

3.Its nice to be riding a lighter bike than my Giant DH. I am around 63 lbs and the weight is nicely down low. It handles well.

I will admit the motor conversion is a bit noisy but not offensive. I am pleased with how quite the mid drive mechanism is working, as in the FW and everything. Very quiet and well behaved. I was expecting a lot of chain noise and chain skipping but so far its behaving itself.

I will try and make a video one day to show how it can climb hills. If this bike does not climb hills long and hard its been a waste of time, (but I am optimistic) as this was the whole point of this build.
 
Looks awesome, I will try to catch up as soon as I can!

7-speed freewheel gear clusters are pretty cheap, but eventually I am thinking I might try a cassette freehub on the rear wheel, so I can choose individual sprockets and the number of adjacent gears (3-speed?)
 
For the hill climb: Your 26" wheel is driven with 6/5 (due conversion) and 32/24 reduction, so total 1.6 reduction in first gear. So your MAC drive a virtual 26/1.6= 16 1/4 inch wheel. If this fails on a steep hill then the MAC is just crab :lol: But it has already proven on Greenmachine's bike to be not.

Still you've got the option to use 13-34T cassette which will give you a range that might fit your needs better... but with this small difference you can just drive your final drive train till your chain starts to jump in fastest gear and swap it then... 1800W on a 12T sprocket wont last very long if you use it frequently.

Still i'm impressed by your really stiff mount. Hope the new Gen3 sprocket adapters for all-right-side-drive-train are ready to ship in a few months so future builds will still be a bit more compact and stiffer.

I'm glad to see another member join the "crossbreak style" drive train club, shows me that all my explanation and ES-wiki work was not in vane, thank you for sharing :)

Enjoy your ride :D

Edit: I still have got one question, what ground clearance do you have left now with your 36T pedal chain wheel installed?
 
Screen Shot 2013-07-04 at 3.30.06 PM.jpg
crossbreak said:
Edit: I still have got one question, what ground clearance do you have left now with your 36T pedal chain wheel installed?

The ground clearance from the bottom of the motor shell to the ground is 10" so I figure its plenty of clearance.

I have noticed something I that I feel is an interesting fact with mid drives when it comes to lag time from initial throttle application.I have posted the comment and asking for comments on this thread I started here --------> http://www.endless-sphere.com/forums/viewtopic.php?f=28&t=51482 to see if others have noticed this as well. I think I have confirmed today on the trail that if you are either coasting or at a stop and do not have the chain tensioned up before applying the power there will be a percieved lag in throttle response. The motor is responding immediately as it should but it takes a short time for the pawls in the cassette to engage or at least it does with my set up. If pedal assist is loading up the drive train engaging the pawls first you get a total different feeling when applying the power from the motor. Sounds like a moot point but this was bugging me trying to figure out what was with the lag time.

Photo is taken from the trail today. The bike is working good. 35 miles and counting!
 
crossbreak said:
I have a Lyen 12Fet for repair here, maybe I have time to configure my CA V3 for it, should be much the same as EB controller? Yet I have never used a CA in my live so I need to learn that :D
The gear counts were calced for 13T-34T 7-speed cassette ;) chain lasts longer and shifting is smoother, I only let go the throttle when shifting down but not when shifitng up (during acceleration)
Crossbreak I think you will like the cruise control feature on the CA when you get to tinkering with it. Also what is a real bonus is after the throttle settings are all configured you get a very nice curve to the twist grip. No huge dead spots any more once things get dialed in. To answer you question if the Lyen 12fet is the same as the EB, I don't know the answer to that.
 
Sounds like a moot point but this was bugging me trying to figure out what was with the lag time.

Did you set your controller for fast throttle response? I had this issue a lot when using softstart ramping BMSbattery controllers (KU123). Got a lot better with a Greentime 15Fet. Still it does not feel like a direct drive. My solution would be:
Use a torque throttle, always apply a little throttle to keep the chain rolling. Does't consume much energy. When using an Arduino, there could be a "sport mode" and an "eco mode" with this function disabled. Already wrote that on my list a year ago. Yet we are still working on the BMS register reads and did not have much time for throttle logic. The BMS story is almost done, my friend will write an Android interface for displaying cell voltages, battery cycles, total AH charged and discharged etc... after that, I'll try to write a program that exactly does the above described.
 
Back
Top