
You are using an out of date browser. It may not display this or other websites correctly.
You should upgrade or use an alternative browser.
You should upgrade or use an alternative browser.
Cycle Analyst LCD screen busted
- Thread starter iacei
- Start date

have you checked with grin tech at http://ebikes.ca ? they probably keep spares around, if you can get them to reply to you. (i haven't been able to get a response lately)
if not, someone probably has a fried ca; v2 and v3 ls versions likely can use the same one (backlight may be different color).
if not, someone probably has a fried ca; v2 and v3 ls versions likely can use the same one (backlight may be different color).
Ok Folks, story is sad but can help you
1st: if you need a new screen just go to ebay and search for LCD 1602S and check the measurements you will find the LCD you need for the quarter of the price including shipping.
secondly, use flux + small heatgun otherwise you might end up like me with a busted CA3
So atm, I am waiting for my new CA3 to arrive because I don't know what went wrong with mine, components seem fine and LCD (expensive one from ebikes.ca) lights up.
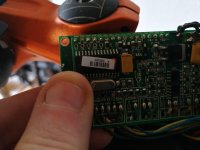
Attachments
iacei said:secondly, use flux + small heatgun
"heatgun"?
do you mean soldering iron?
if you really mean heatgun, those will heat up *everything* including the mcu, probably to temperatures way beyond what they're designed to take, and probably for much longer than they could handle that.
so...it could just be a solder ball formed between smd leads/etc somewhere, and you could test for shorts between pins and pads and traces, with the continuity function of your multimeter if it has one (faster because it beeps when resistance is very very low, so you don't have to look at the display for every measurement). then just note down every short you find, and then ask ebikes.ca if there should be shorts between those or not. if not, you can try to check for solder bridges or balls that you can remove.
otherwise, it's more likely a heat-damaged component (the more complex, the more likely to fail, so teh mcu is the most likely failed part).
No, I really mean a smb heatgun
https://www.amazon.com/gp/product/B01GESLB1I/ref=as_li_qf_sp_asin_il_tl?ie=UTF8&tag=troni001-20&camp=1789&creative=9325&linkCode=as2&creativeASIN=B01GESLB1I&linkId=3c256587c56d0fe421621781d4235ee1
It is necessary when you want to desolder a component which is attached to many solder points and the LCD still sticks even when you used a desoldering pump before.
But I agree with my big heatgun, even if I did take precautions I surely damaged something
ah.
well, with a damaged lcd you're going to toss after removing, it's much simpler if you just cut the pins between the lcd and the mcu board.
then desolder each pin individually, which shouldnt' take much heat or much effort.
once that's done, and the holes are clean enough to put the new lcd's pins thru, then solder each pin individually, which should work fine too.
alternately if you need the header itself, you can desolder it from the lcd side, because you're replacing the lcd, so it doesnt' matter what you do to that part.") just ensure whatever heat you use doesnt' affect the mcu board.
just ensure whatever heat you use doesnt' affect the mcu board.
since the most likely failure is the mcu itself, you could ask grin tech if they sell just the programmed mcu--if so you could replace the one on the dead ca and see if it works now.
the other likely part failure is the pass transistor, which you can get from various electronics places. it's a different type of fet than usual, a depletion-mode, iirc (justin_le posted about it in one of the ca repair threads, possibly mine). if it is the pass transistor, then you could just try powering the ca from a 12v-15v source into the aux-power-input pin (cant' remember it's name, but it's listed on the pcb layout pic on teh ca info page).
well, with a damaged lcd you're going to toss after removing, it's much simpler if you just cut the pins between the lcd and the mcu board.
then desolder each pin individually, which shouldnt' take much heat or much effort.
once that's done, and the holes are clean enough to put the new lcd's pins thru, then solder each pin individually, which should work fine too.
alternately if you need the header itself, you can desolder it from the lcd side, because you're replacing the lcd, so it doesnt' matter what you do to that part.
just ensure whatever heat you use doesnt' affect the mcu board. since the most likely failure is the mcu itself, you could ask grin tech if they sell just the programmed mcu--if so you could replace the one on the dead ca and see if it works now.
the other likely part failure is the pass transistor, which you can get from various electronics places. it's a different type of fet than usual, a depletion-mode, iirc (justin_le posted about it in one of the ca repair threads, possibly mine). if it is the pass transistor, then you could just try powering the ca from a 12v-15v source into the aux-power-input pin (cant' remember it's name, but it's listed on the pcb layout pic on teh ca info page).
apparently it doesn't have a pin in the headers for it (the one i was thinking of is for a sense line on a high voltage system, using a voltage divider).
but you can power by hooking 12v (not 12v-15v as i thought above) to the fet output pin; it's in this ca repair thread:
https://endless-sphere.com/forums/viewtopic.php?f=2&t=19540&start=25#p678269
basically will be the non-ground end of c5, which iirc is the big yellow tantalum cap, so the + end of that.
do you also have voltages downstream? iirc there is a 5v regulator for the mcu / etc, somewhere just after the led/etc. can't remember where. been a long time since i poked around in there cuz of the smd stuff.
if there are voltages down stream including at the mcu pin for that (you can look up the spec sheet for that mcu to be sure where that is, but it's probably a corner pin, wiht the diametrically opposed corner being ground), then if you have an oscilloscope or a multimeter with a frequency check function, you can see if there are any signals coming out of any mcu pin, or at the clock pin (see if the oscillator is alive).
if there are voltages down stream including at the mcu pin for that (you can look up the spec sheet for that mcu to be sure where that is, but it's probably a corner pin, wiht the diametrically opposed corner being ground), then if you have an oscilloscope or a multimeter with a frequency check function, you can see if there are any signals coming out of any mcu pin, or at the clock pin (see if the oscillator is alive).
you'd have to trace out the circuit (or ask grin tech for the schematic of that section if they'll tell you) to find out which specific components are at fault.
since you have the 12.9v, i'd guess that whatever parts are downstream of that are not loading/regulating it to make the 10v instead, and the 5v from that. the only circuit info i have on them is in my "cycle analyst repair" thread, which is pretty incomplete. (so far i havent' gotten any of those fixed completely, though one sort of works now).
since you have the 12.9v, i'd guess that whatever parts are downstream of that are not loading/regulating it to make the 10v instead, and the 5v from that. the only circuit info i have on them is in my "cycle analyst repair" thread, which is pretty incomplete. (so far i havent' gotten any of those fixed completely, though one sort of works now).
Similar threads
- Replies
- 2
- Views
- 667
- Question
- Replies
- 10
- Views
- 363
- Replies
- 4
- Views
- 634
- Replies
- 4
- Views
- 388
- Question
- Replies
- 5
- Views
- 268