Bafang BBSxx, replacement of bearings in bottom bracket

tomjasz said:
Glad you sorted it. It's not often EVERY repair is videoed.
No good deed goes unpunished...

No, it is still solid as a rock. Locked. And will not get out. Even if I ask gently, Hey Google, please.......
 
Now I can ride like the wind again.

Took some time cuz of Swedish PostNord sux.
 

Attachments

  • WhatsApp Image 2019-02-10 at 05.52.36 (1).jpeg
    WhatsApp Image 2019-02-10 at 05.52.36 (1).jpeg
    123.4 KB · Views: 741
  • WhatsApp Image 2019-02-10 at 05.52.36 (2).jpeg
    WhatsApp Image 2019-02-10 at 05.52.36 (2).jpeg
    174.2 KB · Views: 741
  • WhatsApp Image 2019-02-10 at 05.52.36 (7).jpeg
    WhatsApp Image 2019-02-10 at 05.52.36 (7).jpeg
    279.4 KB · Views: 741
  • WhatsApp Image 2019-02-10 at 05.52.36 (8).jpeg
    WhatsApp Image 2019-02-10 at 05.52.36 (8).jpeg
    142.9 KB · Views: 741
The clay based grease is a over rated solution started by the same fella that made the plastic gear an overemphasized non event. SHC100 is the appropriate grease. Not reactive with the OEM grease used.

Specification:
Item: Multipurpose Grease
NLGI Grade: 2
Base Oil: Synthetic
Container Size: 13.4 oz.
Lubricant NSF Rating: Not Rated
Grease Thickener: Lithium Complex
Grease Color: Red
Grease Container: Cartridge
Min. Operating Temp.: -40 Degrees F
Max. Operating Temp.: 350 Degrees F
Flash Point: Not Specified
Dropping Point: 475 Degrees F
Four-Ball Wear: 0.50mm
Timken OK Load: Not Specified
Application: Higher Speed Applications Such as Electric Motors, Where Reduced Friction, Low Wear, Long Service Life are Required"
 
Old thread, but I figured my experience might help someone.

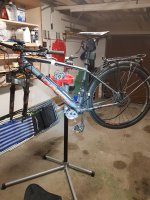
I have a 750W Bafang I purchased in 2018 on my cargo bike. After just 600 km I started hearing rattling inside the bottom bracket when pedaling hard or when the electric motor kicks in. My assumption was that water and dirt got in when riding on muddy autumn roads. As spring is coming I started the rebuild.

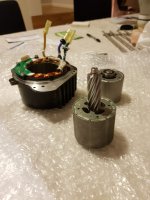
First I ordered new SKF needle bearings.

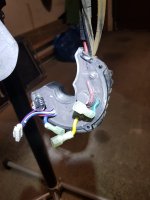
Second I took apart the bottom bracket. Contrary to Philip's description the aluminium nut on the left side can stay on the bike. Also instead of buying special tooling for undoing the nuts with 4-slots I just used 2 pairs of bent pliers (
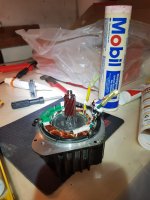
https://images-na.ssl-images-amazon.com/images/I/610+VDY3oAL._SX425_.jpg) and a helping hand on the other side to keep the axle from turning. What I found inside was actually a pleasing site. Everything seemed well lubricated and clean. The only thing immediately wrong was that one of the push-bearings was missing one ball:
uc


Thirdly I just cleaned everything and relubricated. As I didn't have replacement for push bearing then I kept the left side withut one ball. With the reassembly I could notice straight away that the crank shaft didn't slide in like it had come out, but had to be pushed while pedaling. After reassembly I went for a short ride and pedaled as hard as I could - couldn't hear any rattling.

My conclusion is that since the new needle bearings were so much tighter then the originals were allowing too much play and the push bearings were taking part of the rotational punishment. But of course this is a quess.

Notes:
1. Like Philip, I would say you can't rebuild with same components as getting needle bearings out will destroy them.
2. The new motors actually have a decent seal and I found no water inside after riding on very dirty roads. Also considering I kept my bike locked on the terasse the whole winter in the rain and snow. This seal seems to be custom with BF writen on it. Dimensions 15,3 x 27 x 3 mm if older model owners want to upgrade.
uc

uc
 
California Ebike sells an extraction tool.
Muscle heads need not apply. It needs finesse.
 
Arvicola Terrestris said:
First remove the pedal arms on both sides and the chain. You can leave the motor on the bike if you like, I did.

Left side first:
Remove the aluminium M33 nut and leave the M33 steel nut (older models have to identical M33 steel nuts, which don't need to be removed)
Remove the the nut with four slots from the crank shaft
Remove rubber seal from the crank shaft
Remove aluminium washer from the crank shaft
Remove last nut with four slots from the crank shaft

Right side:
Remove five small PZ0 screws from the plastic gear cover on the drive unit
Now you can pull the crank shaft out with chain wheel and the large gear

Inside the bottom bracket is now four bearings, 2 Needle bearings and 2 Ball Thrust bearing. One of each, on each side.

Use a mandrel and a small hammer and try get them out gently, for the left side bearings use the mandrel from the right side of the bottom bracket and Visa Versa

Parts of the Ball Thrust Bearing might just fall off, so watch out.

To be continued...

/philip

Hello Arvicola Terrestris,

hopefully you can read this reply to this old post of yours,

I have to remove the 2 needle bearings and your picture below is the only one I found in the whole internet of someone who succeeded in doing so.
how did you do it exactly?
mine are stuck and I dont know how to remove without destroying everything...
Please let me know.
Greetings from Singapore
 
Back
Top