oatnet
1 MW
oooohhh... just came across this thread, beautiful job, I want one of those V2 units!
-JD
-JD
recumpence said:D,
I just had a brainstorm..............
Picture this----- Remove your bottom bracket and make two plates that have holes bored to the same diameter as the bottom bracket bearing cups. You can, then, capture those plates under the bottom bracket bearing cups when you reinstall them. If you countersink those holes, you could get away with only a couple MM of added BB width. Once you install those plates, the drive could be mounted to them. All that would, then, be required is rotation bracing to keep the drive located up against the underside of the downtube.
Matt

rizzlo34 said:Hi, I know this information is probably posted somewhere, but I was unable to find it. I have a couple of questions regarding these brushless motors.
1. What is the advantage/disadvantage of going with higher voltages and how does that effect the performance?
2. What are the things to consider with the ratings of batteries? (Is there a break down for determining how a certain motor will perform, and how long the batteries will last under a certain load). If I was using the Terminator motor in a similar manner that Matt has them set up, what should I expect to use for batteries? (How many? Series/Parallel? What does a 2C or 3C etc. mean?) I would like to be able to hold around 30-35mph for 25miles or so.
Any information you can provide would be very helpful, and any extra input you have above and beyond my questions is appreciated.
Thanks,
-Ryan
recumpence said:Oat,
Only a few of the second run are spoken for. Would you like one?
Matt

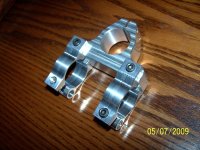
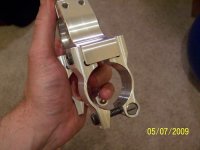
recumpence said:I came up with a set (that is prettier than I ever thought they would be and cheaper than I originally said) and I could pretty much hear the crickets chirping in the background because it is suddenly so quiet.
Matt
recumpence said:I am not discouraged. I have been manufacturing products for several years now. I know the gig. It is just weird that all I heard was clamps, clamps, clamps, untill I came up with a set (that is prettier than I ever thought they would be and cheaper than I originally said) and I could pretty much hear the crickets chirping in the background because it is suddenly so quiet.
Weird.
Anyway, no big thing. Drives are selling! The first run is sold out and I have 7 of run #2 sold that are being setup as we speak. In fact, of run #2, nearly every drive I have sold is a two stage drive! That is cool because I have alot of two stage parts in stock.
Matt