Ideas for reinforcing a brace/shelve inside the triangle?

bumper

10 W
Joined
Jun 6, 2008
Messages
65
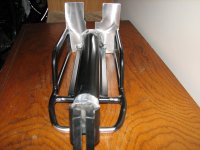
I want to rest my battery pack on this platform while at the same time enclose it in some kind of ballistic nylon case that will be velcro strapped to the top tube. I've tried just suspending the pack in a velcro case before and eventually the fabric tears. I'm thinking a platform will have greater longevity.

What kind of clamps or parts have you used to reinforce such a platform? I'm thinking of a couple of 1" wood boards; glued together. With cut outs I would carve out to fit around the tubes. How can I ensure that the platform doesn't fall down or off? Any other materials beside wood?
 

Attachments

  • bike-blue-print.jpg
    bike-blue-print.jpg
    101 KB · Views: 498
I use a dense flexible 1/2" thick foam strip (from an old boat seat) which is taped to the battery pack bottom. Then that "package" goes into the heavy duty fabric bag. I have velcro strips on all 3 sides, not just the top. The battery basically rests on the foam, which rests on the bottom triangle tube. Worked great last summer. No fabric bag damage at all. In the first pic, you can see how the pack rests on the bottom tube (with a 1/2" pad between). In the second pic is pack enclosed in fabric bag.
bikeprogress.jpg


100_2405.jpg
 
Hmmmm.. i've had great luck carrying batteries with my FalconEV bag. Most of the weight rests on the bottom tubes, as it should be. Velcro attaching to the top tube is only so strong, anyway.

Check this thread if you haven't already, it might be the answer to your problems, if you have the right size triangle..

http://endless-sphere.com/forums/viewtopic.php?f=4&t=29211

BTW, i tried making a platform that hooked into the water bottle holders. It was a big failure :(... the problem was that the side to side motion made the battery slip from right to left. Having a non-tubular frame didnt' help..
 
I had a similiar situation with my Jamis Steel no suspension with the battery on the rear rack. Having a front hub motor helped a bit with weight distribution but I still didn't like having the weight so high and taking up all my rack.

So I cut down an old spare bike rack to fit between the down tubes and used C Clamps to bolt it to the down tubes. Put some old rubber strips-cut up inner tubes behind the clamps to protect the paint.

Then I scrounged a bag from the Army Suplus store and zip tied it to the rack and frame. Viola! Less than $20 and my 36 v 15 ah Ping fits with room to spare. Its quite sturdy and has survived a few falls without sliding off.

Best of luck!
 

Attachments

  • Jamis battery rack 3.jpg
    Jamis battery rack 3.jpg
    299.8 KB · Views: 986
Kent,
That's an ingenious solution. I may just try that. I wish my mind could work like that. Thanks!

Any other out of the box ideas are welcome.
 
I have used wood platforms, which are attached to the bike using thin galvanized metal. In my case, scraps from a place that makes heating and cooling ducts. You might be able to see it some in this pic.Frankenbike longtail.  Bouncing Betty..jpg

Strips of metal, about the thickness of roof flashing and 1-2 inches wide are attached to the wood with screws. It's possible to get the straps very very tight by angling the screw, so the screw pulls the strap very tight. After other screws are inserted, the angled screw can be removed if you want.
 
Komodo  battery rack.jpg

Heres another one this time from my current build. Like many these days, my Jamis Komodo has a sloping down tube basically diminishing the usefullness of the main triangle. Some one in this thread-I have forgotton who-mentioned that he took a standard seat tube rack and basically cut off the seat post end , turned it around and welded it back up. Now it faces forward while still maintaining the seat post angle. I had a end piece welded on to help support the front as well as keeping it from sliding from side to side. I notched out to clear the cables and after painting it will put rubber strips under the front end to protect the paint.

Of course you can adjust your bracket so it sits even lower, but i wanted space there for the controller. Secure, old of the weather yet still able to cool.

Thanks again for whoever this idea was.
 

Attachments

  • Welding on rack.jpg
    Welding on rack.jpg
    330 KB · Views: 908
Dogman,
Do you have a closeup of the bottom part of that brace? Looks like you have another piece of wood that is supporting that shelf. Is is grooved?
 
I'll get one soon. No groove needed on the bottom piece, it stays aligned fine. Once you get the hang of this method, it's simple cheap, fast. The trick is learning how to use a screw to get the tin strip on super tight.

Edit, was sicker than usual yesterday. Will try to get your pics soon.
 
Made it out of bed today, so here is a few closer pics of how the wood attached to my longtail.

The main thing holding the small block is screws that come down from the main support board. Then the straps of tin hold the main board in place quite tightly. The metal toolbox is then screwed to the board.
Bouncing betty, battery support 1.jpgbouncing betty  battery support 2.jpg

The velcro strap just helps hold the tool box lid closed, so it doesn't rip the latch off and dump out the battery.
 
Thanks, Dogman. Looks like I'll go with that since I've got plenty of wood scraps.

When you put the screws in, is it going away from the bike tube or kinda over it. You mentioned angling it to make it tight. Hope this makes sense.
 
So I cut down an old spare bike rack to fit between the down tubes and used C Clamps to bolt it to the down tubes. Put some old rubber strips-cut up inner tubes behind the clamps to protect the paint.

Genius solution right there. 8)

I'm gonna have to do that on my old folding BMX. I'll have to work out better clamps so it doesn't take tools to remove at least one side, but that shouldn't be too tough. Sweet. :)
 
A bit hard to describe, After you bend the tin into place, and get a screw hole in it, you figure out where that screw would enter the wood. Then angle out some, and start the screw in a spot further away from the center. This will pull the strap super tight.

The idea is that one way or the other, you are screwing down a strap that is too short, and the screw pulls it tighter.
 
Back
Top