Modifying my 45 volt fixed output charger to 43.8v variable

e-beach

10 MW
Joined
Jan 10, 2012
Messages
3,540
Location
Any Los Angeles area beach I am at. Or Santa Monic
So my $200 Kingpan KP3612EL 12 amp charger died after only one year. It’s a battery charger for frock-sake! It should last 10 years, but Nooooooo. :evil:

So I hunted around and settled on this one on this eBay listed Vpower KP-669 6 amp charger advertised "for LiFePO4." VPower Charger Lable.jpgIt was more of an emergency buy because my bike is my main transportation and I needed a way to charge my battery pack, and the eBay price of $42.90 USA delivered to my door was attractive enough to make me hit the “pay now” button. It arrived in about 1 week, and worked as advertised in delivering 45 volts at 6 amps. . But, it turns out 45 volts may be too high a voltage to charge my Headway 40152 cells as stated in this thread.

http://endless-sphere.com/forums/viewtopic.php?f=14&t=52747

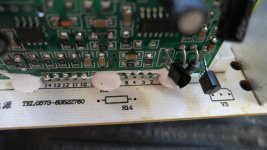
So I started thinking on how to get the voltage down so not to harm my cells. At first thought about adding 2 or 3 diodes in line on the output side figuring they have enough resistance to knock the voltage down ½ volt or so each, but then I decided that I would rather put a variable resistor in the circuit somewhere if possible to really trim this charger. The R15 seemed a perfect place to pull the 5.1k resistor and replace it with a trim pot. Medium shot Charger.jpgIt was on the DC side, was metered 37.8 volts, seemed to be before the last voltage regulator or step-up coil so I decided to pull the 5.1k resistor.5.jpg I had a Bourns 3299 10K trim pot that was in my parts box from some long forgotten project. Bpitmd 3299.jpgThe specs were superior to the 1/4 watt resistor....It worked.
http://www.mouser.com/ds/2/54/3299-61160.pdf

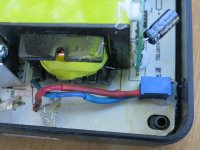
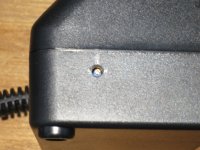
I bench tested the ohms of the removed resistor and then set the Bourns to the same ohm reading and soldered it to the bottom of the PCB. Placed into the bottom half of it's case, VR in place.jpgI then plugged the charger to my pack and once my batteries reached 44 volts, I adjusted the output to 43.8 volts. View attachment 3View attachment 2My batteries are charging happily, I get a green light when they are charged and that part makes me happy. I will change the configuration soon and will put pins through the resistor holes on the board and then solder the wires from the top. Then I will drill a small hole in the side of the charger case and hot glue the pot to the board so I can make adjustments to the output current with the case closed. View attachment 1But for now "I got a green light baby, and I got to be moving out of here." - RIP J.J. Cale 2013

[youtube]l8uk7vlk0sE[/youtube]
 
that resistor is there to drain down the output capacitor when the charger is turned off. can you see how one side is connected to the ground and the other is connected to the output?

that is not where you put the resistor to adjust the output voltage. it has to go on the daughter board where the voltage feedback returns to the TL494 and op amps.

if you start a thread on your kingpan charger we can help you fix it. it has a trimpot for the voltage already in the circuit.
 
dnmun said:
that resistor is there to drain down the output capacitor when the charger is turned off. can you see how one side is connected to the ground and the other is connected to the output?

that is not where you put the resistor to adjust the output voltage. it has to go on the daughter board where the voltage feedback returns to the TL494 and op amps.

Ok, I am not sure what you are seeing, and it probably due to the low rez photos, the way the leads are laying on the board and my slopy soldering job, but the place where I tied-in leads to pin 4 on the daughter board and the positive side of one of the transformers. This photo should make it a a bit more clear.

CU Leads.jpg

dnmun said:
you start a thread on your kingpan charger we can help you fix it. it has a trimpot for the voltage already in the circuit.

Thank you very much for the offer and I will defiantly be taking you up on that one. It will take me a few days or so to get through some other things but in the coming week or so I will certainly take you up on that offer!

:D
 
your red wire is attached to a trace that runs over to the 4th pin from the right that connects to the daughter board above.

can you follow that trace up onto the daughter board and tell me which pin it reaches on the TL494?

if you notice next to the spot where the daughter board is attached there is the outline of a resistor there but no resistor. that is the spot where we normally add the resistor to raise the charger voltage on this Vpower charger.

you wanted to lower it so we have to go onto the daughter board and find the two surface mount resistors that make up the divider bridge on the input to the TL494. then change them to lower the final voltage.
 
The pin is 13 on TL494, OUTPUT CTRL.

Sorry to hijack the thread a bit.
I have the same charger but for 16S battery.
Charger gives 59.1V and battery/bms is supposed to have 56.8V max.
Also the current rating is a bit too high, included charger with the battery was 2A and I don't think that the tiny bms can hold 6A charge rate.
Is there any documentation about the daughter board around or has anyone figured it out yet?
The charger is absolute bargain if it just could be adjusted for wider voltage and current ratings.
 
i think heath knows most about the TL494 and albert vandalen did the soft start mod on his kingpan circuit analysis:

http://www.avdweb.nl/solar-bike/electronics/portable-lightweight-lifepo4-ebike-battery-charger-800g.html#h0-1-2-5-the-battery-charger-circuit

on the 48V charger i think you have that resistor on the main pcb next to the daughter board. it is not present on the 36V charger and in the past i had made up a trimpot and resistor in series for someone to use to adjust the voltage down on the 48V charger to 50.1V on the output.

you cannot do this to lower the voltage on the 36V charger so you have to go onto the daughter board and modify the two sets of surface mount resistors to adjust the charger voltage lower.
 
dnmun said:
your red wire is attached to a trace that runs over to the 4th pin from the right that connects to the daughter board above.

can you follow that trace up onto the daughter board and tell me which pin it reaches on the TL494?
Hard to tell for sure but it looks like pin 1.

DB-Backlight small.jpg

Click here for higher rez picture or the daughter board and use the magnifying icon at the bottom right of the picture.
http://s328.photobucket.com/user/pb.../DB-Backlight_zps96a54aef.jpg.html?sort=3&o=0

dnmun said:
if you notice next to the spot where the daughter board is attached there is the outline of a resistor there but no resistor. that is the spot where we normally add the resistor to raise the charger voltage on this Vpower charger. You wanted to lower it so we have to go onto the daughter board and find the two surface mount resistors that make up the divider bridge on the input to the TL494. then change them to lower the final voltage.

Yes, I did notice the empty R14 and V3 spots, I wasn't sure how to utilize them.View attachment 1
 

Attachments

  • empty v3.jpg
    empty v3.jpg
    64 KB · Views: 3,409
Bor_Ed said:
......Is there any documentation about the daughter board around or has anyone figured it out yet?
The charger is absolute bargain if it just could be adjusted for wider voltage and current ratings.

After scraping away some of the mounting (chalk?) the number on my board is XSL1.PCB
I have found no documentation on it yet. :(
 
yep, pin #4 gets to the reversing input on pin#1 of the TL494. so when the voltage goes down at #4 then the TL494 increases the voltage to the output.

you can see where the trace over to pin #1 starts on the back side from that through hole on the right side between 753 and 222 surface mounts in parallel there.

that pair is connected between the input to the TL494 and ground so the through hole on the left side of those resistors should be at ground and you can measure continuity at that through hole back to your ground.

to raise the voltage at pin #1 on the TL494 you would reduce the resistor value of those two resistors 512 and 183 in series from the output voltage and the through hole.

you wanted to reduce the voltage by about 2% so you should change that combination by 2%. so 5100 plus 18k ohms is 23k ohms, you wanna get to about 22.5k ohms.

you could add a 1 mega ohm resistor in parallel with both of them and see what the voltage is on the output. or you could add a resistor in parallel with either of those two to get the total equivalent resistance down a little to reach the 22.5K ohm. so if you have some loose small 1/4 or 1/8W resistor about 500k to 1 meg then figure out how to use them to get there. then solder them directly onto the top of the surface mount resistors. solder the legs of the leaded resistor to the ends of the surface mounts.

so by adding that trimpot where you did you are doing the same thing in effect by adding a smaller resistor in series with those on the daughterboard. so if it works then it should be ok imo. instead of 5100 ohms on that little resistor you have about 2500 ohms in the trimpot i bet. you could even adjust it where you want it and measure the value of the trimpot and then use another fixed leaded resistor and resolder it where you took out the old one.
 
dnmun said:
........so by adding that trimpot where you did you are doing the same thing in effect by adding a smaller resistor in series with those on the daughterboard. so if it works then it should be ok imo. instead of 5100 ohms on that little resistor you have about 2500 ohms in the trimpot i bet. you could even adjust it where you want it and measure the value of the trimpot and then use another fixed leaded resistor and resolder it where you took out the old one.

I was feeling the the thing, changing that resistance had the same effect.

And since it is working now, "if it broke, why fix it?"

In the next coming days I will clean it up by moving the leads to the top of the board or as you suggested, measure the ohms on the trim-pot and replace it with a fixed value resistor of comparable ohms. This charger will undoubtedly go into my backpack for travel at some point so the less to rattle and shake out of tune the better.

Anyway thanks for the help on this one and will be needing help on that Kingpan KP3612EL soon enough.

:D
 
The final outcome.....for now.

I decided that I was ready to end this project for now. Got too many things to do. When I pulled the trim pot connectors off the bottom of the board the pot was trimmed to 4.37 ohms on my 20k ohm setting. With the original resistor value at 5.1K would that make a difference of 730 ohms?

Anyway I wasn't in the mood to experiment, I don't have the time at the moment so I mounted the pot on the top of the board and then hot glued it to the board. I then drilled an adjustment hole in the side of the case to tweak it if I need to.

After an overnight charge and 15 minutes off the charger my batteries are all now at 3.60 to 3.61 volts. :D
 

Attachments

  • Trim pot mounted.jpg
    Trim pot mounted.jpg
    93.5 KB · Views: 3,357
  • Trim adjust hole.jpg
    Trim adjust hole.jpg
    97.7 KB · Views: 3,357
how much can the voltage be varied, its a 36v output transformer.
 
scriewy said:
how much can the voltage be varied, its a 36v output transformer.

I don't know yet. I only have that one charger at the moment so I didn't want to play with it too much. I have it set for my Headway battery pack optimal voltage and think I need to leave it there until I can afford to get a second charger. (I don't have a job at the moment.... :oops: )

I have a broken kingpan 12a charger that I will try to repair in the coming weeks. If I can get that one going then I will play with my vpower charger and fully answer your question because maybe a better title would be "trimmable" as apposed to variable.

:D
 
yes, you can adjust the output current by changing the shunt resistor value. if you add another resistor in parallel to the shunt resistor then the output current can be higher for the same feedback delta V across the shunt resistor.
 
What it the make and model of the battery charger you have? Is it the same as the one discussed above in this thread?

:D
 
Back
Top