Outdoor chair to full suspension bike

Bluefang

10 kW
Joined
Aug 27, 2010
Messages
589
Location
Australia, Goldcoast
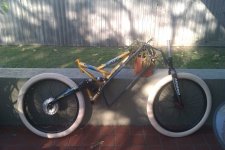
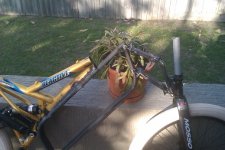
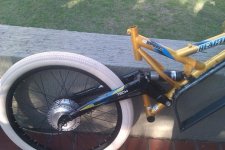
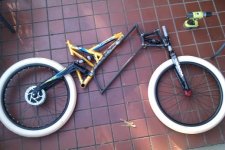
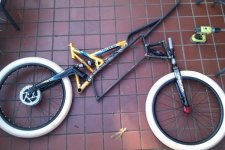
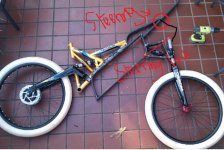
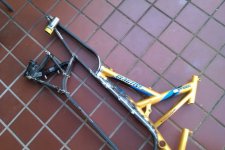
So i had some outdoor chairs i had to throw out, they were good quality mild steel and had lasted 10yrs with out dying so i thought what can i do with then rather then throwing them out, then i found a full suspension crappy bike to start with..... so i started building a bike i have wanted to build for a while. Full suspension, not a huge travel dirt bike but something to comfortably ride on roads with. 70km/h top speed and enough torque at the start to toss me off the back.

I only wanted to use a single motor so i bought a 80-100 and i ll use a modified 12fet controller at 72V to get about 5-7kw out of the motor and run it thru a 5-1 clutched gearbox to 90-20 chain drive into a Nuvinci CVP, one of the older ones i think, cant remember the model number atm. I have not calculated if that will be in the rough ball park of the speeds i am after but i can change the drive sprocket easily.

I have always loved the hossack style of front suspension, so i though hell i might as well try building one to see if it is possible so i am....with carbon fibre wraped alloy front forks it should look very weird :mrgreen: Still have not decided how i am going to do the front end exactly..... :mrgreen:
IMAG0129.jpg
IMAG0130.jpg
IMAG0131.jpg
IMAG0132.jpg
IMAG0135.jpg
IMAG0136.jpg

IMAG0138.jpg
 
I think its obvious to those that have been here awhile i usually applaud the DIY approach and love to see it as much as anyone...uhm, the outdoor furniture steel though? whats the wall thickness on it like and the quality? All of the outdoor stuff i have seen is cheap crappy steel, definitely wouldn't trust it on a bike i'm doing 70 clicks on
That said, i love the design and the DIY girder inspired front end, looks trick...

*subscribed*

KiM
 
1mm thick, i would almost say its cold rolled as it doesnt have a seam on the inside or outside :mrgreen: so i think its plenty strong enough considering most stuff is over built by like 4x. But hey, i ll find out when i test it by ridding over a kerb or something :mrgreen:

The center section is going to be boxed in by sheet alloy or something so that will add alot to that areas strenght. The only thing i am worried about is the front end not been ridged enough in side to side movements, but worst case i ll just rebuild it afew times till it works properly :mrgreen:

By the way, whats the inner diameter of mountain bike head tubes? The BMX one i had lying around may be too short to support the front fork with out collapsing the alloy tube.
 
Haha I like it thats so RAD. If I understand rigth, you have the steering tube on the suspended part of your front end? It will probably act kinda strangely but its worth trying, as you will have dynamic dampering then ;) Redneck engeenering is the way to go :p
 
http://www.hossack-design.co.uk/php/page.php?p=4

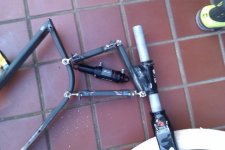
Hossack style :mrgreen: In the last pic where the 2 lengths meet i will have the steering input, and some sort of pivoting link to the botom for steering.

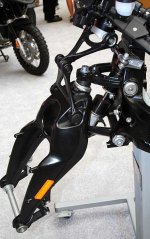
I will change my upper wishbone to be similar to the BMW one with the shock going thru it, will make life much easier :roll:

ts.jpg
 
There are actually afew bikes around with this style of suspension. But for large movements ie offroad its not really that great so for normal bikes its useless. For Ebikes its fantastic :mrgreen:

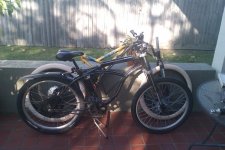
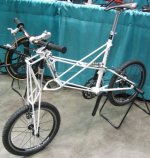
The below bike is a similar concept
kimori_12.jpg
 
Looks like your having some good fun. One recomendation I have is that the front suspension has to be in between the handlebars and wheel. It looks as if your handlebars are still going to be connected solid to the front wheel via the forks.
Please be carefull with your material choices, good tubing is fairly cheap and a failure of the frame at even 10 mph can put you in the hospital.
 
The steering and front suspension will be totally separate, on different planets even :mrgreen:

Steering.jpg

Hossack suspension is designed to separate steering from the suspension and also to eliminate braking dive so you can brake harder without flipping the bike and also absorb bumps better when braking :mrgreen: And i tested one of the bits of outdoor chair metal i am using, braced it so that i could stand on it over 40cm away from where i had it braced and it did not flex or bend at all. 85kg lightly jumping on it :oops:

I ll have another very very short steering tube welded into where the 2 lengths converge and then using a stem clamp, half for top and half for bottom i will link them with some thing i ll make up some how..... :idea: no idea yet but should be fun
 
Cool build, I would keep both trailing arms parallel so your wheel geometry stays linier. In the picture they are uneven.
Alex
 
Very interesting. Is this going to be a pure electric bike? Are you going to relocate the bottom bracket?
 
I am having the arms converge rather then been parallel in the hopes to remove as much brake dive as possible, not sure if its correct, but hey if its wrong i ll just move them later :mrgreen:

The bike will essentially be electric power 99% of the time, but pedal power will still be there as it was on the original frame for extra power from a stop and so that i dont have to worry about cops pulling me over and also to get home in case of a failure somewhere or i run out of battery power, even tho i am going to have 2x the batteries i have currently :twisted:

Pedals will be geared so that i can pedal along with the motor if i need too or i am feeling cold and need to do some work to warm up :|
 
Some of these outdoor chairs are quite strong steel tubing, similar or the same as what's used on heavy-duty bedside potty chairs, whcih is what I cut up to build CrazyBike2's suspended-mesh seat frame from. ;)

If I had enough of it, I'd be perfectly willing to build a whole cargo bike from the stuff, even with the loads and abuse I put mine thru. :lol:


Buuut: some of these outdoor chairs are made from what might as well be recycled beer cans, and jsut about as strong. :roll: :lol:
 
Bluefang said:
I am having the arms converge rather then been parallel in the hopes to remove as much brake dive as possible...
Unequal length wishbone is how the original RD350 was setup for exactly that reason. It is said that he could hit the front brakes midway through a corner without adverse effects, something you wouldn't do with telescopic forks.
 
I have changed the top arm to be lengths of pipe with nuts welded to each end so i can fit the shock in the middle of it, i will connect them so they are held together to ensure the suspension is ridged, also welded in the lower mount for the shock and added the extension where the handle bars will mount, in the picture where the bit of tube is i will most likely drill and mount the tube and cut off all the excess, after i have mounted the shock fully so i can test where the normal ride height is going to be and where i can place the bracing bars for the upper wishbones. :roll:
IMAG0141.jpg

Hopefully all my welds hold up as they are pretty shocking, very hard to tig weld around corners :wink: But it seems to be coming together as what i have imagined in my head, hopefuly getting the clutch to mount to the motor will be as easy as i imagine too, turned a bolt down to match the taper bore of the clutch and then sandwich it all together with another bolt on top. Good thing the large motors come with a threaded section of their shafts :mrgreen:
 
Subscribed....

Cool build man, I'm not understaning the pivots, it seems you want everything nice and tight up there, but you are using those ball joints, aret hey going to be under tension or something? Forgive me, I need to go watch some graphic videos on youtube to figure out how it works. The bike you posted is very unique, and yours promises the same, keep posting pics. :p
 
All the pivot points with be under tension, only the shock absorber will be under compression hopefully :mrgreen: Even more important is nothing is under bending forces.

I have not had much time to work on the bike as i have been at work and sorting out repairs to the welder I borrowed, part of the cost of borrowing it was repairing the amp adjustment pot, ofcourse its a 2.5k ohm pot so it took me a few tries to find a shop that had one the right size :cry:

But i finaly got delivery of my bearings to rebuild the 80-100 motor i am going to use, removing the skirt bearing, installing hall sensors and spraying some laquer or some sort over the windings to hold them in place should be my next task, also bending up some little push fan for the back of the motor, not the best but will be better then nothing :) Hmm i dont really want a silver and orange motor in a black and white bike so i might spray atlease the can with a flat black or something.
 
Bluefang,
just a note on one of the earlier pictures where you'd drawn a red "steering link".
You really want that to go along the lines of one of the "wishbones" or you'll get significant bump steer - might be a bit tricky on a bike!!!
U2U me if you want more b******t on the topic ;^)
 
I should be fine with the steering link, its the black line. All i have to do is make sure its central and as close to inline as i can make it over the range of the front forks movement, the pivots in the link will absorb all the slack. I am now thinking of changing most of the fork mounting setup by mounting the wishbones straight to the old head tube which i will weld some nuts to the sides and tap into the tube itself, been BMX tubes they are ridiculously thick so with the nut as some extra bracing they will hold up. Doing this will also increase the rake so i am less likely to ruin the forks on a pot hole or bump but the project is kinda on hold as my welder was sent away for repairs and wont be back for 3weeks rather then the 1 i was told, also a friend borrowed my gearbox for some measurements but has not returned it yet :(
 
Bluefang,

What's the status? I need a working Hossack to copy. Based on my understanding, I'd want the wishbones to be identical and parallel to retain a major advantage of the Hossack which is no change in trail during suspension movement along with, of course, eliminating brake dive, which I detest.
 
Little late to this party, but I have a few suggestions regarding suspension geometry/setup. First http://www.tonyfoale.com/ has a ton of info about motorcycle setup and unconventional front suspensions in particular. http://www.tonyfoale.com/Articles/Dive/DIVE.htm Is the core of the info important to a Hossack front. The graphical methods used in the Dive article are also great for quickly iterating design ideas. His FFE calculator is a bargain super-tool for final tweaking of suspension setups. (this is motorcycle stuff, but it'll all scale down to a bicycle)

John, parallel arms on a Hossack is bad. It results in a strongly regressive brake dive characteristic that won't preserve suspension travel well, and will make the suspension feel softer than normal while braking. It also results in the same trail vs suspension travel performance as a telescoping front fork. You could do a lot worse than to copy the BMW geometry or the geometry I've used on my motorcycles. http://flickr.com/gp/20633716@N07/Y8LXhv

One final thing, backlash in any of the front suspension links is unpleasant when pushing the limits of the suspension. I'd recommend using ball-bearings or preloaded bushings wherever possible. (Teflon lined spherical bushings are a good backup plan as they start with a mild preload)

Lawson
 
Well the status is almost finished with building the bike.....been waiting 2 months for some rod end spherical bushings to arrive so i can put the front suspension together to test the bike :) I have hounded the company sending the parts and they shipped the bearings to me afew days ago with express international shipping so they should be here some time early next week.

I have not revived the thread yet as i wanted to make sure it worked before i posted anything and i am shit at taking bit by bit photos and explanations. But the batteries are built into the frame, everythings compressed together and it feels extremely solid so i should have it all working in a week or so.

In regards to setting up the suspension i have used something close to the angles in the 2nd link, Fig 3. I have to admit i have not measured anything while building this bike so it should be interesting to see if the "she'll be right" attitude ends up with a bike that works :mrgreen: But the basics are non parallel and with the bottom arm been about 30% longer

OMG that is one awesome bike you have!!!!! i have actually been looking into 2wd bikes and some of the benifits in road racing aplications but looking at complete hydraulic drive tho, have you seen the R1 bike they did with like 10% front wheel drive. Looked much easier to handle in bad conditions. Unfortunatly hydraulics weigh too much and cost a bundle.

Derek
 
amberwolf said:
Some of these outdoor chairs are quite strong steel tubing, similar or the same as what's used on heavy-duty bedside potty chairs, whcih is what I cut up to build CrazyBike2's.....lol:

AW,
I would be afraid of a "shitty outcome." :shock: :lol: :lol: :lol:
 
Known specs premium tubing is so dirt cheap compared to the labor involved in turning it into something, I don't really see why it ever makes sense to deal with less than the best available steel tubing.

http://www.aircraftspruce.com/catalog/mepages/4130tubing_un1.php
 
Back
Top