I am also beginning a build with one of the Qulbix 140MD DIY frame kits.
The overdrive is not explained well anywhere, but it's pretty simple. I do have some questions as well for someone who received the setup from the "factory".
First, here is a link
Qulbix Manuals - Qulbix Performance Electric Bikes to the production version of the bike that they sell, page 12 section 19 and 19.2 show pictures of the crank, and describe the disassembly, but not what I know you are looking for.
This link still works to their original website where you could see individual components listed for sale
Qulbix Overdrive Kit

The above image is larger on the site but again I know this isn't what you are looking for.
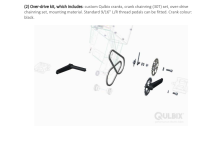
The only documentation Qulbix has shows this image;

These are the components I received as well. As far as I can tell, the first nut with those two steel bars welded on is to brace against the frame inside where a wrench would be hard to get... but it looks like you could get one in there so not sure why the need to weld a washer and those arms to a bolt.
The second component, that L shaped bracket, I can't find any way for it to line up with anything on the frame. I am inferring it may be for mounting a PAS sensor for pedal torque sensing.
As far as I can tell the first two pieces go on the inside of the frame "arm" and the two washers go on the other side of the frame to space out the gear enough that it's mounting bolts don't rub the frame. If you don't want a PAS sensor I don't think you NEED the custom L shaped bracket, unless that's not what it's for.

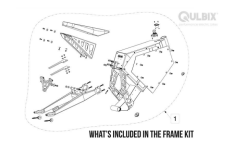
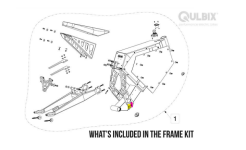
The weird thing is that as you can see in this image, there is a threaded hole (yellow) and open one that is slightly lopsided on my frame.

As far as I can tell the pink hole is where you attach the chainring, and I have no clue what the yellow threaded hole is for, maybe a chainguard?
I have watched my way through all the videos of these bikes available and I've yet to actually see the L shaped metal component or the bolt with washer and arms welded on to validate my suspicions. So many times you almost catch a glimpse and then the camera pans back away...
Rear sprocket will depend on front sprocket. They sent me a 22T with the frame, but I've been running simulations on grins calculator and may try everything from a 60t rear to a 40t. You want to be running your motor at it's most efficient RPM for your most consistent used speed. If you only do a single 100km/h run once to prove it can, it would be silly to keep that gearing when you mostly operate at 50km/h as you'd be in the 40-60% efficiency band most likely.
Personally, I'll be modifying things to fit 420 chain, so I'm looking at different sprockets, but amazon is your friend for generic bike parts that don't need pedigree like a single sprocket.


