Ryobi battery Build - Am i ready to test?(update: success)

brooklynboy

10 mW
Joined
Mar 30, 2015
Messages
29
Location
Brooklyn, NY
Hi guys,

I've been a long time lurker and finally decided to register. These forums has provided so much information that encourages people to do amazing things. My battery build is inspired a couple you guys, so thanks!
bluovalguy
EVBiker2000
BYqSXt8Z
dogman dan

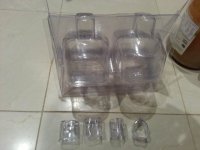
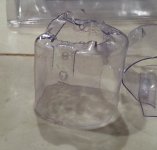
The caps with made by cutting out the plastic from the packaging. Then I placed it on a towel, applied heat gun and then wrapped around ryobi batteries. The battery contact area needed to be molded tight so that the 18AWG wire could compression fit. A small plier was heated enough to clamp/join the two ends of the plastic. Everything fits tight and ran fine on my citybug that originally ran on 24v. Bumps and rattling don't bother it.

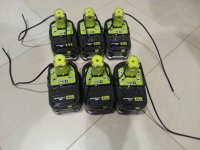
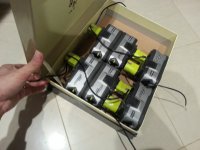
Ok, so I now have a 54V 8AH battery ( 3S2P , but will soon add another 3 to make it 3S3P for a total of 54V 12Ah). Home depot had clearance on Ryobi 18V P108, 2 for 25$. The cells inside are Samsung INR18650-20Q and the pack is rated for 4Ah.
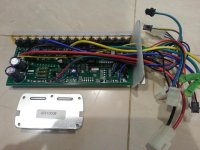
Am I ready to test on a 48V 1000W rearwheel bike? The bike kit just arrived from NJ for 205.95. I know I need torque arms and electrical tape to wrap up the caps.
 

Attachments

  • battery_wiring.jpg
    battery_wiring.jpg
    63.8 KB · Views: 5,764
  • battery_in box.jpg
    battery_in box.jpg
    72.1 KB · Views: 5,764
  • plastic_cap.jpg
    plastic_cap.jpg
    61 KB · Views: 5,764
  • battery_ cap.jpg
    battery_ cap.jpg
    70.1 KB · Views: 5,764
  • box_closed.jpg
    box_closed.jpg
    69.5 KB · Views: 5,764
ARRGH! I have some Ryobi tools that need new batteries. But I sure don't find em for 25 bucks in my town! Nice score!

Love the creative use of the shrink packaging to make your no solder connections. Very cool.

But, 18g is a big small for carrying 1000w, so after the parallel connection, go to 12g for the main wire to the controller. Or double up the 18g.
 
Thanks dogman ( Dude, you are like a celebrity to me). I'll upgrade the wiring and then wrap in electrical tape. The battery deal was found on slickdeals and I had to drive to 3 homedepot to collect 16 of them. My wife thinks I have a battery fetish in addition to my led & warranty voiding habits. If it weren't for these cheap batteries, I wouldn't be building an ebike or 2.

999zip ( Big fan of your's as well )- I'm using a stock ryobi charger because that's what I have and it's easy to take apart the pack. If I build a charger for this system, I might remove the casings/shell.
These batteries have a meter on them. All I need to do to check the charge is pull it out and press the button.

The plastic caps idea is kinda borrowed from an instructables, but they used a 3d printer. If someone else has done it before, I don't mean to take credit. I may register on instructables and do a tutorial.

Ok I think I'm ready for the weekend. The bike is built and battery ready, pictures to follow.
 
I believe the ryobi's have a lvc built in and I also won't be traveling more than 10 miles RT. My kit is 48v 1000w and doesn't specify the amps, but i'm guessing under 20A. The battery is 3 x 18v in series with 2 sets in parallel giving me 54V 8Ah ( 432 wh). I won't be adding another set since I don't need the distance or speed.

Test Complete !
31 mph on level ground, no pedal- confirmed on gps
29 mph uphill 3.7% grade 1 mile, no pedal from stand still ( used google maps with bike path and a little math). I weigh around 140lbs.
Solid contacts on all 6 batteries and no sparks or marks on battery. The controller & battery was barely warm in the enclosure and outside temp. was 63 F.

Conclusions:
- I don't really need to go 30+mph, it sticks out like a sore thumb in NYC.
- Testing without the torque arm at 30+ mph is dumb. I wish i had taken a picture before the ride, but I think it's slightly bent ( steel frame ). My excuse is the phone was in my pocket, so I didn't know how fast i was going.
- The free multi-meter from harborfreight maxes out at 10A, so I don't know how many amps I'm drawing.
- It's so much fun! I might take it somewhere to test the max speed.
- I will need a bike with disc brakes.
20150405_170738.jpg
 
You may try kool stop pads. Recharge to try and fully your pack. Good luck. Speed kills range 18mph is best compromise. 30 mph could be 30a controller. Pedal first saves battery. Try it.
 
Have not seen tool packs with active lvc, they usually trigger tools speed control or swith to stop discharge. In this particular case, l suspect, it manipulates temp line to simulate overheat for lvc (being retrofit for dumb NiCd tools) , so no cut off on discharge leads.
I believe your Harbour fright mm is real bottle neck as current meter, better use it as V meter to not pass lv barrier. For 15s, i would suggest 54V unloaded.
Do not wonder if your controller blows caps aswell, you probably have cheap 63V caps (intended for 48v system) , which is on the cliff in 63V of charger battery and you probably have no way to lower your hvc with tool pack charger
18AWG is tiny as well, maybe just enough to deal with your current levels.

Anyway, brakes are the most important part of the equation, solve that first.
Have fun! :D
 
Thank you for the kool stop pads tip. I won't be testing anymore til the torque arm & brakes come in.

parabellum - I've opened up several ryobi tools and I don't see any lvc circuit, but I could be wrong. The battery itself has some fancy circuits inside that I assumed to be lvc. There is a built in 4 led battery meter on each battery. After my test run, I checked with a multimeter and all 6 batteries were within .1v of each other. I hope I'm being cautious enough. I agree that the 18AWG need to be beefed up. Could you recommend a better capacitor? I already have it in pieces while I wait for torque arm & brakes.
Hehe, I guess 60.2V is kinda close to 63V when you account for tolerances & heat.
 

Attachments

  • 20150406_202356.jpg
    20150406_202356.jpg
    85 KB · Views: 5,470
brooklynboy said:
Thank you for the kool stop pads tip. I won't be testing anymore til the torque arm & brakes come in.

parabellum - I've opened up several ryobi tools and I don't see any lvc circuit, but I could be wrong. The battery itself has some fancy circuits inside that I assumed to be lvc. There is a built in 4 led battery meter on each battery. After my test run, I checked with a multimeter and all 6 batteries were within .1v of each other. I hope I'm being cautious enough. I agree that the 18AWG need to be beefed up. Could you recommend a better capacitor? I already have it in pieces while I wait for torque arm & brakes.
Hehe, I guess 60.2V is kinda close to 63V when you account for tolerances & heat.
Lvc could be triggered in the PWM switch, often inside the pushbutton assembly.
Why 60.2V? If your battery are that low of the charger and you can make solid connection tu controller (~12AWG) in order for BEMF spikes from the motor not raise battery side V now and then, you may be fine. Fets will probably be 75V rated. Just ride carefully firs minute, without regen braking (if it works on that high V). Post fet codes to be sure about ratings.
 
my ryobi tools (whcih use same batteries as above) have low voltage cut off built into the batteries
 
parabellum - you're right 60.2V is low. I measured again after I fully charged, 20.9V on each pack and 62.4V for entire set ( ouch). Thanks for the advice about BEMF, I never heard of it till now. The caps are CD288H 63v 470uF and 15 FETs (HY1707 FC837J21). If I blow the caps, I'll eat the cotton candy & replace with 100V 470uF.

999zip - the caps are pressure fit and worked well so far.It is molded first and then joined together with pliers ( heated on stove ). I check for black carbon since the cap is clear and found no evidence of sparking. I also agree that lvc is a bad way to monitor my batteries. That is why I pull the battery out and press the meter button to check.

knighty - thanks for the confirmation, I came to the same conclusion. When I saw your screen name, I LOL. Then my wife asked me what was so funny, so I told her you are the guy who built a 72v bike on his first try and rode around till your nuts went numb. My wife laughed and said it sounded like something I would do.
Your reputation precedes you and I appreciate your contributions.

20150407_201624.jpg
20150407_201904.jpg
 
Here is the Gps of a test run also using The Ryobi batteries.
9 packs which equals 15s6p.
Bangfang 36v 500 watt CST motor.
https://connect.garmin.com/modern/activity/745111291

Jeff S
 
brooklynboy said:
knighty - thanks for the confirmation, I came to the same conclusion. When I saw your screen name, I LOL. Then my wife asked me what was so funny, so I told her you are the guy who built a 72v bike on his first try and rode around till your nuts went numb. My wife laughed and said it sounded like something I would do.

lol, that was me ! :)
 
Is this a east coast thing ? The Blue Balls Brothers.
I thinking about your batteries connections and how you can make them stronger and ez to disconnect ect.
 
jssneptune - read your posts as well, but i couldn't find any info on how you are connecting & mounting your battery. Would you mind sharing some pictures?

999zip - It's not a east coast thing. Honestly, I thought you were a founding member of the ' tingling testicle troops ' who tinker with e-bikes. My brakes are working now and wire harness upgraded to 12 gauge. I've also been thinking about better & easier connection for the ryoberries. It is a 2x3 with holes that fit the stem tightly. I used a 1" spade bit, jigsaw and round file. The ryoberries fit like "L" and "7" on to the wood. I'm waiting for some berylium copper contacts( fancy, eh?) to arrive before drilling some holes to connect wires. I'll post some more interesting stuff this weekend, ie. printable template & working prototype. Final config. should be 6pcs to one piece of wood.

 
Hi,
I was not clear but I was trying to post some numbers that may help such as
35 mph at 15s6p
I rode 12 miles and went from 63v to 57v. then rode around the block to reach 55.5 which is storage.

Garmin gps were used.
hope my pic works.
Jeff S
 

Attachments

  • 20150418_170009_resized_1.jpg
    20150418_170009_resized_1.jpg
    137 KB · Views: 5,163
At your battery price i would take them apart. If i had to do it again i would parallel the batteries but leave the factory circuit on the top pack so I would use 3 circuit boards. Make leads then hack the factory charger. probably use three chargers then I would Have balance, lvc, and fast charging I may build one 5s pack like this to test it out. then i could run 20s @ 12Ah or 10s @ 24 Ah.
planning on my first commute to work tomorrow.
Jeff S
 
Sweet ride, dude. I was thinking roughly along the same lines. The idea is to have 3 18v 12AH stacks and then use a factory charger right? Unfortunately I think our 18V 4AH is not set up to balance the 10 cells ( 5s2p ), so 5s6p might not work. The solder tabs are setup like :
ryobi18vbatteryp108.jpg


This guy also found out that his rigid charger doesn't balance charge. They have the same solder tabs as Ryobi.
https://www.siliconmethod.com/the-18-volt-rechargable-battery-blues/

I've traced the tabs the best I could and dunno how it can balance charge. It could bulk charge just fine, lvc and rapid charge ok. I would like to be wrong and learn something new. There seems to be some balancing leads in your setup, but I can't tell without a wiring diagram. Your build looks plenty awesome and I'm glad you shared it.

I spent the weekend riding instead of futzing around with practical stuff. All i have to share is a piece of wood and battery contact ( beryllium copper!!!).
View attachment 1
20150420_222649.jpg
 
Back
Top